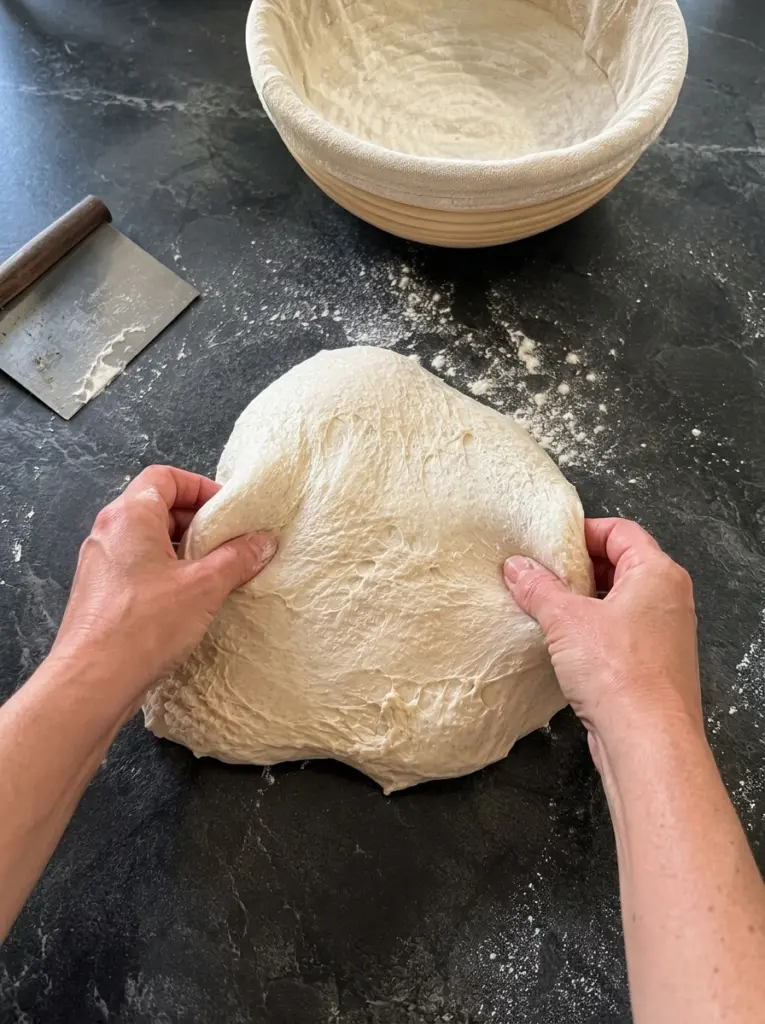
Sourdough baking has a reputation for being a slow, meditative process that stretches across two full days — an overnight bulk ferment, a cold retard in the fridge, and finally a bake the next morning. And honestly, that’s how I prefer to make it most of the time. There’s something special about a long, slow fermentation that develops deep flavor and that perfect chewy-yet-airy crumb. But life doesn’t always cooperate with a 24-hour timeline. Maybe you forgot to feed your starter the night before, maybe unexpected guests are coming for dinner, or maybe you simply woke up craving warm, crusty bread without wanting to wait until tomorrow to eat it.
That’s exactly why this same day sourdough recipe exists. This is the loaf I turn to when I need real, from-scratch sourdough bread without the two-day commitment. It uses a stiff starter at peak (or just before peak) to give the dough enough fermentation power to rise and develop flavor in a single day, while still relying on classic sourdough techniques like autolyse, the rubaud method, and coil folds to build strength and structure. The result is a loaf with a crisp, blistered crust, an open, airy crumb, and that unmistakable tangy sourdough flavor — all achievable from mix to bake in about one day.
This recipe went a little viral the last time I shared it, and for good reason. It strips away the intimidation factor of sourdough baking and gives you a clear, step-by-step process you can follow even if you’ve never made a same day loaf before. Whether you’re an experienced sourdough baker looking for a faster method, or you’re newer to the craft and want a reliable recipe with real technique behind it, this guide will walk you through everything you need to know.
Why This Recipe Works
The secret to same day sourdough isn’t a shortcut ingredient or a gimmick — it’s about maximizing the efficiency of each stage of the process so that fermentation, gluten development, and shaping can all happen within a compressed but still respectful timeline.
Here’s what makes this method work so well:
A stiff starter at peak activity. Using 200 grams of stiff starter that is at peak or just before peak means your leaven is already primed with maximum yeast and bacterial activity. A stiff starter (lower hydration than a typical 100% hydration starter) also tends to favor yeast activity over excessive acidity, which helps your dough rise efficiently without becoming overly sour or breaking down too quickly.
Autolyse before the starter goes in. Letting your flour and water rest together for at least an hour before adding the starter allows the flour to fully hydrate and enzymes to begin breaking down starches into sugars. This jumpstarts gluten development before you’ve even started mixing in earnest, which saves you time and effort later in the process.
The rubaud method for gluten strength. Instead of a traditional stretch-and-fold only approach, incorporating the rubaud mixing method (that vigorous underwater folding motion within the bowl) builds gluten strength quickly and efficiently. It’s tiring — your shoulder will know it — but it dramatically speeds up structure development compared to folds alone.
Coil folds to build and maintain structure. Coil folds are gentle on the dough while still being highly effective at strengthening the gluten network and redistributing yeast activity throughout the dough. Doing multiple rounds throughout bulk fermentation, especially early on, gives your dough the strength it needs to hold its shape and trap gas for a good rise.
A short cold retard, not a long one. Even though this is a same day recipe, popping the shaped dough into the fridge for an hour before baking firms it up just enough to make scoring clean and precise, without requiring the 12+ hour retard traditional recipes call for.
High heat, covered baking. Baking covered at a high temperature for the first half of baking traps steam around the loaf, which keeps the crust soft long enough for maximum oven spring, then finishing uncovered at a slightly lower temp allows the crust to crisp, brown, and develop that signature sourdough crackle.
Together, these techniques let you achieve real sourdough character — flavor, crumb structure, and crust — in a fraction of the usual time.
Ingredients
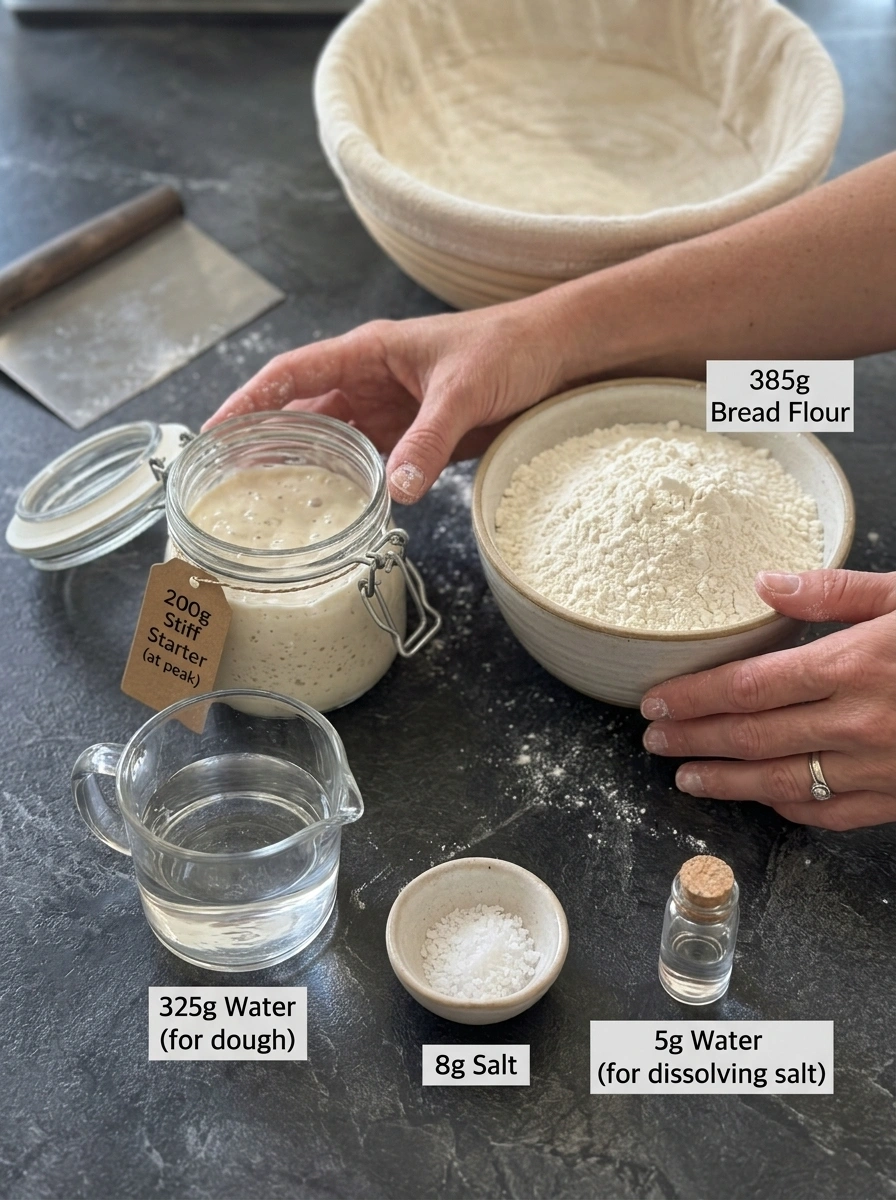
This recipe makes one standard loaf of sourdough bread. Here’s exactly what you’ll need:
- 200 grams stiff starter, at peak or slightly before peak
- 385 grams bread flour
- 325 grams water, for the dough
- 8 grams salt
- 5 grams water, for dissolving the salt
A few notes on ingredients: bread flour is important here because its higher protein content compared to all-purpose flour gives you stronger gluten development, which is especially helpful when you’re working on a compressed same day timeline. If you only have all-purpose flour on hand, you can still make this recipe, but expect a slightly less structured crumb and possibly a touch less oven spring.
Your starter should be stiff, meaning it has a lower hydration than a typical 100% hydration liquid starter — think more of a dough-like consistency than a pancake-batter consistency. If you don’t normally keep a stiff starter, you can convert your regular starter by feeding it with less water than usual a day or two ahead of baking.
Step-by-Step Instructions
Step 1: Autolyse the Flour and Water
In the morning, combine your 385 grams of bread flour with 325 grams of water in a large mixing bowl. Mix just until no dry flour remains — you don’t need to knead it at this stage. Cover the bowl and let it rest for at least 1 hour. This autolyse period allows the flour to fully absorb the water and lets natural enzymes begin breaking down starches, which jumpstarts gluten development before any additional mixing begins.
Step 2: Add the Starter
After the hour of autolyse is complete, add your 200 grams of stiff starter (at peak or just before peak) to the bowl. Mix well for about 7 to 15 minutes, until the starter is completely incorporated into the dough and you no longer see any streaks or lumps of starter. This step is essential — thorough incorporation ensures even fermentation throughout the entire dough.
Step 3: Rest for 20 Minutes
Let the dough rest, covered, for 20 minutes. This short rest allows the dough to relax slightly and gives the starter a chance to begin activating within the dough before you introduce salt.
Step 4: Add Salt and Use the Rubaud Method
Dissolve your 8 grams of salt in 5 grams of water, then add this salted water to the dough. Using the rubaud method, mix the dough with a diving, folding motion — scooping your hand underneath the dough, stretching it up, and folding it back over itself — continuously for several minutes. Keep going until, as the original recipe puts it, your shoulder hurts, or longer. This vigorous mixing method builds significant gluten strength in a short amount of time, which is key to getting good structure on a same day timeline.
Step 5: First Round of Coil Folds
After 20 to 30 minutes, perform your first round of coil folds. To do a coil fold, wet your hands, gently lift the center of the dough upward, letting the edges fold underneath as the dough naturally coils under its own weight. Rotate the bowl a quarter turn and repeat on all sides.
Step 6: Repeat Coil Folds
Repeat the coil fold process at least one more time, for a total of at least three rounds throughout bulk fermentation. Check on your dough every 20 minutes to assess whether it needs another round. If the dough is holding its shape well and feels strong and elastic, you can leave it alone. If it looks flat or is spreading out in the bowl, give it another round of coil folds to build additional strength.
Step 7: Bulk Ferment Until Ready
Continue to let the dough bulk ferment, checking every 20 minutes, until it has puffed up to about 70 to 80 percent larger than its original size and passes the poke test (gently poke the dough with a wet finger — if the indentation slowly springs back partway, it’s ready). For reference, this typically takes about 4 to 5 hours after the starter is mixed in, in a home kept around 19–20°C (66–68°F). If your kitchen is warmer, this may happen faster, so keep a close eye on your dough rather than relying strictly on the clock.
Step 8: Shape Your Dough
Once your dough has passed the poke test and shows good volume, turn it out onto a lightly floured surface and shape it into a boule or batard, whichever you prefer. Use gentle but firm motions to build surface tension without deflating all the gas you’ve worked to build.
Step 9: Chill in the Fridge
Place your shaped dough into a banneton or bowl lined with a floured towel, then transfer it to the fridge for 1 hour before baking. This short chill firms up the dough, making it easier to score cleanly and helping it hold its shape during the initial oven spring.
If you want to do decorative scoring, move your dough to the freezer for the final 20 minutes of this chilling period instead of the fridge, and use a fresh, sharp lame. The extra-firm dough surface makes intricate scoring patterns much cleaner and easier to execute.
Step 10: Preheat the Oven
While your dough chills, preheat your oven to 500°F with your Dutch oven or baking vessel inside. Once your dough is ready to bake, turn the oven down to 450°F (or 400°F if you’re using a gas oven).
Step 11: Score and Bake, Covered
Remove your dough from the fridge or freezer, score it with your lame using whatever pattern you like, and transfer it into your preheated baking vessel. Add your steam source at this point (see notes below). Bake with the lid on for 30 minutes.
Step 12: Uncover and Finish Baking
After 30 minutes, turn the oven temperature down to 400°F (or 380°F for gas ovens), remove the lid, and continue baking uncovered for an additional 15 minutes, or until the crust is deeply golden brown and the loaf sounds hollow when tapped.
Step 13: Check Internal Temperature
Your bread is fully baked when it reaches an internal temperature of about 210°F. Use an instant-read thermometer inserted into the center of the loaf to confirm doneness.
Step 14: Cool Completely
Remove the loaf from the oven and transfer it to a wire cooling rack. Resist the urge to cut into it right away — let it cool completely, ideally for at least 1 hour, so the crumb can finish setting. Cutting too early can result in a gummy interior.
Tips for Success
- Watch the dough, not just the clock. Fermentation timing depends heavily on your kitchen’s temperature, your starter’s strength, and the specific flour you’re using. Use the visual and tactile cues (puffiness, poke test) as your primary guide.
- Keep your starter fed and healthy. A sluggish or underfed starter will struggle to ferment a same day dough in time. Feed your starter consistently in the days leading up to baking so it’s strong and active.
- Don’t skip the autolyse. Even though it adds an hour to your timeline, autolyse significantly improves dough extensibility and makes the rubaud method and coil folds far more effective.
- Use a baking sheet underneath your Dutch oven. This helps insulate the bottom of the bread from direct, intense heat and prevents over-browning or burning on the base of the loaf.
- Add steam for better oven spring. Toss 1–2 ice cubes into your Dutch oven alongside the dough, or spritz the dough generously with water right before covering it, to create steam that keeps the crust pliable during the critical early minutes of baking.
- Score with confidence. A shallow, hesitant score can cause the bread to tear unpredictably during oven spring. Use a quick, decisive motion at roughly a 45-degree angle for a classic ear.
- Let your shoulder guide you on the rubaud method. The dough should start to feel noticeably smoother, stronger, and more elastic as you mix. That transformation is your sign the gluten network is developing well.
Variations
While this recipe is written as a classic same day white sourdough loaf, there’s plenty of room to customize it once you’re comfortable with the base method:
- Whole wheat swap: Replace up to 20–25% of the bread flour with whole wheat flour for a heartier, nuttier loaf. You may need to add a touch more water since whole wheat flour absorbs more liquid.
- Add-ins: Fold in olives, shredded cheese, roasted garlic, or dried herbs during your final coil fold for a flavor-packed variation.
- Seeded crust: After shaping, roll the exterior of your dough in a mix of sesame seeds, poppy seeds, or oats before the final chill for added texture and visual appeal.
- Sweet version: Incorporate cinnamon and raisins during the final coil fold stage for a same day cinnamon raisin sourdough, perfect for toast.
- Smaller or larger loaves: Scale the recipe up or down proportionally if you want a larger boule for a crowd or a smaller loaf for a smaller household.
Serving Suggestions
Fresh same day sourdough is incredibly versatile. Here are some of my favorite ways to enjoy it:
- Sliced thick and served warm with good butter and flaky salt
- Toasted and topped with avocado, a fried egg, and chili flakes
- Alongside a bowl of soup or stew for dipping
- Made into crostini with olive oil and toppings like whipped ricotta or tomato bruschetta
- Turned into a hearty grilled cheese or sandwich the next day once fully cooled
Storage
To store your same day sourdough bread, let it cool completely first, then keep it cut-side down on a cutting board covered with a clean kitchen towel, or store it in a paper bag at room temperature for up to 2–3 days. Avoid storing sourdough in plastic if you want to preserve that crisp crust, since plastic traps moisture and softens it.
For longer storage, slice the loaf and freeze the slices in an airtight freezer bag for up to 3 months. Toast slices directly from frozen for a quick, easy way to enjoy fresh-tasting bread anytime.
If your bread does go a bit stale, don’t toss it — day-old sourdough is perfect for croutons, breadcrumbs, French toast, or bread pudding.
Recipe Card
Same Day Sourdough Bread
Prep time: About 1 hour active preparation Fermentation time: Approximately 4–5 hours Chill time: 1 hour Bake time: 45 minutes Total time: About 7–8 hours Yield: 1 loaf
Ingredients:
- 200g stiff starter, at peak or slightly before peak
- 385g bread flour
- 325g water
- 8g salt
- 5g water (for dissolving salt)
Instructions:
- Autolyse flour and water for 1 hour.
- Mix in starter for 7–15 minutes.
- Rest 20 minutes.
- Add dissolved salt; mix using rubaud method.
- Coil fold after 20–30 minutes; repeat at least 2 more times (3 total).
- Bulk ferment 4–5 hours, checking every 20 minutes, until dough is 70–80% larger and passes the poke test.
- Shape dough.
- Chill in fridge for 1 hour (or fridge + 20 min freezer for decorative scoring).
- Preheat oven to 500°F, then reduce to 450°F (400°F for gas).
- Score, add steam, and bake covered for 30 minutes.
- Reduce heat to 400°F (380°F for gas); bake uncovered for 15 more minutes.
- Bake until internal temperature reaches 210°F.
- Cool completely before slicing.
Frequently Asked Questions
1. Can I make this recipe with a liquid starter instead of a stiff starter? You can, but the timing and dough hydration will change. A liquid (100% hydration) starter will add more water to your total dough, so you may need to reduce the water in the main dough slightly to compensate, and fermentation activity may behave a bit differently.
2. What if my starter isn’t at peak yet when I want to start? It’s best to time your starter feeding so it peaks right around when you plan to mix your dough. If it’s not quite there, you can wait a bit longer, or use it slightly before peak — the recipe accounts for this flexibility.
3. Can I skip the autolyse step if I’m short on time? You can, but it will affect the final texture and may make the rubaud method and coil folds less effective, since the flour won’t be as fully hydrated beforehand. If possible, try to keep at least a 30–45 minute autolyse.
4. What is the rubaud method exactly? It’s a hand-mixing technique where you dive your hand under the dough, lift and stretch it, then fold it back over itself repeatedly. It builds gluten strength quickly without needing a stand mixer.
5. How do I know if my dough needs more coil folds? If the dough is holding its shape and feels tight and elastic, it likely doesn’t need another round. If it looks slack, flat, or is spreading out significantly in the bowl, give it another round of coil folds.
6. My kitchen is warmer than 19–20°C. How will that affect timing? Warmer temperatures speed up fermentation significantly. Start checking your dough for readiness earlier than the 4–5 hour mark, and rely on the poke test and visual cues rather than the clock.
7. Do I have to chill the dough before baking? The 1-hour chill firms the dough for cleaner scoring and helps it hold shape during the initial oven spring. It’s a short step, but skipping it can make scoring and handling the dough more difficult.
8. Can I bake this without a Dutch oven? Yes, though a Dutch oven or covered baking vessel helps trap steam for better oven spring and crust development. If you don’t have one, use a baking stone or sheet and create steam by adding a pan of hot water to the oven or spritzing the loaf and oven walls with water before baking.
9. Why did my bread turn out dense instead of open and airy? This is usually a sign of underproofing (not enough bulk fermentation time), an underactive starter, or insufficient gluten development from the rubaud method and coil folds. Make sure your starter is strong and active, and don’t rush the bulk fermentation stage — rely on the poke test rather than the clock.
Final Thoughts
Same day sourdough proves that you don’t have to sacrifice real technique or flavor just because you’re working with a compressed timeline. By combining a stiff, active starter with focused gluten-building methods like the rubaud technique and coil folds, you can go from flour and water to a warm, crackly-crusted loaf in a single day. Keep this recipe saved for the days when a slow ferment just isn’t in the cards — your kitchen will still smell like a proper bakery by dinnertime.
Save this recipe and follow along for more sourdough tips, techniques, and recipes!
Print
Same Day Sourdough Bread: A Complete Guide for When Life Happens
Ingredients
This recipe makes one standard loaf of sourdough bread. Here’s exactly what you’ll need:
- 200 grams stiff starter, at peak or slightly before peak
- 385 grams bread flour
- 325 grams water, for the dough
- 8 grams salt
- 5 grams water, for dissolving the salt
A few notes on ingredients: bread flour is important here because its higher protein content compared to all-purpose flour gives you stronger gluten development, which is especially helpful when you’re working on a compressed same day timeline. If you only have all-purpose flour on hand, you can still make this recipe, but expect a slightly less structured crumb and possibly a touch less oven spring.
Your starter should be stiff, meaning it has a lower hydration than a typical 100% hydration liquid starter — think more of a dough-like consistency than a pancake-batter consistency. If you don’t normally keep a stiff starter, you can convert your regular starter by feeding it with less water than usual a day or two ahead of baking.
Instructions
In the morning, combine your 385 grams of bread flour with 325 grams of water in a large mixing bowl. Mix just until no dry flour remains — you don’t need to knead it at this stage. Cover the bowl and let it rest for at least 1 hour. This autolyse period allows the flour to fully absorb the water and lets natural enzymes begin breaking down starches, which jumpstarts gluten development before any additional mixing begins.
After the hour of autolyse is complete, add your 200 grams of stiff starter (at peak or just before peak) to the bowl. Mix well for about 7 to 15 minutes, until the starter is completely incorporated into the dough and you no longer see any streaks or lumps of starter. This step is essential — thorough incorporation ensures even fermentation throughout the entire dough.
Let the dough rest, covered, for 20 minutes. This short rest allows the dough to relax slightly and gives the starter a chance to begin activating within the dough before you introduce salt.
Dissolve your 8 grams of salt in 5 grams of water, then add this salted water to the dough. Using the rubaud method, mix the dough with a diving, folding motion — scooping your hand underneath the dough, stretching it up, and folding it back over itself — continuously for several minutes. Keep going until, as the original recipe puts it, your shoulder hurts, or longer. This vigorous mixing method builds significant gluten strength in a short amount of time, which is key to getting good structure on a same day timeline.
After 20 to 30 minutes, perform your first round of coil folds. To do a coil fold, wet your hands, gently lift the center of the dough upward, letting the edges fold underneath as the dough naturally coils under its own weight. Rotate the bowl a quarter turn and repeat on all sides.
Repeat the coil fold process at least one more time, for a total of at least three rounds throughout bulk fermentation. Check on your dough every 20 minutes to assess whether it needs another round. If the dough is holding its shape well and feels strong and elastic, you can leave it alone. If it looks flat or is spreading out in the bowl, give it another round of coil folds to build additional strength.
Continue to let the dough bulk ferment, checking every 20 minutes, until it has puffed up to about 70 to 80 percent larger than its original size and passes the poke test (gently poke the dough with a wet finger — if the indentation slowly springs back partway, it’s ready). For reference, this typically takes about 4 to 5 hours after the starter is mixed in, in a home kept around 19–20°C (66–68°F). If your kitchen is warmer, this may happen faster, so keep a close eye on your dough rather than relying strictly on the clock.
Once your dough has passed the poke test and shows good volume, turn it out onto a lightly floured surface and shape it into a boule or batard, whichever you prefer. Use gentle but firm motions to build surface tension without deflating all the gas you’ve worked to build.
Place your shaped dough into a banneton or bowl lined with a floured towel, then transfer it to the fridge for 1 hour before baking. This short chill firms up the dough, making it easier to score cleanly and helping it hold its shape during the initial oven spring.
If you want to do decorative scoring, move your dough to the freezer for the final 20 minutes of this chilling period instead of the fridge, and use a fresh, sharp lame. The extra-firm dough surface makes intricate scoring patterns much cleaner and easier to execute.
While your dough chills, preheat your oven to 500°F with your Dutch oven or baking vessel inside. Once your dough is ready to bake, turn the oven down to 450°F (or 400°F if you’re using a gas oven).
Remove your dough from the fridge or freezer, score it with your lame using whatever pattern you like, and transfer it into your preheated baking vessel. Add your steam source at this point (see notes below). Bake with the lid on for 30 minutes.
After 30 minutes, turn the oven temperature down to 400°F (or 380°F for gas ovens), remove the lid, and continue baking uncovered for an additional 15 minutes, or until the crust is deeply golden brown and the loaf sounds hollow when tapped.
Your bread is fully baked when it reaches an internal temperature of about 210°F. Use an instant-read thermometer inserted into the center of the loaf to confirm doneness.
Remove the loaf from the oven and transfer it to a wire cooling rack. Resist the urge to cut into it right away — let it cool completely, ideally for at least 1 hour, so the crumb can finish setting. Cutting too early can result in a gummy interior.