
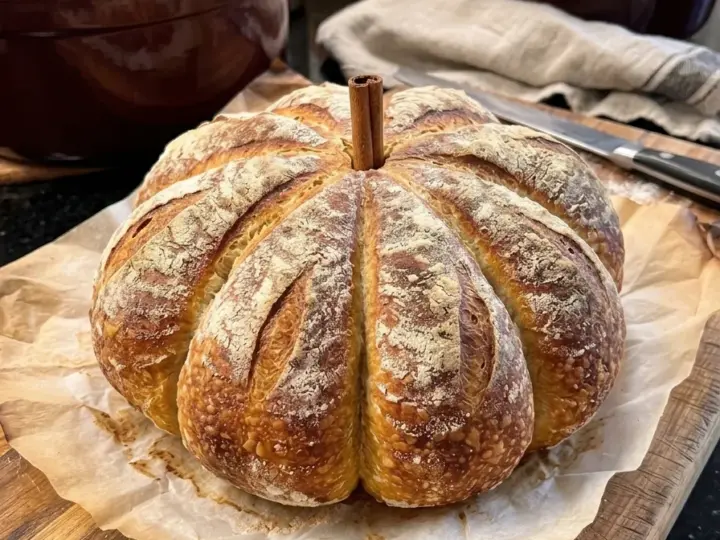
Pumpkin-shaped sourdough brings a festive shape to a naturally leavened loaf. Four lengths of kitchen twine divide the dough into eight sections, creating rounded pumpkin-like lobes as it rises in the oven. Beneath that decorative exterior is a plain sourdough bread with a golden crust, a gently tangy flavor, and a tender, chewy center.
This recipe is about the shape, not pumpkin flavor. There is no pumpkin puree in the dough, and adding it would change the flour-and-water balance. Serve the loaf as a seasonal centerpiece, then slice it for soup, toast, sandwiches, or a holiday meal.
The process works best when you treat fermentation as the priority and shaping as the finish. Build strength in the dough, let it rise appropriately, chill it for easier handling, and tie the twine loosely enough to allow expansion. A tight string grid is not necessary and can make the loaf difficult to release.
Recipe note: This original recipe has not been independently tested. Starter strength, dough temperature, flour, and equipment affect timing and shape. The pumpkin outline is decorative and naturally irregular; use the fermentation and baking cues below rather than expecting an identical result from every loaf.
Why You’ll Love This Loaf
- A simple sourdough dough becomes a seasonal centerpiece.
- No pumpkin puree, coloring, or specialty mold is needed.
- A cold proof makes the dough easier to handle before tying.
- The same loaf works for savory meals and breakfast toast.
- The decoration uses oven-safe kitchen twine that is removed before serving.
Recipe at a Glance
- Hands-on work: Approximately 35–45 minutes across several stages
- Initial dough rest: 30 minutes
- Bulk fermentation: Approximately 4–7 hours at a moderate room temperature, including folds
- Cold proof: Approximately 8–14 hours
- Bake time: Approximately 45–55 minutes
- Cooling: At least 2 hours
- Total elapsed time: Usually about 16–25 hours, excluding any starter feeding time
- Yield: 1 medium round loaf, about 10–12 slices
The schedule is a guide. A cool kitchen or sluggish starter can extend fermentation substantially. Do not bake underfermented dough simply to match a timetable.
Ingredients
For the Dough
- 4 cups bread flour, spooned and leveled, approximately 17 ounces
- 1 1/4 cups water, approximately 10 ounces by weight
- A scant 1/2 cup ripe, active 100%-hydration sourdough starter, approximately 3.5 ounces
- 1 1/2 teaspoons fine salt, approximately 0.3 ounce
For Shaping and Baking
- A little rice flour or bread flour for the proofing basket
- A little additional flour for the work surface
- A small amount of neutral oil, optional, for lightly coating the twine
- 1 cinnamon stick, optional, inserted after baking as a decorative stem and removed before slicing
Essential Shaping Supply
- Four lengths of uncolored, food-safe, oven-rated 100% cotton kitchen twine, approximately 24–30 inches each
Weight measurements are strongly preferred for sourdough. Starter volume is particularly unreliable because bubbles change how much fits in a cup. The approximate weights above define the intended formula more consistently than cup measures.
Understanding the Dough
The starter contains equal weights of flour and water. Including those contributions, the dough has roughly 69% hydration, depending on rounding. This moderate moisture level is intended to support a round shape without creating an exceptionally wet dough.
Use bread flour for a stronger structure. A very soft all-purpose flour can make the dough spread more and may need a different water adjustment. Do not replace a large portion with whole-wheat flour and expect the same fermentation, feel, or shape without further testing.
The recipe contains no commercial yeast. A ripe, active starter is responsible for the rise. Discard starter taken cold from the refrigerator is not automatically ready to leaven the loaf.
Ingredient Notes
Active Starter
Use starter that has been recently fed and is visibly expanded, bubbly, and near its peak. Its exact rise time depends on feeding ratio, flour, and temperature. A starter that consistently rises well after feeding is more useful than relying on one isolated float test.
If it has collapsed and smells sharply acidic, feed and refresh it before mixing. If it barely expands after feeding, work on starter activity before attempting decorative shaping. Twine cannot compensate for weak fermentation.
Bread Flour
Bread flour helps hold the round shape and supports oven expansion. Measure carefully and avoid packing cup measurements. A kitchen scale is helpful because small inconsistencies can noticeably change dough handling.
Water
Use water that gives a comfortably moderate dough temperature rather than hot water intended to force a fast rise. Slightly warm water may help in a cool room; cooler water can be useful in a warm kitchen.
The dough should feel soft and tacky but become more elastic after folds. Resist adding flour repeatedly to make it dry.
Salt
Fine salt seasons the loaf and affects dough behavior. Coarse salts vary in volume, which is why the approximate weight is useful. Do not omit salt and expect the same flavor or fermentation pattern.
Twine
Use only twine explicitly suitable for food contact and oven use. Avoid synthetic string, elastic, dyed craft cord, waxed decorative thread, fishing line, and anything with metallic or plastic components.
The twine stays on during baking and is removed after the loaf has cooled enough to handle. Keep exposed ends short and away from heating elements. Optional light oiling can help reduce sticking, but should not soak the string or create drips.
Equipment
Use a mixing bowl, dough scraper, proofing basket or towel-lined bowl, parchment rated for the temperature, and a covered Dutch oven large enough for the loaf. A 5- to 6-quart round Dutch oven is a useful starting point, provided its lid and knob are oven-rated for the chosen temperature.
You will also need a sharp blade, scissors, a cooling rack, and suitable oven gloves. Follow the Dutch oven manufacturer’s heating guidance. The method below uses a preheated vessel only if your cookware permits that use.
A round loaf is easiest for a pumpkin outline. A very narrow pot can restrict the lobes, while a very large unsupported dough may spread. Allow space for expansion.
How to Make Pumpkin-Shaped Sourdough
1. Mix the Dough
Combine the ripe starter and water in a bowl, stirring to disperse. Add bread flour and mix until no dry pockets remain. Cover and rest for 30 minutes.
Sprinkle in the salt and work it through with damp fingers, pinching and folding gently until evenly incorporated. The dough may feel rough at first; folds and resting will improve it.
2. Build Strength With Folds
Over the next 90 minutes, give the dough three sets of stretch-and-folds, approximately 30 minutes apart. With damp hands, lift one side gently and fold it over the center. Turn the bowl and repeat around the dough.
Do not pull until the dough tears. It should become smoother and hold a mound more readily over successive sets. Cover between folds.
3. Complete Bulk Fermentation
Let the dough continue fermenting, covered, until visibly aerated, somewhat domed, and increased by roughly half to three-quarters rather than blindly waiting for a full doubling. Small bubbles may appear along the bowl edges, and the dough should feel lighter and more elastic.
The total bulk period may be around 4–7 hours after mixing in a room near 74–78°F, but this is not a guarantee. Cooler conditions take longer. Warm dough can move quickly and may need less rise before a long cold proof.
Watch the dough instead of treating the upper time limit as a mandatory wait. A very loose, collapsing dough may have fermented too far.
4. Preshape and Rest
Turn onto a lightly floured work surface. Gently gather into a round using a scraper and light tension. Rest uncovered for about 20 minutes.
The dough should relax slightly without spreading into a puddle. If it is sticky, flour the surface and tool lightly rather than burying it in flour.
5. Shape the Round
Shape into a snug boule, folding the edges inward and tightening gently with the scraper or cupped hands. Avoid tearing the surface. Place seam-side up in a well-floured proofing basket or towel-lined bowl.
Cover and refrigerate for approximately 8–14 hours. The cold dough is easier to turn out and arrange on twine. Refrigerator temperature and fermentation progress affect the result; chilling does not completely stop fermentation immediately.
6. Heat the Oven and Prepare Twine
Preheat the oven to 450°F. If permitted by the manufacturer, preheat the covered Dutch oven according to its guidance, allowing adequate time for the vessel to become hot.
Cut four lengths of suitable cotton kitchen twine. Lightly coat with a trace of neutral oil if desired, then wipe away excess. Lay them across the center of a sheet of suitable parchment like spokes, with ends extending in eight directions at approximately even intervals.
7. Turn Out the Dough
Turn the chilled loaf seam-side down onto the center of the twine arrangement. Handle gently and keep it cold while working. The strings should cross under the loaf and divide it into eight sections when brought up.
8. Tie Loosely
Bring opposite ends of each length over the loaf and tie near the top center. Leave the strings resting loosely against the dough, with visible room for expansion. Do not cinch tightly or cut grooves into the dough before baking.
As the loaf expands, the twine restrains narrow lines and creates rounded sections. Tight strings can dig deeply into the crust and become difficult to remove. Trim long tails while leaving enough to identify the knots later.
9. Score Lightly
Make a few shallow decorative scores on the exposed sections if desired, keeping the blade away from the strings and your fingers. Avoid an elaborate deep scoring pattern on a first attempt; it can distort the pumpkin shape.
10. Bake Covered, Then Uncovered
Using the parchment as a sling, lower the loaf carefully into the hot Dutch oven. Cover and bake about 25 minutes at 450°F.
Remove the lid carefully, keeping your face and hands clear of steam. Reduce the oven to 425°F and bake another 20–30 minutes, until the loaf is deeply golden and baked through. The center will generally read about 205–210°F when done.
If it browns too quickly, tent appropriately or adjust according to your oven and cookware guidance. Do not pull strings or try to retie them on a hot loaf.
11. Cool and Remove All Twine
Transfer carefully to a rack and cool until safe to handle. Cut the twine at the top and gently peel it away in sections, checking the underside as well. If a strand sticks, loosen patiently rather than tearing a large strip of crust.
Confirm that all four lengths and any loose fibers are removed. Continue cooling for at least 2 hours total before slicing. Insert an optional cinnamon stick only after baking for presentation, and remove it before cutting or serving.
Tips for a Clear Pumpkin Shape
Start With a Strong Round
A well-shaped boule gives the strings something to define. Slack dough may spread despite the twine. Focus first on fermentation and structure, then decoration.
Keep Strings Loose
The oven expansion creates the indentations. Pre-tightening is unnecessary and makes removal harder. Think of the strings as guides rather than a tight package.
Use Even Spacing
Four crossing lengths create eight sections. Uneven spacing makes some lobes larger, which can still look appealing. Precision is less important than safe materials and gentle handling.
Work With Cold Dough
A refrigerated loaf is firmer and easier to position. Have the twine and parchment ready before turning it out so the dough does not sit warming while you organize equipment.
Remove Decoration Before Serving
Kitchen twine and a cinnamon-stick stem are not edible parts of the loaf. Check carefully before slicing, particularly when serving children or guests who did not see the shaping process.
Optional Variations
Plain Round Loaf
Skip the twine and score a conventional boule. The same dough can make a simple sourdough, though the appearance and expansion will differ.
Light Flour Finish
Dust lightly with flour before tying or scoring for a rustic contrast. Use a restrained amount so it does not leave thick raw-flour patches on the finished bread.
Herb Serving Butter
Keep the dough plain and offer herb butter at the table. This adds flavor without changing the tested status or hydration of the base formula.
Pumpkin-Flavor Bread
This is not a direct variation made by simply stirring in puree. Pumpkin puree adds moisture and solids and would require a separately developed dough. Use a pumpkin sourdough recipe designed for that ingredient if flavor is the priority.
Serving Ideas
Present the cooled loaf whole as a seasonal centerpiece, then remove any decorative stem and slice with a serrated knife. Serve with soup, roasted vegetables, cheese, or a simple olive oil dip.
The plain crumb works for breakfast toast with butter and jam. For sandwiches, slice only after full cooling and choose fillings that do not overwhelm the crust or soak the center immediately.
Leftover sound bread can become toast, croutons, breadcrumbs, or a savory bread pudding. The shape is decorative, but the loaf remains ordinary food to portion and store thoughtfully.
Storage
Room temperature: Once fully cool, store plain bread for up to 2 days for best quality. A paper bag preserves more crust character but allows drying; a sealed bag keeps the crumb softer while softening the crust.
Freezer: Wrap cooled slices or a loaf tightly and freeze for up to 3 months for quality. Remove all twine and decorative pieces before freezing. Separate slices if you want to toast individual portions.
Refrigerator: Refrigeration usually accelerates staling of plain bread. It is generally less useful than freezing for longer storage, unless perishable fillings or toppings have been added.
Refresh: Warm thawed bread briefly at 350°F, checking to avoid excessive drying. Toast slices as desired. Discard moldy bread rather than removing only the visible spot.
Troubleshooting
The Dough Didn’t Rise
The starter may not have been ready, or the dough may be cold. Give appropriate time and look for activity rather than adding commercial yeast mid-process without a plan. Use a reliably active starter next time.
The Loaf Spread Flat
Dough strength, overfermentation, or loose shaping may be involved. Twine cannot replace structure. Use bread flour, fold gently, and watch rise progress.
The Strings Cut Deeply Into the Crust
They were likely tied too tightly or the dough expanded more than expected. Leave more slack next time. Remove carefully and check that no pieces remain embedded.
The Pumpkin Sections Are Uneven
That is a normal decorative variation. Arrange strings more evenly next time, but do not tighten them to force symmetry. Fermentation and scoring also affect expansion.
The Center Is Gummy
The loaf may be underbaked or sliced too early. Check the baked center and cool thoroughly. A decorative shape does not change the need for complete baking and cooling.
Frequently Asked Questions
Does It Taste Like Pumpkin?
No. It is plain sourdough shaped like a pumpkin. There is no pumpkin puree or spice in the dough.
Can I Use Any String?
No. Use uncolored, food-safe, oven-rated 100% cotton kitchen twine. Craft string, synthetic cord, and decorative ribbon are not suitable substitutes.
Can I Use Starter Discard?
Not unless it is active enough to leaven bread. This recipe relies on ripe starter rather than a separate yeast addition. Feed and refresh sluggish starter before mixing.
Is a Dutch Oven Required?
This particular method is written for a covered Dutch oven. Open baking is possible with a different approach, but crust and rise can change. Do not improvise steam methods that conflict with your oven’s guidance.
Can I Bake It Without an Overnight Proof?
A same-day proof is possible with experience, but cold dough makes tying easier. The timing would need adjustment according to dough activity. The supplied schedule uses refrigeration for convenience and handling.
How Many Calories Are in a Slice?
Using common flour values, a twelfth of this plain loaf may be approximately 155–175 calories before toppings. Actual starter flour, ingredient weights, and slice size affect the number. This is an estimate, not verified nutrition data.
Print
Pumpkin-Shaped Sourdough Bread
Description
Hands-on: 35–45 minutes across stages
Bulk fermentation: Approximately 4–7 hours, including folds
Cold proof: Approximately 8–14 hours
Bake: 45–55 minutes
Cool: At least 2 hours
Yield: 1 loaf, about 10–12 slices
Ingredients
- 4 cups bread flour, approximately 17 ounces
- 1 1/4 cups water, approximately 10 ounces by weight
- A scant 1/2 cup ripe 100%-hydration starter, approximately 3.5 ounces
- 1 1/2 teaspoons fine salt, approximately 0.3 ounce
- Flour for basket and shaping
- A trace of neutral oil for twine, optional
- Four 24–30-inch lengths food-safe, oven-rated 100% cotton kitchen twine
- Cinnamon stick for decoration after baking, optional
Instructions
- Mix starter, water, and flour. Cover and rest 30 minutes, then work in salt.
- Give three sets of gentle folds 30 minutes apart. Continue bulk fermentation until aerated and risen roughly half to three-quarters, adjusting to conditions.
- Preshape a round, rest 20 minutes, then shape a snug boule. Place seam-up in a floured basket, cover, and refrigerate 8–14 hours.
- Heat oven to 450°F and preheat a suitable Dutch oven only as permitted by its manufacturer. Arrange four twine lengths as evenly spaced spokes on suitable parchment.
- Turn cold dough seam-down onto the center. Bring opposite ends over the loaf and tie loosely, allowing room to expand. Trim long tails and score lightly if desired.
- Lower into the Dutch oven, cover, and bake 25 minutes. Uncover carefully, reduce to 425°F, and bake 20–30 minutes more, until deeply golden and baked through, generally about 205–210°F in the center.
- Cool on a rack. When safe to handle, cut and remove all twine, checking the underside and grooves. Cool at least 2 hours total before slicing.
- Add an optional cinnamon-stick stem only after baking and remove before cutting.
Storage: Keep fully cooled plain bread at room temperature for up to 2 days for quality, or freeze well wrapped for up to 3 months. Remove every string and decorative piece before serving.