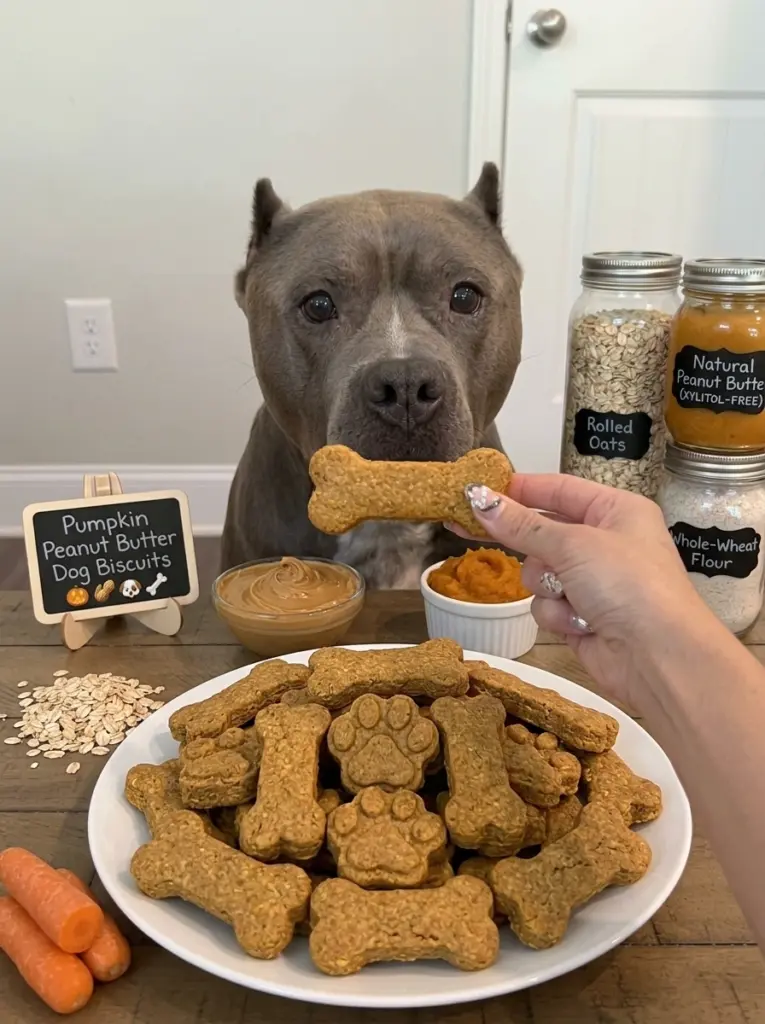
These Pumpkin Peanut Butter Dog Biscuits are crunchy, wholesome, and packed with fiber-rich pumpkin and irresistible peanut butter. An easy, classic homemade dog treat recipe your pup will love!
Keywords: pumpkin peanut butter dog treats, dog biscuits recipe, homemade dog treats, crunchy dog treats, healthy dog snacks, DIY dog biscuits, baked dog treats, easy dog treat recipe
There’s something wonderfully classic about a crunchy, homemade dog biscuit, and these Pumpkin Peanut Butter Dog Biscuits deliver exactly that. Combining fiber-rich pumpkin purée with irresistible peanut butter, egg, whole-wheat flour, and rolled oats, this recipe bakes up into sturdy, satisfying biscuits that are perfect for everyday treats, training rewards, or simply spoiling your pup. With a crisp, crunchy texture and a flavor combination dogs go crazy for, this is the kind of treat that will have your dog waiting eagerly by the treat jar.
Unlike many store-bought dog biscuits, which can contain preservatives, artificial flavors, or fillers, this homemade recipe relies on simple, wholesome ingredients you likely already have in your kitchen. It’s an easy way to bake a big batch of treats that store well and keep your dog happily rewarded for weeks to come.
In this article, we’ll walk through the complete recipe, explain the benefits of each ingredient, share step-by-step directions, cover important safety tips, and answer some of the most common questions pet parents have about baking homemade dog biscuits.
Why Homemade Dog Biscuits Are a Great Choice
Baking your own dog biscuits at home offers several advantages over many store-bought options:
- You control exactly what goes into them. No preservatives, artificial flavors, or fillers, just real, simple ingredients.
- They’re cost-effective. A batch of homemade biscuits often costs significantly less than comparable store-bought treats.
- They store exceptionally well. Unlike frozen treats, baked biscuits have a satisfying crunch and keep well at room temperature or in the fridge for extended periods.
- They’re easy to customize. You can adjust the shape, size, and add-ins to suit your dog’s preferences and your own kitchen tools.
- The classic peanut butter and pumpkin combination is a proven favorite. Few flavor pairings are as universally loved by dogs as this one.
Why This Recipe Works So Well for Dogs
Every ingredient in this recipe was chosen for both flavor and nutritional value. Let’s take a closer look.
Pumpkin Purée: A Digestive Powerhouse
Pumpkin is a go-to ingredient in many homemade dog treats for good reason. It’s rich in fiber, which can help support healthy digestion, and it’s also a good source of beta-carotene, vitamin A, and antioxidants. Be sure to use 100% pure pumpkin purée, not pumpkin pie filling, which contains added sugar and spices that aren’t appropriate for dogs.
Peanut Butter: The Flavor Dogs Can’t Resist
Peanut butter might be the single most beloved ingredient in dog treats, and this recipe uses a generous amount to really let that flavor shine. The most important thing to remember is to always use a peanut butter that is completely free of xylitol. Xylitol is a sugar substitute found in many sugar-free and diet peanut butter products, and it is highly toxic to dogs, even in very small amounts. Always carefully check the ingredient label before using peanut butter in any homemade dog treat.
Eggs: A Binding Agent and Nutrient Boost
Eggs help bind the dough together while adding extra protein and nutrients. They’re a great source of amino acids and can contribute to a shiny, healthy coat.
Whole-Wheat Flour: Structure and Crunch
Whole-wheat flour forms the structural base of these biscuits, giving them the classic firm, crunchy texture that makes baked dog treats so satisfying. Most dogs without a specific grain sensitivity tolerate whole-wheat flour well in moderation.
Rolled Oats: Added Fiber and Texture
Old-fashioned rolled oats add extra fiber to the dough and contribute to the biscuits’ texture. Oats are generally well tolerated by most dogs and are a common addition to homemade treat recipes.
Ingredients You’ll Need
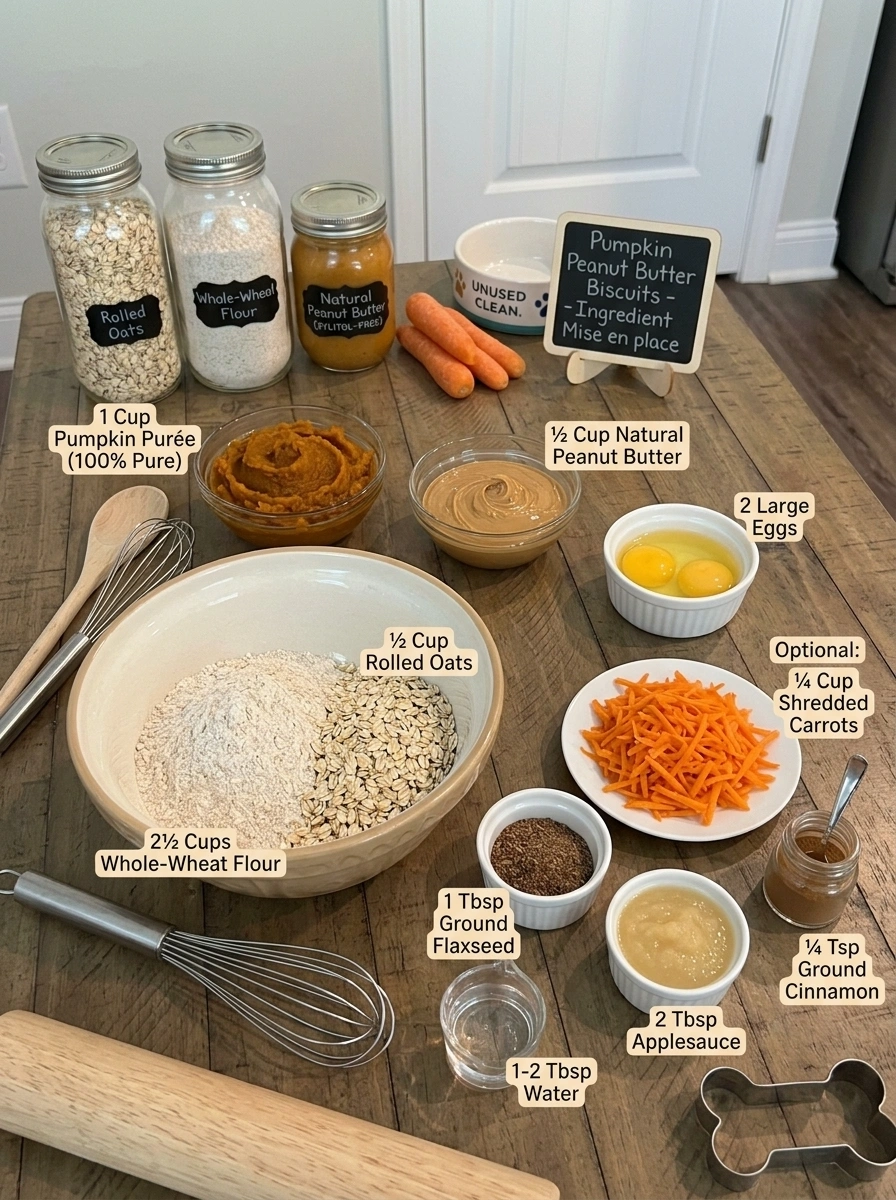
Base Ingredients
- 1 cup pumpkin purée (100% pure pumpkin) – Supports digestion and adds fiber and beta-carotene.
- ½ cup natural peanut butter (xylitol-free) – The star flavor of this recipe. Always double-check the label for xylitol before use.
- 2 large eggs – Helps bind the dough and adds extra protein.
- 2½ cups whole-wheat flour – Forms the structural base of the biscuits.
- ½ cup old-fashioned rolled oats – Adds fiber and a hearty texture.
Optional Add-Ins
Customize your pumpkin peanut butter biscuits with any of these dog-safe extras:
- ¼ cup finely shredded carrots – Adds crunch, fiber, and beta-carotene.
- 1 tbsp ground flaxseed – A source of omega-3 fatty acids that may support skin and coat health.
- 2 tbsp unsweetened applesauce – Adds extra moisture and natural sweetness.
- ¼ tsp ground cinnamon – Adds a warm, cozy flavor note. Use in small amounts, as cinnamon is safe for dogs only in moderation.
- 1–2 tbsp water, if needed – Helps bring the dough together if it feels too dry.
Step-by-Step Directions
This recipe takes a bit more hands-on time than a blended frozen treat, but the results are well worth it.
Step 1: Preheat the Oven
Preheat the oven to 350°F (175°C) and line a baking sheet with parchment paper.
Step 2: Combine the Wet Ingredients
Combine the pumpkin purée, peanut butter, and eggs in a large bowl and mix until smooth.
Step 3: Add the Dry Ingredients
Gradually add the whole-wheat flour and rolled oats. Mix until a firm, workable dough forms. If the dough feels too dry, add water one tablespoon at a time until it comes together.
Step 4: Roll Out the Dough
Roll the dough out on a lightly floured surface to about ¼ inch (6 mm) thick.
Step 5: Cut Into Shapes
Cut the dough into bone shapes, paw prints, or small circles using cookie cutters, then arrange the cut biscuits on the prepared baking sheet.
Step 6: Bake Until Golden
Bake for 25–30 minutes, or until the biscuits are firm and lightly golden.
Step 7: Extra-Crunchy Option
For extra-crunchy biscuits, turn off the oven and leave the treats inside for another 20–30 minutes while the oven cools. This helps dry them out further for an even crispier finished texture.
Step 8: Cool Completely
Allow the biscuits to cool completely before serving or storing them.
Step 9: Store and Serve
Store the cooled biscuits in an airtight container in the refrigerator for about 1 week, or freeze them for up to 3 months.
Safety Tips for Homemade Dog Biscuits
Homemade treats are a wonderful way to spoil your dog, but a few important safety guidelines should always be kept in mind.
- Always confirm your peanut butter is xylitol-free. This is the most critical safety step in this recipe, since xylitol poisoning can be extremely dangerous for dogs.
- Use 100% pure pumpkin purée, not pumpkin pie filling. Pie filling contains added sugar and spices that aren’t appropriate for dogs.
- Use cinnamon sparingly, if at all. While cinnamon is generally considered safe for dogs in small amounts, it should be used in moderation and is entirely optional.
- Make sure the biscuits are fully baked before serving. This is important both for food safety, due to the raw egg in the dough, and for achieving the right crunchy texture.
- These are treats, not a complete diet. Serve as an occasional treat, and keep portions appropriate for your dog’s size and regular daily food intake.
- Always supervise your dog while eating, especially with any new treat.
- Adjust serving sizes based on your dog’s size, age, and activity level. When in doubt, consult your veterinarian.
Tips for the Best Results
- Roll the dough to an even thickness. This helps the biscuits bake evenly and achieve a consistent, satisfying crunch.
- Use fun cookie cutters. Bone shapes, paw prints, or simple circles all work well and add a playful touch to your homemade treats.
- Don’t skip the extra oven-drying step. This step makes a noticeable difference in achieving that classic, crunchy dog biscuit texture.
- Let the biscuits cool completely before storing. This helps preserve their crunch and prevents excess moisture from building up in the storage container.
- Make a big batch. Since these biscuits freeze well for up to 3 months, it’s worth doubling the recipe so you always have treats on hand.
- Re-roll scraps for minimal waste. Any leftover dough scraps can be re-rolled and cut into additional biscuits.
Fun Variations to Try
Once you’ve mastered the base recipe, try these tasty twists:
- Veggie-Boosted Biscuits – Add shredded carrots for extra crunch, fiber, and beta-carotene.
- Cinnamon Pumpkin Biscuits – Add a small pinch of ground cinnamon for a warm, cozy flavor, perfect for fall.
- Omega Boost Biscuits – Mix in ground flaxseed for a coat-supporting dose of omega-3 fatty acids.
- Extra Moist Biscuits – Stir in unsweetened applesauce for added moisture and a touch more natural sweetness.
- Mini Training Biscuits – Cut the dough into smaller shapes for bite-sized training treats that are easier to portion during sessions.
Storage Instructions
Refrigerator Storage
Store the cooled biscuits in an airtight container in the refrigerator for about 1 week. Because these are baked, crunchy treats, they can also generally be stored at room temperature in an airtight container for a few days, though refrigeration will help extend their freshness.
Freezer Storage
For longer storage, freeze the biscuits in an airtight, freezer-safe container or resealable bag for up to 3 months.
Thawing and Serving
If frozen, allow the biscuits to thaw at room temperature before serving. Their crunchy texture should return once fully thawed.
Recipe Facts
- Prep Time: 15 minutes
- Cook Time: 25–30 minutes
- Total Time: Approximately 40–45 minutes (plus optional additional cooling time in the oven)
- Yield: Varies based on cutter size (typically 24–30 biscuits)
Frequently Asked Questions
Is pumpkin good for dogs? Yes, plain, 100% pure pumpkin purée is considered a healthy, digestion-supporting ingredient for dogs. It’s rich in fiber and can be helpful for both occasional constipation and diarrhea.
What peanut butter is safe for dogs? Choose a natural peanut butter with minimal ingredients, ideally just peanuts and maybe a small amount of salt. Always avoid any peanut butter containing xylitol, which is toxic and potentially fatal to dogs.
Can I use a different type of flour? Whole-wheat flour is used in this recipe for its structure and fiber content, but if your dog has a wheat sensitivity, you may be able to substitute a dog-safe alternative flour, such as oat flour, though the texture and amount of liquid needed may vary.
Is cinnamon safe for dogs? Yes, in small amounts, cinnamon is generally considered safe for dogs and is a popular addition to fall-inspired treat recipes. It’s an optional ingredient in this recipe and should be used sparingly.
How long do these biscuits stay fresh? When stored in an airtight container in the refrigerator, these biscuits will stay fresh for about 1 week. For longer storage, they can be frozen for up to 3 months.
Why do you turn off the oven and leave the biscuits inside? This extra step helps further dry out the biscuits, resulting in an even crunchier texture, which is a classic characteristic of baked dog biscuits.
Are these biscuits suitable for puppies? The ingredients in this recipe are generally gentle and dog-friendly, but it’s always best to check with your veterinarian before introducing new treats to a puppy’s diet, especially given the crunchy texture of these biscuits.
Can I make the dough ahead of time? Yes, you can prepare the dough and refrigerate it, tightly wrapped, for up to a day or two before rolling and baking, though for the best texture, it’s generally best to bake fairly soon after mixing.
Final Thoughts
These Pumpkin Peanut Butter Dog Biscuits are a simple, classic way to give your dog a crunchy, satisfying treat made with wholesome, real ingredients. With a base of fiber-rich pumpkin, irresistible peanut butter, egg, and whole-wheat flour, plus a variety of optional add-ins to make the recipe your own, these biscuits bake up into a big batch that stores well for weeks, whether in the refrigerator or freezer. Whether you’re looking for an everyday treat, a training reward, or just want to spoil your pup with something homemade, these biscuits are sure to become a staple in your treat rotation.
As always, check with your veterinarian if your dog has any specific dietary needs or health conditions before introducing new treats, and be sure to supervise your dog while they enjoy their reward. Here’s to happy pups and a treat jar that’s always full!
Print
Pumpkin Peanut Butter Dog Biscuits
- Total Time: Approximately 40–45 minutes (plus optional additional cooling time in the oven)
Ingredients
Base Ingredients
- 1 cup pumpkin purée (100% pure pumpkin) – Supports digestion and adds fiber and beta-carotene.
- ½ cup natural peanut butter (xylitol-free) – The star flavor of this recipe. Always double-check the label for xylitol before use.
- 2 large eggs – Helps bind the dough and adds extra protein.
- 2½ cups whole-wheat flour – Forms the structural base of the biscuits.
- ½ cup old-fashioned rolled oats – Adds fiber and a hearty texture.
Optional Add-Ins
Customize your pumpkin peanut butter biscuits with any of these dog-safe extras:
- ¼ cup finely shredded carrots – Adds crunch, fiber, and beta-carotene.
- 1 tbsp ground flaxseed – A source of omega-3 fatty acids that may support skin and coat health.
- 2 tbsp unsweetened applesauce – Adds extra moisture and natural sweetness.
- ¼ tsp ground cinnamon – Adds a warm, cozy flavor note. Use in small amounts, as cinnamon is safe for dogs only in moderation.
- 1–2 tbsp water, if needed – Helps bring the dough together if it feels too dry.
Instructions
This recipe takes a bit more hands-on time than a blended frozen treat, but the results are well worth it.
Preheat the oven to 350°F (175°C) and line a baking sheet with parchment paper.
Combine the pumpkin purée, peanut butter, and eggs in a large bowl and mix until smooth.
Gradually add the whole-wheat flour and rolled oats. Mix until a firm, workable dough forms. If the dough feels too dry, add water one tablespoon at a time until it comes together.
Roll the dough out on a lightly floured surface to about ¼ inch (6 mm) thick.
Cut the dough into bone shapes, paw prints, or small circles using cookie cutters, then arrange the cut biscuits on the prepared baking sheet.
Bake for 25–30 minutes, or until the biscuits are firm and lightly golden.
For extra-crunchy biscuits, turn off the oven and leave the treats inside for another 20–30 minutes while the oven cools. This helps dry them out further for an even crispier finished texture.
Allow the biscuits to cool completely before serving or storing them.
Store the cooled biscuits in an airtight container in the refrigerator for about 1 week, or freeze them for up to 3 months.
- Prep Time: 10 minutes
- Cook Time: 25–30 minutes