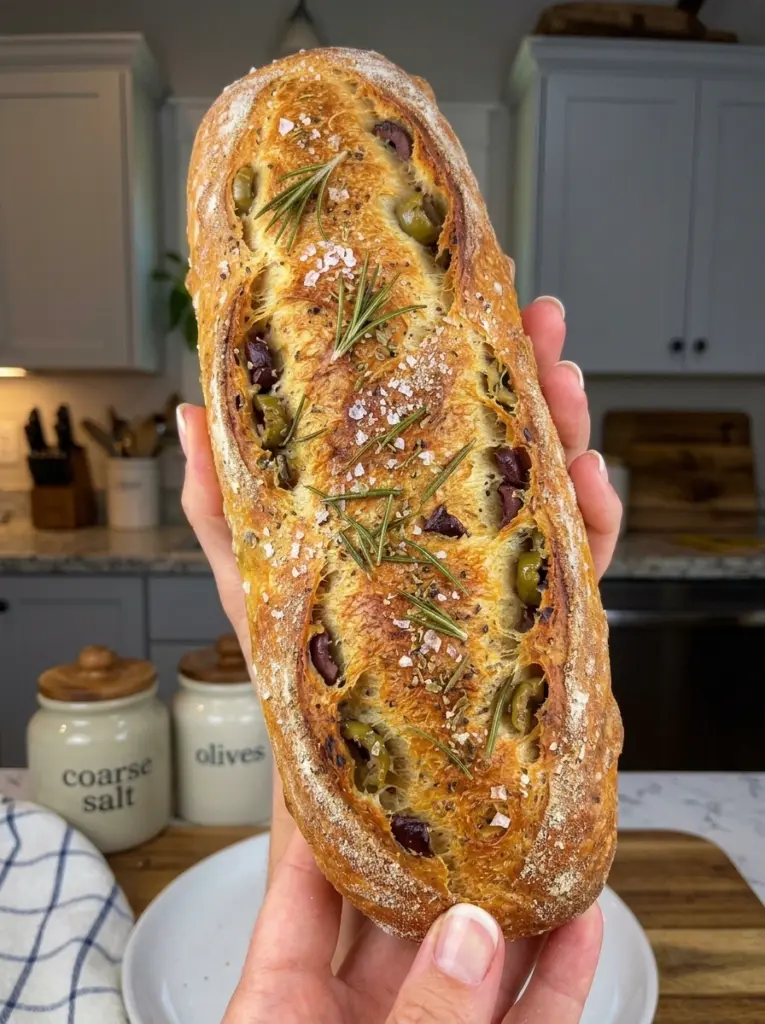
This Easy Olive Baguette is beautifully crisp and golden on the outside with a soft, chewy, airy interior packed with savory olives. A simple yeast dough creates bakery-style baguettes without complicated techniques, while a combination of Kalamata and green olives brings salty, briny Mediterranean flavor to every slice.
The dough uses a gentle stretch-and-fold method rather than intensive kneading, helping build enough strength to trap air while keeping the crumb light and pleasantly chewy. The chopped olives are folded in carefully so they stay distributed throughout the bread without weighing down the dough.
These olive baguettes are perfect alongside soups, pasta, salads, cheese boards, hummus, whipped feta, or extra-virgin olive oil. They also make fantastic sandwiches or can simply be sliced and served warm with butter.
With a crisp crust, airy crumb, and plenty of savory olive flavor, this is an easy homemade bread you’ll want to bake again and again.
Why You’ll Love This Easy Olive Baguette
There’s plenty to love about these rustic homemade baguettes:
Crisp bakery-style crust. Baking the baguettes at high heat with steam helps create a beautifully crisp, deeply golden exterior.
Soft and airy inside. A well-hydrated dough combined with gentle stretch-and-folds produces a chewy interior with plenty of airy pockets.
Loaded with olives. Kalamata and green olives provide different layers of salty, savory, slightly tangy flavor.
No complicated kneading. The dough develops strength gradually through resting and folding rather than lengthy traditional kneading.
Perfect for entertaining. Slice the baguettes for cheese boards, charcuterie platters, dips, and Mediterranean-style appetizers.
Versatile enough for everyday meals. Serve them with dinner, turn them into sandwiches, or toast leftover slices for breakfast.
Ingredients You’ll Need
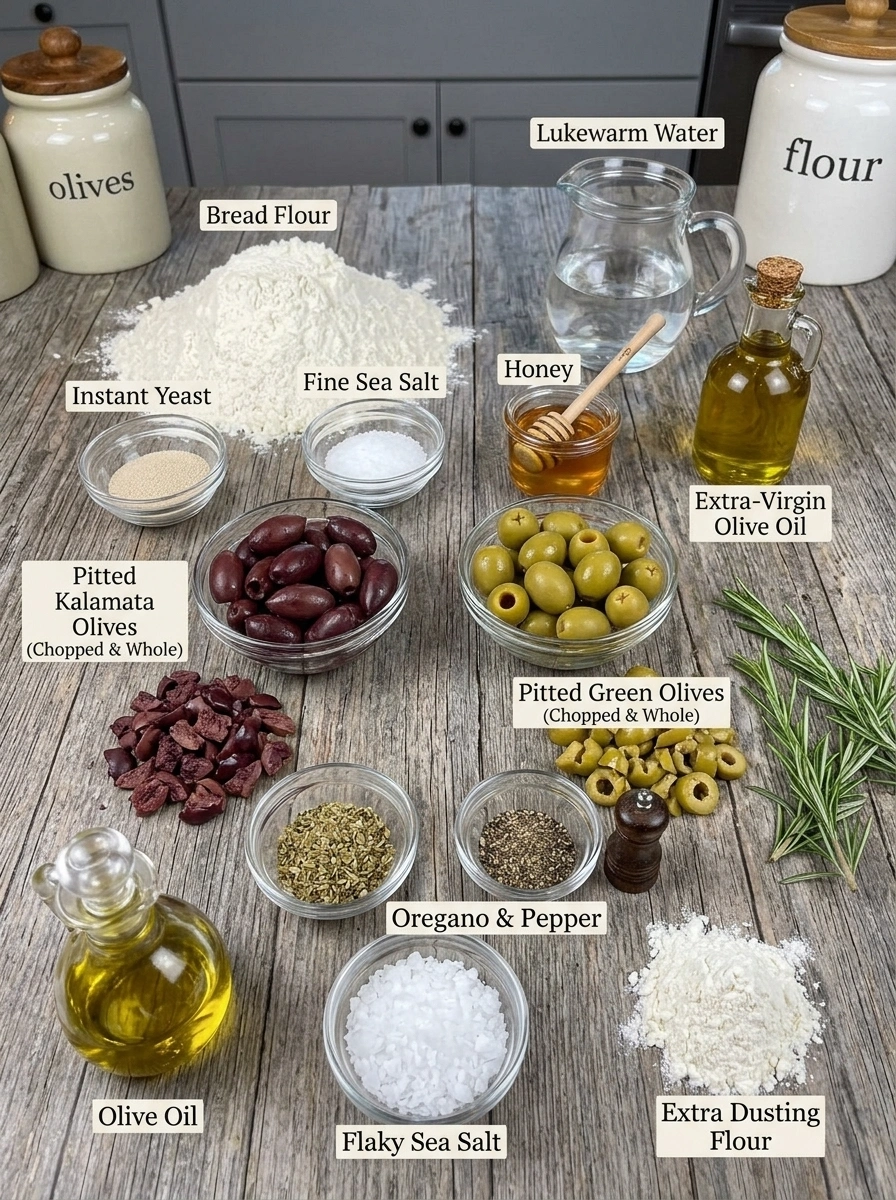
Here’s everything you’ll need to make these crisp, chewy olive baguettes and why each ingredient matters.
For the Dough
- 4 cups (480 g) bread flour — Provides the higher protein content needed to develop a strong, chewy baguette structure.
- 1½ tsp instant yeast — Gives the dough its rise and creates the airy interior.
- 1½ tsp fine sea salt — Seasons the bread and balances the salty flavor of the olives.
- 1 tsp honey or granulated sugar — Adds a subtle touch of sweetness and complements the savory olives.
- 1½ cups (360 g) lukewarm water — Hydrates the flour and creates a soft, slightly sticky dough.
- 1 tbsp extra-virgin olive oil — Adds richness and a subtle Mediterranean flavor.
For the Olives 🫒
- 1 cup (140–160 g) Kalamata olives, pitted — Adds rich, fruity, salty Mediterranean flavor.
- ½ cup green olives, pitted — Provides a brighter, slightly sharper olive flavor that complements the Kalamata olives.
- ½ tsp dried oregano, optional — Adds another layer of Mediterranean herb flavor.
- ½ tsp freshly ground black pepper — Gives the bread a subtle peppery warmth.
For Finishing
- Extra flour, for dusting — Prevents the soft dough from sticking during dividing and shaping.
- Olive oil, optional — Can be used for a subtle finishing touch.
- Flaky sea salt, optional — Adds extra crunch and salty flavor to the finished baguettes.
How to Make Easy Olive Baguette
The process takes a little time because the dough needs to rest and rise, but each individual step is straightforward.
Step 1: Prepare the Olives 🫒
Drain both the Kalamata and green olives thoroughly.
Place them between clean paper towels and gently press to remove as much surface moisture as possible.
Roughly chop the olives into small pieces.
Don’t skip the drying step. Excess olive brine introduces additional liquid into the dough and can leave the crumb immediately surrounding the olives wet or gummy.
Step 2: Mix the Dough
In a large mixing bowl, combine the bread flour, instant yeast, fine sea salt, and honey or sugar.
Pour in the lukewarm water and extra-virgin olive oil.
Mix with a sturdy spoon, dough whisk, or your hands until everything comes together into a rough, shaggy dough.
Make sure there aren’t any large pockets of dry flour remaining.
The dough should be soft and slightly sticky rather than firm and dry.
Step 3: Let the Dough Rest
Cover the bowl and allow the dough to rest for 20–30 minutes.
This simple resting period gives the flour time to fully absorb the water and makes the dough noticeably easier to stretch and strengthen.
Step 4: Add the Olives
Sprinkle the chopped Kalamata olives, green olives, oregano, and black pepper evenly over the dough.
With slightly damp hands, grab one side of the dough, gently stretch it upward, and fold it toward the center.
Rotate the bowl and repeat the process around the dough.
Continue gently folding until the olives are reasonably well distributed.
Avoid aggressively kneading the olives into the dough. Rough handling can crush them and tear the gluten structure you’re trying to develop.
Step 5: Stretch and Fold
Cover the dough and let it rest for another 20–30 minutes.
Perform a set of approximately four stretch-and-folds, rotating the bowl between each fold.
Cover and rest again.
Repeat this process 2–3 times.
With each set, you’ll notice the dough becoming smoother, stronger, and more elastic.
Step 6: First Rise 🫧
Cover the bowl and leave the dough at room temperature for approximately 1–2 hours.
The dough should become noticeably expanded, airy, and bubbly.
Don’t rely exclusively on the clock. Fermentation speed varies depending on the temperature of your kitchen and the activity of your yeast.
Step 7: Divide the Dough 🥖
Lightly flour your work surface and carefully turn out the risen dough.
Divide it into 3 equal portions.
Gently shape each portion into a rough rectangle without aggressively pressing out all of the fermentation bubbles.
Cover the pieces and let them rest for approximately 15 minutes.
This short bench rest relaxes the gluten and makes final shaping easier.
Step 8: Shape the Baguettes
Working with one piece at a time, gently flatten the dough into a rectangle.
Fold the upper third toward the center and gently seal it.
Bring the lower third upward and seal again.
Fold the dough lengthwise once more and carefully pinch the seam closed.
Turn the baguette seam-side down.
Using gentle pressure, roll from the center toward the ends until the baguette reaches approximately 12–14 inches long.
Repeat with the remaining portions.
Step 9: Final Proof
Transfer the shaped baguettes to parchment paper or a well-floured baker’s couche.
Cover loosely and allow them to proof for approximately 30–45 minutes.
They should look noticeably puffier and lighter but shouldn’t dramatically double in size.
Step 10: Preheat the Oven 🔥
Preheat your oven to 450°F (230°C).
If you’re using a baking stone or baking steel, give it plenty of time to become thoroughly heated.
Place an empty heat-safe metal pan on the lower oven rack. You’ll use this to create steam during the beginning of baking.
Step 11: Score the Baguettes
Immediately before baking, use a bread lame or very sharp knife to make 3–4 shallow diagonal cuts across each baguette.
Make confident, quick cuts rather than repeatedly dragging the blade through the dough.
When possible, avoid scoring directly through large exposed olive pieces.
Step 12: Bake With Steam 💨
Transfer the baguettes to the hot oven.
Carefully pour approximately 1 cup of hot water into the preheated metal pan and immediately close the oven door.
Bake the baguettes with steam for approximately 10 minutes.
The humid environment delays crust formation during the beginning of baking, allowing the loaves to expand before developing their crisp exterior.
Step 13: Finish Baking 🥖
After the first 10 minutes, carefully remove the steam pan if practical.
Continue baking for another 10–15 minutes, or until the baguettes are deeply golden brown with a crisp exterior.
Don’t remove them while they’re still pale. A deeper golden crust provides significantly better flavor and crunch.
Step 14: Cool
Transfer the baked baguettes to a wire cooling rack.
Allow them to cool for at least 20–30 minutes before slicing.
Although freshly baked bread is tempting, the interior is still finishing its setting process after leaving the oven. Cutting immediately can compress the crumb or make it seem gummy.
Flavor Variations
Garlic Olive: Add 2 finely minced roasted garlic cloves when folding in the olives.
Rosemary Olive: Add 1 tablespoon finely chopped fresh rosemary for a fragrant Mediterranean variation.
Parmesan Olive: Fold in ½ cup freshly grated Parmesan for extra savory, cheesy flavor.
Sun-Dried Tomato & Olive: Add finely chopped, thoroughly drained sun-dried tomatoes alongside the olives.
Spicy Olive: Add crushed red pepper flakes for a gentle kick of heat.
Mediterranean: Combine Kalamata olives, green olives, fresh rosemary, and roasted garlic for an especially bold Mediterranean-inspired baguette.
How to Serve Easy Olive Baguette
These savory baguettes work beautifully with all kinds of meals and appetizers:
- With extra-virgin olive oil — Keep it simple and let the olives and crisp bread shine.
- With hummus — The creamy chickpea dip pairs perfectly with the salty olives.
- With whipped feta — A particularly delicious Mediterranean-style appetizer.
- Alongside tomato soup — Use slices to soak up the warm, flavorful soup.
- With pasta or lasagna — Serve instead of traditional garlic bread.
- On a charcuterie board — Pair with cheeses, cured meats, vegetables, and dips.
- With mozzarella and tomatoes — Add fresh basil and olive oil for an easy Mediterranean-inspired plate.
- Alongside grilled chicken — An easy bread option for a simple dinner.
- For sandwiches — Split the baguettes and fill with mozzarella, chicken, turkey, roasted vegetables, or other favorite fillings.
- Warm with butter — Sometimes the simplest way is the best.
Tips for the Best Easy Olive Baguette
Dry the olives thoroughly. This is one of the most important steps. Excess brine can introduce unwanted moisture and create gummy areas inside the bread.
Don’t add too much extra flour. The dough is supposed to be soft and slightly sticky. Adding excessive flour during shaping can produce a heavier, denser baguette.
Use bread flour when possible. Its higher protein content helps develop the strong gluten network needed for a chewy, airy baguette.
Handle the risen dough gently. You want to preserve as much of the fermentation gas as possible when dividing and shaping.
Don’t aggressively knead in the olives. Gentle folding distributes them while protecting both the olive pieces and developing gluten.
Watch the dough rather than only the clock. Room temperature can significantly change fermentation and proofing times.
Preheat the oven thoroughly. Strong initial heat helps produce better oven spring and crust development.
Use steam during the beginning of baking. Steam helps the baguettes expand before the crust sets and contributes to the crisp bakery-style exterior.
Bake until deeply golden. Pale baguettes won’t have the same crispness or developed flavor.
Let the bread cool before cutting. Waiting at least 20–30 minutes helps the crumb finish setting.
Storage Information
Easy Olive Baguettes are at their best on the same day they’re baked, when the exterior is especially crisp and the center is soft and chewy.
Store leftovers at room temperature for approximately 1–2 days. Once completely cooled, keep them wrapped or in a bread bag.
To restore the crust, place the baguette in a 350°F (175°C) oven for 5–8 minutes before serving.
For longer storage, allow the baguettes to cool completely and freeze them. You can freeze whole baguettes or individual portions depending on how you plan to use them.
Reheat directly from frozen until warmed through and crisp again.
Freezing is preferable to refrigerating bread because refrigeration tends to make bread stale more quickly.
Frequently Asked Questions
Can I use only Kalamata olives?
Yes. You can make the baguettes entirely with Kalamata olives if you prefer their deeper, fruitier flavor. The combination of Kalamata and green olives simply creates more variety in flavor.
Why should I dry the olives before adding them?
Olives can carry quite a bit of brine. Removing this excess moisture helps prevent wet or gummy pockets from developing around the olive pieces.
Why is my baguette dough sticky?
A soft, slightly sticky dough is normal. The moisture helps create a lighter, airier crumb. The dough should also become smoother and easier to handle as you complete the stretch-and-fold sets.
Can I knead the dough instead of doing stretch-and-folds?
You can, but gentle stretch-and-folds work particularly well for this recipe because they strengthen the dough while making it easier to incorporate the olives without crushing them.
How do I know when the first rise is finished?
Look for dough that has noticeably expanded and developed a light, airy appearance with visible fermentation bubbles. Depending on room temperature, this will generally take around 1–2 hours.
Should the baguettes double during the final proof?
No. They should become visibly puffy and lighter, but you don’t need to wait for them to dramatically double before baking.
Why do I need steam in the oven?
Steam keeps the exterior of the baguettes flexible during the beginning of baking, giving the dough more opportunity to expand before the crust becomes firm.
Can I make these baguettes ahead of time?
You can bake them ahead, but they’re best fresh. If preparing well in advance, freezing the cooled baguettes and reheating them before serving will give you better results than storing them for several days.
Can I freeze Olive Baguettes?
Yes. Once completely cooled, freeze the baguettes well wrapped. Reheat them directly from frozen in the oven to bring back their crisp exterior.
Recipe Card
Prep Time: Approximately 30 minutes
Rest & Rise Time: Approximately 2½–4 hours
Bake Time: 20–25 minutes
Cooling Time: 20–30 minutes
Total Time: Approximately 3½–5 hours
Yield: 3 baguettes
Oven Temperature: 450°F (230°C)
This Easy Olive Baguette combines everything that’s delicious about rustic homemade bread: a deeply golden, crisp crust, soft and chewy interior, and generous pieces of salty Kalamata and green olives throughout.
Serve it alongside pasta or soup, add it to a Mediterranean-inspired appetizer board, turn it into a flavorful sandwich, or simply tear off a piece while it’s still slightly warm and dip it into good extra-virgin olive oil.
Once you see how easily a simple dough, a few folds, and plenty of olives can turn into beautiful bakery-style baguettes at home, this savory bread may quickly become one of your favorite loaves to bake.
Print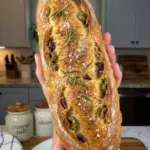
Easy Olive Baguette
Ingredients
Here’s everything you’ll need to make these crisp, chewy olive baguettes and why each ingredient matters.
For the Dough
- 4 cups (480 g) bread flour — Provides the higher protein content needed to develop a strong, chewy baguette structure.
- 1½ tsp instant yeast — Gives the dough its rise and creates the airy interior.
- 1½ tsp fine sea salt — Seasons the bread and balances the salty flavor of the olives.
- 1 tsp honey or granulated sugar — Adds a subtle touch of sweetness and complements the savory olives.
- 1½ cups (360 g) lukewarm water — Hydrates the flour and creates a soft, slightly sticky dough.
- 1 tbsp extra-virgin olive oil — Adds richness and a subtle Mediterranean flavor.
For the Olives 🫒
- 1 cup (140–160 g) Kalamata olives, pitted — Adds rich, fruity, salty Mediterranean flavor.
- ½ cup green olives, pitted — Provides a brighter, slightly sharper olive flavor that complements the Kalamata olives.
- ½ tsp dried oregano, optional — Adds another layer of Mediterranean herb flavor.
- ½ tsp freshly ground black pepper — Gives the bread a subtle peppery warmth.
For Finishing
- Extra flour, for dusting — Prevents the soft dough from sticking during dividing and shaping.
- Olive oil, optional — Can be used for a subtle finishing touch.
- Flaky sea salt, optional — Adds extra crunch and salty flavor to the finished baguettes.
Instructions
The process takes a little time because the dough needs to rest and rise, but each individual step is straightforward.
Drain both the Kalamata and green olives thoroughly.
Place them between clean paper towels and gently press to remove as much surface moisture as possible.
Roughly chop the olives into small pieces.
Don’t skip the drying step. Excess olive brine introduces additional liquid into the dough and can leave the crumb immediately surrounding the olives wet or gummy.
In a large mixing bowl, combine the bread flour, instant yeast, fine sea salt, and honey or sugar.
Pour in the lukewarm water and extra-virgin olive oil.
Mix with a sturdy spoon, dough whisk, or your hands until everything comes together into a rough, shaggy dough.
Make sure there aren’t any large pockets of dry flour remaining.
The dough should be soft and slightly sticky rather than firm and dry.
Cover the bowl and allow the dough to rest for 20–30 minutes.
This simple resting period gives the flour time to fully absorb the water and makes the dough noticeably easier to stretch and strengthen.
Sprinkle the chopped Kalamata olives, green olives, oregano, and black pepper evenly over the dough.
With slightly damp hands, grab one side of the dough, gently stretch it upward, and fold it toward the center.
Rotate the bowl and repeat the process around the dough.
Continue gently folding until the olives are reasonably well distributed.
Avoid aggressively kneading the olives into the dough. Rough handling can crush them and tear the gluten structure you’re trying to develop.
Cover the dough and let it rest for another 20–30 minutes.
Perform a set of approximately four stretch-and-folds, rotating the bowl between each fold.
Cover and rest again.
Repeat this process 2–3 times.
With each set, you’ll notice the dough becoming smoother, stronger, and more elastic.
Cover the bowl and leave the dough at room temperature for approximately 1–2 hours.
The dough should become noticeably expanded, airy, and bubbly.
Don’t rely exclusively on the clock. Fermentation speed varies depending on the temperature of your kitchen and the activity of your yeast.
Lightly flour your work surface and carefully turn out the risen dough.
Divide it into 3 equal portions.
Gently shape each portion into a rough rectangle without aggressively pressing out all of the fermentation bubbles.
Cover the pieces and let them rest for approximately 15 minutes.
This short bench rest relaxes the gluten and makes final shaping easier.
Working with one piece at a time, gently flatten the dough into a rectangle.
Fold the upper third toward the center and gently seal it.
Bring the lower third upward and seal again.
Fold the dough lengthwise once more and carefully pinch the seam closed.
Turn the baguette seam-side down.
Using gentle pressure, roll from the center toward the ends until the baguette reaches approximately 12–14 inches long.
Repeat with the remaining portions.
Transfer the shaped baguettes to parchment paper or a well-floured baker’s couche.
Cover loosely and allow them to proof for approximately 30–45 minutes.
They should look noticeably puffier and lighter but shouldn’t dramatically double in size.
Preheat your oven to 450°F (230°C).
If you’re using a baking stone or baking steel, give it plenty of time to become thoroughly heated.
Place an empty heat-safe metal pan on the lower oven rack. You’ll use this to create steam during the beginning of baking.
Immediately before baking, use a bread lame or very sharp knife to make 3–4 shallow diagonal cuts across each baguette.
Make confident, quick cuts rather than repeatedly dragging the blade through the dough.
When possible, avoid scoring directly through large exposed olive pieces.
Transfer the baguettes to the hot oven.
Carefully pour approximately 1 cup of hot water into the preheated metal pan and immediately close the oven door.
Bake the baguettes with steam for approximately 10 minutes.
The humid environment delays crust formation during the beginning of baking, allowing the loaves to expand before developing their crisp exterior.
After the first 10 minutes, carefully remove the steam pan if practical.
Continue baking for another 10–15 minutes, or until the baguettes are deeply golden brown with a crisp exterior.
Don’t remove them while they’re still pale. A deeper golden crust provides significantly better flavor and crunch.
Transfer the baked baguettes to a wire cooling rack.
Allow them to cool for at least 20–30 minutes before slicing.
Although freshly baked bread is tempting, the interior is still finishing its setting process after leaving the oven. Cutting immediately can compress the crumb or make it seem gummy.