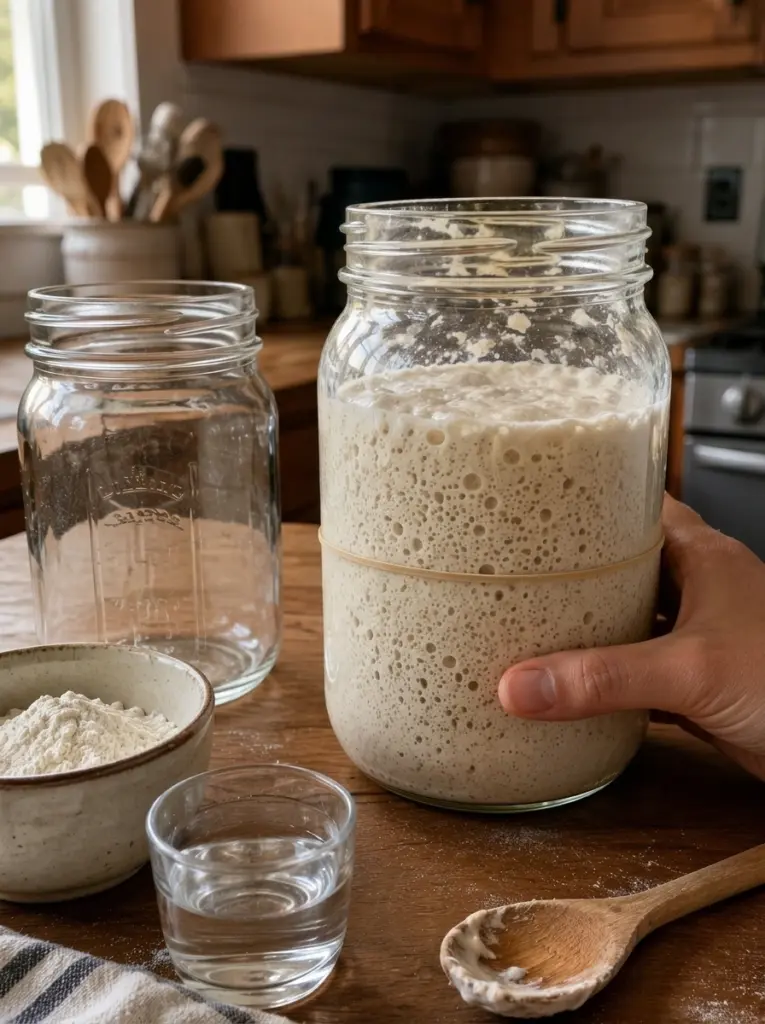
If you’ve ever stared into a jar of bubbling flour and water and wondered whether it’s thriving or just barely surviving, you’re not alone. A sourdough starter can feel mysterious at first — some days it’s wildly active, other days it looks flat and sleepy. But here’s the truth I’ve learned after years of feeding mine: a strong starter doesn’t need complicated tricks, fancy tools, or a chemistry degree. What it needs is consistency.
In this guide, I’m sharing the exact habits I rely on to keep my sourdough starter healthy, active, and ready to bake with — from feeding ratios to jar hygiene to knowing when it’s actually peaked. Whether you’re nursing a brand-new starter or reviving one that’s been neglected in the back of your fridge, these simple routines will help you read your starter’s behavior instead of just guessing.
What Is a Sourdough Starter (and Why Consistency Matters)
A sourdough starter is a living culture of wild yeast and beneficial bacteria, kept alive in a simple mixture of flour and water. Every time you “feed” it — adding fresh flour and water — you’re giving that colony of microorganisms new food to consume, which produces the bubbles, rise, and tangy aroma that give sourdough bread its signature texture and flavor.
The reason consistency matters so much is simple: your starter is alive. It behaves like a living ecosystem that thrives on routine. Feed it on a predictable schedule, keep its environment stable, and it rewards you with reliable, vigorous fermentation. Neglect it, starve it, or expose it to extreme temperatures, and it slows down, weakens, or develops off smells and flavors. The good news is that starters are remarkably resilient — even a sluggish one can usually be nursed back to full strength with a few days of steady care.
Why This Approach Works
Instead of chasing rigid timers or obsessing over exact hours, this method is built around observation. You learn to read your starter’s rise-and-fall cycle — the same way a baker learns to read dough by feel rather than by recipe alone. Once you understand what your starter looks like at its peak, you’ll always know exactly when it’s ready to bake with, and you’ll catch problems early before they become serious.
This approach also works because it removes guesswork. A marked jar, a clean feeding ratio, and a stable environment take the mystery out of starter care — you’re not just hoping it’s healthy, you’re watching the evidence for yourself.
What You Need
- A clean glass jar (with room for the starter to expand)
- A kitchen scale (for accurate 1:1:1 feeding by weight)
- All-purpose or bread flour (whole wheat or rye can also be used for feeding)
- Filtered or dechlorinated water, room temperature
- A rubber band or marker for tracking rise
- A loose-fitting lid, cloth cover, or jar lid resting loosely on top
- A warm, stable spot in your kitchen
Step-by-Step: My Sourdough Starter Care Routine
1. Feed It Consistently
At room temperature, a starter gets hungry fast. I feed mine on a regular schedule — generally once a day when it’s out on the counter — rather than letting it sit hungry for long stretches. Skipping feedings or waiting too long between them is one of the fastest ways to weaken a starter over time.
2. Use a Simple 1:1:1 Feeding Ratio
I keep my feeding math easy by using a 1:1:1 ratio by weight: equal parts starter, water, and flour. For example, 60 g starter + 60 g water + 60 g flour. This ratio gives the culture enough fresh food to stay active without overwhelming it, and it’s easy to scale up or down depending on how much starter you need.
3. Discard Before Feeding
Before adding fresh flour and water, I discard down to a manageable amount of starter — usually the amount I actually need for feeding or baking. This keeps the jar from growing endlessly and keeps the feeding ratio meaningful. Without discarding, you’d need increasingly large amounts of flour and water just to keep up, which wastes ingredients and makes the starter harder to manage.
4. Mark the Starting Level
Right after feeding, I wrap a rubber band around the jar at the current starter level. This one small habit tells me everything: whether it’s rising, how quickly, whether it doubles, and when it starts to fall. It’s the simplest tool I use, and it takes all the guesswork out of tracking activity.
5. Watch the Starter, Not Just the Clock
Times can vary depending on your kitchen’s temperature, your flour, and your starter’s personality. Instead of watching the clock, I watch the jar. A healthy starter gradually becomes bubbly and airy, and develops a predictable rise after each feeding — that pattern is far more useful than any fixed number of hours.
6. Keep It Comfortably Warm
I avoid placing my starter anywhere too hot — near a stove, in direct sun, or on top of a warm appliance. Normal warm room temperature is enough to encourage steady fermentation without forcing or stressing the culture. Too much heat can actually exhaust a starter and lead to weak, sour, or overly liquid results.
7. Use a Clean Jar
Every so often, I move my starter into a freshly washed jar. Dried starter residue tends to build up around the sides and rim over time, and letting it accumulate can affect both hygiene and how easily you can read the starter’s rise. A clean jar also just makes the whole process more pleasant to work with.
8. Cover It Loosely
I never seal my starter’s jar tightly. Fermentation produces gas, and that gas needs somewhere to go. I use a lid that rests loosely, a cloth secured with a band, or a jar cover designed to breathe — something that protects the starter from dust and pests while still letting gases escape safely.
9. Pay Attention to the Peak
Once my starter reaches its maximum height and begins to flatten or fall back down, I know it has completed its feeding cycle. This peak moment — right before it starts to collapse — is generally the strongest and most active point, and it’s the window I aim for when I’m about to bake.
10. Use the Refrigerator When I’m Not Baking Often
When I’m not baking regularly, I move my established, strong starter into the refrigerator. Cold temperatures slow fermentation dramatically, which means far less frequent feeding is needed to keep it alive. Before I bake again, I take it out and bring it back into a regular room-temperature feeding routine until it’s active and rising predictably — usually a couple of feedings is enough to wake it back up.
Tips for an Even Stronger Starter
- Use a scale rather than measuring cups — weight is far more accurate than volume for flour and water.
- Stick to unbleached flour when possible; bleached flour can contain residues that slow fermentation.
- Keep your feeding schedule as close to the same time each day as you can — starters like routine.
- If your starter smells sharply of nail polish remover, it’s hungry and needs feeding sooner.
- Avoid metal utensils and containers that react with acidic starter; stick to glass, plastic, or wood.
Variations to Try
- Whole wheat boost: Swap in a portion of whole wheat or rye flour during feedings for a more active, robust culture.
- Discard-friendly routine: Instead of throwing away discard, keep it in a separate jar in the fridge for pancakes, crackers, or waffles.
- Twice-daily feeding: In very warm kitchens, some bakers feed twice a day to keep a fast-moving starter from overshooting its peak too quickly.
- Stiff starter: Reduce the water slightly for a firmer, doughier starter that some bakers find easier to manage and slower to over-ferment.
How to Know When It’s Ready to Bake With
A starter is ready to use when it has roughly doubled in size within a few hours of feeding, is full of visible bubbles throughout — not just on top — and has a light, airy texture with a pleasant tangy aroma. If you drop a small spoonful into a glass of water and it floats, that’s a good sign it has enough gas trapped inside to leaven bread well.
Storage Guidance
- Room temperature: Best for frequent bakers; feed once every 12–24 hours.
- Refrigerated: Ideal for occasional bakers; feed roughly once a week, or whenever you notice a layer of dark liquid (“hooch”) forming on top.
- Long-term backup: Dry a small amount of starter on parchment paper and store it in an airtight container as an emergency backup in case your active starter is ever lost.
Quick Reference: Starter Care Card
| Habit | Details |
|---|---|
| Feeding ratio | 1:1:1 by weight (e.g., 60 g starter + 60 g water + 60 g flour) |
| Feeding frequency (room temp) | Every 12–24 hours |
| Feeding frequency (fridge) | About once a week |
| Ideal temperature | Comfortable warm room temp, away from direct heat |
| Jar cover | Loose lid or cloth — never airtight |
| Ready-to-bake sign | Roughly doubled, full of bubbles, passes the float test |
Frequently Asked Questions
1. How often should I feed my sourdough starter? At room temperature, feed it about once every 12–24 hours. If it’s in the refrigerator, feeding once a week is usually enough to keep it healthy.
2. What is the best feeding ratio for a sourdough starter? A simple 1:1:1 ratio by weight — equal parts starter, water, and flour — is a reliable starting point for most home bakers.
3. Why do I need to discard starter before feeding? Discarding keeps the jar size manageable and keeps the feeding ratio meaningful. Without it, you’d need larger and larger amounts of flour and water to maintain the same ratio.
4. How do I know when my starter has peaked? Mark the starting level with a rubber band after feeding. When the starter reaches its highest point and begins to flatten or fall back, it has peaked.
5. Can I keep my starter in the refrigerator? Yes, once it’s established and strong, refrigeration is a great option for bakers who aren’t baking often. Just remember to bring it back to room temperature and feed it a few times before baking with it.
6. What does a healthy starter look and smell like? It should be bubbly throughout, airy in texture, and have a pleasant tangy smell. A predictable rise and fall after feeding is a strong sign of good health.
7. Why is my starter not rising? This is often due to temperature that’s too cold, a feeding schedule that’s too infrequent, or flour that isn’t providing enough nutrients. Try feeding more consistently in a warmer spot for a few days.
8. Do I need a special lid for my starter jar? No — you just need something that covers the jar loosely, protecting it from dust while still allowing fermentation gases to escape. A tightly sealed jar isn’t a good idea.
9. How do I know if my starter is ready to bake with? Look for it roughly doubling within a few hours of feeding, visible bubbles throughout, and a light, airy texture. The float test — dropping a spoonful into water to see if it floats — can also help confirm it’s ready.
Final Thoughts
Keeping a sourdough starter healthy really comes down to one simple rhythm: feed consistently → mark the level → watch it rise → learn its cycle. Once you tune into your starter’s own behavior instead of chasing a strict schedule, you’ll always know exactly what it needs and when it’s ready to bake with. Your starter’s bubbles, rise, and rhythm will always tell you far more than simply counting the days.
Give these habits a try, and don’t be afraid to get to know your starter’s personality — every jar behaves a little differently, and that’s part of the fun.