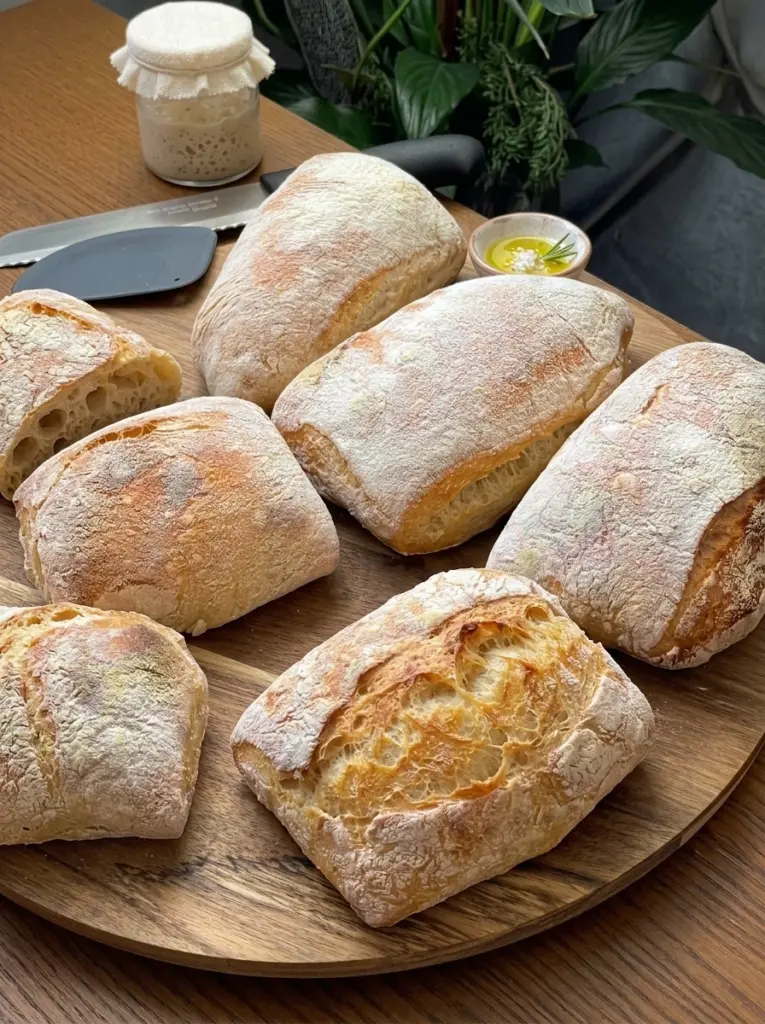
This Sourdough Ciabatta is wonderfully rustic, light, chewy, and filled with the beautiful irregular holes that make ciabatta so distinctive. Made with an active sourdough starter and a high-hydration dough, the bread develops a deeply golden, crisp exterior while the inside stays remarkably moist, airy, and tender.
Instead of aggressively kneading the dough, a series of gentle stretch-and-folds gradually develops gluten strength while preserving the moisture needed for that characteristic open crumb. An overnight cold fermentation adds deeper sourdough flavor and also makes the very wet dough easier to divide and handle.
The result is the kind of rustic bread that’s perfect for Italian-style sandwiches, crispy panini, dipping into olive oil, breakfast toast, or simply tearing apart and eating with butter while it’s fresh.
Why You’ll Love This Sourdough Ciabatta
There’s plenty to love about making this rustic Italian-inspired bread at home:
Beautiful open crumb. High hydration combined with proper fermentation and gentle handling encourages large, irregular air pockets.
Crisp golden crust. A thoroughly preheated oven and steam during the beginning of baking help create a thin, crisp exterior.
Light and chewy interior. Despite its rustic appearance, properly fermented ciabatta feels surprisingly light inside.
Naturally leavened. Active sourdough starter provides the fermentation rather than commercial yeast.
Deep sourdough flavor. An optional overnight cold fermentation allows the flavor to develop further.
Perfect sandwich bread. Its chewy crust and airy interior make ciabatta especially good for panini and substantial sandwiches.
Simple ingredients. Flour, water, starter, salt, and olive oil are all you need for the basic dough.
Ingredients You’ll Need
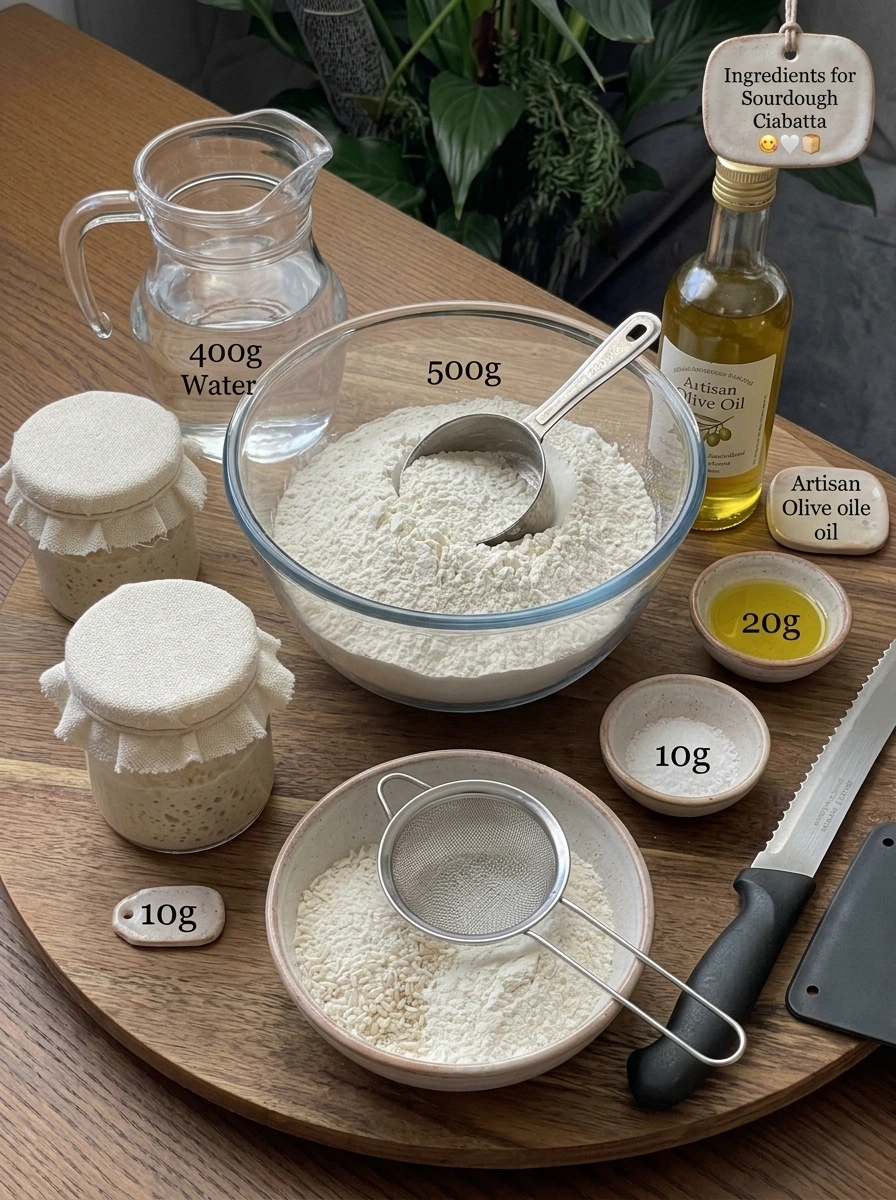
Here’s everything that goes into this Sourdough Ciabatta and why each ingredient matters.
For the Dough 🍞
- 500 g bread flour — Provides the strong gluten structure needed to support a wet, high-hydration dough and open crumb.
- 100 g active sourdough starter — Naturally leavens the bread while contributing characteristic sourdough flavor and fermentation.
- 400 g water — Creates the highly hydrated dough responsible for ciabatta’s moist texture and irregular air pockets.
- 10 g fine sea salt — Seasons the bread while helping strengthen the dough structure.
- 20 g extra-virgin olive oil — Adds subtle richness, flavor, and tenderness.
For Shaping
- Rice flour or bread flour, for dusting — Helps prevent the extremely sticky dough from attaching to the work surface, parchment, or couche.
- Extra flour for the work surface — Makes dividing and transferring the fermented dough easier without incorporating additional flour into it.
How to Make Sourdough Ciabatta
Ciabatta dough is intentionally very wet. The key isn’t trying to make it behave like a firm bread dough—it’s developing enough strength through folding while preserving its high hydration and fermentation bubbles.
Step 1: Mix the Starter and Water
Add the active sourdough starter and approximately 350 g of the water to a large mixing bowl.
Stir until the starter is mostly dispersed throughout the water.
Using an active, bubbly starter is important because it provides the fermentation power needed to aerate this wet dough.
Step 2: Add the Flour
Add the bread flour.
Mix until the flour is completely hydrated and there are no obvious dry pockets remaining.
The dough will look rough and sticky at this stage. That’s completely normal.
Cover the bowl and allow the mixture to rest for approximately 30–45 minutes.
This resting period gives the flour time to absorb the water before the remaining ingredients are incorporated.
Step 3: Add the Salt, Olive Oil & Remaining Water
Add the fine sea salt and extra-virgin olive oil.
Begin gently working them into the dough.
Gradually add the remaining 50 g water, folding and squeezing gently until the liquid becomes incorporated.
Don’t be concerned if the dough feels extremely wet and sticky.
The high hydration is intentional and plays an important role in developing the characteristic open ciabatta crumb.
Step 4: Begin the Stretch-and-Folds
Wet your hands before touching the dough to minimize sticking.
Grab one side of the dough, gently stretch it upward without tearing it, and fold it toward the center.
Rotate the bowl and repeat from the remaining sides.
This completes one set of stretch-and-folds.
Cover the bowl again and let the dough rest.
Step 5: Continue Building Dough Strength
Over approximately the next 2–3 hours, perform a total of about 4–6 sets of stretch-and-folds, spacing them approximately 30 minutes apart.
The change in the dough should gradually become noticeable.
Initially, it may spread quickly and feel difficult to control. As gluten strength develops, it should become smoother, more elastic, and increasingly capable of holding itself together.
Continue using wet hands rather than adding flour to the dough.
Step 6: Bulk Fermentation 🫧
Cover the dough and allow it to continue fermenting at room temperature.
Depending on your starter activity and room temperature, bulk fermentation may take approximately 4–7 hours.
Don’t wait for the dough to necessarily double.
Instead, look for several signs:
- Noticeable increase in volume
- Bubbles along the sides and surface
- A puffy, aerated appearance
- Increased elasticity
- Dough that looks alive and fermented rather than dense and flat
Learning to judge these visual signs is more useful than relying exclusively on the clock.
Step 7: Cold Fermentation ❄️
Once bulk fermentation has progressed appropriately, cover the bowl securely and transfer it to the refrigerator.
Cold ferment for approximately 8–16 hours.
The overnight refrigeration develops deeper flavor while also making the high-hydration dough slightly firmer and easier to handle the following day.
Step 8: Prepare the Work Surface
Generously dust your work surface with bread flour or rice flour.
Carefully remove the cold dough from its container and allow it to fall gently onto the floured surface.
Do not punch it down.
Do not knead it.
At this stage, your goal is to preserve as many of the fermentation bubbles as possible.
Step 9: Divide the Ciabatta
Generously dust the exposed surface of the dough with flour.
Using a bench scraper, divide it gently into 2 large rectangular pieces.
Avoid repeatedly cutting, reshaping, or pressing the dough.
If the pieces need adjustment, use the bench scraper and lightly floured hands to gently stretch them into rustic rectangles.
Ciabatta isn’t supposed to look perfectly uniform.
Step 10: Final Proof
Carefully transfer each piece onto heavily floured parchment paper or a floured baker’s couche.
Cover loosely.
Let the ciabatta proof for approximately 30–60 minutes, until the pieces look noticeably puffy, relaxed, and airy.
Continue handling them as little as possible.
Step 11: Preheat the Oven 🔥
Place a baking stone, baking steel, or heavy baking tray inside the oven.
Preheat to 475°F (245°C) for at least 30–45 minutes.
A thoroughly heated baking surface provides strong initial heat when the dough enters the oven.
For additional crust development, place a separate empty metal tray on a lower rack to use for steam.
Step 12: Bake With Steam 💨
Carefully transfer the ciabatta onto the preheated baking surface.
If using steam, introduce it carefully during the beginning of baking.
Bake at 475°F (245°C) for approximately 10 minutes.
Steam during the early stage helps keep the exterior flexible while the dough expands.
Step 13: Finish Baking
After approximately 10 minutes, reduce the oven temperature to 450°F (230°C).
Continue baking for another 15–20 minutes, until the ciabatta is deeply golden brown.
Don’t remove the loaves while they’re still pale. Good crust color contributes significantly to the bread’s flavor and texture.
For an especially crisp crust, turn off the oven when the bread is finished and leave the loaves inside for approximately 5 minutes with the oven door slightly open.
Step 14: Cool Completely 🤍
Transfer the baked ciabatta to a wire cooling rack.
Allow it to cool for at least 1 hour before slicing.
This is especially important with a high-hydration loaf.
The interior continues setting as the bread cools. Cutting while it’s very hot can compress the delicate crumb and make a properly baked interior appear gummy.
How to Get Those Beautiful Ciabatta Holes 🫧
The dramatic irregular holes are one of the defining features of good ciabatta, and several parts of the process work together to create them.
Keep the hydration high. The wet dough provides the environment needed for a light, open structure.
Develop strength gradually. Stretch-and-folds strengthen the gluten network without requiring aggressive kneading.
Use an active starter. Strong fermentation creates the gases that eventually become those beautiful pockets inside the loaf.
Don’t add unnecessary flour. Adding lots of flour directly to the dough changes its hydration and can result in a tighter crumb.
Don’t punch down the fermented dough. Those bubbles took hours to develop. Preserve them.
Handle the dough minimally during shaping. Ciabatta needs far less shaping than a tightly structured sandwich loaf.
Use a bench scraper. It’s one of the easiest ways to divide and move wet dough without squeezing it.
The goal isn’t to manually create large holes. Your job is to develop a strong, well-fermented dough and then avoid destroying the gas structure it has naturally created.
Flavor Variations
Rosemary Garlic Ciabatta: Fold finely chopped fresh rosemary and roasted garlic into the dough for an aromatic savory loaf.
Olive Ciabatta: Add chopped, thoroughly drained Kalamata or green olives during the final stretch-and-fold.
Jalapeño Cheddar: Fold diced jalapeños and shredded cheddar into the dough for a spicy, cheesy variation.
Sun-Dried Tomato: Add chopped, well-drained sun-dried tomatoes and fresh basil.
Everything Ciabatta: Sprinkle everything bagel seasoning over the surface before baking.
Herb & Parmesan: Add dried Italian herbs and finely grated Parmesan for an extra-savory loaf.
Garlic Parmesan: Combine roasted garlic with grated Parmesan for a rich variation that’s especially good alongside pasta.
How to Serve Sourdough Ciabatta
Fresh ciabatta is incredibly versatile:
- With extra-virgin olive oil and balsamic vinegar — Tear into rustic pieces and dip.
- With butter and flaky sea salt — Simple and especially good while the bread is fresh.
- With prosciutto and mozzarella — A classic Italian-inspired sandwich combination.
- With turkey and provolone — Perfect for an easy lunch.
- With chicken pesto — Use the airy bread for a flavorful sandwich or panini.
- As a Caprese sandwich — Fill with fresh mozzarella, tomatoes, basil, and olive oil.
- With roasted vegetables — Add mozzarella, goat cheese, or pesto if desired.
- With garlic butter — Toast slices until crisp around the edges.
- With hummus — Use torn pieces for dipping.
- With avocado — Toast thick slices for a rustic avocado toast.
- With eggs and cheese — Turn it into a substantial breakfast sandwich.
- With tomato and fresh basil — Toast slices for a simple bruschetta-style appetizer.
Tips for the Best Sourdough Ciabatta
Start with an active starter. Your starter should be showing good fermentation activity before you use it in the dough.
Don’t fear sticky dough. Ciabatta is supposed to have high hydration. A wet dough isn’t automatically a failed dough.
Wet your hands instead of adding flour. This makes stretch-and-folds easier without reducing the dough’s hydration.
Use strong bread flour. A high-hydration dough benefits from flour capable of developing a strong gluten network.
Give the dough time to develop strength. The first fold and the final fold may feel dramatically different as the gluten develops.
Watch fermentation, not only the clock. Starter strength and room temperature can significantly change fermentation speed.
Be generous with flour on the outside during dividing. Surface flour helps you manage the sticky dough without working that flour into the interior.
Never punch the dough down. Preserving fermentation gases is particularly important for an open ciabatta crumb.
Handle it gently after fermentation. Excessive shaping can destroy the air pockets you’re trying to preserve.
Preheat thoroughly. Give your stone, steel, or heavy tray enough time to become fully heated.
Bake until deeply golden. Proper browning creates a more flavorful, crisp crust.
Cool completely before slicing. Waiting an hour is difficult, but it’s particularly important for this moist, open-crumb bread.
Common Ciabatta Problems
My dough is extremely sticky. Is that normal?
Yes. This is a high-hydration dough and should feel considerably wetter than typical sandwich bread dough. Wet hands and a bench scraper make handling much easier.
My ciabatta came out flat.
A flat loaf can result from insufficient dough strength, fermentation issues, or excessive handling during dividing and shaping. The dough needs enough gluten development to retain fermentation gases.
My crumb doesn’t have large holes.
A tighter crumb can occur when the dough is under-fermented, handled too aggressively, made too dry, or insufficiently strengthened before shaping.
The inside looks gummy.
Make sure the loaf is thoroughly baked and allow it to cool for at least one hour before slicing. Cutting high-hydration bread while it’s still hot can make the interior appear gummy.
Storage Information
Sourdough ciabatta is at its best on the day it’s baked, when the crust is crisp and the crumb is fresh and moist.
Once completely cooled, store the bread in a breathable bread bag or paper bag at room temperature for approximately 2 days.
For longer storage, freezing is the better option.
Slice the completely cooled ciabatta and place the pieces in an airtight freezer bag. Freeze for up to approximately 3 months.
Individual slices can be reheated or toasted directly from frozen.
For a whole or larger piece, reheating it in a hot oven helps restore the crisp exterior.
Frequently Asked Questions
What hydration is this Sourdough Ciabatta?
Based on the listed dough ingredients alone, the recipe contains 400 g water for 500 g flour, before accounting for the flour and water contained in the sourdough starter. The exact overall hydration therefore depends on your starter’s hydration.
Why is ciabatta dough so wet?
High hydration helps create the moist, airy interior and irregular open crumb associated with ciabatta.
Do I need to knead the dough?
Traditional kneading isn’t necessary here. A series of stretch-and-folds gradually develops strength while keeping the wet dough manageable.
How do I know when bulk fermentation is finished?
Look for dough that has noticeably increased in volume and appears puffy, bubbly, and aerated. It doesn’t necessarily need to completely double.
Do I have to cold ferment overnight?
The overnight cold fermentation is included for deeper flavor and easier handling of the wet dough. The recipe calls for approximately 8–16 hours in the refrigerator.
Why shouldn’t I punch down ciabatta dough?
Punching it down removes the fermentation gases responsible for the open, irregular crumb you’re trying to create.
Can I add olives?
Yes. Chopped, well-drained olives can be incorporated during the final stretch-and-fold.
Why use rice flour for shaping?
Rice flour is useful for dusting because it helps prevent wet dough from sticking to the work surface, parchment, or couche.
Should I score ciabatta before baking?
This recipe doesn’t require scoring. The gently divided rustic rectangles can be baked as shaped.
Why should I wait an hour before cutting it?
The high-moisture crumb continues setting after baking. Allowing the loaf to cool completely gives you a cleaner, better-set interior.
Recipe Card
Prep Time: Approximately 30 minutes active preparation
Stretch & Fold / Bulk Fermentation: Approximately 4–7 hours total, depending on fermentation
Cold Fermentation: 8–16 hours
Final Proof: 30–60 minutes
Bake Time: Approximately 25–30 minutes
Cooling Time: At least 1 hour
Yield: 2 large ciabatta loaves
Initial Oven Temperature: 475°F (245°C)
Finishing Oven Temperature: 450°F (230°C)
Leavening: Active sourdough starter
This Sourdough Ciabatta is all about developing fermentation and dough strength while interfering with the dough as little as possible once those precious bubbles have formed. The high hydration creates the potential for a beautifully open interior, while the stretch-and-folds give the dough enough structure to capture the gases produced by your sourdough starter.
Once fermentation is complete, gentle handling becomes the priority. Flour the outside generously, use a bench scraper, avoid kneading or punching down, and let the dough retain its naturally irregular shape.
Bake it until deeply golden, give it the full hour to cool, and then finally slice it open to reveal that rustic, airy, chewy sourdough crumb.
Print
Sourdough Ciabatta
Ingredients
Here’s everything that goes into this Sourdough Ciabatta and why each ingredient matters.
For the Dough 🍞
- 500 g bread flour — Provides the strong gluten structure needed to support a wet, high-hydration dough and open crumb.
- 100 g active sourdough starter — Naturally leavens the bread while contributing characteristic sourdough flavor and fermentation.
- 400 g water — Creates the highly hydrated dough responsible for ciabatta’s moist texture and irregular air pockets.
- 10 g fine sea salt — Seasons the bread while helping strengthen the dough structure.
- 20 g extra-virgin olive oil — Adds subtle richness, flavor, and tenderness.
For Shaping
- Rice flour or bread flour, for dusting — Helps prevent the extremely sticky dough from attaching to the work surface, parchment, or couche.
- Extra flour for the work surface — Makes dividing and transferring the fermented dough easier without incorporating additional flour into it.
Instructions
Ciabatta dough is intentionally very wet. The key isn’t trying to make it behave like a firm bread dough—it’s developing enough strength through folding while preserving its high hydration and fermentation bubbles.
Step 1: Mix the Starter and Water
Add the active sourdough starter and approximately 350 g of the water to a large mixing bowl.
Stir until the starter is mostly dispersed throughout the water.
Using an active, bubbly starter is important because it provides the fermentation power needed to aerate this wet dough.
Step 2: Add the Flour
Add the bread flour.
Mix until the flour is completely hydrated and there are no obvious dry pockets remaining.
The dough will look rough and sticky at this stage. That’s completely normal.
Cover the bowl and allow the mixture to rest for approximately 30–45 minutes.
This resting period gives the flour time to absorb the water before the remaining ingredients are incorporated.
Step 3: Add the Salt, Olive Oil & Remaining Water
Add the fine sea salt and extra-virgin olive oil.
Begin gently working them into the dough.
Gradually add the remaining 50 g water, folding and squeezing gently until the liquid becomes incorporated.
Don’t be concerned if the dough feels extremely wet and sticky.
The high hydration is intentional and plays an important role in developing the characteristic open ciabatta crumb.
Step 4: Begin the Stretch-and-Folds
Wet your hands before touching the dough to minimize sticking.
Grab one side of the dough, gently stretch it upward without tearing it, and fold it toward the center.
Rotate the bowl and repeat from the remaining sides.
This completes one set of stretch-and-folds.
Cover the bowl again and let the dough rest.
Step 5: Continue Building Dough Strength
Over approximately the next 2–3 hours, perform a total of about 4–6 sets of stretch-and-folds, spacing them approximately 30 minutes apart.
The change in the dough should gradually become noticeable.
Initially, it may spread quickly and feel difficult to control. As gluten strength develops, it should become smoother, more elastic, and increasingly capable of holding itself together.
Continue using wet hands rather than adding flour to the dough.
Step 6: Bulk Fermentation 🫧
Cover the dough and allow it to continue fermenting at room temperature.
Depending on your starter activity and room temperature, bulk fermentation may take approximately 4–7 hours.
Don’t wait for the dough to necessarily double.
Instead, look for several signs:
- Noticeable increase in volume
- Bubbles along the sides and surface
- A puffy, aerated appearance
- Increased elasticity
- Dough that looks alive and fermented rather than dense and flat
Learning to judge these visual signs is more useful than relying exclusively on the clock.
Step 7: Cold Fermentation ❄️
Once bulk fermentation has progressed appropriately, cover the bowl securely and transfer it to the refrigerator.
Cold ferment for approximately 8–16 hours.
The overnight refrigeration develops deeper flavor while also making the high-hydration dough slightly firmer and easier to handle the following day.
Step 8: Prepare the Work Surface
Generously dust your work surface with bread flour or rice flour.
Carefully remove the cold dough from its container and allow it to fall gently onto the floured surface.
Do not punch it down.
Do not knead it.
At this stage, your goal is to preserve as many of the fermentation bubbles as possible.
Step 9: Divide the Ciabatta
Generously dust the exposed surface of the dough with flour.
Using a bench scraper, divide it gently into 2 large rectangular pieces.
Avoid repeatedly cutting, reshaping, or pressing the dough.
If the pieces need adjustment, use the bench scraper and lightly floured hands to gently stretch them into rustic rectangles.
Ciabatta isn’t supposed to look perfectly uniform.
Step 10: Final Proof
Carefully transfer each piece onto heavily floured parchment paper or a floured baker’s couche.
Cover loosely.
Let the ciabatta proof for approximately 30–60 minutes, until the pieces look noticeably puffy, relaxed, and airy.
Continue handling them as little as possible.
Step 11: Preheat the Oven 🔥
Place a baking stone, baking steel, or heavy baking tray inside the oven.
Preheat to 475°F (245°C) for at least 30–45 minutes.
A thoroughly heated baking surface provides strong initial heat when the dough enters the oven.
For additional crust development, place a separate empty metal tray on a lower rack to use for steam.
Step 12: Bake With Steam 💨
Carefully transfer the ciabatta onto the preheated baking surface.
If using steam, introduce it carefully during the beginning of baking.
Bake at 475°F (245°C) for approximately 10 minutes.
Steam during the early stage helps keep the exterior flexible while the dough expands.
Step 13: Finish Baking
After approximately 10 minutes, reduce the oven temperature to 450°F (230°C).
Continue baking for another 15–20 minutes, until the ciabatta is deeply golden brown.
Don’t remove the loaves while they’re still pale. Good crust color contributes significantly to the bread’s flavor and texture.
For an especially crisp crust, turn off the oven when the bread is finished and leave the loaves inside for approximately 5 minutes with the oven door slightly open.
Step 14: Cool Completely 🤍
Transfer the baked ciabatta to a wire cooling rack.
Allow it to cool for at least 1 hour before slicing.
This is especially important with a high-hydration loaf.
The interior continues setting as the bread cools. Cutting while it’s very hot can compress the delicate crumb and make a properly baked interior appear gummy.