Sourdough Artisan Bread: The Ultimate Guide to a Crackly Crust and Airy Crumb at Home
Meta Description: This Sourdough Artisan Bread has a deeply golden, crackly crust and a soft, airy interior. Made with just flour, water, salt, and starter, this naturally fermented loaf is a must-bake!
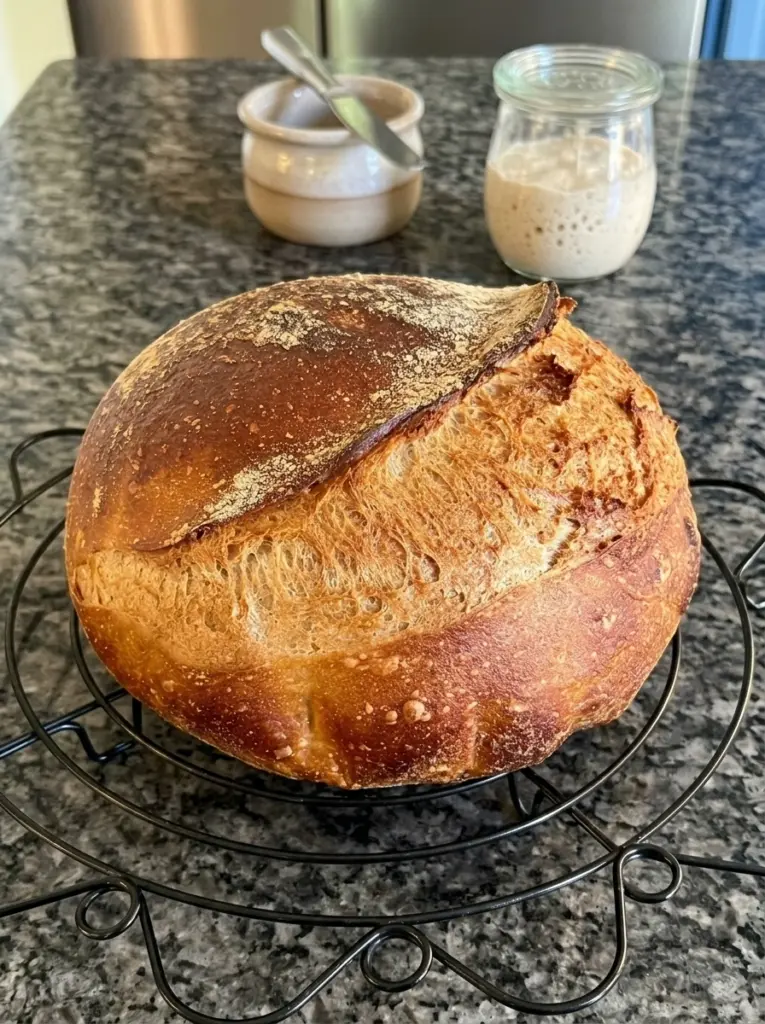
There’s nothing quite like pulling a loaf of homemade Sourdough Artisan Bread out of the oven, its crust crackling as it cools and that unmistakable tangy aroma filling the kitchen. Made from just four simple ingredients — flour, water, salt, and an active sourdough starter — this naturally fermented bread develops incredible depth of flavor without any commercial yeast at all. The result is a bakery-quality loaf with a deeply golden, crisp crust and a soft, chewy interior full of beautiful, irregular air pockets.
While sourdough bread has a reputation for being intimidating, this recipe breaks the process down into clear, manageable stages, from mixing and building strength to cold proofing and baking in a hot Dutch oven. Once you understand the rhythm of the process, this is the kind of bread you’ll find yourself wanting to bake every single week.
Let’s walk through everything you need to know to make this crackly, tangy, beautifully airy sourdough loaf at home.
Why You’ll Love This Sourdough Artisan Bread
There’s so much to love about this classic, naturally fermented loaf:
Incredible depth of flavor. Naturally fermented with a sourdough starter rather than commercial yeast, this bread develops a complex, pleasantly tangy flavor that store-bought bread simply can’t match.
Just four simple ingredients. With only flour, water, salt, and starter, this recipe proves that great bread doesn’t require a long ingredient list.
That coveted bakery-style crust and crumb. Baking in a preheated Dutch oven creates steam that results in a deeply golden, crackly crust alongside an airy, irregular interior crumb.
A rewarding, meditative process. From the stretch-and-folds to the long fermentation, this recipe is as much about the process as the final result, making it a satisfying weekend baking project.
Great for sandwiches, toast, and more. This versatile loaf pairs beautifully with everything from simple butter to hearty soups and sandwiches.
Freezes beautifully. Slice and freeze any extra loaf for toast-ready bread whenever you need it.
Ingredients You’ll Need
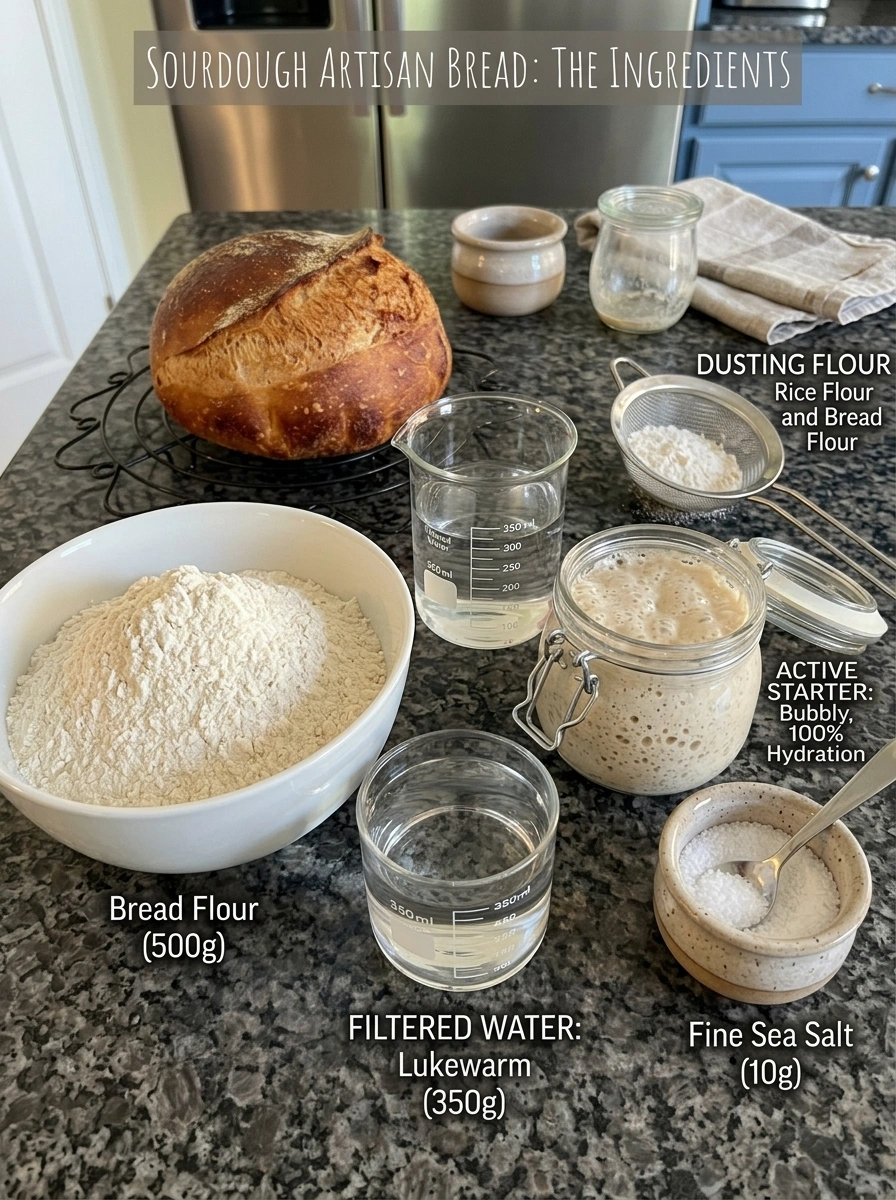
Here’s a breakdown of what goes into this naturally fermented sourdough loaf and why each ingredient matters.
For the Dough
- 500 g bread flour — The foundation of the loaf, bread flour’s higher protein content helps develop the strong gluten structure needed for that classic chewy, airy crumb.
- 350 g filtered water, lukewarm — Hydrates the flour and activates the starter; filtered water is recommended since chlorine in tap water can sometimes inhibit fermentation.
- 100 g active, bubbly sourdough starter (100% hydration) — The natural leavening agent that gives this bread its rise and signature tangy flavor. Make sure your starter is active and bubbly, ideally near its peak, before using it.
- 10 g fine sea salt — Essential for flavor, salt also helps strengthen the dough’s gluten structure and regulate fermentation speed.
For Shaping
- Rice flour or bread flour, for dusting — Used to dust the proofing basket and work surface; rice flour is especially useful since it doesn’t absorb into the dough as readily as wheat flour, helping prevent sticking.
How to Make Sourdough Artisan Bread
This recipe unfolds over several stages spanning about a day and a half from start to finish. Here’s exactly how to make it.
Step 1: Mix the Dough
Add the water and active sourdough starter to a large mixing bowl. Stir until the starter is mostly dispersed throughout the water. Add the bread flour and mix until no dry flour remains and a rough, shaggy dough forms. Cover and let the dough rest for approximately 30 minutes.
Step 2: Add the Salt
Sprinkle the salt over the dough and work it in with damp hands until evenly incorporated.
Step 3: Build Strength with Stretch-and-Folds
During the first 2 hours of bulk fermentation, perform 3–4 sets of stretch-and-folds approximately 30 minutes apart. With wet hands, gently lift one side of the dough until you feel resistance, then fold it over the center. Rotate the bowl and repeat on all four sides. With each set, the dough should become smoother, stronger, and more elastic.
Step 4: Bulk Fermentation
After the folds are complete, cover the dough and allow fermentation to continue. The dough is ready when it looks noticeably expanded, smooth, slightly domed, jiggly, and filled with bubbles. Depending on your starter strength and room temperature, total bulk fermentation may take roughly 4–7 hours. Watch the dough’s appearance and fermentation activity rather than relying solely on the clock.
Step 5: Pre-Shape
Lightly flour your work surface and gently turn out the dough. Using a bench scraper, shape it into a loose round without aggressively pressing out the trapped gases. Let it rest uncovered for approximately 20–30 minutes.
Step 6: Final Shape
Lightly flour the top of the dough and flip it over. Gently stretch the dough into a rough rectangle. Fold the sides toward the center, then roll the dough into a tight boule or bâtard, creating surface tension without tearing it.
Step 7: Cold Proof
Generously dust a proofing basket with rice flour. Place the shaped dough into the basket seam-side up. Cover and refrigerate for approximately 8–16 hours. This slow cold fermentation develops deeper flavor and makes the loaf easier to score.
Step 8: Preheat the Oven
Place a Dutch oven inside your oven and preheat to 475°F (245°C) for approximately 45 minutes. Carefully turn the cold dough onto a piece of parchment paper. Dust the surface lightly with flour if desired.
Step 9: Score the Loaf
Using a bread lame or very sharp blade, make one confident slash approximately ½ inch deep across the top of the loaf. The score gives the bread a controlled place to expand dramatically in the oven.
Step 10: Bake
Carefully transfer the dough into the hot Dutch oven. Cover and bake at 450°F (230°C) for approximately 20 minutes. Remove the lid and continue baking for another 20–25 minutes, until the crust becomes deeply golden brown and crisp. For an even darker artisan-style crust, bake uncovered for a few additional minutes while watching carefully.
Step 11: Cool Completely
Transfer the loaf to a wire rack and allow it to cool for at least 1–2 hours before slicing. Cutting into sourdough while it’s very hot can compress the crumb and make the interior seem gummy.
What to Look For in a Great Sourdough Loaf
A well-made artisan sourdough loaf should have:
- A deeply golden, crisp crust
- Good oven spring
- A pronounced score or “ear”
- An airy, irregular crumb
- A soft and chewy interior
- Visible fermentation bubbles
- A pleasantly mild sourdough tang
How to Serve Sourdough Artisan Bread
This versatile loaf pairs beautifully with a wide range of dishes and toppings:
- Salted butter — A simple, classic way to enjoy a warm slice.
- Olive oil and herbs — A simple Mediterranean-style dip for fresh bread.
- Homemade jam — Pairs beautifully with the tangy sourdough flavor.
- Avocado and eggs — Turn a slice into a hearty, satisfying breakfast.
- Soup or chili — A classic pairing for sopping up every last bite.
- Grilled cheese — This bread’s sturdy crust and airy crumb make an excellent grilled cheese.
- Sandwiches — A flavorful, hearty base for any sandwich filling.
- Bruschetta — Toast and top with fresh tomatoes, basil, and garlic for a simple appetizer.
- Cheese boards — A wonderful bread to serve alongside a spread of cheeses.
- Garlic butter — Brush with garlic butter and toast for an easy, flavorful side.
Tips for the Best Sourdough Artisan Bread
Use an active, bubbly starter. Make sure your starter is at or near its peak activity before mixing the dough, as a sluggish starter will result in slower, less reliable fermentation.
Watch the dough, not the clock. Fermentation times can vary significantly based on temperature, flour, hydration, and starter strength, so look for visible rise, bubbles, elasticity, and a light, airy feel before moving to the next stage.
Don’t skip the stretch-and-folds. This step is essential for building the gluten structure that gives the finished loaf its characteristic chewy texture and airy crumb.
Use filtered water. Chlorine in tap water can sometimes inhibit fermentation, so filtered water is recommended for the best results.
Let the loaf cool completely before slicing. Cutting into hot sourdough can compress the crumb and make the interior seem gummy, even if it’s fully baked.
Preheat your Dutch oven thoroughly. A properly preheated Dutch oven is essential for creating the steam and heat needed for good oven spring and a crackly crust.
Recipe Variations and Substitutions
This classic sourdough recipe is a fantastic base that’s easy to adapt:
- Add mix-ins: Fold in ingredients like olives, roasted garlic, shredded cheese, or dried herbs during shaping for a flavored variation.
- Try whole wheat flour: Substituting a portion of the bread flour with whole wheat flour adds a heartier flavor and texture, though it may require slight adjustments to hydration.
- Adjust the shape: This dough can be shaped into a round boule or an oblong bâtard depending on your preference and the shape of your proofing basket.
- Experiment with scoring patterns: Beyond a single slash, decorative scoring patterns can be used for a more artisan, bakery-style presentation.
- Adjust fermentation for your schedule: The bulk fermentation and cold proof times can be adjusted somewhat based on your schedule and kitchen temperature, though the dough’s appearance should always be the primary guide.
Storage Information
Store the completely cooled loaf at room temperature in a bread bag or wrapped in a clean kitchen towel for about 2–3 days. For longer storage, slice the loaf and freeze it. Individual slices can go straight from the freezer into the toaster, making it easy to enjoy fresh-tasting bread whenever you need it.
Frequently Asked Questions
Why is my sourdough not rising well? A weak or inactive starter is the most common cause of poor rising. Make sure your starter is bubbly and active, ideally used near its peak, before mixing the dough.
Do I have to cold proof the dough overnight? Cold proofing is highly recommended, as it develops deeper flavor and makes the dough easier to score. While shorter cold proof times can work, the full 8–16 hours produces the best results.
Why do I need a Dutch oven for baking? A Dutch oven traps steam around the dough as it bakes, which is essential for achieving good oven spring and that deeply golden, crackly crust characteristic of artisan sourdough.
Can I use all-purpose flour instead of bread flour? Bread flour is recommended for its higher protein content, which helps develop the strong gluten structure needed for a chewy, airy crumb. All-purpose flour can be used in a pinch, but the texture may be slightly different.
Why does my bread seem gummy after baking? Cutting into the loaf before it has fully cooled is a common cause of a gummy-seeming interior. Be sure to let the bread cool for at least 1–2 hours before slicing.
How do I know when bulk fermentation is complete? Look for dough that appears noticeably expanded, smooth, slightly domed, jiggly, and filled with visible bubbles, rather than relying solely on a specific time, since fermentation speed varies based on several factors.
Recipe Card
What to Expect: A deeply golden, crackly crust with a soft, chewy interior full of beautiful irregular air pockets and a pleasant sourdough tang.
This Sourdough Artisan Bread brings the experience of naturally fermented, bakery-quality bread into your own kitchen. With just flour, water, salt, and starter, this recipe walks through every stage of the process, from building dough strength to achieving that coveted crackly crust, resulting in a loaf that’s as rewarding to make as it is to eat.
Bake a loaf this weekend, and get ready for this crackly, tangy sourdough bread to become a regular fixture in your kitchen!
Print
Sourdough Artisan Bread
Ingredients
Here’s a breakdown of what goes into this naturally fermented sourdough loaf and why each ingredient matters.
For the Dough
- 500 g bread flour — The foundation of the loaf, bread flour’s higher protein content helps develop the strong gluten structure needed for that classic chewy, airy crumb.
- 350 g filtered water, lukewarm — Hydrates the flour and activates the starter; filtered water is recommended since chlorine in tap water can sometimes inhibit fermentation.
- 100 g active, bubbly sourdough starter (100% hydration) — The natural leavening agent that gives this bread its rise and signature tangy flavor. Make sure your starter is active and bubbly, ideally near its peak, before using it.
- 10 g fine sea salt — Essential for flavor, salt also helps strengthen the dough’s gluten structure and regulate fermentation speed.
For Shaping
- Rice flour or bread flour, for dusting — Used to dust the proofing basket and work surface; rice flour is especially useful since it doesn’t absorb into the dough as readily as wheat flour, helping prevent sticking.
Instructions
This recipe unfolds over several stages spanning about a day and a half from start to finish. Here’s exactly how to make it.
Add the water and active sourdough starter to a large mixing bowl. Stir until the starter is mostly dispersed throughout the water. Add the bread flour and mix until no dry flour remains and a rough, shaggy dough forms. Cover and let the dough rest for approximately 30 minutes.
Sprinkle the salt over the dough and work it in with damp hands until evenly incorporated.
During the first 2 hours of bulk fermentation, perform 3–4 sets of stretch-and-folds approximately 30 minutes apart. With wet hands, gently lift one side of the dough until you feel resistance, then fold it over the center. Rotate the bowl and repeat on all four sides. With each set, the dough should become smoother, stronger, and more elastic.
After the folds are complete, cover the dough and allow fermentation to continue. The dough is ready when it looks noticeably expanded, smooth, slightly domed, jiggly, and filled with bubbles. Depending on your starter strength and room temperature, total bulk fermentation may take roughly 4–7 hours. Watch the dough’s appearance and fermentation activity rather than relying solely on the clock.
Lightly flour your work surface and gently turn out the dough. Using a bench scraper, shape it into a loose round without aggressively pressing out the trapped gases. Let it rest uncovered for approximately 20–30 minutes.
Lightly flour the top of the dough and flip it over. Gently stretch the dough into a rough rectangle. Fold the sides toward the center, then roll the dough into a tight boule or bâtard, creating surface tension without tearing it.
Generously dust a proofing basket with rice flour. Place the shaped dough into the basket seam-side up. Cover and refrigerate for approximately 8–16 hours. This slow cold fermentation develops deeper flavor and makes the loaf easier to score.
Place a Dutch oven inside your oven and preheat to 475°F (245°C) for approximately 45 minutes. Carefully turn the cold dough onto a piece of parchment paper. Dust the surface lightly with flour if desired.
Using a bread lame or very sharp blade, make one confident slash approximately ½ inch deep across the top of the loaf. The score gives the bread a controlled place to expand dramatically in the oven.
Carefully transfer the dough into the hot Dutch oven. Cover and bake at 450°F (230°C) for approximately 20 minutes. Remove the lid and continue baking for another 20–25 minutes, until the crust becomes deeply golden brown and crisp. For an even darker artisan-style crust, bake uncovered for a few additional minutes while watching carefully.
Transfer the loaf to a wire rack and allow it to cool for at least 1–2 hours before slicing. Cutting into sourdough while it’s very hot can compress the crumb and make the interior seem gummy.