
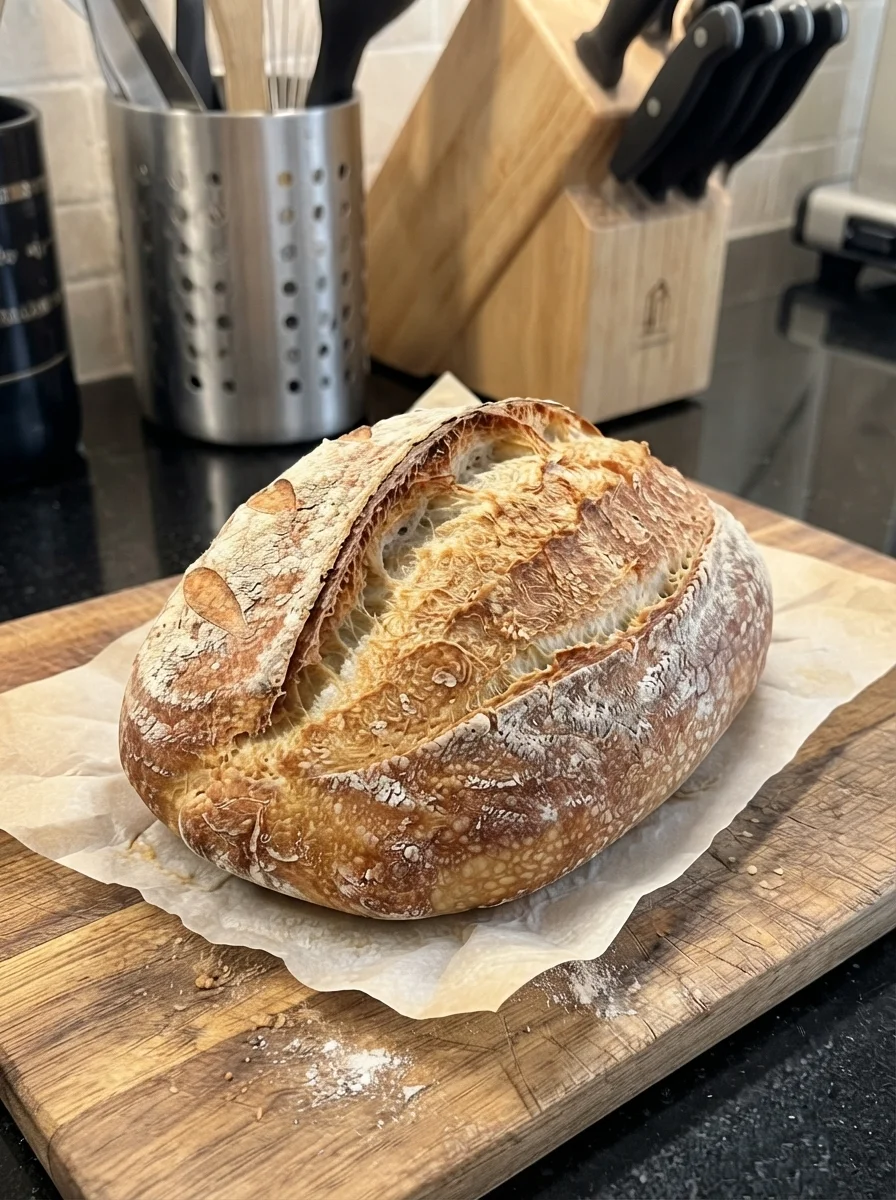
A golden crust, a gently chewy center, and the smell of fresh bread make this rustic Italian-inspired loaf a welcome addition to the dinner table. Its simple dough uses flour, water, yeast, and salt, with a little olive oil for flavor and tenderness. Shape it into an oval, score the surface, and bake on a sheet pan for bread that is easy to serve with soup, pasta, or a dish of olive oil.
This recipe makes one generous loaf without a sourdough starter or a Dutch oven. Kneading and a few folds build strength, while two rises give the dough time to become puffy before baking. The result should have a lightly crisp crust when fresh and a tender, moderately chewy crumb.
“Rustic Italian bread” describes many different breads rather than one fixed regional recipe. This version is an approachable Italian-inspired home loaf. It is not ciabatta, and it does not promise the large, irregular holes of a very wet artisan dough.
Recipe note: This is an original, untested recipe. Flour absorption, kitchen temperature, oven performance, and shaping can affect the result. Use the dough and doneness cues below, and adjust the schedule to the dough rather than following the clock alone.
Why You’ll Love This Recipe
- The ingredient list is short and familiar.
- A baking sheet replaces specialty bread equipment.
- The dough is soft enough for a tender crumb but manageable for shaping.
- The flavor works with savory meals, toast, and sandwiches.
- Baked slices can be frozen for later.
Recipe at a Glance
- Hands-on preparation: Approximately 25 minutes
- First rise: 60–90 minutes
- Second rise: 35–50 minutes
- Bake time: Approximately 30–35 minutes
- Cooling: At least 1 hour for clean slices
- Total time: Approximately 3 hours 30 minutes to 4 hours 20 minutes, allowing for the initial rest
- Yield: 1 oval loaf, approximately 12 slices
- Oven temperature: 425°F
Ingredients
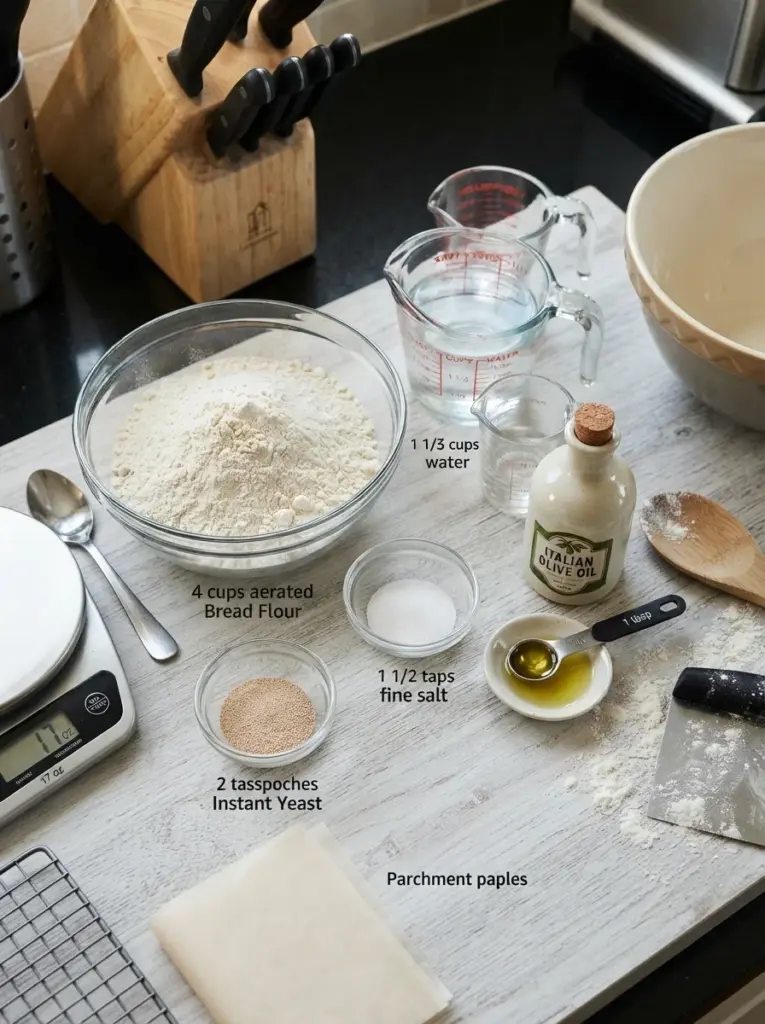
- 4 cups bread flour, spooned and leveled, approximately 17 ounces
- 1 1/3 cups lukewarm water, plus up to 1 tablespoon only if needed
- 2 teaspoons instant yeast
- 1 1/2 teaspoons fine salt
- 1 tablespoon olive oil
- A little additional flour for shaping
- A little additional olive oil for the rising bowl
The flour quantity is the starting point for the formula. Bread flour measured by volume can vary, so use the approximate weight if you have a kitchen scale. Do not pack flour into the cup.
Ingredient Notes
Bread Flour
Bread flour gives the dough strength and a pleasantly chewy texture. Its protein content helps the loaf hold its shape during the second rise and oven expansion. All-purpose flour can be used as a variation, but the dough may feel softer and the finished loaf may have less height or chew.
Measure lightly. A tightly packed cup can add enough flour to make the dough stiff and the crumb heavy. Spoon flour into the cup, level it, and avoid repeatedly adding more during kneading simply to remove all stickiness.
The intended dough is soft and slightly tacky, not runny. It should become easier to handle as it rests and develops strength.
Water
Use lukewarm water, approximately 95–105°F, or follow the instant yeast manufacturer’s temperature guidance. The water should not feel hot. A thermometer is useful if you are unsure.
The initial 1 1/3 cups provides a moderate amount of moisture for the listed flour. Add the optional tablespoon only if the dough remains dry and difficult to bring together after resting. Different flours absorb water differently, so a small adjustment can be helpful.
Instant Yeast
Instant yeast mixes directly into the flour. Check the expiration date and store it according to the package instructions. There is no need to dissolve it separately unless its manufacturer directs otherwise.
If using active dry yeast, follow the package instructions for dissolving it in part of the measured water. The rise may take longer. Do not add extra water on top of the total merely to activate the yeast.
Salt
Salt gives the bread flavor and affects dough behavior. Fine salt provides a more predictable teaspoon measurement than coarse crystals. Kosher salt brands vary in density, so a volume substitution may change the result.
Do not omit the salt and expect the same loaf. Bread made without it tastes noticeably different, even when served with toppings.
Olive Oil
A tablespoon of olive oil adds mild flavor and slightly tenderizes the crumb. It also means this loaf may not have the same very crackly crust as a completely lean artisan bread. Choose an oil you enjoy, but there is no need to use a strongly flavored finishing oil.
Equipment
You will need a large bowl, a spoon or spatula, a clean work surface, a baking sheet, baking parchment rated for 425°F, and a wire rack. A dough scraper helps with handling and shaping.
A stand mixer with a dough hook is optional. An instant-read thermometer is helpful for checking both the water and the baked center. A sharp bread lame or knife is useful for scoring, and a serrated knife makes slicing easier after cooling.
A Dutch oven is not required for this method. Avoid assuming that switching to a covered pot leaves the temperature and baking schedule unchanged.
How to Make Rustic Italian Bread
1. Mix the Dry Ingredients
Combine the flour, instant yeast, and salt in a large bowl. Stir thoroughly so the yeast and salt are distributed rather than concentrated in separate spots.
2. Add Water and Oil
Pour in the 1 1/3 cups lukewarm water and the olive oil. Stir until a shaggy dough forms and most dry flour is incorporated. Scrape the bottom of the bowl to find any dry pockets.
Cover and rest for 15 minutes. This pause gives the flour time to absorb the water and can make kneading easier. It is a simple dough rest rather than a separate long fermentation stage.
If the dough still contains dry, crumbly patches after resting, add some or all of the optional tablespoon of water gradually. If it is already soft and cohesive, do not add it automatically.
3. Knead Until Smoother
Turn the dough onto a lightly floured surface. Knead for approximately 8–10 minutes, folding and pressing until it becomes smoother and elastic. Alternatively, mix with a dough hook for approximately 5–7 minutes at the speed recommended by your mixer manufacturer.
The dough can remain a little tacky. It should stretch somewhat before tearing and hold together as a soft mound. Use a scraper and short pauses if it sticks rather than adding large handfuls of flour.
4. Begin the First Rise
Lightly oil a bowl. Add the dough and turn once to coat. Cover and leave in a comfortably warm, draft-free place for about 60–90 minutes, until approximately doubled.
About 30 minutes into this rise, give the dough one gentle set of folds: lift one edge and fold it toward the center, turn the bowl, and repeat around the dough. Cover again and allow it to continue rising. This helps reinforce structure without a second full kneading session.
The fold is included within the first-rise schedule, not followed by an automatic extra 90 minutes. Watch for expansion. Cooler rooms take longer, and warmer rooms can work faster.
5. Shape an Oval Loaf
Line a baking sheet with suitable parchment. Turn the risen dough onto a lightly floured surface. Gently press out very large gas pockets while preserving some of the dough’s lightness.
Pat into a rough rectangle. Fold the sides slightly inward, then roll into a snug log, pinching the seam closed. Tuck the ends gently and place seam-side down on the sheet. Aim for a compact oval approximately 10–12 inches long rather than stretching the dough into a very thin baguette.
Surface tension helps the loaf rise upward. Do not tear the skin or knead the dough aggressively while shaping. If it resists, cover for 5 minutes, then continue.
6. Let the Shaped Loaf Rise
Cover loosely and let rise for approximately 35–50 minutes, until visibly puffy. Preheat the oven to 425°F during this stage, allowing enough time for the oven to become fully hot.
The loaf should look expanded but still hold its shape. A gentle fingertip indentation should return slowly. If the dough feels fragile and begins collapsing, it may have risen too far. Bake promptly rather than waiting for a dramatic second doubling.
7. Score the Top
Uncover the loaf. Dust lightly with flour if desired, then make three shallow diagonal cuts with a sharp blade. Cut with quick, controlled strokes rather than dragging a dull knife through the dough.
Scoring creates a place for expansion as the loaf bakes. Handle the dough gently so you do not flatten it before it enters the oven.
8. Bake
Bake on a center rack for approximately 30–35 minutes, until deeply golden and baked through. Begin checking around 25 minutes if your oven browns quickly.
If the surface becomes dark before the center is ready, tent loosely with foil. The center will generally be around 200–205°F when baked. Temperature, crust color, and a set interior are more useful together than tapping for a hollow sound alone.
This method does not require added steam. It prioritizes a straightforward home bake with a lightly crisp fresh crust. Do not pour water onto the oven floor, hot glass, or heating elements in an attempt to create steam.
9. Cool Fully
Transfer the bread to a wire rack and cool for at least 1 hour, preferably until the center is no longer warm. The crust may make faint crackling sounds as it cools.
Cutting too soon can compress the crumb and make it seem gummy even if the loaf was baked. Use a serrated knife and gentle sawing motions once the bread has set.
What to Expect From the Crumb and Crust
This loaf should have a moderately chewy center with smaller and medium-sized air pockets. Its texture depends on flour, kneading, proofing, and handling. It is not designed to guarantee a very open ciabatta-style crumb.
The crust is best on the day of baking. As moisture moves outward during storage, the crust softens, especially in a sealed bag. Brief reheating can restore some crispness.
A rustic appearance can include uneven flour dusting and natural expansion around the scores. It should not mean an underbaked center or a loaf that spread flat before baking. Good dough strength and complete baking still matter.
Tips for Better Results
Measure Before Adjusting
Start with the listed quantities and let the dough rest before deciding it needs more flour or water. Flour absorption is not instantaneous. Repeated large additions can move the formula far from its intended balance.
Use the Rise as a Visual Guide
The first rise should show substantial expansion. The second should leave the shaped loaf puffy but stable. The clock tells you when to check, not when the dough must be ready.
Shape With Gentle Tension
A loose shape can spread sideways. A compact log with a closed seam has a better chance of keeping height. Avoid coating the shaping surface with so much flour that the dough cannot grip itself.
Preheat Thoroughly
Put the loaf into an already hot oven. An oven that is still warming can give a different rise and crust. If results repeatedly brown too fast or too slowly, an oven thermometer may help identify a temperature mismatch.
Don’t Rush Cooling
Cooling is part of the process. A full hour is a useful starting point for this loaf, but larger or thicker shapes may need longer. If the first cut feels steamy and sticky, leave the remaining loaf to cool further.
Overnight Option
For an overnight schedule, reduce the instant yeast to 1 teaspoon. Mix, rest, and knead as directed, then place in a roomy oiled bowl. Cover, leave at room temperature for about 20–30 minutes, and refrigerate for approximately 8–12 hours.
The next day, check the dough. If it has expanded substantially, shape it gently. If it is still very tight and barely risen, let it stand covered until visibly aerated before shaping. Refrigerator temperatures vary, so this option requires observation rather than a fixed promise of readiness.
After shaping, allow enough time for the cool dough to become puffy. It may need longer than the same-day second-rise range. Preheat, score, bake, and cool as directed.
This is an optional, untested schedule variation. Do not add an overnight cold rest after a fully completed warm first rise without checking expansion; too much fermentation can weaken the dough.
Serving Ideas
Serve thick slices with tomato soup, vegetable stew, pasta, or beans. A small dish of olive oil and black pepper makes a simple accompaniment. The bread’s mild flavor also suits cheese, roasted vegetables, or a warm sandwich filling.
For toast, slice only what you need and toast until the edges are crisp. Add butter, jam, or a savory spread. Slightly stale slices are useful for garlic toast, croutons, or breadcrumbs if there is no mold or spoilage.
For a sandwich, cool the loaf fully before slicing. Avoid assembling very wet fillings far ahead, since the crumb can absorb liquid. Toasting the cut surfaces helps but does not make the bread waterproof.
Variations
Herb Loaf
Add 1 teaspoon dried Italian seasoning with the flour for a subtle herb note. Strong herbs can dominate, so begin modestly. This keeps the dough’s liquid balance close to the original.
Sesame Finish
Brush the risen loaf very lightly with water before scoring and sprinkle with a small amount of sesame seeds. Omit for anyone avoiding sesame. A heavy seed coating is unnecessary.
Two Smaller Loaves
Divide after the first rise and shape two compact ovals. They will likely bake faster than one large loaf. Begin checking earlier and use center temperature and crust color to judge doneness.
Garlic Toast
Keep the base recipe plain. After baking and cooling, brush slices with a little garlic butter and toast just before serving. This gives garlic flavor without changing the dough structure or claiming a separate garlic-bread formula has been tested.
Storage and Reheating
Room temperature: Cool completely before storing. Keep for up to 2 days for best quality. A paper bag preserves some crust texture but allows drying; a sealed bag keeps the center softer while softening the crust.
Refrigerator: Refrigeration usually speeds staling of plain bread and is not necessary for short storage. Bread with perishable fillings or toppings needs different handling from this plain loaf.
Freezer: Wrap a cooled loaf or separated slices well and freeze for up to 3 months for best quality. Remove excess air and label the date. Slices can be toasted directly from frozen.
Refresh: Warm thawed bread at 350°F for approximately 8–12 minutes, checking to avoid drying it excessively. Toast individual slices as needed.
Discard bread with mold rather than cutting away only the visible patch.
Troubleshooting
The Dough Is Dry
Check the flour measurement and allow the initial rest. Add the optional water gradually if the dough remains crumbly. Do not pour in a large amount at once.
The Dough Is Sticky
Some tackiness is expected. Knead, rest briefly, and use a scraper. Add flour sparingly only if needed for handling, rather than making the dough completely dry.
The Loaf Spread Sideways
The dough may have lacked strength, been shaped loosely, or proofed too long. Knead sufficiently, include the gentle fold, and shape a compact oval. Bake once puffy and stable.
The Crumb Is Dense
Possible causes include packed flour, inactive yeast, insufficient rising, or underbaking. Watch expansion and check the center. A close crumb alone does not identify one cause.
The Center Is Gummy
The loaf may need more baking or cooling. Use a thermometer alongside visual checks, and cool fully before slicing. A dark crust does not guarantee a finished center.
The Crust Softened Overnight
That is common as moisture redistributes. Refresh briefly in the oven. Sealed storage preserves softness but cannot maintain the original crust indefinitely.
Frequently Asked Questions
Is This Traditional Italian Bread?
It is an Italian-inspired home loaf. Italy has many regional bread traditions, and this recipe is not presented as a definitive version of all of them.
Can I Use All-Purpose Flour?
Yes, as a variation, though absorption and structure may differ. Start with the listed water, rest the dough, and add the optional tablespoon only if needed. Expect a potentially softer dough and less chewy crumb.
Does It Need Sugar?
No sugar is included in this formula. Yeast can work in a flour-and-water dough without added sugar. Allow enough rising time rather than adding sweetener to force a faster schedule.
Can I Make It Without a Mixer?
Yes. Hand kneading and a gentle fold during the first rise provide the intended structure. A scraper is helpful if the dough sticks to the counter.
Do I Need Steam?
No. The supplied method bakes without added steam. Steam methods depend on equipment and can cause burns or damage if improvised. Follow your oven manufacturer’s guidance if using a separate tested steam-baking method.
How Many Calories Are in a Slice?
Using about 17 ounces of flour and 1 tablespoon oil, an estimated twelfth of the loaf may be roughly 150–170 calories. Actual values depend on flour and slice size. This is an ingredient-based approximation, not verified nutrition data; calculate from your labels for greater precision.
Print
Rustic Italian Bread
Description
Hands-on prep: About 25 minutes
Initial rest: 15 minutes
First rise: 60–90 minutes
Second rise: 35–50 minutes
Bake: 30–35 minutes
Cool: At least 1 hour
Yield: 1 loaf, about 12 slices
Ingredients
- 4 cups bread flour, spooned and leveled, approximately 17 ounces
- 1 1/3 cups lukewarm water, plus up to 1 tablespoon only if needed
- 2 teaspoons instant yeast
- 1 1/2 teaspoons fine salt
- 1 tablespoon olive oil
- Additional flour for handling and oil for the bowl
Instructions
- Stir flour, yeast, and salt in a bowl. Add water and oil and mix to a shaggy dough. Cover and rest 15 minutes. Add the optional water gradually only if still dry.
- Knead by hand for about 8–10 minutes or with a dough hook for 5–7 minutes, until smoother and elastic. Keep the dough soft and slightly tacky.
- Place in an oiled bowl, cover, and rise 60–90 minutes, until approximately doubled. Give one gentle set of folds about 30 minutes into the rise.
- Shape into a snug oval, pinch the seam closed, and place seam-side down on a parchment-lined baking sheet.
- Cover and rise 35–50 minutes, until puffy. Preheat the oven to 425°F.
- Make three shallow diagonal scores. Bake approximately 30–35 minutes, until golden and baked through, generally around 200–205°F in the center. Tent if browning too quickly.
- Transfer to a rack and cool at least 1 hour before slicing.
Storage: Keep fully cooled bread at room temperature for up to 2 days for quality, or freeze well wrapped for up to 3 months. Refresh briefly at 350°F or toast slices.
Overnight variation: Reduce yeast to 1 teaspoon, refrigerate the kneaded dough after a short 20–30-minute room-temperature rest, and allow 8–12 hours cold fermentation. Judge expansion and the final proof by appearance, allowing extra time as needed.