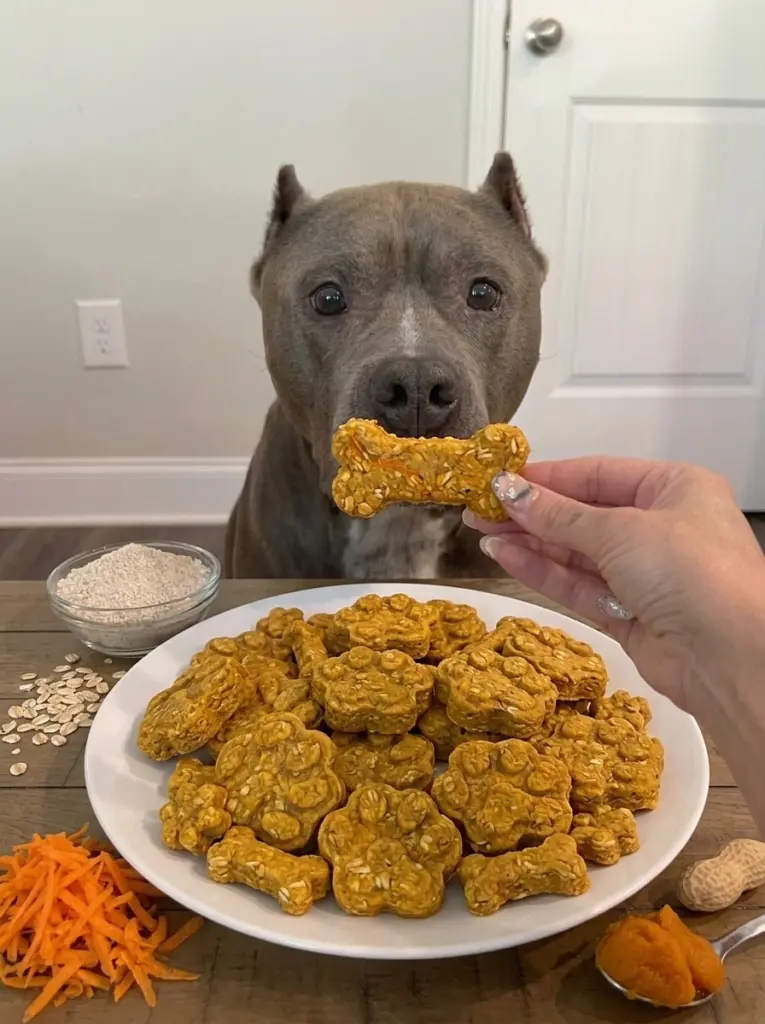
These Pumpkin Carrot Dog Biscuits are a simple, wholesome homemade treat built around two dog-friendly favorites: fiber-rich pumpkin and fresh shredded carrots. Combined with hearty oats and a handful of pantry staples, they bake up crunchy, naturally flavorful, and free of the fillers and added sugar found in a lot of store-bought treats.
This recipe is easy enough for a first-time treat baker, and the notes below will help you get the texture right, understand which ingredients need extra attention for your dog’s safety, and store the finished biscuits so they stay fresh and crunchy.
A quick but important note before you start: even with dog-friendly ingredients, homemade treats like these should only make up a small part of your dog’s overall diet. Every dog has different nutritional needs and sensitivities, so if your dog has any known allergies, digestive issues, or health conditions, check with your veterinarian before introducing a new treat.
Why Your Dog Will Love This Recipe
- Naturally flavorful. Pumpkin and carrot bring sweetness and flavor without any added sugar.
- Fiber-rich ingredients. Both pumpkin and carrots are known for their fiber content, which can be gentle and supportive for digestion.
- Satisfying crunch. A low, slow bake — plus an optional oven-cooling step — gives these biscuits a firm, crunchy texture dogs enjoy chewing.
- Customizable. Optional add-ins like peanut butter, flaxseed, applesauce, or parsley let you tailor the recipe to your dog’s taste.
- Great for treat jars or training. These hold their shape well and can be cut into smaller pieces for training rewards.
Ingredients for Pumpkin Carrot Dog Biscuits
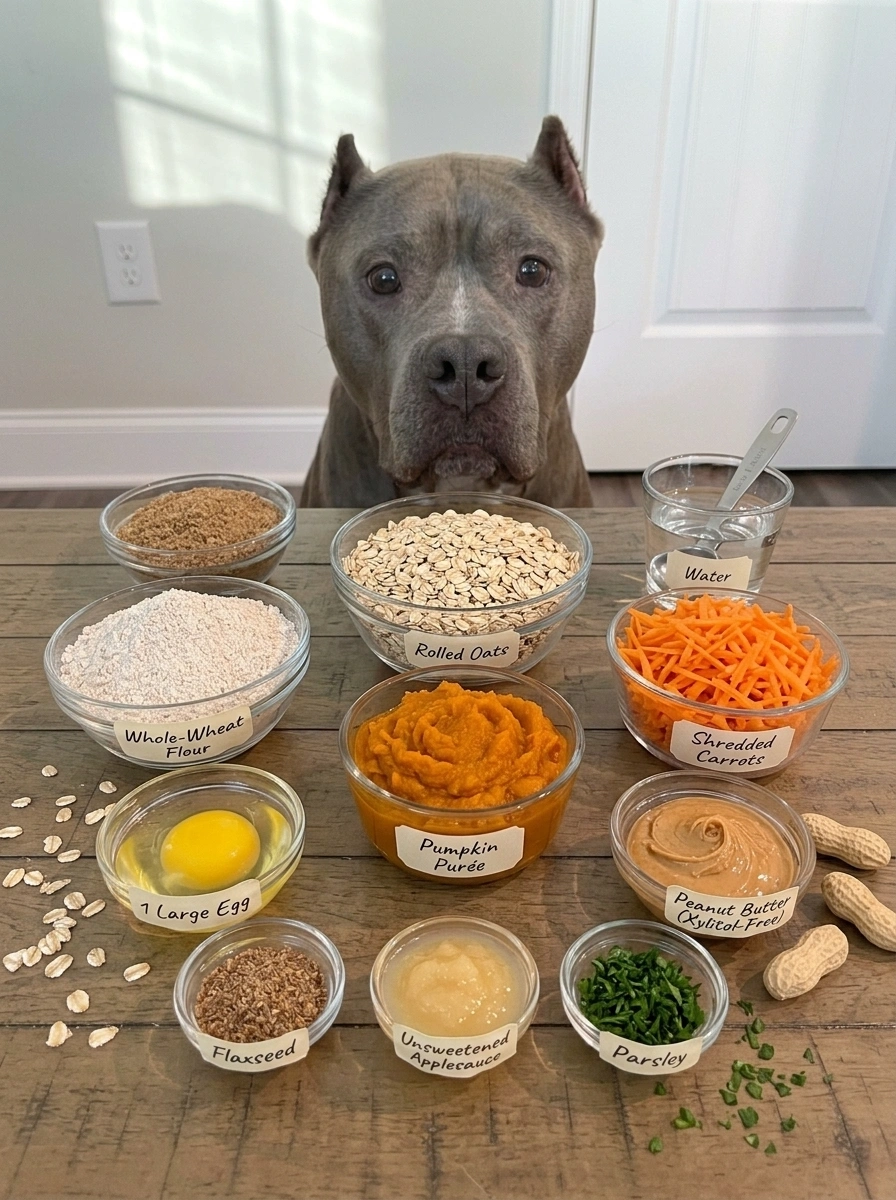
- ¾ cup pumpkin purée (100% pure pumpkin)
- 1 cup finely shredded carrots
- 1 large egg
- 2 cups old-fashioned rolled oats
- 1 cup whole-wheat flour
Optional Add-Ins
- 2 tablespoons natural peanut butter (xylitol-free)
- 1 tablespoon ground flaxseed
- 2 tablespoons unsweetened applesauce
- 2 tablespoons fresh parsley, finely chopped
- 1–2 tablespoons water, if needed
Ingredient Notes
Pumpkin purée. Be sure to use 100% pure pumpkin purée, not pumpkin pie filling. Pie filling contains added sugar and spices that aren’t appropriate for dogs, while plain pumpkin is a gentle, fiber-rich ingredient that’s commonly used in dog treats and can be easy on digestion.
Shredded carrots. Fresh carrots add natural sweetness, a bit of crunch, and extra fiber and nutrients. Shredding them finely helps them blend evenly into the dough and bake through fully, rather than leaving larger chunks that stay firm or undercooked.
Egg. The egg helps bind the dough and adds a bit of protein. This recipe is baked long enough to cook the egg thoroughly, so there’s no need to worry about it being undercooked in the finished biscuits.
Old-fashioned rolled oats. Oats are gentle and easy to digest for most dogs, and they give these biscuits their hearty texture. Blending part of the oats into a coarse flour helps bind the dough, while leaving some oats whole adds extra texture to the finished treats.
Whole-wheat flour. This gives the dough enough structure to hold its shape when cut into biscuit shapes and baked. If your dog has a known wheat sensitivity, see the substitutions below for an alternative.
Peanut butter — xylitol-free is essential, if using. If you choose to add the optional peanut butter, it’s critical to check the label and confirm it’s free of xylitol (sometimes listed as “birch sugar”). Xylitol is highly toxic to dogs, even in small amounts, and can cause a dangerous drop in blood sugar or, in severe cases, liver failure. Always double-check the label, even on brands marketed as “natural.”
Substitutions and Variations
- Sweet potato instead of pumpkin: You can substitute an equal amount of plain cooked and mashed sweet potato for the pumpkin purée for a slightly different flavor.
- Oat flour instead of whole-wheat flour: For dogs with wheat sensitivities, replace the whole-wheat flour with additional oat flour, adjusting the liquid slightly as needed since oat flour absorbs moisture differently.
- Added flaxseed: Ground flaxseed contributes a bit of fiber and healthy fat, and blends easily into the dough.
- Applesauce for extra moisture and mild sweetness: Unsweetened applesauce can help soften the dough slightly and adds a touch of natural sweetness.
- Fresh parsley: A small amount of finely chopped parsley adds a pop of color and a mild, fresh flavor, and is commonly used in dog treats.
- Peanut butter-free version: Simply omit the peanut butter if your dog has a peanut allergy or you’d rather avoid it, adding a little extra water as needed to help the dough come together.
Kitchen Equipment
- Baking sheet
- Parchment paper
- Box grater or food processor, for shredding carrots
- Food processor or blender, for making oat flour
- Large mixing bowl
- Rolling pin
- Cookie cutters (bone, paw print, or circle shapes work well)
- Wire cooling rack
How to Make Pumpkin Carrot Dog Biscuits
Step 1: Preheat and Prep
Preheat the oven to 350°F (175°C) and line a baking sheet with parchment paper.
Step 2: Prep the Carrots
Wash, peel, and finely shred the carrots. Shredding them finely helps ensure they cook through evenly and blend smoothly into the dough.
Step 3: Make the Oat Flour
Blend 1½ cups of the rolled oats in a food processor until they form a coarse oat flour, leaving the remaining ½ cup of oats whole. The oat flour helps bind the dough, while the whole oats add texture to the finished biscuits.
Step 4: Combine the Wet Ingredients
In a large bowl, combine the pumpkin purée, shredded carrots, and egg, stirring until well blended.
Step 5: Add the Dry Ingredients
Add the oat flour, the remaining whole rolled oats, and the whole-wheat flour to the bowl. Mix until a firm, workable dough forms. If the dough feels too sticky, work in a little more oat flour. If it’s too dry or crumbly, add water a tablespoon at a time until it comes together.
Step 6: Roll and Cut
Roll the dough out on a lightly floured surface to about ¼ inch (6 mm) thick. Cut into bone shapes, paw prints, or small circles using cookie cutters, and arrange the pieces on the prepared baking sheet.
Step 7: Bake
Bake for 22 to 28 minutes, or until the biscuits are firm and lightly golden around the edges. For extra-crunchy biscuits, turn off the oven once baking is done and leave the biscuits inside for another 20 to 30 minutes as the oven cools. This gradual drying-out period gives them a firmer, crunchier bite.
Step 8: Cool Completely
Transfer the biscuits to a wire rack and let them cool completely before serving. Full cooling also helps them firm up to their final crunchy texture.
Expert Tips for the Best Results
- Always use 100% pure pumpkin purée. Double-check the can or label to confirm it isn’t pumpkin pie filling, which contains added sugar and spices.
- Shred the carrots finely. Finer shreds cook through more evenly and blend more smoothly into the dough than larger pieces.
- Check peanut butter labels carefully, if using. Confirm any peanut butter is xylitol-free every time you buy a new jar, since ingredients can vary between brands.
- Roll the dough to an even thickness. Consistent thickness helps the biscuits bake evenly, so you avoid some pieces being underdone while others turn out overly hard.
- Use the oven-cooling step for extra crunch. This step deepens the crunch without any risk of burning, since the oven is already off.
Common Mistakes to Avoid
Using pumpkin pie filling instead of pure pumpkin. Pie filling contains added sugar and spices that aren’t necessary or appropriate for dogs. Always check the label for “100% pure pumpkin.”
Using peanut butter that contains xylitol. If you’re including the optional peanut butter, this is the most important ingredient to check carefully, since xylitol is dangerous for dogs even in small amounts.
Shredding the carrots too coarsely. Larger carrot pieces can stay firmer than the rest of the dough and may not bake through as evenly.
Rolling the dough unevenly. Inconsistent thickness leads to uneven baking, with some biscuits turning out too soft and others too hard.
Serving biscuits before they’re fully cooled. Warm biscuits are softer than their final texture, so it’s hard to judge doneness, and warm treats are more prone to sticking together in storage.
How to Serve Pumpkin Carrot Dog Biscuits
These biscuits work well as an everyday treat, broken into smaller pieces for training rewards, or kept in a treat jar for an easy grab-and-go option. As with any homemade treat, they should be offered in moderation and shouldn’t replace a balanced, complete dog food as your pet’s primary diet.
Make-Ahead Instructions
This recipe is easy to make ahead, since the finished biscuits store well and hold their crunch for days once fully cooled. Bake a full batch at the start of the week and pull biscuits from the refrigerator or freezer as needed.
Storage Instructions
Refrigerating
Store the biscuits in an airtight container in the refrigerator for about 1 week.
Freezing
For longer storage, freeze the biscuits in a freezer-safe container or bag for up to 3 months. Thaw at room temperature before serving.
Reheating
Reheating isn’t necessary, since these biscuits are meant to be served at room temperature. If a batch has softened slightly in storage, you can warm them in a 300°F (150°C) oven for a few minutes to re-crisp them before letting them cool again.
Frequently Asked Questions
Can I make this recipe ahead of time? Yes. These biscuits store well, so you can bake a batch in advance and keep them refrigerated or frozen until you’re ready to use them.
How long do these dog biscuits last? Stored in an airtight container in the refrigerator, they’ll keep for about 1 week, or up to 3 months in the freezer.
Can I freeze homemade dog biscuits? Yes. Freeze them in a freezer-safe container or bag and thaw at room temperature before serving.
Can I use pumpkin pie filling instead of plain pumpkin? No. Pumpkin pie filling contains added sugar and spices that aren’t appropriate for dogs. Always use 100% pure pumpkin purée.
Is peanut butter necessary for this recipe? No, it’s an optional add-in. If you skip it, you may need to add a little extra water to help the dough come together.
Why is my dough too crumbly or too sticky? If the dough is dry and crumbly, add water a tablespoon at a time until it holds together. If it’s too sticky to roll, work in a bit more oat flour.
Why are my biscuits not crunchy enough? This usually means they need a little more time in the oven, or would benefit from the optional oven-cooling step, which lets residual heat continue drying them out.
How many of these treats can I give my dog? Treats should only make up a small portion of your dog’s daily diet. The right amount depends on your dog’s size, weight, and regular food intake, so check with your veterinarian if you’re unsure, especially for small dogs or dogs with health conditions.
Final Recipe Summary
These Pumpkin Carrot Dog Biscuits combine fiber-rich pumpkin, fresh shredded carrots, and hearty oats into a simple, crunchy homemade treat. With an easy roll-and-cut method and an optional oven-cooling step for extra crunch, this is a straightforward recipe for anyone new to baking dog treats at home. Just be sure to use 100% pure pumpkin purée, confirm any peanut butter you add is xylitol-free, and offer these biscuits as an occasional treat rather than a substitute for your dog’s regular diet.
Prep Time: 20–25 minutes Cook Time: 22–28 minutes (plus an optional 20–30 minutes of oven-cooling time for extra crunch) Total Time: Approximately 45 minutes to just over 1 hour Yield: Varies by cutter size; typically 24–36 biscuits
Print
Pumpkin Carrot Dog Biscuits
- Total Time: Approximately 45 minutes to just over 1 hour
- Yield: Varies by cutter size; typically 24–36 biscuits
Ingredients
- ¾ cup pumpkin purée (100% pure pumpkin)
- 1 cup finely shredded carrots
- 1 large egg
- 2 cups old-fashioned rolled oats
- 1 cup whole-wheat flour
Optional Add-Ins
- 2 tablespoons natural peanut butter (xylitol-free)
- 1 tablespoon ground flaxseed
- 2 tablespoons unsweetened applesauce
- 2 tablespoons fresh parsley, finely chopped
- 1–2 tablespoons water, if needed
Instructions
Preheat the oven to 350°F (175°C) and line a baking sheet with parchment paper.
Wash, peel, and finely shred the carrots. Shredding them finely helps ensure they cook through evenly and blend smoothly into the dough.
Blend 1½ cups of the rolled oats in a food processor until they form a coarse oat flour, leaving the remaining ½ cup of oats whole. The oat flour helps bind the dough, while the whole oats add texture to the finished biscuits.
In a large bowl, combine the pumpkin purée, shredded carrots, and egg, stirring until well blended.
Add the oat flour, the remaining whole rolled oats, and the whole-wheat flour to the bowl. Mix until a firm, workable dough forms. If the dough feels too sticky, work in a little more oat flour. If it’s too dry or crumbly, add water a tablespoon at a time until it comes together.
Roll the dough out on a lightly floured surface to about ¼ inch (6 mm) thick. Cut into bone shapes, paw prints, or small circles using cookie cutters, and arrange the pieces on the prepared baking sheet.
Bake for 22 to 28 minutes, or until the biscuits are firm and lightly golden around the edges. For extra-crunchy biscuits, turn off the oven once baking is done and leave the biscuits inside for another 20 to 30 minutes as the oven cools. This gradual drying-out period gives them a firmer, crunchier bite.
Transfer the biscuits to a wire rack and let them cool completely before serving. Full cooling also helps them firm up to their final crunchy texture.
- Prep Time: 20–25 minutes
- Cook Time: 22–28 minutes (plus an optional 20–30 minutes of oven-cooling time for extra crunch)