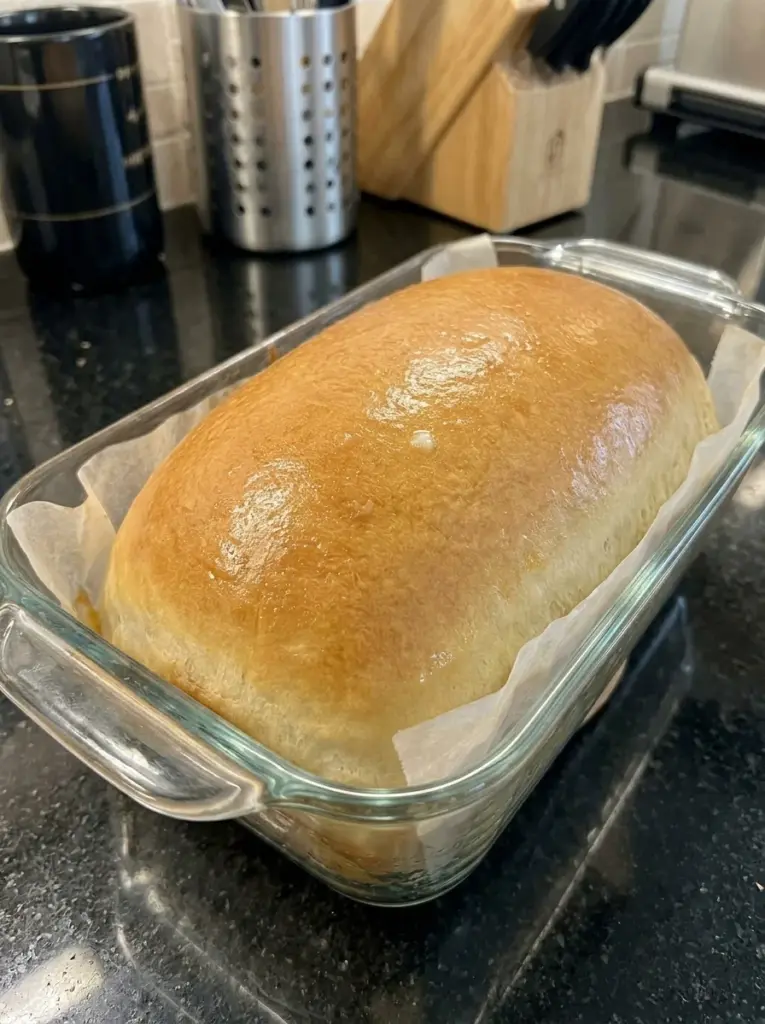
Light, tender, and wonderfully pillowy, this No-Knead Soft & Fluffy Sandwich Bread gives you everything you want from a homemade sandwich loaf without traditional kneading.
The dough comes together right in a mixing bowl using all-purpose flour, warm milk, yeast, honey, butter, and an egg. Instead of kneading until smooth and elastic, you simply stir everything into a very soft, sticky dough and allow time and yeast to do much of the work.
Warm milk, butter, honey, and egg give the finished bread a tender crumb with a subtle richness and gentle sweetness. After baking, a quick brush of melted butter softens the golden crust even further.
Slice it for sandwiches, grilled cheese, toast, French toast, breakfast sandwiches, or butter-and-jam toast. And because the loaf freezes beautifully, you can keep individual slices ready for busy mornings and quick lunches.
Why You’ll Love This No-Knead Sandwich Bread
No kneading required. Mix everything together with a wooden spoon or sturdy spatula and let the dough rise.
Soft and fluffy. Milk, butter, and egg help create a tender, pillowy crumb.
Perfect for sandwiches. The loaf slices easily once completely cooled and works with both hot and cold fillings.
Simple ingredients. Everything is made from familiar baking staples.
One-bowl dough. There’s no need to pull out a stand mixer.
Lightly sweetened with honey. Two tablespoons add subtle sweetness without turning the loaf into dessert bread.
Golden buttery crust. Brushing the hot loaf with melted butter gives the crust a softer finish.
Freezer-friendly. Freeze individual slices and toast them directly from frozen.
What Makes This Bread So Soft?
Several ingredients work together to create the soft texture.
Warm Milk
Milk replaces the water used in many basic bread recipes.
It contributes richness and helps produce a softer crumb.
Butter
Melted butter adds tenderness and flavor to the dough.
Another tablespoon brushed over the freshly baked crust helps keep the exterior softer as the loaf cools.
Egg
One large egg provides structure while contributing richness and tenderness.
Honey
Honey provides subtle sweetness while complementing the rich milk-and-butter dough.
A Soft, Sticky Dough
Perhaps most importantly, this isn’t supposed to be a stiff dough.
A relatively high-moisture dough helps create the soft interior.
Resist the temptation to keep adding flour simply because the dough feels sticky.
Ingredients 🍞
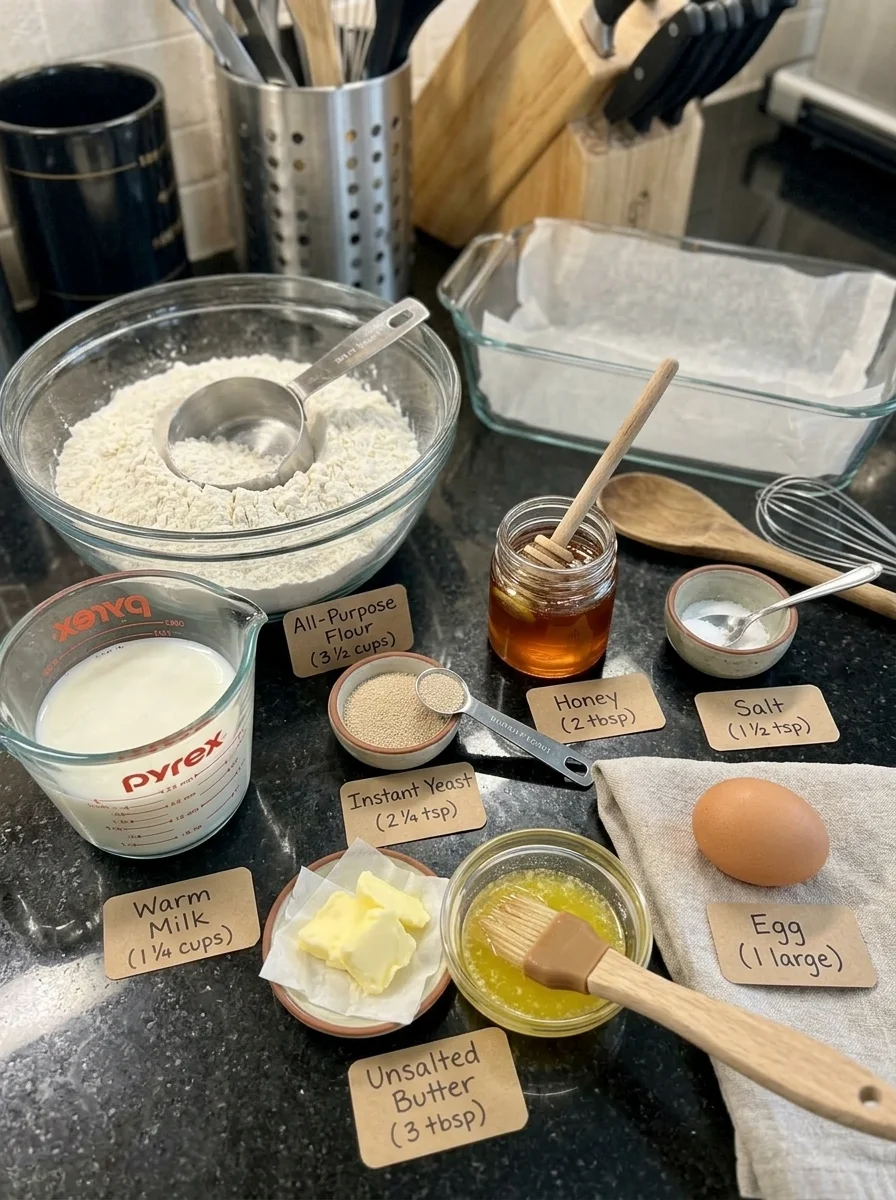
- 3 1/2 cups all-purpose flour
- 1 1/4 cups warm milk, approximately 105–110°F
- 2 1/4 tsp instant yeast
- 2 tbsp honey
- 1 1/2 tsp salt
- 2 tbsp unsalted butter, melted
- 1 large egg
- 1 tbsp melted butter, for brushing the top
Ingredient Notes
All-purpose flour: Provides the structure of the loaf while keeping the crumb softer than a very high-protein bread flour might.
Warm milk: Aim for approximately 105–110°F. It should feel pleasantly warm, not hot.
Instant yeast: Gives the loaf its rise. The brief five-minute rest in the warm milk and honey also gives you an opportunity to combine and hydrate the ingredients before continuing.
Honey: Adds mild sweetness and complements the milk and butter.
Salt: Essential for balanced bread flavor.
Unsalted butter: Two tablespoons go into the dough for richness and tenderness. Another tablespoon is brushed over the hot loaf.
Egg: Adds structure, color, richness, and tenderness.
How to Make No-Knead Soft & Fluffy Sandwich Bread
Step 1: Prepare the Milk and Yeast 🍞
Pour 1 1/4 cups warm milk into a large mixing bowl.
The milk should be approximately 105–110°F.
Add:
- 2 tablespoons honey
- 2 1/4 teaspoons instant yeast
Whisk gently.
Allow the mixture to stand for approximately 5 minutes.
The milk shouldn’t be excessively hot. Very hot liquid can damage the yeast.
Step 2: Add the Butter, Egg, and Salt
Add:
- 2 tablespoons melted unsalted butter
- 1 large egg
- 1 1/2 teaspoons salt
Whisk until the egg is thoroughly incorporated.
If your melted butter is extremely hot, allow it to cool before adding it.
Step 3: Add the Flour
Gradually add 3 1/2 cups all-purpose flour.
Stir with a wooden spoon or sturdy spatula as you add it.
Continue stirring until no obvious pockets of dry flour remain.
The dough should look very soft and sticky.
That’s exactly what you want.
What Should No-Knead Sandwich Bread Dough Look Like?
This dough won’t look exactly like conventional kneaded sandwich bread dough.
Don’t expect a perfectly smooth, firm ball.
Instead, it should be:
- Very soft
- Sticky
- Moist
- Thick enough to hold together
- Easily moved with a spatula
- Softer than traditional hand-kneaded dough
Avoid adding large amounts of extra flour in an attempt to make the dough easy to handle with your hands.
You’re not going to knead it, so it doesn’t need to feel like a conventional kneading dough.
Step 4: Cover the Dough
Cover the mixing bowl tightly with plastic wrap or a clean kitchen towel.
Place it somewhere warm and free from drafts.
Step 5: First Rise
Allow the dough to rise for approximately 1–1 1/2 hours.
Rather than watching only the clock, watch the dough itself.
It should become:
- Noticeably larger
- Puffy
- Airy
- Close to doubled in volume
A warmer kitchen may produce a faster rise.
A cooler kitchen may require more time.
Yeast works on its own schedule, so appearance is more important than an exact number of minutes.
Why No Kneading Is Necessary
Traditional bread dough is kneaded to organize and strengthen its gluten network.
With this loaf, the combination of a soft dough, thorough mixing, and sufficient rising time allows structure to develop without a conventional kneading session.
You still need to mix until the flour is thoroughly hydrated and the dough is cohesive.
But you don’t need to turn it onto the counter and knead it for 8–10 minutes.
That makes this recipe especially convenient for anyone who wants homemade sandwich bread without a stand mixer or intensive hand kneading.
Step 6: Prepare the Loaf Pan
Lightly grease a 9×5-inch loaf pan.
Make sure the corners and sides are coated.
Step 7: Transfer the Dough
Uncover the risen dough.
Using a lightly greased spatula, gently scrape it into the prepared loaf pan.
Because the dough is sticky, greasing the spatula makes this considerably easier.
Avoid aggressively stirring or punching down the dough.
Some deflation is unavoidable during transfer, but you don’t want to squeeze out all the gas created during the first rise.
Step 8: Smooth the Surface
Use the greased spatula to gently smooth the top.
Don’t press down heavily.
You’re simply evening out the surface so the loaf rises more uniformly.
Step 9: Second Rise
Loosely cover the loaf pan.
Let the dough rise for another 30–45 minutes.
It should become visibly puffy and rise close to the top of the pan.
Meanwhile, preheat your oven to 375°F.
How to Know When the Second Rise Is Finished
The dough should look airy and expanded rather than dense.
It should be approaching the top edge of the pan.
Don’t necessarily wait for it to dramatically overflow the pan.
An excessively long second rise can weaken the dough structure and potentially cause the loaf to deflate.
If your kitchen is particularly warm, begin checking it before the full 45 minutes.
Step 10: Bake 🔥
Place the loaf pan on the center rack of your preheated oven.
Bake at 375°F for approximately 30–35 minutes.
The bread should develop a beautiful golden-brown crust.
Step 11: Check for Doneness
You can use several indicators.
The loaf should look deeply golden and sound somewhat hollow when gently tapped.
For a more reliable measurement, insert an instant-read thermometer into the center.
The internal temperature should be approximately 190–195°F.
Step 12: Protect the Crust if Necessary
If the top becomes dark before the center reaches the proper temperature, loosely tent it with aluminum foil.
This is most likely to be necessary during the final 10 minutes.
Don’t tightly wrap the loaf.
A loose foil tent is enough to shield the crust from excessive browning.
Step 13: Brush with Butter 🧈
Remove the finished loaf from the oven.
Immediately brush the surface with 1 tablespoon melted butter.
The warm crust absorbs some of the butter, giving it extra flavor and helping create a softer finish.
Step 14: Cool in the Pan
Allow the bread to remain in the loaf pan for approximately 10 minutes.
This gives the structure a little time to settle while still allowing you to remove the loaf before condensation softens the sides excessively.
Step 15: Transfer to a Wire Rack
Carefully remove the loaf from the pan.
Transfer it to a wire cooling rack.
Allow it to cool for at least 1 hour before slicing.
This is one of the most important steps in the entire recipe.
Why You Shouldn’t Slice Hot Bread
Fresh bread smells incredible straight from the oven, so waiting can be difficult.
But the interior is still setting while the loaf cools.
Cutting it immediately can:
- Compress the crumb
- Make the center appear gummy
- Release too much internal moisture
- Make clean slices difficult
- Affect the final texture
For the best sandwich slices, let the loaf cool completely.
Time and Yield ⏱️
Prep Time: 10 minutes
First Rise: 1–1 1/2 hours
Second Rise: 30–45 minutes
Bake Time: 30–35 minutes
Cooling Time: at least 1 hour
Total Active + Rising/Baking Time: approximately 2 hours 25 minutes, plus cooling as needed
Yield: 1 loaf
Servings: approximately 12 slices
Estimated Calories: approximately 185 calories per slice
The exact calorie count will depend on the specific flour, milk, honey, butter, and slice size.
Tips for the Softest No-Knead Sandwich Bread
Measure your flour carefully. Too much flour can make the loaf unnecessarily dense.
Keep the dough soft. Sticky dough is expected in this recipe.
Use warm milk, not hot milk. Aim for approximately 105–110°F.
Don’t add flour just because the dough sticks to your hands. You don’t need to handle or knead it traditionally.
Let the first rise develop fully. The dough should become noticeably puffy and nearly double.
Use a greased spatula. It makes transferring sticky dough much easier.
Be gentle during transfer. Avoid unnecessarily deflating the dough.
Don’t overproof the second rise. Bake once the dough has become puffy and risen close to the top of the pan.
Use a thermometer when possible. An internal temperature around 190–195°F provides a useful doneness check.
Brush with butter immediately. This helps create that desirable soft sandwich-bread crust.
Cool before slicing. This is essential for a properly set crumb.
How to Get a Taller Loaf
Start by making sure your yeast is active and your dough receives enough time during both rises.
Other factors that influence loaf height include:
Pan size: This recipe is designed for a 9×5-inch loaf pan.
Flour quantity: Excess flour makes the dough heavier and can restrict expansion.
Yeast activity: Old or poorly stored yeast may produce a weak rise.
Milk temperature: Milk that’s too cold slows fermentation, while excessively hot milk can damage yeast.
Proofing time: Underproofed dough hasn’t produced enough gas, while severely overproofed dough may lose its ability to maintain its structure.
Watch the dough rather than relying entirely on a timer.
Why Milk Makes Sandwich Bread Softer
Milk contributes more than liquid.
Compared with a very basic flour-water-yeast loaf, milk helps create a richer, more tender style of bread that’s especially suitable for sandwiches.
Combined with butter and egg, it gives this loaf a softer, more enriched texture than rustic crusty bread.
That’s why the recipe works particularly well for:
- Lunch sandwiches
- Breakfast toast
- Grilled cheese
- French toast
- Peanut butter and jelly
- Egg sandwiches
Why Honey Works Well in This Bread 🍯
Two tablespoons of honey provide enough sweetness to round out the flavor without making the bread taste like dessert.
The honey pairs particularly well with milk and butter and gives the bread the mild sweetness many people associate with soft sandwich loaves.
You can taste it, but it shouldn’t overwhelm savory sandwich fillings.
Serving Ideas 🥪
Turkey Sandwich
Layer sliced turkey with cheese, lettuce, tomato, and your favorite sandwich spread.
Grilled Cheese
Butter the exterior of two slices and fill them with your favorite melting cheese.
The soft crumb becomes beautifully crisp and golden in a skillet.
Peanut Butter & Jelly
The slight honey sweetness makes this loaf especially good for classic PB&J.
Breakfast Toast
Toast a slice and spread it with:
- Butter
- Jam
- Honey
- Peanut butter
- Almond butter
Avocado Toast
Toast until lightly crisp and top with mashed avocado, salt, pepper, and an egg if desired.
French Toast
The enriched milk-and-egg dough makes excellent French toast.
Slightly stale slices are particularly good because they absorb the custard mixture without falling apart as easily.
Breakfast Sandwich
Use toasted slices with egg, cheese, and bacon or sausage.
Tuna or Chicken Salad Sandwich
The soft bread works particularly well with creamy sandwich fillings.
Easy Flavor Variations
Honey Butter Sandwich Bread
Brush the hot loaf with a mixture of melted butter and a small amount of honey.
Seeded Sandwich Bread
Sprinkle sesame, sunflower, or mixed seeds over the surface before baking.
Herb Sandwich Bread
Add dried herbs to the flour for a savory loaf.
Garlic Herb Bread
Add garlic powder and Italian herbs for bread that’s particularly good for grilled sandwiches.
Cinnamon Honey Toasting Bread
Add cinnamon to the dough for a subtly spiced breakfast loaf.
Cheese Sandwich Bread
Fold shredded cheese into the dough for a savory variation.
Keep in mind that substantial additions can affect the dough’s texture and rising behavior.
Troubleshooting
Why is my bread dense?
Several things can cause a dense loaf:
- Too much flour
- Inactive yeast
- Insufficient first rise
- Insufficient second rise
- Dough that was heavily deflated during transfer
Keep the dough soft and allow it to become visibly puffy before baking.
Why is my dough extremely sticky?
It’s supposed to be sticky.
This isn’t a traditional kneaded dough.
Use a sturdy spoon and greased spatula rather than trying to make it comfortable to knead by hand.
Why didn’t my bread rise?
Check the age of your yeast and the temperature of your milk.
Also consider the room temperature.
A cool kitchen can substantially slow yeast fermentation.
Why did my loaf rise and then collapse?
The dough may have overproofed during the second rise.
If the structure stretches beyond what it can support, it can collapse during or after baking.
Why is the center gummy?
The loaf may be underbaked or may have been sliced while still hot.
For the most reliable result, check that the center reaches approximately 190–195°F, then cool before slicing.
Why is the crust too dark?
Cover the loaf loosely with aluminum foil during the final 10 minutes of baking.
Why is my crust too hard?
The loaf may have baked too long.
Brushing the hot crust with melted butter also helps soften it.
Why is my bread dry?
Too much flour or overbaking are common causes.
Measure carefully and begin checking for doneness around 30 minutes.
Why does my bread crumble when sliced?
It may still be too warm.
Allow the loaf to cool completely so the crumb can finish setting.
Make-Ahead Instructions
You can bake the loaf earlier in the day and leave it whole until completely cooled.
For sandwiches, you’ll get the cleanest slices once the bread has cooled fully.
If you’re preparing it specifically for meal prep, slice the entire cooled loaf and store it in a tightly sealed bread bag or container.
For longer storage, freeze the slices.
Storage Information 🧊
Allow the loaf to cool completely before storing.
Place it in an airtight container, bread bag, or tightly sealed food-storage bag.
Store at room temperature for up to 3 days.
Keep the bread away from direct sunlight and excessive heat.
Refrigeration can make many breads firm and stale more quickly, so room-temperature storage is preferable for short-term use.
For storage beyond a few days, freezing is the better option.
Freezer Instructions ❄️
This sandwich bread freezes very well.
For the most convenient storage:
- Cool the loaf completely.
- Slice it.
- Place parchment between slices if desired.
- Transfer the slices to a freezer-safe bag.
- Remove as much excess air as practical.
- Freeze for up to 3 months.
Individual slices can be removed as needed.
How to Toast Bread Straight From Frozen
There’s usually no need to thaw individual slices before toasting.
Place a frozen slice directly into your toaster and toast until warm and golden.
Depending on your toaster, it may need a slightly longer setting than fresh bread.
This makes freezing pre-sliced sandwich bread especially convenient.
Frequently Asked Questions
Do I really need to knead this bread?
No. This recipe is specifically designed as a no-knead sandwich loaf.
Why is the dough so sticky?
The dough intentionally contains enough moisture to remain very soft. Don’t try to turn it into a dry kneading dough by adding lots of flour.
Can I make it without a stand mixer?
Yes. A bowl, wooden spoon or sturdy spatula, and loaf pan are all you need.
What temperature should the milk be?
Approximately 105–110°F.
Can I use instant yeast?
Yes. The recipe calls for 2 1/4 teaspoons instant yeast.
How long should the first rise take?
Approximately 1–1 1/2 hours, although room temperature can change the timing.
How long should the second rise take?
Approximately 30–45 minutes.
What size loaf pan should I use?
A 9×5-inch loaf pan.
What temperature should I bake the bread?
Bake at 375°F.
How do I know when it’s finished?
The crust should be golden brown. For a more reliable check, the center should reach approximately 190–195°F.
Why brush the top with butter?
Butter adds flavor and helps create a softer crust.
How long should I cool it before slicing?
At least 1 hour, and preferably until the loaf is completely cooled.
Is this bread good for sandwiches?
Yes. Its soft crumb makes it particularly suitable for sandwiches.
Can I use it for French toast?
Absolutely. The milk, butter, egg, and honey make it especially good for French toast.
How long does homemade sandwich bread last?
Store it airtight at room temperature for up to 3 days.
Can I freeze it?
Yes. Freeze sliced bread for up to 3 months.
Do I need to thaw frozen slices before toasting?
No. Individual slices can generally go directly from the freezer into the toaster.
Final Thoughts
This No-Knead Soft & Fluffy Sandwich Bread proves that a tender homemade sandwich loaf doesn’t require a stand mixer or a long kneading session. 🍞🥪
Warm milk, honey, butter, and egg give the bread a soft, enriched crumb, while the simple no-knead method keeps preparation approachable. After two rises and about 30–35 minutes in the oven, you get a beautifully golden loaf with a pillowy center.
The most important things to remember are to keep the dough soft and sticky, allow both rises to develop properly, avoid adding unnecessary flour, and let the finished loaf cool before slicing.
Use thick slices for grilled cheese, make everyday lunch sandwiches, toast them for breakfast, turn slightly older slices into French toast, or freeze individual portions for later.
It’s a versatile homemade loaf designed for the kinds of meals that make sandwich bread a kitchen staple.
Print
No-Knead Soft & Fluffy Sandwich Bread
Ingredients
- 3 1/2 cups all-purpose flour
- 1 1/4 cups warm milk, approximately 105–110°F
- 2 1/4 tsp instant yeast
- 2 tbsp honey
- 1 1/2 tsp salt
- 2 tbsp unsalted butter, melted
- 1 large egg
- 1 tbsp melted butter, for brushing the top
Instructions
Step 1: Prepare the Milk and Yeast 🍞
Pour 1 1/4 cups warm milk into a large mixing bowl.
The milk should be approximately 105–110°F.
Add:
- 2 tablespoons honey
- 2 1/4 teaspoons instant yeast
Whisk gently.
Allow the mixture to stand for approximately 5 minutes.
The milk shouldn’t be excessively hot. Very hot liquid can damage the yeast.
Step 2: Add the Butter, Egg, and Salt
Add:
- 2 tablespoons melted unsalted butter
- 1 large egg
- 1 1/2 teaspoons salt
Whisk until the egg is thoroughly incorporated.
If your melted butter is extremely hot, allow it to cool before adding it.
Step 3: Add the Flour
Gradually add 3 1/2 cups all-purpose flour.
Stir with a wooden spoon or sturdy spatula as you add it.
Continue stirring until no obvious pockets of dry flour remain.
The dough should look very soft and sticky.
That’s exactly what you want.
What Should No-Knead Sandwich Bread Dough Look Like?
This dough won’t look exactly like conventional kneaded sandwich bread dough.
Don’t expect a perfectly smooth, firm ball.
Instead, it should be:
- Very soft
- Sticky
- Moist
- Thick enough to hold together
- Easily moved with a spatula
- Softer than traditional hand-kneaded dough
Avoid adding large amounts of extra flour in an attempt to make the dough easy to handle with your hands.
You’re not going to knead it, so it doesn’t need to feel like a conventional kneading dough.
Step 4: Cover the Dough
Cover the mixing bowl tightly with plastic wrap or a clean kitchen towel.
Place it somewhere warm and free from drafts.
Step 5: First Rise
Allow the dough to rise for approximately 1–1 1/2 hours.
Rather than watching only the clock, watch the dough itself.
It should become:
- Noticeably larger
- Puffy
- Airy
- Close to doubled in volume
A warmer kitchen may produce a faster rise.
A cooler kitchen may require more time.
Yeast works on its own schedule, so appearance is more important than an exact number of minutes.
Why No Kneading Is Necessary
Traditional bread dough is kneaded to organize and strengthen its gluten network.
With this loaf, the combination of a soft dough, thorough mixing, and sufficient rising time allows structure to develop without a conventional kneading session.
You still need to mix until the flour is thoroughly hydrated and the dough is cohesive.
But you don’t need to turn it onto the counter and knead it for 8–10 minutes.
That makes this recipe especially convenient for anyone who wants homemade sandwich bread without a stand mixer or intensive hand kneading.
Step 6: Prepare the Loaf Pan
Lightly grease a 9×5-inch loaf pan.
Make sure the corners and sides are coated.
Step 7: Transfer the Dough
Uncover the risen dough.
Using a lightly greased spatula, gently scrape it into the prepared loaf pan.
Because the dough is sticky, greasing the spatula makes this considerably easier.
Avoid aggressively stirring or punching down the dough.
Some deflation is unavoidable during transfer, but you don’t want to squeeze out all the gas created during the first rise.
Step 8: Smooth the Surface
Use the greased spatula to gently smooth the top.
Don’t press down heavily.
You’re simply evening out the surface so the loaf rises more uniformly.
Step 9: Second Rise
Loosely cover the loaf pan.
Let the dough rise for another 30–45 minutes.
It should become visibly puffy and rise close to the top of the pan.
Meanwhile, preheat your oven to 375°F.
How to Know When the Second Rise Is Finished
The dough should look airy and expanded rather than dense.
It should be approaching the top edge of the pan.
Don’t necessarily wait for it to dramatically overflow the pan.
An excessively long second rise can weaken the dough structure and potentially cause the loaf to deflate.
If your kitchen is particularly warm, begin checking it before the full 45 minutes.
Step 10: Bake 🔥
Place the loaf pan on the center rack of your preheated oven.
Bake at 375°F for approximately 30–35 minutes.
The bread should develop a beautiful golden-brown crust.
Step 11: Check for Doneness
You can use several indicators.
The loaf should look deeply golden and sound somewhat hollow when gently tapped.
For a more reliable measurement, insert an instant-read thermometer into the center.
The internal temperature should be approximately 190–195°F.
Step 12: Protect the Crust if Necessary
If the top becomes dark before the center reaches the proper temperature, loosely tent it with aluminum foil.
This is most likely to be necessary during the final 10 minutes.
Don’t tightly wrap the loaf.
A loose foil tent is enough to shield the crust from excessive browning.
Step 13: Brush with Butter 🧈
Remove the finished loaf from the oven.
Immediately brush the surface with 1 tablespoon melted butter.
The warm crust absorbs some of the butter, giving it extra flavor and helping create a softer finish.
Step 14: Cool in the Pan
Allow the bread to remain in the loaf pan for approximately 10 minutes.
This gives the structure a little time to settle while still allowing you to remove the loaf before condensation softens the sides excessively.
Step 15: Transfer to a Wire Rack
Carefully remove the loaf from the pan.
Transfer it to a wire cooling rack.
Allow it to cool for at least 1 hour before slicing.
This is one of the most important steps in the entire recipe.
Why You Shouldn’t Slice Hot Bread
Fresh bread smells incredible straight from the oven, so waiting can be difficult.
But the interior is still setting while the loaf cools.
Cutting it immediately can:
- Compress the crumb
- Make the center appear gummy
- Release too much internal moisture
- Make clean slices difficult
- Affect the final texture
For the best sandwich slices, let the loaf cool completely.