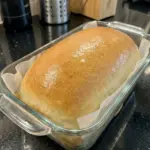
Ingredients
- 3 1/2 cups all-purpose flour
- 1 1/4 cups warm milk, approximately 105–110°F
- 2 1/4 tsp instant yeast
- 2 tbsp honey
- 1 1/2 tsp salt
- 2 tbsp unsalted butter, melted
- 1 large egg
- 1 tbsp melted butter, for brushing the top
Instructions
Step 1: Prepare the Milk and Yeast 🍞
Pour 1 1/4 cups warm milk into a large mixing bowl.
The milk should be approximately 105–110°F.
Add:
- 2 tablespoons honey
- 2 1/4 teaspoons instant yeast
Whisk gently.
Allow the mixture to stand for approximately 5 minutes.
The milk shouldn’t be excessively hot. Very hot liquid can damage the yeast.
Step 2: Add the Butter, Egg, and Salt
Add:
- 2 tablespoons melted unsalted butter
- 1 large egg
- 1 1/2 teaspoons salt
Whisk until the egg is thoroughly incorporated.
If your melted butter is extremely hot, allow it to cool before adding it.
Step 3: Add the Flour
Gradually add 3 1/2 cups all-purpose flour.
Stir with a wooden spoon or sturdy spatula as you add it.
Continue stirring until no obvious pockets of dry flour remain.
The dough should look very soft and sticky.
That’s exactly what you want.
What Should No-Knead Sandwich Bread Dough Look Like?
This dough won’t look exactly like conventional kneaded sandwich bread dough.
Don’t expect a perfectly smooth, firm ball.
Instead, it should be:
- Very soft
- Sticky
- Moist
- Thick enough to hold together
- Easily moved with a spatula
- Softer than traditional hand-kneaded dough
Avoid adding large amounts of extra flour in an attempt to make the dough easy to handle with your hands.
You’re not going to knead it, so it doesn’t need to feel like a conventional kneading dough.
Step 4: Cover the Dough
Cover the mixing bowl tightly with plastic wrap or a clean kitchen towel.
Place it somewhere warm and free from drafts.
Step 5: First Rise
Allow the dough to rise for approximately 1–1 1/2 hours.
Rather than watching only the clock, watch the dough itself.
It should become:
- Noticeably larger
- Puffy
- Airy
- Close to doubled in volume
A warmer kitchen may produce a faster rise.
A cooler kitchen may require more time.
Yeast works on its own schedule, so appearance is more important than an exact number of minutes.
Why No Kneading Is Necessary
Traditional bread dough is kneaded to organize and strengthen its gluten network.
With this loaf, the combination of a soft dough, thorough mixing, and sufficient rising time allows structure to develop without a conventional kneading session.
You still need to mix until the flour is thoroughly hydrated and the dough is cohesive.
But you don’t need to turn it onto the counter and knead it for 8–10 minutes.
That makes this recipe especially convenient for anyone who wants homemade sandwich bread without a stand mixer or intensive hand kneading.
Step 6: Prepare the Loaf Pan
Lightly grease a 9×5-inch loaf pan.
Make sure the corners and sides are coated.
Step 7: Transfer the Dough
Uncover the risen dough.
Using a lightly greased spatula, gently scrape it into the prepared loaf pan.
Because the dough is sticky, greasing the spatula makes this considerably easier.
Avoid aggressively stirring or punching down the dough.
Some deflation is unavoidable during transfer, but you don’t want to squeeze out all the gas created during the first rise.
Step 8: Smooth the Surface
Use the greased spatula to gently smooth the top.
Don’t press down heavily.
You’re simply evening out the surface so the loaf rises more uniformly.
Step 9: Second Rise
Loosely cover the loaf pan.
Let the dough rise for another 30–45 minutes.
It should become visibly puffy and rise close to the top of the pan.
Meanwhile, preheat your oven to 375°F.
How to Know When the Second Rise Is Finished
The dough should look airy and expanded rather than dense.
It should be approaching the top edge of the pan.
Don’t necessarily wait for it to dramatically overflow the pan.
An excessively long second rise can weaken the dough structure and potentially cause the loaf to deflate.
If your kitchen is particularly warm, begin checking it before the full 45 minutes.
Step 10: Bake 🔥
Place the loaf pan on the center rack of your preheated oven.
Bake at 375°F for approximately 30–35 minutes.
The bread should develop a beautiful golden-brown crust.
Step 11: Check for Doneness
You can use several indicators.
The loaf should look deeply golden and sound somewhat hollow when gently tapped.
For a more reliable measurement, insert an instant-read thermometer into the center.
The internal temperature should be approximately 190–195°F.
Step 12: Protect the Crust if Necessary
If the top becomes dark before the center reaches the proper temperature, loosely tent it with aluminum foil.
This is most likely to be necessary during the final 10 minutes.
Don’t tightly wrap the loaf.
A loose foil tent is enough to shield the crust from excessive browning.
Step 13: Brush with Butter 🧈
Remove the finished loaf from the oven.
Immediately brush the surface with 1 tablespoon melted butter.
The warm crust absorbs some of the butter, giving it extra flavor and helping create a softer finish.
Step 14: Cool in the Pan
Allow the bread to remain in the loaf pan for approximately 10 minutes.
This gives the structure a little time to settle while still allowing you to remove the loaf before condensation softens the sides excessively.
Step 15: Transfer to a Wire Rack
Carefully remove the loaf from the pan.
Transfer it to a wire cooling rack.
Allow it to cool for at least 1 hour before slicing.
This is one of the most important steps in the entire recipe.
Why You Shouldn’t Slice Hot Bread
Fresh bread smells incredible straight from the oven, so waiting can be difficult.
But the interior is still setting while the loaf cools.
Cutting it immediately can:
- Compress the crumb
- Make the center appear gummy
- Release too much internal moisture
- Make clean slices difficult
- Affect the final texture
For the best sandwich slices, let the loaf cool completely.