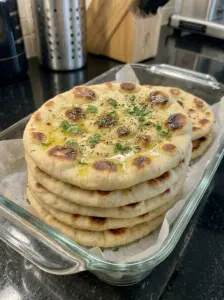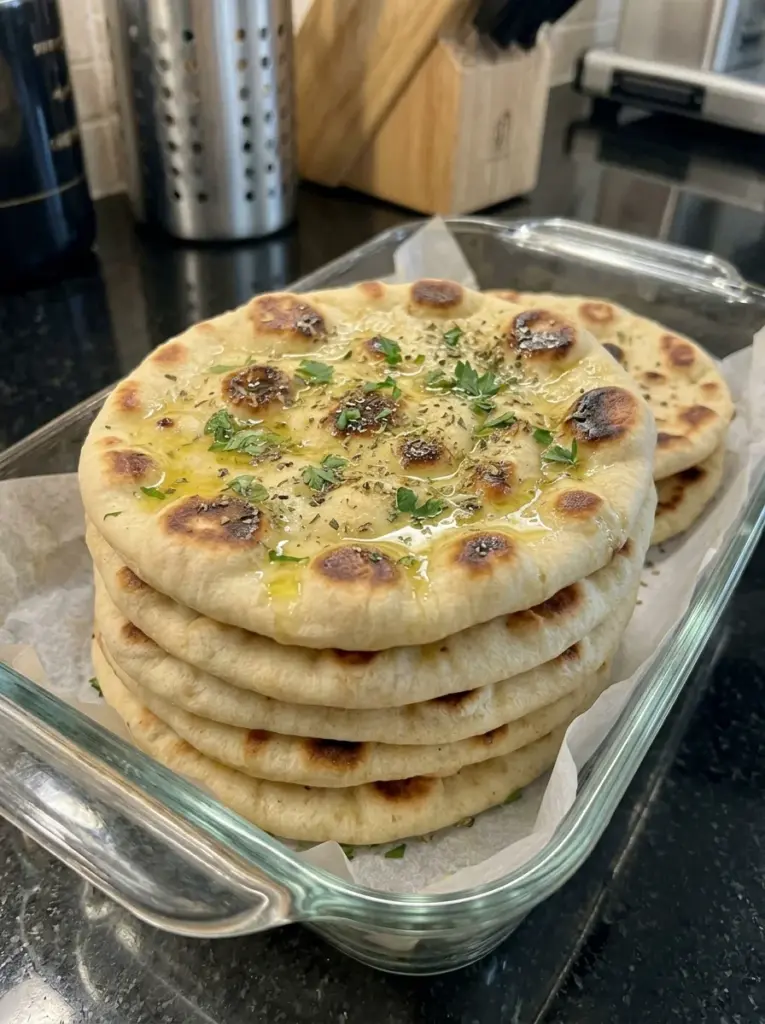
Soft, chewy, fluffy, and beautifully golden around the edges, this Easy No-Knead Greek Flatbread makes warm homemade bread surprisingly simple. 🫓🇬🇷✨
The dough comes together in one bowl using all-purpose flour, warm water, instant yeast, olive oil, oregano, and garlic. There’s no traditional kneading required—simply stir everything together, cover the bowl, and give the yeast time to create a soft, puffy dough.
After rising, the dough is divided into individual portions, gently rolled or stretched, and cooked in a hot skillet until bubbles appear and golden-brown spots develop across the surface.
A final brushing of extra-virgin olive oil keeps the flatbreads soft and adds rich Mediterranean flavor, while oregano and fresh parsley provide a fragrant herbal finish.
Serve these warm with tzatziki, hummus, feta, grilled chicken, gyros, souvlaki, roasted vegetables, olives, or Greek salad, or use them as soft wraps for your favorite Mediterranean-inspired fillings.
Why You’ll Love This No-Knead Greek Flatbread
No kneading required. Stir the dough together with a wooden spoon or spatula and let the yeast do the work.
Soft and fluffy. The relatively soft dough creates tender flatbreads that remain flexible enough for wrapping.
Beautifully golden. A hot skillet creates those characteristic browned spots and lightly crisp edges.
One-bowl dough. Preparation is simple and requires very little cleanup.
No oven required. Every flatbread cooks directly on the stovetop.
Mediterranean flavor. Olive oil, oregano, garlic, and optional fresh parsley give the bread plenty of flavor on its own.
Perfect for wraps. Use them with chicken, beef, falafel, vegetables, or gyro-style fillings.
Great for dipping. Tear warm flatbread into pieces and serve it with hummus, tzatziki, or whipped feta.
Freezer-friendly. Make the full batch and freeze extras for up to three months.
What Is Greek-Style Flatbread?
Greek-style skillet flatbread is a soft, flexible bread that’s excellent for wrapping around grilled meats and vegetables or serving alongside dips and spreads.
Unlike pocket pita, this recipe isn’t specifically designed to inflate completely and create a hollow center.
Instead, the goal is a soft, chewy, relatively thick flatbread with scattered air bubbles, golden-brown spots, and enough flexibility to fold around fillings.
The dough contains olive oil and is cooked in a skillet lightly brushed with additional olive oil.
That gives it a slightly richer texture than a dry-skillet pocket pita.
It’s especially good for:
- Gyros
- Souvlaki
- Grilled chicken
- Falafel
- Hummus
- Tzatziki
- Whipped feta
- Roasted vegetables
- Mediterranean wraps
Ingredients 🫓
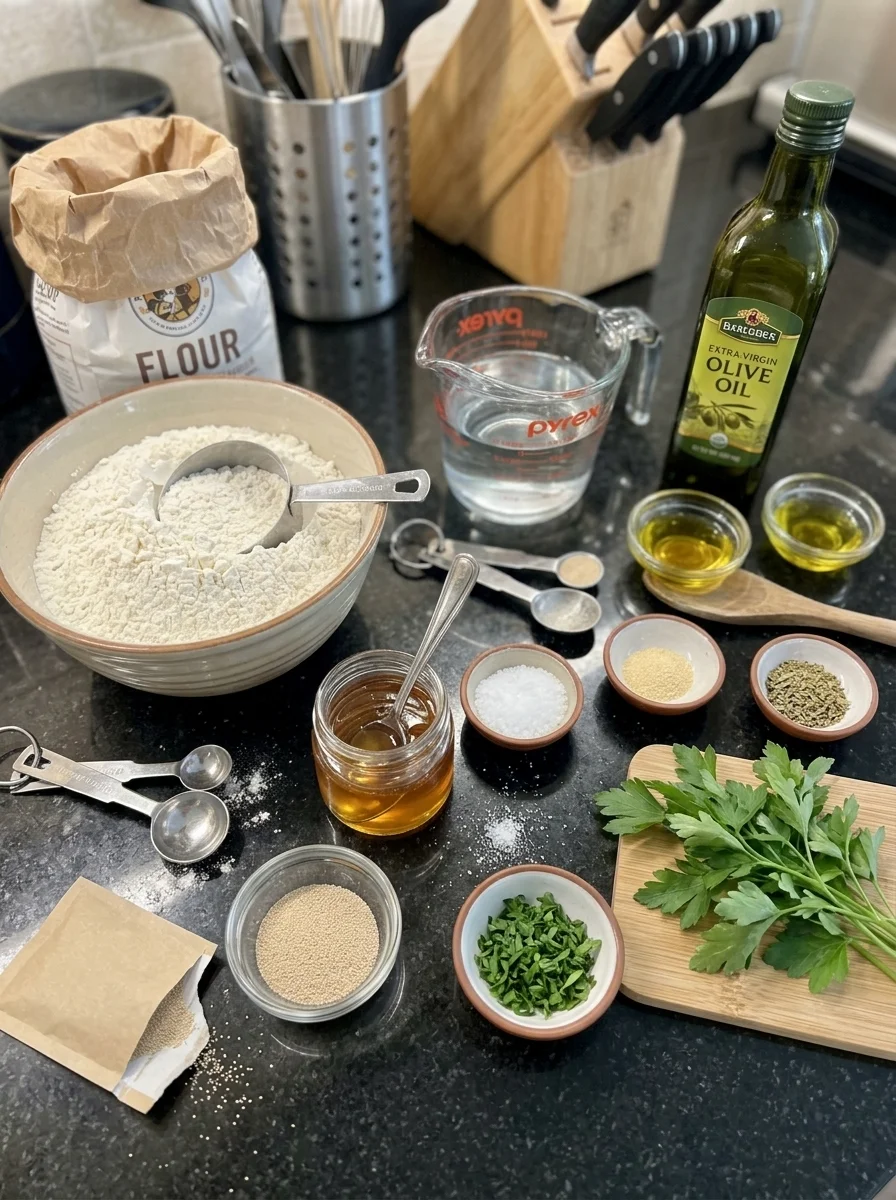
- 3 cups all-purpose flour
- 1 cup warm water, approximately 105–110°F
- 2 1/4 tsp instant yeast
- 1 tsp honey
- 1 tsp salt
- 2 tbsp extra-virgin olive oil
- 1/2 tsp garlic powder
- 1 tsp dried oregano
- 1 tbsp fresh parsley, chopped, optional
- Extra olive oil, for cooking and brushing
Ingredient Notes
All-purpose flour: Provides enough structure for a chewy flatbread while keeping the finished bread tender.
Warm water: Aim for approximately 105–110°F. It should feel comfortably warm rather than hot.
Instant yeast: Provides lift and creates the small air pockets that make the flatbread soft and fluffy.
Honey: A teaspoon adds subtle sweetness and complements the olive oil and herbs.
Salt: Essential for balancing the dough’s flavor.
Extra-virgin olive oil: Adds tenderness, richness, and Mediterranean flavor. It’s used both inside the dough and lightly on the skillet and finished flatbread.
Garlic powder: Gives the bread subtle savory flavor without adding pieces of fresh garlic that could burn against the hot skillet.
Dried oregano: Adds the characteristic herbal flavor that pairs especially well with Greek-inspired fillings.
Fresh parsley: Optional, but excellent sprinkled over the warm olive-oil-brushed flatbreads before serving.
How to Make Easy No-Knead Greek Flatbread
Step 1: Prepare the Yeast Mixture 🍞
Pour 1 cup warm water into a large mixing bowl.
The water should be approximately 105–110°F.
Add:
- 2 1/4 teaspoons instant yeast
- 1 teaspoon honey
Stir gently.
Allow the mixture to stand for approximately 5 minutes.
With instant yeast, this rest isn’t strictly required for activation, but it gives the ingredients time to begin hydrating before the remaining ingredients are added.
Step 2: Add the Dry Ingredients
Add:
- 3 cups all-purpose flour
- 1 teaspoon salt
- 1/2 teaspoon garlic powder
- 1 teaspoon dried oregano
Pour in 2 tablespoons extra-virgin olive oil.
Step 3: Mix the Dough
Using a wooden spoon or sturdy spatula, stir until the ingredients come together.
Continue mixing until there are no large pockets of dry flour.
The dough should be:
- Soft
- Shaggy
- Slightly sticky
- Moist
- Rough rather than perfectly smooth
That’s exactly what you want.
Step 4: Don’t Knead
Once the ingredients are thoroughly combined, stop mixing.
There’s no need to turn the dough onto the counter and knead it until smooth.
This is intentionally a no-knead flatbread dough.
Its relatively soft consistency and long rise allow the flour to hydrate while the dough develops enough structure for shaping and skillet cooking.
What Should No-Knead Flatbread Dough Look Like?
Don’t expect this dough to resemble a stiff pizza dough immediately after mixing.
It should remain somewhat sticky and shaggy.
If you add flour until it becomes completely dry and easy to handle, the finished flatbreads can become denser and less flexible.
The dough will become easier to work with after rising.
Use lightly floured hands and a lightly floured work surface during shaping rather than adding substantial additional flour to the dough itself.
Step 5: Cover the Dough
Cover the mixing bowl with plastic wrap or a clean kitchen towel.
Place it in a warm, draft-free location.
Step 6: Let It Rise 🍞
Allow the dough to rise for approximately 1–1 1/2 hours.
Rather than judging the rise only by the clock, look at the dough.
It should become:
- Noticeably larger
- Puffy
- Airy
- Close to doubled in volume
In a particularly warm kitchen, this may happen in approximately an hour.
In a cooler room, it may require the full 90 minutes or slightly longer.
Why Rising Time Matters
The first rise does much more than simply make the dough larger.
During fermentation, yeast produces gas that creates air pockets throughout the dough.
At the same time, the flour continues hydrating and the dough gains structure.
Because this recipe skips traditional kneading, giving the dough sufficient resting and rising time is particularly important.
Don’t rush to divide it while it still looks dense.
Wait until it’s visibly puffy.
Step 7: Transfer the Dough
Lightly flour your work surface.
Turn the risen dough out of the bowl.
Because the dough is soft, use a bowl scraper or spatula if necessary.
Avoid aggressively punching or flattening it.
Some gas will naturally escape during handling, but gentle handling helps preserve some of the airy structure.
Step 8: Divide Into 8 Portions
Divide the dough into 8 approximately equal pieces.
For extremely consistent flatbreads, you can weigh the entire dough and divide the weight by eight.
Uniform portions will cook more consistently.
Step 9: Shape Into Dough Balls
With lightly floured hands, gently shape each portion into a ball.
The balls don’t need to be perfectly smooth.
Arrange them on the lightly floured work surface and cover them with a clean kitchen towel.
Step 10: Rest for 10–15 Minutes
Allow the dough balls to rest for approximately 10–15 minutes.
Don’t skip this short rest.
Dividing and shaping tightens the gluten.
Resting allows that gluten to relax, which makes each piece easier to stretch or roll without constantly shrinking back toward the center.
How to Shape Greek Flatbread 🫓
Step 11: Lightly Flour the Dough
Take one rested dough ball and dust it lightly with flour.
Lightly flour your work surface as well.
Use only enough flour to prevent sticking.
Step 12: Stretch or Roll
Gently stretch the dough with your hands or use a rolling pin.
Shape it into a round approximately 6–7 inches wide.
Don’t worry about creating a perfect circle.
Slightly irregular homemade flatbreads often look more rustic and appealing.
Step 13: Keep the Thickness Even
More important than creating a perfect shape is maintaining relatively even thickness.
Extremely thin sections may become crisp or burn before thicker sections finish cooking.
Thick areas may remain doughy.
Aim for a consistent thickness from the center toward the edges.
Step 14: Keep the Dough Covered
Keep the remaining dough balls covered while you work.
This prevents their surfaces from drying out.
You can shape the flatbreads one at a time as you cook or roll several in advance and keep them covered.
How to Cook Greek Flatbread in a Skillet 🔥
Step 15: Preheat the Skillet
Place a large cast-iron skillet or heavy-bottomed pan over medium-high heat.
Give it enough time to become thoroughly hot.
The dough should begin bubbling fairly quickly once it touches the skillet.
Step 16: Add a Small Amount of Olive Oil
Lightly brush the skillet with olive oil.
You only need a very thin coating.
The goal isn’t to deep-fry the flatbread.
A small amount helps produce the characteristic golden surface while adding extra flavor.
Step 17: Cook the First Side
Carefully place one shaped flatbread into the hot skillet.
Cook for approximately 1–2 minutes.
Watch the surface.
Small and medium bubbles should begin appearing.
Lift one edge with a spatula and check underneath.
You want scattered golden-brown spots.
Step 18: Flip
Turn the flatbread over.
Cook the second side for another 1–2 minutes.
It may puff in several areas as steam forms inside the dough.
Step 19: Press Gently if Necessary
If certain areas aren’t making contact with the skillet, gently press them with a spatula.
Don’t aggressively flatten the entire flatbread.
You want to maintain some of those soft air pockets.
Step 20: Remove When Cooked Through
Once both sides are golden in spots and the center is cooked through, remove the flatbread from the skillet.
Avoid leaving it on the heat unnecessarily.
Overcooking is one of the easiest ways to turn soft flatbread into dry or stiff bread.
Step 21: Repeat
Cook the remaining seven portions.
Add another very small amount of olive oil to the skillet whenever necessary.
Watch the skillet temperature as you continue.
Heavy pans, particularly cast iron, retain heat and may become increasingly hot during the batch.
Reduce the burner slightly if later flatbreads begin browning too quickly.
Finish with Olive Oil & Herbs 🌿
As soon as a flatbread comes off the skillet, lightly brush its surface with extra-virgin olive oil.
If desired, sprinkle with:
- Fresh chopped parsley
- Additional dried oregano
- A tiny pinch of salt
Place it inside a clean kitchen towel.
Add each newly cooked flatbread to the stack and cover again.
Why You Should Cover Hot Flatbread
This simple step makes a significant difference.
Freshly cooked flatbread contains plenty of moisture.
If it’s left uncovered on a plate, steam immediately escapes and the surface begins drying.
Stacking the warm breads and covering them with a clean towel traps some of that moisture.
The result is flatbread that stays:
- Softer
- More flexible
- Easier to fold
- Better for wraps
- Less likely to crack
Don’t seal extremely hot flatbread inside an airtight plastic bag immediately, however, because excessive condensation can accumulate.
Use the towel while they’re hot, then transfer the cooled breads to proper storage.
Greek Flatbread vs. Pocket Pita
Although the two breads use similar ingredients, they aren’t exactly the same.
Pocket Pita
Pocket pita is generally cooked with the goal of creating rapid steam expansion that separates the interior into two layers.
It’s commonly cooked on a very hot, dry surface.
The ideal result is a dramatic full puff that leaves a hollow center.
Greek-Style Flatbread
This recipe is designed primarily for a soft, flexible, chewy flatbread.
It doesn’t need to form a complete internal pocket.
Instead, it develops scattered bubbles and golden-brown spots while remaining substantial enough to wrap around fillings.
The skillet is also lightly brushed with olive oil, giving the exterior additional flavor and color.
Both are delicious, but they serve slightly different purposes.
Recipe Information ⏱️
Prep Time: 15 minutes
Rise Time: 1–1 1/2 hours
Rest Time: 10–15 minutes
Cook Time: approximately 15 minutes
Total Time: approximately 1 hour 45 minutes
Yield: 8 flatbreads
Serving Size: 1 flatbread
Estimated Calories: approximately 190 calories per flatbread
The exact calorie count will vary depending on the flour, olive oil used during cooking and finishing, and exact portion sizes.
Tips for the Best No-Knead Greek Flatbread
Keep the dough soft. Don’t add excessive flour simply because it feels sticky.
Use warm—not hot—water. Approximately 105–110°F is ideal.
Give the dough enough time to rise. Look for a visibly puffy dough rather than relying entirely on the clock.
Use lightly floured hands. This makes sticky dough easier to divide without drying it out.
Rest after dividing. Ten to fifteen minutes makes shaping considerably easier.
Don’t obsess over perfect circles. Even thickness matters more than perfect shape.
Preheat your skillet properly. A lukewarm pan can produce pale, dry flatbread.
Use only a little oil. A thin coating is enough.
Watch the heat throughout cooking. The skillet can become hotter as you work through the batch.
Don’t overcook. Remove each flatbread once it’s cooked through and golden.
Brush with olive oil while warm. This adds flavor and helps maintain a tender surface.
Keep cooked flatbreads covered. Trapped steam keeps them soft and flexible.
Why Is My Flatbread Tough?
There are several possible causes.
Too Much Flour
This is one of the most common reasons.
The dough should remain relatively soft.
Adding enough flour to make it completely dry can produce dense or tough bread.
Overcooking
A few extra minutes in the skillet can evaporate considerable moisture.
Cook only until each side has golden spots and the center is done.
Skillet Temperature Was Too Low
This may sound surprising, but low heat can also dry out flatbread.
If the skillet isn’t hot enough, the dough needs much longer to cook.
That extended cooking time allows more moisture to escape.
Flatbread Was Left Uncovered
Even perfectly cooked bread can become firm as it cools if left exposed to dry air.
Stack and cover the hot flatbreads.
How Hot Should the Skillet Be?
Medium-high heat is a good starting point.
The exact burner setting depends on your cookware and stove.
Cast iron stores substantial heat, while thinner pans respond more quickly to burner adjustments.
Look for visual cues.
After placing the dough in the pan, bubbles should begin developing relatively quickly.
The underside should develop golden-brown spots within approximately 1–2 minutes.
If it remains pale after two minutes, the skillet may need additional heat.
If it develops black spots almost immediately while the center remains raw, reduce the heat.
Why Does Flatbread Bubble?
The bubbles are created largely by steam and expanding gases inside the dough.
When the moist dough touches the hot skillet, the bottom begins cooking rapidly.
Moisture inside heats and becomes steam.
At the same time, air and fermentation gases trapped in the dough expand.
That pushes sections of the bread upward and creates the characteristic bubbles.
Unlike pocket pita, you don’t need the entire flatbread to inflate.
Scattered bubbles are exactly what you want.
What to Serve with Greek Flatbread 🇬🇷
Tzatziki
Warm flatbread and cool cucumber-yogurt tzatziki are a classic combination.
Tear the bread into pieces and dip directly into the sauce.
Hummus
Serve the flatbread warm with classic hummus, roasted garlic hummus, or roasted red pepper hummus.
Whipped Feta
Soft flatbread works especially well with creamy, salty whipped feta.
Greek Salad
Serve alongside tomatoes, cucumber, olives, red onion, and feta for an easy Mediterranean meal.
Grilled Chicken
Slice seasoned grilled chicken and wrap it inside the warm flatbread with lettuce, tomato, onion, and tzatziki.
Souvlaki
Use the flatbread as the base for chicken or pork souvlaki with fresh vegetables and sauce.
Gyro-Style Wrap
Add gyro-style meat, tomato, red onion, lettuce, and tzatziki.
Roasted Vegetables
Fill with roasted zucchini, peppers, eggplant, onion, feta, and hummus.
Falafel
Add falafel, vegetables, hummus, and tahini or tzatziki for a satisfying vegetarian wrap.
Easy Greek Flatbread Wrap Ideas
Chicken Tzatziki Wrap
Fill with:
- Grilled chicken
- Tzatziki
- Tomatoes
- Cucumber
- Red onion
- Lettuce
Beef Gyro-Style Wrap
Add seasoned beef, tomato, onion, feta, and tzatziki.
Mediterranean Vegetable Wrap
Use hummus as the base and add roasted vegetables, olives, cucumber, and feta.
Falafel Flatbread
Add falafel, hummus, cucumber, tomato, pickled onion, and tahini.
Greek Breakfast Wrap
Fill with scrambled eggs, feta, tomatoes, spinach, and herbs.
Easy Flavor Variations
Garlic Herb Flatbread
Increase the garlic powder slightly and add additional dried herbs.
Rosemary Olive Oil Flatbread
Replace or complement the oregano with finely chopped rosemary.
Parsley & Garlic Flatbread
Add chopped parsley directly to the dough along with the garlic powder.
Za’atar Flatbread
Sprinkle za’atar over the olive-oil-brushed flatbreads after cooking for a Mediterranean-inspired variation.
Feta Herb Flatbread
Sprinkle crumbled feta over the warm finished bread.
Spicy Flatbread 🌶️
Add crushed red pepper flakes to the dough or sprinkle them over the olive oil after cooking.
Lemon Herb Flatbread 🍋
Finish the bread with olive oil, parsley, oregano, and a little finely grated lemon zest.
Make-Ahead Instructions
These flatbreads can be prepared earlier in the day and reheated just before serving.
Cook the entire batch and keep the breads covered while they cool.
Once completely cooled, transfer them to an airtight container or zip-top bag.
When you’re ready to serve, warm them briefly in a skillet.
You can also prepare a larger batch and freeze the extras.
Storage Information 🥡
Allow the flatbreads to cool before storing.
Place them in an airtight container or zip-top bag.
Store at room temperature for up to 3 days.
Keep the container tightly sealed because flatbread can dry quickly when exposed to air.
For the best texture, reheat before serving.
Freezer Instructions ❄️
These no-knead flatbreads freeze very well.
Allow them to cool completely.
Place parchment paper between each flatbread.
Stack them inside a freezer-safe bag or airtight freezer container.
Remove as much excess air as practical and seal securely.
Freeze for up to 3 months.
The parchment paper allows you to remove one or two pieces without thawing the entire stack.
How to Reheat Greek Flatbread
Skillet Method
Heat a dry skillet over medium heat.
Add one flatbread.
Warm for approximately 20–30 seconds per side, or just until soft and heated through.
Avoid cooking it for several additional minutes because that can dry it out.
Microwave Method
Place a flatbread on a microwave-safe plate.
Cover it with a slightly damp paper towel.
Microwave briefly until warm and soft.
From Frozen
For the best result, allow frozen flatbread to thaw briefly and then warm it in a skillet.
You can also reheat it gently from frozen, but avoid overheating.
Troubleshooting
Why is my dough too sticky?
Some stickiness is expected.
Use lightly floured hands and a lightly floured surface rather than adding large quantities of flour directly to the dough.
Why is my dough too dry?
Too much flour may have been added.
Measure flour carefully and remember that this is supposed to be a soft dough.
Why didn’t my dough rise?
Your yeast may be old, your kitchen may be cold, or the water may have been too hot.
Give the dough additional time if the room is cool.
Why does the dough shrink when I roll it?
The gluten is still tense.
Cover the dough and let it rest another 5–10 minutes, then try again.
Why is my flatbread pale?
Your skillet may not be hot enough.
Allow it to preheat more thoroughly before adding the next piece.
Why does my flatbread burn?
The skillet is too hot or too much oil has accumulated.
Reduce the heat slightly and wipe away excess oil if necessary.
Why is the center still raw?
The dough may have been shaped too thickly or the skillet may be so hot that the exterior browned before the center cooked.
Aim for even thickness and adjust the burner as necessary.
Why is my flatbread crispy instead of soft?
It was probably rolled too thin, overcooked, or left uncovered after cooking.
Why isn’t my flatbread perfectly round?
That’s completely fine.
These are rustic homemade flatbreads, and shape has little effect on flavor.
Focus on even thickness instead.
Why didn’t it create a pocket?
This recipe isn’t designed specifically for a complete pocket.
Scattered puffing and bubbles are normal.
For a hollow center, use a pocket pita recipe designed around very high heat and dry-skillet cooking.
Frequently Asked Questions
Do I really need to knead this flatbread?
No. This recipe is specifically designed as a no-knead dough.
Can I make it without a stand mixer?
Absolutely. A mixing bowl and wooden spoon or spatula are all you need.
What temperature should the water be?
Approximately 105–110°F.
Can I use instant yeast?
Yes. The recipe uses 2 1/4 teaspoons instant yeast.
Why do I let the yeast mixture sit for five minutes?
With instant yeast, the rest isn’t essential for activation, but it gives the yeast, honey, and water time to combine and begin hydrating before the remaining ingredients are added.
How long should the dough rise?
Approximately 1–1 1/2 hours, or until noticeably puffy and close to doubled.
Why do the dough balls need to rest?
The 10–15 minute rest relaxes the gluten and makes them easier to stretch or roll.
Do I need a cast-iron skillet?
No, but cast iron works especially well because it retains heat. Another heavy-bottomed skillet can also work.
Should I oil the skillet?
Yes, but only very lightly.
Does Greek flatbread need to puff completely?
No. Some bubbles and partial puffing are desirable, but a full hollow pocket isn’t required.
Can I use this for gyros?
Yes. Its soft, flexible texture makes it particularly good for gyro-style wraps.
Can I serve it with hummus?
Absolutely. It’s excellent torn into pieces and served warm with hummus.
Can I make the flatbread ahead?
Yes. Store the cooled breads airtight and briefly reheat before serving.
How long does homemade flatbread last?
Store it airtight at room temperature for up to 3 days.
Can I freeze it?
Yes. Freeze with parchment between the individual flatbreads for up to 3 months.
What’s the best way to keep it soft?
Brush the hot flatbreads lightly with olive oil, stack them, and keep them covered with a clean kitchen towel while you finish cooking the batch.
Final Thoughts
This Easy No-Knead Greek Flatbread is a simple way to make warm, soft, chewy homemade bread without traditional kneading or complicated equipment. 🫓🇬🇷✨
A basic mixture of flour, warm water, yeast, honey, olive oil, garlic, and oregano becomes a soft, puffy dough with little hands-on work. After rising, each portion is gently shaped and cooked for just a few minutes in a hot skillet until beautifully golden and lightly puffed.
The keys to the best texture are simple: keep the dough soft, give it enough time to rise, let the divided portions rest before shaping, use a properly heated skillet, and avoid overcooking.
Brush the finished flatbreads with olive oil, sprinkle them with herbs, and keep them stacked beneath a clean towel so they remain soft and flexible.
Serve them warm with tzatziki, hummus, feta, gyros, souvlaki, grilled chicken, falafel, roasted vegetables, or Greek salad, or turn them into easy Mediterranean wraps.
And with three-day room-temperature storage and freezer-friendly portions, you can make a batch once and keep homemade Greek-style flatbread ready for meals throughout the week.
Print
Easy No-Knead Greek Flatbread
Ingredients
- 3 cups all-purpose flour
- 1 cup warm water, approximately 105–110°F
- 2 1/4 tsp instant yeast
- 1 tsp honey
- 1 tsp salt
- 2 tbsp extra-virgin olive oil
- 1/2 tsp garlic powder
- 1 tsp dried oregano
- 1 tbsp fresh parsley, chopped, optional
- Extra olive oil, for cooking and brushing
Instructions
Step 1: Prepare the Yeast Mixture 🍞
Pour 1 cup warm water into a large mixing bowl.
The water should be approximately 105–110°F.
Add:
- 2 1/4 teaspoons instant yeast
- 1 teaspoon honey
Stir gently.
Allow the mixture to stand for approximately 5 minutes.
With instant yeast, this rest isn’t strictly required for activation, but it gives the ingredients time to begin hydrating before the remaining ingredients are added.
Step 2: Add the Dry Ingredients
Add:
- 3 cups all-purpose flour
- 1 teaspoon salt
- 1/2 teaspoon garlic powder
- 1 teaspoon dried oregano
Pour in 2 tablespoons extra-virgin olive oil.
Step 3: Mix the Dough
Using a wooden spoon or sturdy spatula, stir until the ingredients come together.
Continue mixing until there are no large pockets of dry flour.
The dough should be:
- Soft
- Shaggy
- Slightly sticky
- Moist
- Rough rather than perfectly smooth
That’s exactly what you want.
Step 4: Don’t Knead
Once the ingredients are thoroughly combined, stop mixing.
There’s no need to turn the dough onto the counter and knead it until smooth.
This is intentionally a no-knead flatbread dough.
Its relatively soft consistency and long rise allow the flour to hydrate while the dough develops enough structure for shaping and skillet cooking.
What Should No-Knead Flatbread Dough Look Like?
Don’t expect this dough to resemble a stiff pizza dough immediately after mixing.
It should remain somewhat sticky and shaggy.
If you add flour until it becomes completely dry and easy to handle, the finished flatbreads can become denser and less flexible.
The dough will become easier to work with after rising.
Use lightly floured hands and a lightly floured work surface during shaping rather than adding substantial additional flour to the dough itself.
Step 5: Cover the Dough
Cover the mixing bowl with plastic wrap or a clean kitchen towel.
Place it in a warm, draft-free location.
Step 6: Let It Rise 🍞
Allow the dough to rise for approximately 1–1 1/2 hours.
Rather than judging the rise only by the clock, look at the dough.
It should become:
- Noticeably larger
- Puffy
- Airy
- Close to doubled in volume
In a particularly warm kitchen, this may happen in approximately an hour.
In a cooler room, it may require the full 90 minutes or slightly longer.
Why Rising Time Matters
The first rise does much more than simply make the dough larger.
During fermentation, yeast produces gas that creates air pockets throughout the dough.
At the same time, the flour continues hydrating and the dough gains structure.
Because this recipe skips traditional kneading, giving the dough sufficient resting and rising time is particularly important.
Don’t rush to divide it while it still looks dense.
Wait until it’s visibly puffy.
Step 7: Transfer the Dough
Lightly flour your work surface.
Turn the risen dough out of the bowl.
Because the dough is soft, use a bowl scraper or spatula if necessary.
Avoid aggressively punching or flattening it.
Some gas will naturally escape during handling, but gentle handling helps preserve some of the airy structure.
Step 8: Divide Into 8 Portions
Divide the dough into 8 approximately equal pieces.
For extremely consistent flatbreads, you can weigh the entire dough and divide the weight by eight.
Uniform portions will cook more consistently.
Step 9: Shape Into Dough Balls
With lightly floured hands, gently shape each portion into a ball.
The balls don’t need to be perfectly smooth.
Arrange them on the lightly floured work surface and cover them with a clean kitchen towel.
Step 10: Rest for 10–15 Minutes
Allow the dough balls to rest for approximately 10–15 minutes.
Don’t skip this short rest.
Dividing and shaping tightens the gluten.
Resting allows that gluten to relax, which makes each piece easier to stretch or roll without constantly shrinking back toward the center.
How to Shape Greek Flatbread 🫓
Step 11: Lightly Flour the Dough
Take one rested dough ball and dust it lightly with flour.
Lightly flour your work surface as well.
Use only enough flour to prevent sticking.
Step 12: Stretch or Roll
Gently stretch the dough with your hands or use a rolling pin.
Shape it into a round approximately 6–7 inches wide.
Don’t worry about creating a perfect circle.
Slightly irregular homemade flatbreads often look more rustic and appealing.
Step 13: Keep the Thickness Even
More important than creating a perfect shape is maintaining relatively even thickness.
Extremely thin sections may become crisp or burn before thicker sections finish cooking.
Thick areas may remain doughy.
Aim for a consistent thickness from the center toward the edges.
Step 14: Keep the Dough Covered
Keep the remaining dough balls covered while you work.
This prevents their surfaces from drying out.
You can shape the flatbreads one at a time as you cook or roll several in advance and keep them covered.
How to Cook Greek Flatbread in a Skillet 🔥
Step 15: Preheat the Skillet
Place a large cast-iron skillet or heavy-bottomed pan over medium-high heat.
Give it enough time to become thoroughly hot.
The dough should begin bubbling fairly quickly once it touches the skillet.
Step 16: Add a Small Amount of Olive Oil
Lightly brush the skillet with olive oil.
You only need a very thin coating.
The goal isn’t to deep-fry the flatbread.
A small amount helps produce the characteristic golden surface while adding extra flavor.
Step 17: Cook the First Side
Carefully place one shaped flatbread into the hot skillet.
Cook for approximately 1–2 minutes.
Watch the surface.
Small and medium bubbles should begin appearing.
Lift one edge with a spatula and check underneath.
You want scattered golden-brown spots.
Step 18: Flip
Turn the flatbread over.
Cook the second side for another 1–2 minutes.
It may puff in several areas as steam forms inside the dough.
Step 19: Press Gently if Necessary
If certain areas aren’t making contact with the skillet, gently press them with a spatula.
Don’t aggressively flatten the entire flatbread.
You want to maintain some of those soft air pockets.
Step 20: Remove When Cooked Through
Once both sides are golden in spots and the center is cooked through, remove the flatbread from the skillet.
Avoid leaving it on the heat unnecessarily.
Overcooking is one of the easiest ways to turn soft flatbread into dry or stiff bread.
Step 21: Repeat
Cook the remaining seven portions.
Add another very small amount of olive oil to the skillet whenever necessary.
Watch the skillet temperature as you continue.
Heavy pans, particularly cast iron, retain heat and may become increasingly hot during the batch.
Reduce the burner slightly if later flatbreads begin browning too quickly.