
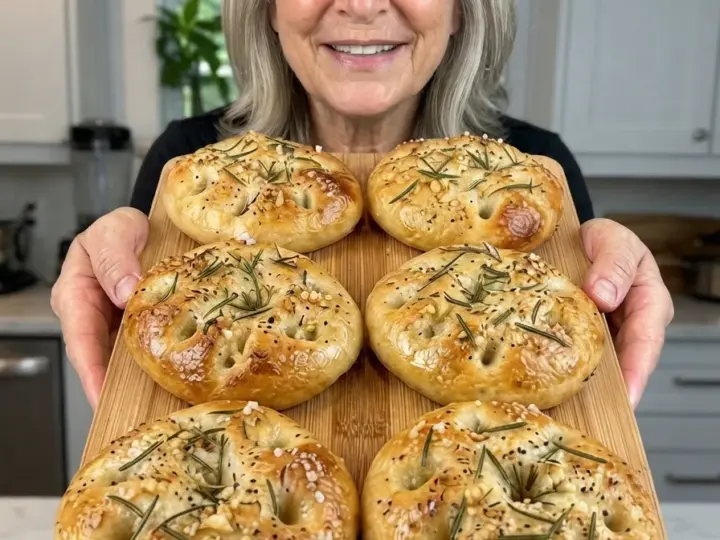
No-Knead Garlic Rosemary Mini Focaccia brings together soft bread, golden olive-oil edges, fragrant rosemary, and a warm garlic finish in small individual rounds. The dough mixes in a bowl with a spoon, then develops during a couple of rests and a gentle folding step. Small metal pans support the sticky dough and help the bottoms bake with a little crispness.
The garlic is added in a warm finishing oil after baking, rather than scattered raw over the dough for the entire time in a hot oven. This gives the finished bread a noticeable garlic flavor while reducing the chance of bitter, scorched pieces. Rosemary goes on before baking so its aroma carries through the surface.
Serve a mini focaccia with soup or salad, split one for a small sandwich, or cut them into wedges for the table. They are best on the day they are baked, when the olive-oil edges are crisp and the centers are still soft.
Development note: This is an untested proposed recipe created for the requested title. The quantities, pan arrangement, and baking range need a home-kitchen test before publication as a tested recipe. Follow the dough and browning cues alongside the suggested times.
What Makes This Focaccia No-Knead?
The dough is stirred thoroughly rather than worked on a counter until smooth. A rest hydrates the flour, and a simple set of folds helps the dough become more cohesive without a kneading session.
The dough remains sticky. That moisture helps create a softer interior, but it also means you should transfer it with a scraper and lightly oiled hands rather than trying to handle it like a firm dinner-roll dough.
This is a same-day method. It is designed for convenience and a fresh rosemary-garlic flavor, not the deeper fermented flavor of a long, cold-rise focaccia. An overnight option is discussed separately so the two schedules are not confused.
Ingredients
Dough
- 3 cups all-purpose flour, spooned and leveled, approximately 12 3/4 ounces by weight
- 2 1/4 teaspoons instant yeast
- 1 teaspoon granulated sugar or honey
- 1 1/4 teaspoons fine salt
- 1 1/4 cups lukewarm water
- 2 tablespoons extra-virgin olive oil
Pans and Rosemary Topping
- 2 tablespoons olive oil for the pans
- 1 tablespoon olive oil for the tops
- 1 tablespoon finely chopped fresh rosemary
- 1/4 teaspoon flaky salt, or a light sprinkle to taste
- Freshly ground black pepper, optional
Garlic Finish
- 1 tablespoon olive oil
- 3 garlic cloves, finely minced
- 1 teaspoon chopped fresh parsley, optional
Yield: Six mini focaccia rounds, each about 4 inches across, depending on pans and dough expansion.
Oil total: Six tablespoons across the dough, pans, topping, and finishing mixture. Keep these measured portions separate so you do not accidentally use the full amount at one stage.
Pan Size and Portioning
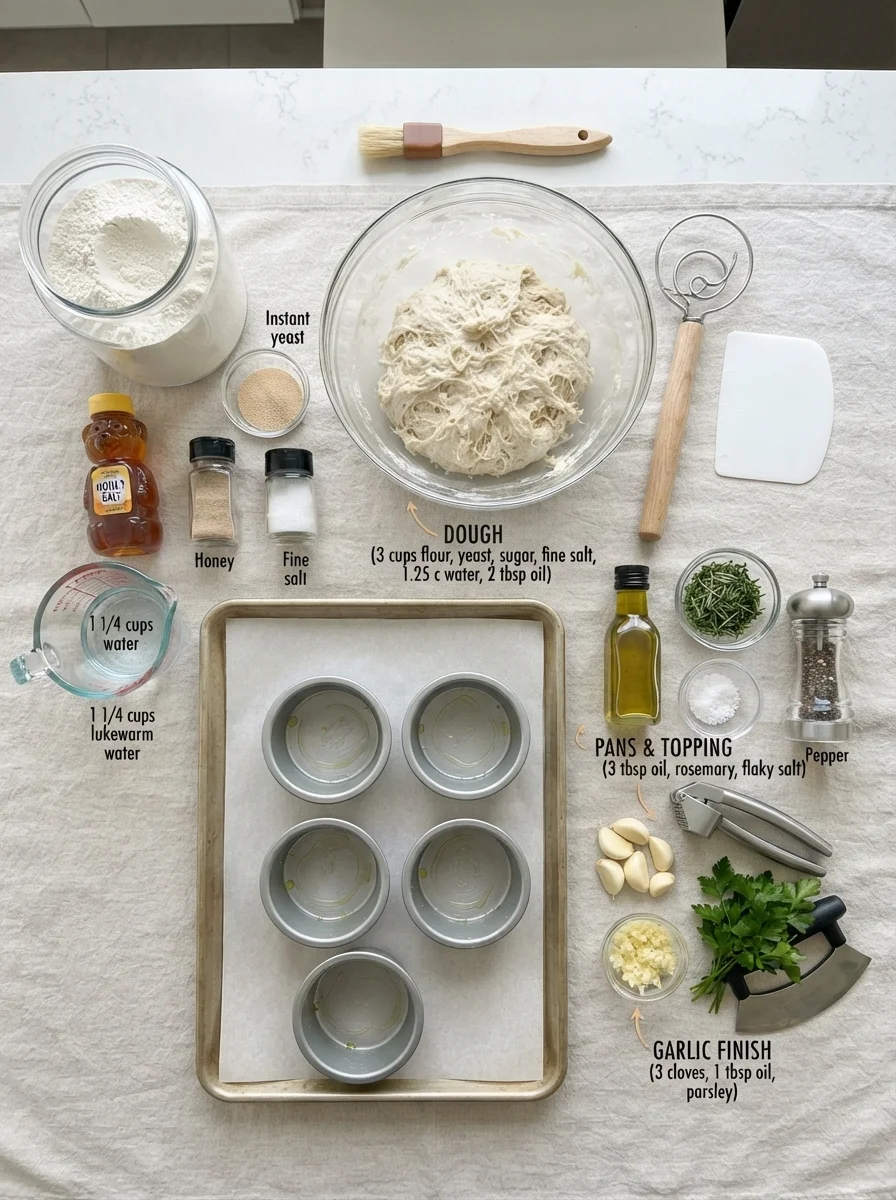
Use six oven-safe metal mini pans approximately 4 inches across with sides at least 1 inch high. Small round cake pans or suitable metal tart pans without removable, leak-prone bottoms can work. Put them on a rimmed baking sheet for easier handling.
Do not use shallow decorative dishes unless they are rated for baking and have enough room for the dough to rise. The small pans need to contain oil as well as expanding dough.
A standard muffin pan makes a different size and shape. A baking sheet alone also produces flatter rounds because the dough can spread. Neither is a verified identical replacement for the individual pans described here.
For a first test, divide the dough evenly by weight if possible. Similar portions bake more consistently and make it easier to compare the pans.
Ingredient Notes
Flour
All-purpose flour gives a tender starting point. Measure carefully because a compacted cup can add significantly more flour than intended and turn the sticky dough into a heavy one.
If measuring by volume, fluff the flour, spoon it into the cup, and level the top. Do not press it down or scoop a tightly packed measure directly from the bag.
Bread flour can be tried for a slightly chewier variation, but it may absorb water differently. Whole-wheat flour is not an equivalent complete substitution; its bran changes both absorption and structure.
Yeast
Instant yeast can be mixed directly with the flour. Check that it has been stored correctly and is still active.
Active dry yeast can be used by dissolving it in the measured lukewarm water with the sugar according to its package directions before combining. That changes the sequence, and the rise may take a different amount of time.
The yeast quantity does not guarantee an exact schedule. Room temperature, water temperature, and the dough’s starting temperature all affect how quickly it expands.
Water
Use lukewarm water, approximately 95–105°F, rather than hot water. A thermometer is more useful than guessing from steam.
The dough is intentionally moist. Do not add flour repeatedly until it feels dry enough to knead comfortably. That would change the kind of bread you are making.
If your flour measurement is accurate and the dough still seems exceptionally loose, allow the initial rest before making any adjustment. Flour absorbs water over time.
Olive Oil
Olive oil contributes flavor, tenderness, and the characteristic pan-fried edge where the bread meets the oiled metal.
The oil for the pans is part of the baking method, not just a token grease layer. Divide it evenly so every mini pan has a thin coating across the bottom and lower sides.
A mild extra-virgin oil lets the rosemary and garlic stand out. A strongly peppery oil adds its own character, which may be welcome if you enjoy it.
Rosemary
Finely chop fresh rosemary so the pieces distribute evenly and do not feel like long needles on the bread. Discard tough woody stems.
Fresh rosemary is aromatic, and a modest quantity goes a long way on six small breads. If using dried rosemary as a separate test, start with less and crush it finely; it is not a spoon-for-spoon replacement for fresh leaves.
Garlic
Fresh minced garlic is warmed briefly in the finishing oil. The goal is fragrance and a softened raw edge, not dark brown pieces.
Prepare the mixture shortly before the bread comes out of the oven. Do not make a jar of garlic oil and leave it at room temperature for later use. This recipe uses a small fresh batch immediately.
Salt and Sweetener
Fine salt seasons the dough, while flaky salt on top adds occasional salty bites. They have different textures and are used in different amounts.
The small quantity of sugar or honey does not make sweet bread. It simply rounds out the flavor. Do not add a large extra amount without considering browning and dough behavior.
Equipment
Have a large bowl, sturdy spoon or dough whisk, flexible scraper, measuring tools, six suitable mini pans, a rimmed baking sheet, and a cooling rack ready.
A kitchen scale is useful for the flour and for dividing portions. A small saucepan or skillet is needed for the garlic finish.
Lightly oiled hands make handling the dough easier. You should not need to cover the counter with flour or use a mixer for this method.
How to Make Mini Focaccia
1. Mix the Dough
Whisk the flour, instant yeast, sugar, and fine salt in the bowl. Add the lukewarm water and two tablespoons olive oil.
Stir until no dry flour remains, scraping the bottom and sides. Continue stirring firmly for about a minute so the mixture becomes cohesive.
Expect a rough, sticky dough that stretches from the spoon and settles slowly. It should not look like a dry ball, but it should have more body than a pourable batter.
2. Rest and Fold
Cover and let the dough rest for about 20 minutes. This gives the flour time to hydrate and makes the mixture easier to fold.
With lightly oiled or damp fingers, lift one side of the dough and fold it toward the center. Rotate the bowl and repeat from three more sides. If using a scraper, lift and turn the dough gently rather than chopping through it.
This is one set of folds, not a kneading session. The dough may look smoother afterward, but it will remain soft and sticky.
3. Allow the First Rise
Cover and leave in a comfortably warm, draft-free place for approximately another 45 to 75 minutes, until noticeably expanded and close to doubled from its original size.
Look for bubbles and a softer, puffy appearance. In a cool room, allow more time. Do not place it on a hot stovetop or in an oven that is switched on.
The 20-minute rest is part of the first-rise period. Avoid adding it again as a separate long proof when estimating the schedule.
4. Oil the Pans
Divide two tablespoons olive oil among the six pans, about one teaspoon per pan. Spread it over the bottoms and lower sides.
Arrange the pans on a rimmed sheet. Check that there is room around them for heat circulation rather than stacking or tightly overlapping them.
A thin layer of oil should remain visible. If the pans have removable bottoms that leak, choose different containers instead of trying to compensate with more oil.
5. Divide the Dough
Release the dough gently from the sides of the bowl and divide into six similar portions with a lightly oiled scraper.
Transfer one portion into each pan. Turn it gently so the surface picks up a little oil, then ease it toward the edges with your fingertips.
Do not force resistant dough. If it pulls back, cover and let it relax for 10 minutes before stretching again. That relaxation fits within the pan-rise period.
6. Let the Mini Breads Become Puffy
Cover loosely and let rise for about 30 to 45 minutes, until soft, expanded, and visibly airy. They should fill more of the pan and jiggle slightly when the sheet is moved gently.
The dough should not need to be squeezed firmly into a precise disc. Overhandling can push out the bubbles you are trying to preserve.
Begin heating the oven to 425°F during this period. Place a rack near the center and give the oven time to finish preheating.
7. Add Rosemary and Dimples
Mix the tablespoon of topping oil with the chopped rosemary. Divide over the six portions.
With lightly oiled fingertips, press straight down to form dimples across the surface. Press deeply enough to create pockets without tearing through the dough or scraping the pan.
Sprinkle lightly with flaky salt and optional black pepper. The oil and herbs should sit in some of the dimples rather than forming a dry layer across the top.
8. Bake
Bake for approximately 18 to 24 minutes, until the tops are golden and the edges are browned. Rotate the sheet if your oven browns unevenly, preferably after the structure has begun to set.
Check a bread near the end by lifting an edge carefully with a utensil. The underside should be golden and set, not pale and wet. Pan material and dough depth can change the baking time.
If the tops color quickly but the bottoms remain pale, adjust the rack position for the final minutes as appropriate for your oven. Watch closely rather than extending the bake unattended.
9. Prepare the Garlic Finish
While the bread finishes baking, put one tablespoon olive oil and the minced garlic in a small pan over low heat.
Warm gently, stirring, just until fragrant and the raw edge begins to soften, approximately 30 to 60 seconds once the oil is warm. Remove from the heat before the garlic turns dark. Small quantities can burn quickly.
Stir in optional parsley after removing the pan from the heat. Use the finish immediately rather than holding it warm for an extended period.
10. Finish and Cool Briefly
Let the breads stand in their pans for about 3 to 5 minutes. Remove carefully and place on a rack so steam does not soften the bottoms unnecessarily.
Brush or spoon the warm garlic oil over the tops, dividing the garlic evenly. A small amount per bread is enough.
Cool for another 10 to 15 minutes before eating. For sandwich-style slicing, allow more cooling so the interior can support a clean cut.
Signs to Watch Instead of the Clock
During the first rise, watch the dough volume and bubbles. A dough that has barely expanded is not ready simply because the listed time has passed.
During the pan rise, watch for puffiness and a delicate feel. Dough that collapses when touched may have proofed too long.
During baking, check both color and structure. The top can brown before the bottom is sufficiently baked, especially in an unsuitable pan.
After baking, allow a little cooling. Cutting immediately releases steam and can make a soft interior seem gummy.
Tips for Soft Centers and Golden Edges
Measure the flour carefully and accept the sticky dough. A dry, easily handled dough will not behave like the intended focaccia.
Use enough pan oil. The measured amount helps create the bottom texture, so do not omit it while expecting the same result.
Handle gently after the rise. The folds happen earlier; dividing and panning should preserve some of the developed air.
Wait for the pan rise. Skipping it produces a flatter, denser result.
Add the fresh garlic after baking. This keeps its flavor distinct and avoids exposing small pieces to the full high-temperature bake.
Remove the breads from their pans after the brief rest. Cooling entirely in the pans can trap moisture underneath.
Serving Ideas
Serve one mini focaccia with tomato soup, lentil soup, or a leafy salad. The rosemary-garlic flavor provides plenty of character without needing a complicated filling.
Cut into wedges for a dinner table with pasta or roasted vegetables. Add dipping oil separately if desired, remembering that the bread already contains several measured oil additions.
For a small sandwich, cool fully, split horizontally, and fill with cheese, cooked chicken, or roasted peppers. Wet fillings soften bread quickly, so assemble close to serving.
You can also toast a cut face in a skillet for a little extra texture. Keep the heat moderate so exposed garlic on the outer surface does not burn.
Make-Ahead Option
For a future overnight test, refrigerate the covered dough after the initial 20-minute rest and fold rather than completing the warm bulk rise. Allow roughly 8 to 12 hours, leaving expansion space in the bowl.
The next day, divide into the oiled pans and allow enough time for the cold dough to relax and become puffy. That can take substantially longer than the standard pan-rise range.
This overnight schedule is a proposed variation, not a verified timing guarantee for the formula. Try the same-day method first if you want a clearer reference for dough texture and expansion.
The garlic finish should still be prepared fresh at baking time. Do not make and store a room-temperature garlic-oil mixture as a shortcut.
Storage and Reheating
These breads are best fresh. Because the finished version receives a fresh garlic-and-oil topping, refrigerate leftovers in a covered container within two hours and use within three to four days. Keep the refrigerator at 40°F or below.
The cold environment will firm the bread, so reheat before serving for a softer center. Warm in a 350°F oven until heated through, checking after about 5 to 8 minutes for individual rounds. Cover loosely if the garlic or top begins browning too quickly.
For freezing, cool promptly and package individually in freezer-safe bags or containers. Use within two months for best quality. Thaw in the refrigerator and reheat, or warm carefully from frozen with additional time.
If you want a room-temperature bread-storage option, leave the fresh garlic finish off the portions you plan to store and follow appropriate handling for plain baked bread. Do not assume garlic oil has the same storage requirements as a dry rosemary topping.
Discard moldy bread and avoid returning served pieces to the main storage container. Keep unused garlic oil refrigerated promptly if any remains, and do not store it on the counter.
Variations to Test
Garlic Powder Topping
For a simpler flavor variation, omit the fresh garlic finish and add a modest pinch of garlic powder to the rosemary topping oil. It will taste different, and the fresh-garlic storage note no longer describes that topping.
Parmesan Finish
Sprinkle a little finely grated Parmesan over the hot bread after baking. It adds salt and richness, so keep the flaky salt light and adjust nutrition accordingly.
Olive Topping
Press a few well-drained olive slices into the dimples. Too many wet add-ins can weigh down these small breads, so start sparingly.
Extra Herbs
Use a little thyme alongside the rosemary. Avoid large pieces of woody stems and keep the total herb quantity modest for the first test.
Troubleshooting
The Dough Is Very Sticky
That is expected. Use oiled hands and a scraper rather than adding flour until it is dry. Check the flour measurement if it behaves like a thin liquid.
The Bread Is Dense
It may have needed a longer rise, gentler handling, or more complete baking. Excess flour can also reduce the intended softness.
The Bottoms Are Pale
The pans may conduct heat poorly or the bread may need a little more baking. Use suitable metal pans and assess the underside, not only the top color.
The Garlic Is Bitter
It likely browned too far in the finishing pan. Use low heat, stir continuously, and remove it while still pale. Burnt garlic cannot reliably be corrected with more oil.
The Dough Springs Back in the Pan
Let it rest before stretching again. Relaxed dough spreads more easily than dough that is repeatedly forced into place.
Frequently Asked Questions
Do I Need a Mixer?
No. A sturdy spoon and scraper are enough for the proposed method.
Are Folds the Same as Kneading?
The short fold set helps structure the dough without a traditional repeated kneading session. It is still an active step and should not be skipped while expecting an identical result.
Can I Make One Large Focaccia?
A larger pan changes thickness and baking time. It needs its own pan-size and timing test rather than an automatic transfer of the mini instructions.
Can I Use Dried Rosemary?
Use a smaller amount and crush it finely as a flavor variation. Dried and fresh rosemary are not equal by the tablespoon.
Can I Skip the Garlic?
Yes. The bread remains rosemary focaccia. Keep the topping oil and rosemary if you want the intended surface flavor.
Print
No-Knead Garlic Rosemary Mini Focaccia
Description
Yield: Six mini rounds, approximately 4 inches across
Active prep: Approximately 20 minutes
First rest and rise: Approximately 65–95 minutes total
Pan rise: Approximately 30–45 minutes
Bake: Approximately 18–24 minutes
Brief cooling: Approximately 15–20 minutes
Total: Approximately 2 1/2–3 1/2 hours
Status: Untested proposed recipe
Ingredients
Dough
- 3 cups all-purpose flour, spooned and leveled, approximately 12 3/4 ounces by weight
- 2 1/4 teaspoons instant yeast
- 1 teaspoon granulated sugar or honey
- 1 1/4 teaspoons fine salt
- 1 1/4 cups lukewarm water
- 2 tablespoons extra-virgin olive oil
Pans and Rosemary Topping
- 2 tablespoons olive oil for the pans
- 1 tablespoon olive oil for the tops
- 1 tablespoon finely chopped fresh rosemary
- 1/4 teaspoon flaky salt, or a light sprinkle to taste
- Freshly ground black pepper, optional
Garlic Finish
- 1 tablespoon olive oil
- 3 garlic cloves, finely minced
- 1 teaspoon chopped fresh parsley, optional
Yield: Six mini focaccia rounds, each about 4 inches across, depending on pans and dough expansion.
Oil total: Six tablespoons across the dough, pans, topping, and finishing mixture. Keep these measured portions separate so you do not accidentally use the full amount at one stage.
Instructions
- Mix 3 cups carefully measured flour, 2 1/4 teaspoons instant yeast, 1 teaspoon sugar, and 1 1/4 teaspoons fine salt. Stir in 1 1/4 cups lukewarm water and 2 tablespoons olive oil thoroughly.
- Cover 20 minutes, then fold the dough inward from four sides. Cover and rise another 45–75 minutes, until close to doubled.
- Oil six suitable 4-inch metal pans with 2 tablespoons oil total. Divide dough evenly and ease into the pans.
- Cover and rise 30–45 minutes until puffy. Heat the oven to 425°F.
- Divide 1 tablespoon oil mixed with 1 tablespoon chopped rosemary over the tops. Dimple and sprinkle lightly with flaky salt.
- Bake 18–24 minutes, until golden on top and underneath.
- Warm 3 minced garlic cloves gently in 1 tablespoon oil over low heat until fragrant, without dark browning.
- Rest breads briefly, remove to a rack, add the garlic finish, and cool a little before serving.
Storage: Refrigerate fresh-garlic-topped leftovers within two hours and use within 3–4 days. Freeze for up to two months for best quality.
Estimated nutrition: Approximately 330–370 calories per mini focaccia when the batch is divided into six and all measured oil is included. Actual retained pan oil, flour measurement, and additions affect the result. This is an unverified estimate.