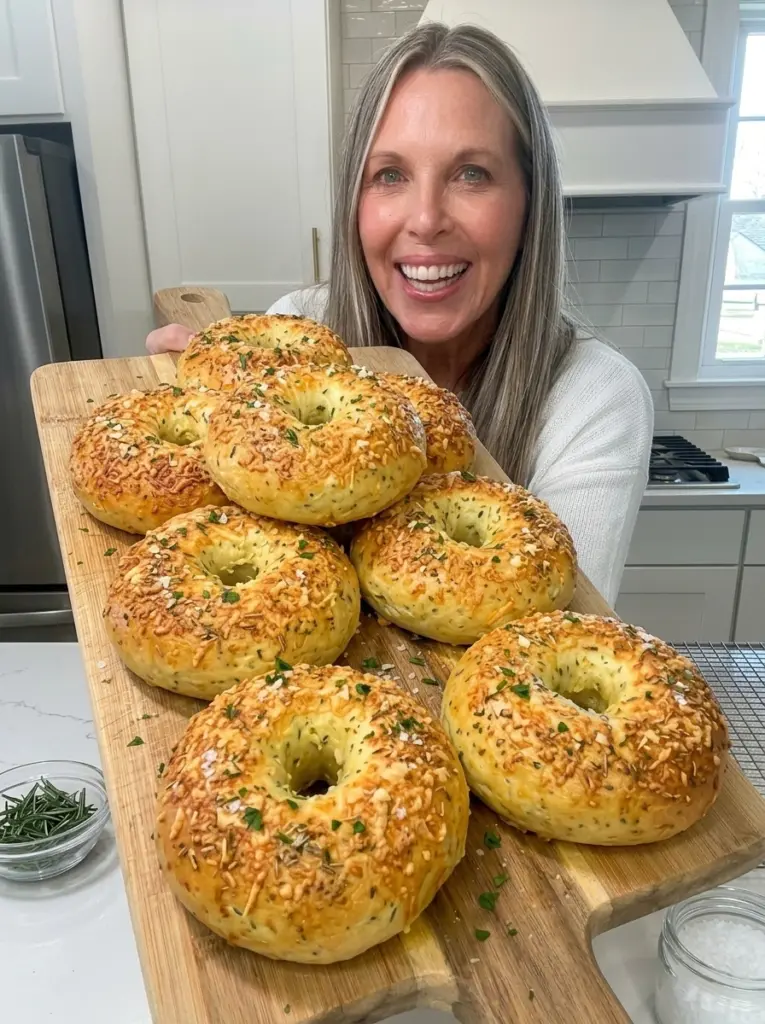
These Garlic Herb High-Protein Zucchini Bagels are soft, cheesy, savory, and packed with fresh zucchini, creamy cottage cheese, garlic, Parmesan, and herbs. Easy to bake with no yeast or boiling required, they’re perfect for breakfast, meal prep, sandwiches, or a satisfying protein-packed snack.
If you love savory bagels but want something a little different from traditional yeast-based versions, these Garlic Herb High-Protein Zucchini Bagels are a delicious homemade option. Fresh zucchini keeps the centers moist and tender, while blended cottage cheese and eggs create a rich base and add extra protein. Mozzarella and Parmesan bring plenty of cheesy flavor, while fresh garlic, parsley, chives, and Italian seasoning make every bite wonderfully savory.
Even better, there’s no yeast, long rising time, or traditional bagel boiling process. Simply prepare the zucchini, blend the cottage cheese and eggs, mix the dough, shape it into bagels, and bake until puffed and golden.
Enjoy them warm with cream cheese, toast them for crispy edges, or split them open and load them with eggs, turkey, avocado, or your favorite sandwich fillings.
Let’s dive into everything you need to know to make these easy Garlic Herb High-Protein Zucchini Bagels at home.
Why You’ll Love These Garlic Herb High-Protein Zucchini Bagels
There’s plenty to love about these savory homemade bagels:
Packed with protein-rich ingredients. Cottage cheese, eggs, mozzarella, and Parmesan contribute protein while creating a satisfying bagel.
No yeast required. Baking powder provides the lift, eliminating lengthy yeast proofing.
No boiling required. Unlike traditional bagels, these go directly from shaping to topping and baking.
Loaded with savory flavor. Fresh garlic, Parmesan, mozzarella, parsley, chives, and Italian herbs ensure these bagels are anything but bland.
Fresh zucchini keeps them tender. Properly drained zucchini adds moisture without making the dough excessively wet.
Perfect for meal prep. Make a batch ahead of time and keep them refrigerated or frozen for quick breakfasts.
Great for sandwiches. Slice and toast them before adding eggs, turkey, chicken, smoked salmon, or vegetables.
Easy to customize. Switch up the cheeses, herbs, seasonings, and vegetables to create plenty of variations.
Ingredients You’ll Need
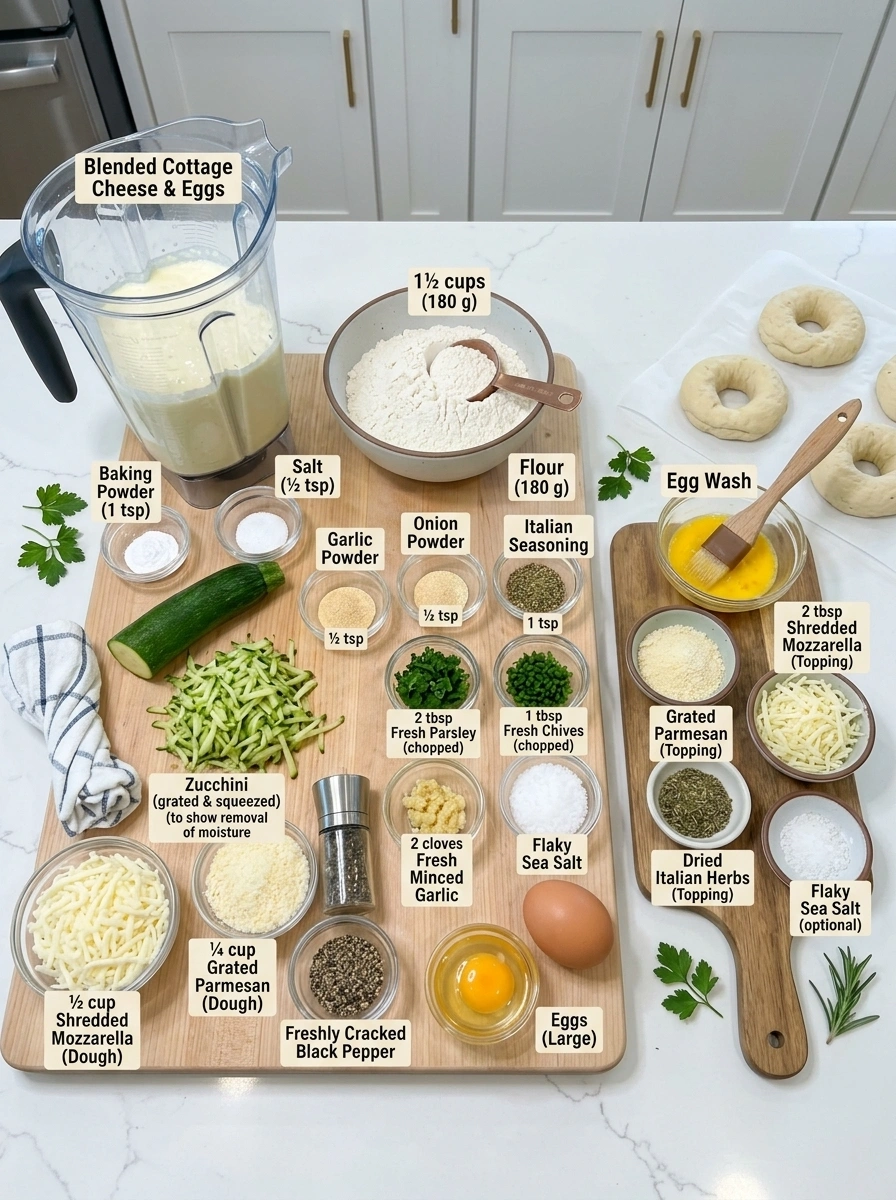
Here’s what goes into these savory zucchini bagels and why each ingredient matters.
- 1 cup (225 g) cottage cheese — Adds creaminess, moisture, and protein while helping create a soft, tender interior.
- 2 large eggs — Provide structure and richness while contributing additional protein.
- 1½ cups (180 g) all-purpose or bread flour — Forms the structural base of the dough. Bread flour can create a slightly chewier result, while all-purpose flour keeps the recipe convenient.
- 1 tsp baking powder — Provides leavening and helps the bagels puff as they bake.
- ½ tsp salt — Enhances the garlic, cheese, and herb flavors.
- 1 small zucchini, finely grated — Adds moisture and tenderness. Removing excess water is essential before incorporating it into the dough.
- ½ cup shredded mozzarella — Adds mild cheesy flavor and richness throughout the bagels.
- ¼ cup freshly grated Parmesan — Provides a salty, nutty, savory flavor that pairs beautifully with garlic and herbs.
- 2 garlic cloves, finely minced — Gives the bagels their distinctive fresh garlic flavor.
- ½ tsp garlic powder — Reinforces the garlic flavor and distributes it throughout the dough.
- ½ tsp onion powder — Adds another layer of savory depth.
- 1 tsp Italian seasoning — Provides a convenient blend of classic dried herbs.
- 2 tbsp fresh parsley, finely chopped — Adds freshness and color.
- 1 tbsp fresh chives, finely chopped — Provides a mild onion-like flavor that complements the cheese and garlic.
- ¼ tsp freshly cracked black pepper — Adds subtle peppery warmth.
For the Topping
- 1 egg, beaten — Creates a glossy surface and helps the toppings stick.
- 2 tbsp grated Parmesan — Creates a savory golden topping.
- 2 tbsp shredded mozzarella — Melts and browns beautifully in the oven.
- ½ tsp dried Italian herbs — Adds extra herbal flavor and aroma.
- Flaky sea salt, optional — Adds a lightly salty finish.
- Fresh parsley — Adds color and freshness just before serving.
How to Make Garlic Herb High-Protein Zucchini Bagels
These bagels are much simpler than traditional yeast bagels, but properly preparing the zucchini and dough makes a big difference.
Step 1: Prepare the Zucchini
Finely grate one small zucchini.
Transfer the grated zucchini onto a clean kitchen towel or several layers of cheesecloth.
Gather the towel around the zucchini and squeeze firmly to remove as much liquid as possible.
Keep squeezing until very little additional water comes out.
This is one of the most important steps in the recipe. Zucchini naturally contains a lot of water, and leaving too much moisture behind can produce an excessively sticky dough and softer, wetter bagels.
Set the squeezed zucchini aside.
Step 2: Blend the Cottage Cheese
Add the cottage cheese and two eggs to a blender or food processor.
Blend until completely smooth and creamy.
Blending eliminates the cottage cheese curds and allows the mixture to incorporate more evenly throughout the dough.
Step 3: Mix the Dough
In a large mixing bowl, whisk together the flour, baking powder, salt, garlic powder, onion powder, Italian seasoning, and freshly cracked black pepper.
Pour the blended cottage cheese and egg mixture into the dry ingredients.
Add the thoroughly squeezed zucchini, shredded mozzarella, Parmesan, minced fresh garlic, parsley, and chives.
Gently mix everything together until a soft dough forms.
The exact moisture level can vary depending on your zucchini and cottage cheese. If the dough remains too sticky to handle, add additional flour 1 tablespoon at a time.
Avoid adding a large amount all at once. You want the dough manageable but still relatively soft.
Step 4: Shape the Bagels
Preheat your oven to 375°F (190°C).
Line a large baking sheet with parchment paper.
Divide the dough into 5–6 approximately equal portions.
Lightly flour or oil your hands to prevent sticking.
Roll each portion gently into a ball. Press your finger through the center and carefully stretch the opening until you have a recognizable bagel shape.
Remember that the hole will become smaller as the bagels puff in the oven, so don’t make it too tiny.
Arrange the shaped bagels on the prepared baking sheet, leaving some space between each one.
Step 5: Add the Garlic Herb Topping
Brush the surface of each shaped bagel with beaten egg.
Sprinkle generously with grated Parmesan, shredded mozzarella, and dried Italian herbs.
Finish with a small amount of flaky sea salt if desired.
The egg wash helps create a beautiful golden finish while keeping the cheesy herb topping attached to the bagels.
Step 6: Bake
Transfer the baking sheet to the preheated oven.
Bake for approximately 20–25 minutes, or until the bagels are puffed and golden and the cheese topping is melted and lightly toasted.
For an especially golden, cheesy surface, switch the oven to broil for the final 1–2 minutes.
Watch them constantly during this stage because Parmesan and mozzarella can brown very quickly under a broiler.
Step 7: Cool and Serve
Remove the bagels from the oven and allow them to cool for approximately 10 minutes.
They will continue to firm slightly as they cool, making them easier to slice.
Garnish with fresh parsley if desired.
Serve them warm, or slice and toast them for crispier edges.
Serving Ideas for Garlic Herb Zucchini Bagels
These savory bagels work with all kinds of breakfast and lunch toppings. Try them with:
- Cream cheese
- Mashed avocado
- Fried eggs
- Scrambled eggs
- Turkey breast
- Grilled chicken
- Smoked salmon
- Fresh tomato
- Sliced cucumber
- Hummus
- Roasted vegetables
- Cottage cheese
- Mozzarella and tomato
For an especially satisfying breakfast sandwich, slice and lightly toast a bagel before filling it with scrambled eggs, turkey bacon, melted Cheddar, and avocado.
You can also serve them alongside scrambled eggs and fresh fruit for breakfast or with soup and salad for lunch.
Flavor Variations
Once you’ve mastered the basic Garlic Herb Zucchini Bagel, there are plenty of ways to change the flavor.
Jalapeño Garlic: Add finely diced jalapeño to the dough and replace the mozzarella with Pepper Jack for a spicy kick.
Rosemary Parmesan: Replace the Italian seasoning with finely chopped fresh rosemary and increase the Parmesan for a stronger savory flavor.
Everything Garlic Herb: Brush with egg wash and generously sprinkle everything bagel seasoning over the surface before baking.
Spinach & Feta: Fold in finely chopped, thoroughly drained spinach and crumbled feta.
Sun-Dried Tomato Basil: Add finely chopped sun-dried tomatoes and fresh basil for Mediterranean-inspired flavor.
Cheddar Chive: Replace the mozzarella with sharp Cheddar and increase the amount of fresh chives.
Spicy Parmesan: Add crushed red pepper flakes and a small pinch of cayenne to the dough.
Three Cheese: Combine mozzarella, Parmesan, and sharp Cheddar for an extra-cheesy variation.
Pro Tips for the Best Zucchini Bagels
Squeeze the zucchini extremely well. This is probably the most important tip. Excess zucchini water makes the dough sticky and can interfere with proper browning and texture.
Blend the cottage cheese until smooth. This produces a more uniform dough and prevents obvious cottage cheese curds throughout the finished bagels.
Use fresh garlic. Garlic powder provides background flavor, but fresh minced garlic creates the more pronounced savory aroma that makes these bagels special.
Add extra flour gradually. Moisture varies between zucchini and different cottage cheese brands. Add only enough flour to make the dough manageable.
Don’t overmix. Once the dough comes together, stop mixing. Excessive handling can make quick bread-style doughs unnecessarily tough.
Oil your hands before shaping. A small amount of oil can make soft, slightly sticky dough much easier to work with.
Make the center holes large enough. The bagels expand while baking, so small holes can close almost completely.
Let them cool before slicing. The centers continue setting after the bagels leave the oven.
Toast before serving. Toasting creates deliciously crisp edges while maintaining the soft, cheesy interior.
Meal Prep and Storage Information
Allow the bagels to cool completely before storing them.
Transfer them to an airtight container and refrigerate for up to 4 days.
For the best texture, slice and toast refrigerated bagels before serving.
For longer storage, slice each completely cooled bagel in half before freezing. Place them in a freezer-safe bag or container, separating them with parchment paper if necessary.
Freeze for up to 2 months.
Individual halves can be reheated or toasted directly from frozen, making them especially convenient for quick breakfasts and snacks.
Frequently Asked Questions
Do these zucchini bagels contain yeast?
No. These are quick homemade bagels that use baking powder for leavening, so there’s no yeast or lengthy proofing process.
Do I have to boil these bagels before baking?
No. Unlike traditional bagels, these go directly into the oven after shaping and topping.
Why do I need to squeeze the zucchini?
Zucchini contains a significant amount of water. Removing as much excess liquid as possible keeps the dough manageable and helps prevent overly wet or gummy bagels.
Why should I blend the cottage cheese?
Blending creates a smooth, creamy mixture that incorporates more evenly into the dough and gives the finished bagels a more uniform texture.
Why is my dough too sticky to shape?
Your zucchini or cottage cheese may contain more moisture. Make sure the zucchini was thoroughly squeezed, then add flour one tablespoon at a time until the dough becomes manageable.
Can I use bread flour instead of all-purpose flour?
Yes. Either can be used. Bread flour’s higher protein content may give the bagels a slightly firmer, chewier structure.
Are these the same texture as traditional boiled bagels?
No. Because these use baking powder and aren’t boiled, expect a softer, more tender texture rather than the dense chew and shiny crust associated with traditional yeast bagels.
Can I freeze Garlic Herb Zucchini Bagels?
Yes. Cool them completely, slice them in half, and freeze for up to approximately 2 months. Slicing before freezing makes individual portions easier to toast.
How can I make the tops more golden?
Use the egg wash before baking and, if necessary, broil the finished bagels for 1–2 minutes. Watch them carefully to prevent the cheese from burning.
Recipe Summary
Prep Time: Approximately 20 minutes
Bake Time: 20–25 minutes
Cooling Time: Approximately 10 minutes
Total Time: Approximately 50–55 minutes
Servings: 5–6 bagels
These Garlic Herb High-Protein Zucchini Bagels combine creamy cottage cheese, fresh zucchini, mozzarella, Parmesan, garlic, and herbs in an easy savory bagel that requires no yeast, proofing, or boiling. They’re soft and tender inside with a beautifully golden, cheesy herb topping.
Serve one warm with cream cheese, toast it and pile it with avocado and eggs, turn it into a loaded breakfast sandwich, or keep a batch in the freezer for busy mornings. With plenty of protein-rich ingredients and endless ways to customize the flavors, these homemade zucchini bagels are an easy addition to breakfast, brunch, or weekly meal prep.
Print
Garlic Herb High-Protein Zucchini Bagels
- Author: Luna
Ingredients
Only six simple ingredients are needed to create this beautifully soft homemade loaf.
- 3 cups all-purpose flour — Provides the structure of the bread while keeping the crumb tender and soft. Avoid adding excessive additional flour during kneading.
- 1 cup warm milk — Adds moisture, richness, and tenderness to the dough. The milk should be comfortably warm rather than hot so it doesn’t damage the yeast.
- 4 tbsp melted butter — Gives the bread a richer flavor and contributes to its soft, tender texture.
- 2 tbsp granulated sugar — Adds a subtle sweetness while also helping support yeast activity and encouraging beautiful browning in the oven.
- 1 tsp salt — Balances the sweetness, enhances the bread’s flavor, and helps control yeast activity.
- 2 tsp instant yeast — Provides the lift that transforms the dough into a light, fluffy loaf.
Instructions
Making soft sandwich bread at home is easier than it looks. The most important parts are developing the dough properly and giving it enough time to rise.
In a large mixing bowl, whisk together the all-purpose flour, instant yeast, granulated sugar, and salt.
Mix until the yeast, sugar, and salt are evenly distributed throughout the flour.
Pour the warm milk and melted butter into the dry ingredients.
Stir everything together with a wooden spoon until a shaggy dough forms and you no longer see large patches of dry flour.
At this stage, the dough doesn’t need to look perfectly smooth. Kneading will transform it into a much softer, more elastic dough.
Transfer the dough onto a lightly floured work surface.
Knead by hand for approximately 8–10 minutes, folding, pressing, and turning the dough repeatedly.
As you knead, the dough should gradually become smoother, softer, and more elastic.
The finished dough should remain slightly tacky but manageable. Think of a soft texture similar to an earlobe rather than a stiff, dry dough.
Avoid continuously adding flour simply because the dough feels slightly sticky. Too much flour can produce a heavier, denser loaf instead of the soft texture you’re looking for.
Lightly grease a clean bowl and place the kneaded dough inside.
Turn the dough once so its surface receives a light coating of oil or butter.
Cover the bowl with plastic wrap or a clean kitchen towel.
Place it somewhere comfortably warm and allow the dough to rise for approximately 1–2 hours, or until roughly doubled in size.
Room temperature can significantly affect rising time, so pay more attention to the size of the dough than the clock.
Once the dough has doubled, gently press it down to release some of the trapped gas.
Transfer the dough onto a lightly floured surface.
Gently pat or roll it into a rectangle approximately 8 inches wide.
Starting from one short end, roll the rectangle tightly into a log. Keep the roll snug as you work so you don’t create large air pockets inside the finished loaf.
Pinch the final seam firmly closed.
Place the shaped dough seam-side down into a parchment-lined loaf pan.
Cover loosely with plastic wrap or a clean kitchen towel.
Allow it to rise for approximately 1 hour, or until the dough looks noticeably light and puffy and domes approximately 1 inch above the rim of the pan.
Don’t rush this stage. A properly risen loaf will have a lighter, softer finished texture.
Preheat the oven to 350°F (175°C).
Place the loaf on the lower oven rack and bake for approximately 30–35 minutes.
The finished bread should have a beautiful deep golden-brown top.
You can also carefully remove the loaf from the pan and gently tap the bottom. Properly baked bread should sound hollow.
Remove the finished loaf from the pan immediately and transfer it to a wire cooling rack.
Allow the bread to cool for at least 30 minutes before slicing.
As tempting as warm bread can be, cutting it immediately after baking can compress the delicate interior and create a gummy texture.
For an even softer crust, lightly brush the top of the hot loaf with melted butter.