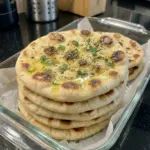
Ingredients
- 3 cups all-purpose flour
- 1 cup warm water, approximately 105–110°F
- 2 1/4 tsp instant yeast
- 1 tsp honey
- 1 tsp salt
- 2 tbsp extra-virgin olive oil
- 1/2 tsp garlic powder
- 1 tsp dried oregano
- 1 tbsp fresh parsley, chopped, optional
- Extra olive oil, for cooking and brushing
Instructions
Step 1: Prepare the Yeast Mixture 🍞
Pour 1 cup warm water into a large mixing bowl.
The water should be approximately 105–110°F.
Add:
- 2 1/4 teaspoons instant yeast
- 1 teaspoon honey
Stir gently.
Allow the mixture to stand for approximately 5 minutes.
With instant yeast, this rest isn’t strictly required for activation, but it gives the ingredients time to begin hydrating before the remaining ingredients are added.
Step 2: Add the Dry Ingredients
Add:
- 3 cups all-purpose flour
- 1 teaspoon salt
- 1/2 teaspoon garlic powder
- 1 teaspoon dried oregano
Pour in 2 tablespoons extra-virgin olive oil.
Step 3: Mix the Dough
Using a wooden spoon or sturdy spatula, stir until the ingredients come together.
Continue mixing until there are no large pockets of dry flour.
The dough should be:
- Soft
- Shaggy
- Slightly sticky
- Moist
- Rough rather than perfectly smooth
That’s exactly what you want.
Step 4: Don’t Knead
Once the ingredients are thoroughly combined, stop mixing.
There’s no need to turn the dough onto the counter and knead it until smooth.
This is intentionally a no-knead flatbread dough.
Its relatively soft consistency and long rise allow the flour to hydrate while the dough develops enough structure for shaping and skillet cooking.
What Should No-Knead Flatbread Dough Look Like?
Don’t expect this dough to resemble a stiff pizza dough immediately after mixing.
It should remain somewhat sticky and shaggy.
If you add flour until it becomes completely dry and easy to handle, the finished flatbreads can become denser and less flexible.
The dough will become easier to work with after rising.
Use lightly floured hands and a lightly floured work surface during shaping rather than adding substantial additional flour to the dough itself.
Step 5: Cover the Dough
Cover the mixing bowl with plastic wrap or a clean kitchen towel.
Place it in a warm, draft-free location.
Step 6: Let It Rise 🍞
Allow the dough to rise for approximately 1–1 1/2 hours.
Rather than judging the rise only by the clock, look at the dough.
It should become:
- Noticeably larger
- Puffy
- Airy
- Close to doubled in volume
In a particularly warm kitchen, this may happen in approximately an hour.
In a cooler room, it may require the full 90 minutes or slightly longer.
Why Rising Time Matters
The first rise does much more than simply make the dough larger.
During fermentation, yeast produces gas that creates air pockets throughout the dough.
At the same time, the flour continues hydrating and the dough gains structure.
Because this recipe skips traditional kneading, giving the dough sufficient resting and rising time is particularly important.
Don’t rush to divide it while it still looks dense.
Wait until it’s visibly puffy.
Step 7: Transfer the Dough
Lightly flour your work surface.
Turn the risen dough out of the bowl.
Because the dough is soft, use a bowl scraper or spatula if necessary.
Avoid aggressively punching or flattening it.
Some gas will naturally escape during handling, but gentle handling helps preserve some of the airy structure.
Step 8: Divide Into 8 Portions
Divide the dough into 8 approximately equal pieces.
For extremely consistent flatbreads, you can weigh the entire dough and divide the weight by eight.
Uniform portions will cook more consistently.
Step 9: Shape Into Dough Balls
With lightly floured hands, gently shape each portion into a ball.
The balls don’t need to be perfectly smooth.
Arrange them on the lightly floured work surface and cover them with a clean kitchen towel.
Step 10: Rest for 10–15 Minutes
Allow the dough balls to rest for approximately 10–15 minutes.
Don’t skip this short rest.
Dividing and shaping tightens the gluten.
Resting allows that gluten to relax, which makes each piece easier to stretch or roll without constantly shrinking back toward the center.
How to Shape Greek Flatbread 🫓
Step 11: Lightly Flour the Dough
Take one rested dough ball and dust it lightly with flour.
Lightly flour your work surface as well.
Use only enough flour to prevent sticking.
Step 12: Stretch or Roll
Gently stretch the dough with your hands or use a rolling pin.
Shape it into a round approximately 6–7 inches wide.
Don’t worry about creating a perfect circle.
Slightly irregular homemade flatbreads often look more rustic and appealing.
Step 13: Keep the Thickness Even
More important than creating a perfect shape is maintaining relatively even thickness.
Extremely thin sections may become crisp or burn before thicker sections finish cooking.
Thick areas may remain doughy.
Aim for a consistent thickness from the center toward the edges.
Step 14: Keep the Dough Covered
Keep the remaining dough balls covered while you work.
This prevents their surfaces from drying out.
You can shape the flatbreads one at a time as you cook or roll several in advance and keep them covered.
How to Cook Greek Flatbread in a Skillet 🔥
Step 15: Preheat the Skillet
Place a large cast-iron skillet or heavy-bottomed pan over medium-high heat.
Give it enough time to become thoroughly hot.
The dough should begin bubbling fairly quickly once it touches the skillet.
Step 16: Add a Small Amount of Olive Oil
Lightly brush the skillet with olive oil.
You only need a very thin coating.
The goal isn’t to deep-fry the flatbread.
A small amount helps produce the characteristic golden surface while adding extra flavor.
Step 17: Cook the First Side
Carefully place one shaped flatbread into the hot skillet.
Cook for approximately 1–2 minutes.
Watch the surface.
Small and medium bubbles should begin appearing.
Lift one edge with a spatula and check underneath.
You want scattered golden-brown spots.
Step 18: Flip
Turn the flatbread over.
Cook the second side for another 1–2 minutes.
It may puff in several areas as steam forms inside the dough.
Step 19: Press Gently if Necessary
If certain areas aren’t making contact with the skillet, gently press them with a spatula.
Don’t aggressively flatten the entire flatbread.
You want to maintain some of those soft air pockets.
Step 20: Remove When Cooked Through
Once both sides are golden in spots and the center is cooked through, remove the flatbread from the skillet.
Avoid leaving it on the heat unnecessarily.
Overcooking is one of the easiest ways to turn soft flatbread into dry or stiff bread.
Step 21: Repeat
Cook the remaining seven portions.
Add another very small amount of olive oil to the skillet whenever necessary.
Watch the skillet temperature as you continue.
Heavy pans, particularly cast iron, retain heat and may become increasingly hot during the batch.
Reduce the burner slightly if later flatbreads begin browning too quickly.