
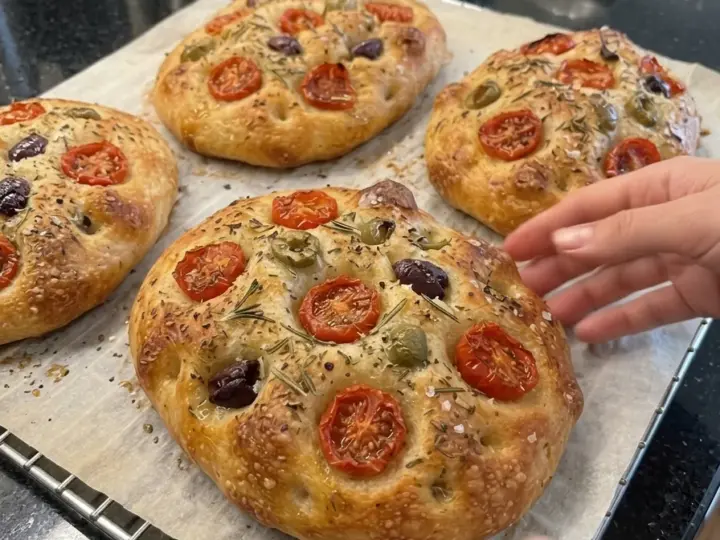
These Easy Mini Tomato Olive Focaccia breads have soft, airy centers, golden edges, and a savory topping of cherry tomatoes, olives, garlic, and herbs. Olive oil pools in the little dimples across the surface, helping the tops develop their familiar focaccia texture while keeping the bread tender underneath.
Making individual focaccia rounds is a convenient way to serve homemade bread. Each portion has its own topping, making them suitable for soup night, lunch boxes, picnic spreads, or a bread basket alongside dinner. You can also split the cooled rounds and fill them with cheese, roasted vegetables, or sliced chicken.
The dough is soft and slightly sticky, but it does not require complicated shaping. After mixing and a few gentle folds, it rises until puffy, then gets divided into small rounds. A second rise gives the dough time to relax before dimpling and topping.
Below, you will find the complete recipe, ingredient explanations, detailed instructions, tips for airy bread, variations, serving ideas, storage guidance, and a recipe card.
What Is Mini Tomato Olive Focaccia?
Mini tomato olive focaccia is an individual-size version of Italian focaccia, an olive-oil-enriched yeast bread with a dimpled surface.
The dimples help hold oil and toppings while creating an uneven surface that browns beautifully. Cherry tomatoes soften during baking and add little pockets of juicy flavor. Olives contribute a salty contrast, and rosemary gives the bread a fragrant finish.
This recipe makes eight small focaccia rounds, approximately 4 inches across. They bake directly on rimmed baking sheets, with room between each round.
The finished breads are thicker and softer than crackers or flatbread, with a tender crumb and lightly crisp edges.
Why You’ll Love This Recipe
The portions are convenient. Individual rounds are easy to serve without cutting a large pan of bread.
The toppings provide plenty of flavor. Tomatoes, olives, olive oil, garlic, and rosemary work well together.
There is no elaborate shaping. The dough is gently stretched into small rounds.
The dough requires minimal handling. A short series of folds develops structure without lengthy kneading.
They work with many meals. Serve with soups, salads, pasta, or grilled dishes.
You can customize each round. Leave olives off a few or vary the herbs.
The leftovers make good sandwiches. Split and lightly toast the breads before filling.
Ingredient Breakdown
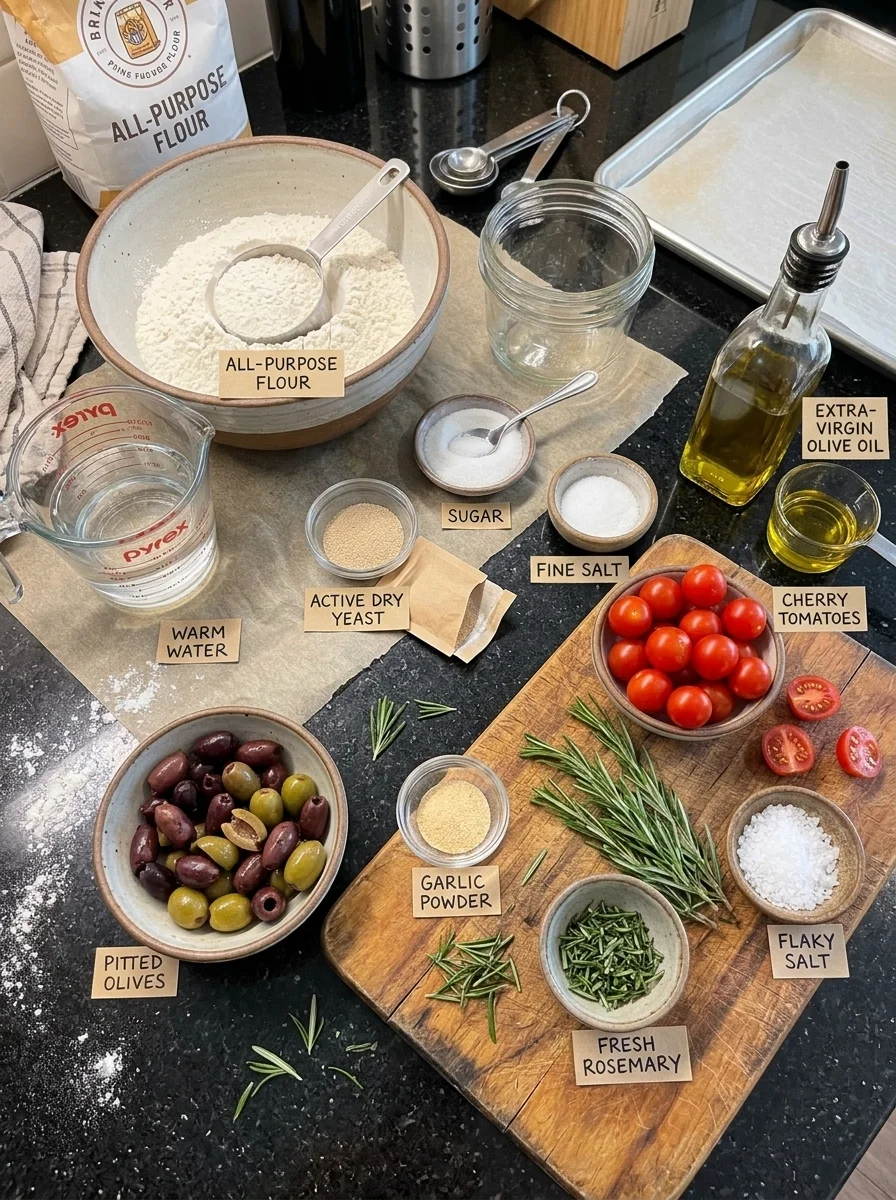
All-Purpose Flour — 3 Cups, About 360 Grams
All-purpose flour gives a tender crumb with enough structure to support the toppings.
For consistent results, weigh the flour. If using measuring cups, spoon it into the cup and level the top.
Bread flour can also be used in the same weight. It generally produces a slightly chewier result.
Warm Water — 1 Cup Plus 2 Tablespoons, About 270 Milliliters
This dough contains more water than a typical firm sandwich dough, which helps create a soft interior.
Use water at approximately 105–110°F (40–43°C) for the active dry yeast.
The dough should be sticky and loose enough to stretch. Avoid adding large amounts of flour to make it feel like a dry dough.
Active Dry Yeast — 2¼ Teaspoons
One standard 7-gram packet provides the rise.
Check the yeast’s freshness before starting. The first mixing step gives it time to become active.
Granulated Sugar — 1 Teaspoon
A little sugar supports the initial yeast mixture without making the bread taste sweet.
Fine Salt — 1 Teaspoon
Salt seasons the dough and balances the olive oil and toppings.
Use fine salt for the listed quantity.
Extra-Virgin Olive Oil — 5 Tablespoons, Divided
Use:
- 2 tablespoons in the dough
- 1 tablespoon for greasing the bowl and baking surfaces
- 2 tablespoons for dimpling and topping
Olive oil contributes flavor, tenderness, and golden edges.
Cherry Tomatoes — About 1 Cup
Choose small, firm cherry or grape tomatoes.
Halve them and lightly blot the cut surfaces. This removes some loose moisture without drying them completely.
Pitted Olives — ½ Cup
Use black olives, green olives, Kalamata olives, or a combination.
Drain thoroughly and halve larger olives. Check for stray pits before adding.
Garlic Powder — ½ Teaspoon
Garlic powder mixes easily into the topping oil and avoids exposed pieces of fresh garlic that can burn during baking.
Fresh Rosemary — 1 Tablespoon, Finely Chopped
Chopped rosemary adds fragrance throughout the topping.
Alternatively, use 1 teaspoon dried rosemary, crushed finely.
Flaky Salt — Optional
A small pinch over each round adds texture and flavor.
Use sparingly because the olives already contribute salt.
How to Make Easy Mini Tomato Olive Focaccia
Step 1: Activate the Yeast
Combine the warm water, sugar, and yeast in a large bowl.
Stir and let stand for 5–10 minutes, until the surface shows bubbling or a light foam.
If there is no activity, check the yeast and water temperature before continuing.
Step 2: Mix the Dough
Add the flour, fine salt, and 2 tablespoons olive oil.
Stir with a sturdy spoon or spatula until no dry flour remains. The dough will look rough and sticky.
Cover and rest for 10 minutes.
Step 3: Fold the Dough
Lightly oil or dampen your hand.
Lift one edge of the dough, stretch it gently upward, and fold it toward the center. Rotate the bowl and repeat around all four sides.
Cover and rest for 10 minutes, then repeat the folding sequence once more.
The dough should become smoother and more elastic, although it will remain sticky.
Step 4: Let Rise
Lightly oil the bowl’s exposed sides and the dough’s surface using part of the tablespoon reserved for greasing.
Cover and let rise for 60–90 minutes, until approximately doubled and visibly airy.
A cool room may require more time.
Step 5: Prepare the Trays
Line two rimmed baking sheets with parchment and lightly brush with the remaining greasing oil.
Each tray should hold four rounds with generous space between them.
Step 6: Divide and Shape
Turn the risen dough onto a lightly oiled surface.
Using an oiled bench scraper or knife, divide into eight roughly equal portions, approximately 80–85 grams each.
Place on the trays and gently stretch into thick rounds about 3½ inches across.
If the dough resists stretching, let it rest for 5–10 minutes, then try again.
Step 7: Allow the Second Rise
Cover loosely with lightly oiled plastic wrap or an inverted tray that does not touch the dough.
Let rise for 25–40 minutes, until puffy.
Preheat the oven to 425°F (220°C) during the final 20 minutes.
Step 8: Prepare the Toppings
Mix the remaining 2 tablespoons olive oil with the garlic powder.
Halve the tomatoes, drain the olives, and chop the rosemary.
Step 9: Dimple and Top
Drizzle the garlic oil over the rounds.
With lightly oiled fingertips, press dimples into each piece, gently widening them to approximately 4 inches. Press deeply without tearing through the dough.
Nestle the tomato halves cut-side up and the olives into the surface. Sprinkle with rosemary and a little flaky salt if desired.
Step 10: Bake
Bake for 18–24 minutes, until golden around the edges and cooked through.
If baking both trays together, rotate them front to back and switch rack positions midway through. Begin checking early because ovens vary.
The undersides should have some golden color rather than remaining pale and damp.
Step 11: Cool Briefly
Transfer to a wire rack and let cool for 10–15 minutes before serving.
For sandwiches, allow them to cool more fully before splitting.
Tips for Soft, Airy Mini Focaccia
Measure the flour accurately. Too much flour makes the dough stiff and limits its airy texture.
Expect stickiness. Oil your hands and tools instead of repeatedly adding flour.
Give the folds time to work. Short rests make the dough easier to stretch.
Judge rising by appearance. Puffy, aerated dough matters more than an exact time.
Avoid pressing hard during shaping. Gentle handling preserves some of the air from the first rise.
Dimple after the second rise. This creates the characteristic surface while spreading the topping oil.
Keep toppings moderate. Too many tomatoes can weigh down the centers.
Drain and blot wet ingredients. Excess liquid can leave soft patches around the toppings.
Cool on a rack. Air circulation helps prevent condensation underneath.
Variations to Try
Mozzarella Tomato Focaccia
Add a small amount of shredded low-moisture mozzarella during the final 5–7 minutes of baking.
This gives the cheese time to melt without becoming overly dark.
Parmesan Herb Rounds
Sprinkle 2–3 tablespoons finely grated Parmesan across the batch before baking.
Reduce the optional flaky salt.
Garlic Rosemary Focaccia
Omit the tomatoes and olives, keeping the garlic oil and rosemary.
This simpler version pairs well with soup and pasta.
Pepperoncini Olive Focaccia
Replace some tomatoes with thinly sliced, thoroughly drained pepperoncini.
Pat the pepper rings dry before pressing them into the dough.
Roasted Pepper Focaccia
Use small pieces of drained roasted red pepper in place of some tomatoes.
Blot well to remove packing liquid.
Fresh Basil Finish
Add torn basil after baking rather than before, preserving its fresh flavor and color.
Overnight Dough
After completing the folds, cover and refrigerate the dough overnight instead of giving it the full room-temperature first rise.
The next day, let it warm until workable and visibly puffy, then divide and shape. Chilled dough may need a longer final rise.
What to Serve with Mini Tomato Olive Focaccia
These breads fit easily into lunch or dinner.
- Tomato soup: Their savory toppings complement a smooth soup.
- Green salad: Add a warm round for a simple lunch.
- Pasta: Serve alongside spaghetti, baked pasta, or pesto noodles.
- Roasted chicken: Use the bread to accompany vegetables and juices.
- Antipasto platters: Pair with cheese, artichokes, and roasted peppers.
- Sandwich fillings: Split and fill with mozzarella, chicken, or grilled vegetables.
- Eggs: Toast leftovers for a savory breakfast.
Serve warm for the softest texture, with a small dish of olive oil if desired.
Storage, Freezing, and Reheating
Refrigerator
Because these breads have moist tomato toppings, refrigerate leftovers once cooled.
Store airtight for up to 3 days.
Freezer
Freeze cooled rounds individually, then transfer to a freezer-safe bag or container.
Store for up to 2 months for best quality.
Oven Reheating
Warm refrigerated focaccia at 350°F (175°C) for approximately 8–12 minutes.
For frozen rounds, allow additional time and cover loosely with foil if the toppings begin browning.
Avoiding a Damp Base
Cool on a rack before packaging. Warm bread sealed in a container traps steam and softens the underside.
Make-Ahead Serving
Bake earlier in the day, then briefly rewarm before dinner. Add fresh basil or other delicate finishing herbs after reheating.
Frequently Asked Questions
Can I use instant yeast?
Yes. Use the same amount. You can follow the same mixing sequence, though the dough may rise faster.
Do I need to knead the dough?
This method uses folds and resting time instead of extended kneading. The dough should become smoother after the folding stages.
Why is my dough sticky?
The relatively high water content helps create a soft crumb. Use lightly oiled hands and tools rather than adding excessive flour.
Can I use one baking sheet?
Only if it comfortably holds all eight rounds with space between them. Otherwise, use two trays or bake in batches.
Why are the centers dense?
The dough may not have risen enough, too much flour may have been added, or the toppings may be excessive.
Can I use whole cherry tomatoes?
Halved tomatoes are easier to distribute and less likely to roll off. Place them cut-side up to limit liquid spreading across the dough.
Can I leave out the olives?
Yes. Keep the tomato quantity the same or add a few additional halves without crowding the surface.
Can I use dried rosemary?
Yes. Substitute approximately 1 teaspoon, crushing it finely before sprinkling.
How do I know they are baked through?
Look for golden edges and lightly browned undersides. The centers should feel set rather than wet or doughy.
Can I double the recipe?
Yes. Divide between additional trays and bake in batches if necessary. Keep the shaped rounds covered while waiting.
Can I make them thinner?
Yes, but thinner rounds bake faster and have a different texture. Begin checking earlier.
Can I use gluten-free flour?
A direct substitution is unlikely to behave the same way. Gluten-free focaccia needs a formula developed for the specific flour blend.

Easy Mini Tomato Olive Focaccia
Description
Individual olive-oil breads with soft centers, golden edges, cherry tomatoes, olives, and rosemary.
- Prep and folding: Approximately 35 minutes
- First rise: 60–90 minutes
- Second rise: 25–40 minutes
- Bake time: 18–24 minutes
- Cooling: 10–15 minutes
- Total time: Approximately 2½–3½ hours
- Yield: 8 mini focaccia rounds
- Course: Bread or side dish
- Difficulty: Easy
Ingredients
Ingredients
For the dough:
- 3 cups (360 g) all-purpose flour
- 1 cup plus 2 tablespoons (270 ml) warm water, 105–110°F (40–43°C)
- 2¼ teaspoons (7 g) active dry yeast
- 1 teaspoon granulated sugar
- 1 teaspoon fine salt
- 2 tablespoons extra-virgin olive oil
For greasing and topping:
- 3 tablespoons extra-virgin olive oil, divided
- 1 cup cherry tomatoes, halved
- ½ cup pitted olives, drained and halved
- ½ teaspoon garlic powder
- 1 tablespoon finely chopped fresh rosemary
- Flaky salt, optional
Instructions
Instructions
- Combine warm water, sugar, and yeast. Rest for 5–10 minutes.
- Stir in flour, fine salt, and 2 tablespoons olive oil.
- Cover and rest for 10 minutes.
- Stretch and fold the dough from four sides. Rest for 10 minutes and repeat.
- Lightly oil the bowl and dough. Cover and rise for 60–90 minutes, until doubled.
- Line and lightly oil two baking sheets, using the remainder of the tablespoon reserved for greasing.
- Divide dough into eight portions. Shape into thick 3½-inch rounds.
- Cover and rise for 25–40 minutes.
- Preheat the oven to 425°F (220°C).
- Mix 2 tablespoons olive oil with garlic powder. Drizzle over the dough.
- Dimple with oiled fingertips, gently widening the rounds.
- Add tomatoes, olives, rosemary, and optional flaky salt.
- Bake for 18–24 minutes, rotating trays as needed, until golden and cooked through.
- Cool on a rack for 10–15 minutes before serving.