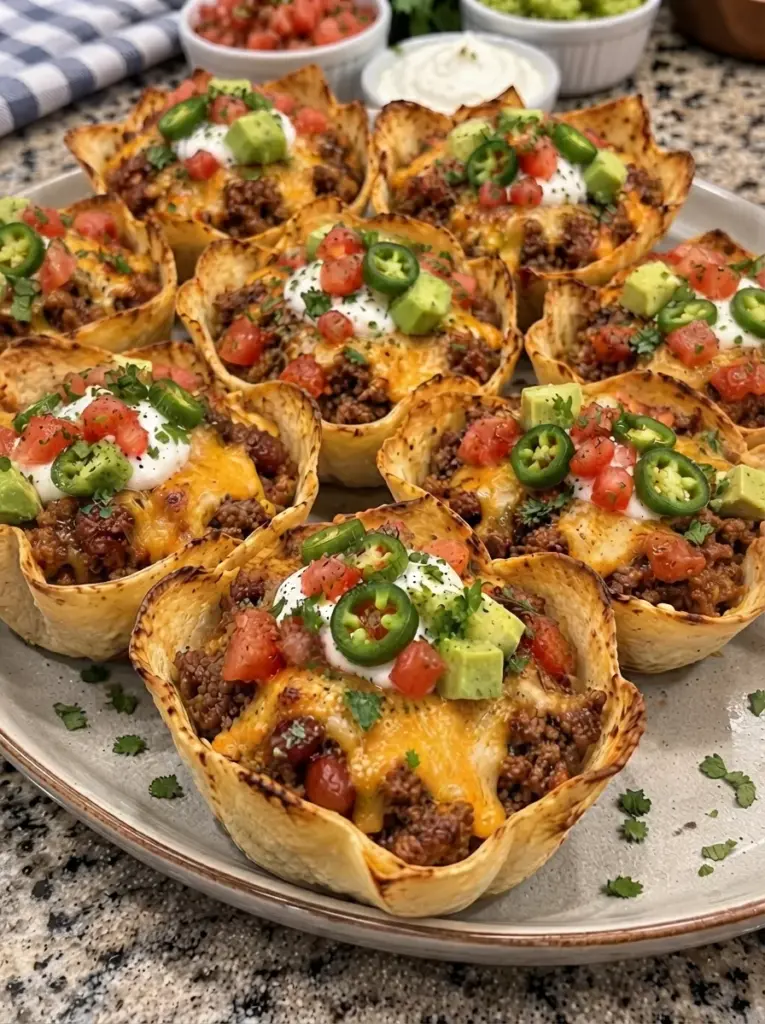
These Crispy Loaded Cheesy Beef & Bean Chili Tortilla Crunch Cups combine golden flour tortilla shells with a thick beef-and-bean filling and melted sharp cheddar. They bring together the best parts of a taco, a bowl of chili, and a tray of loaded nachos in individual portions.
The filling gets its flavor from onion, garlic, taco seasoning, tomato paste, and diced tomatoes with green chiles. Chili beans add substance, while cheddar mixed into the filling helps hold the crumbles together. More cheese melts over the top during a short final bake.
The key to the crunch is preparing the shells before filling them. A brief prebake gives the tortillas structure, and reducing the skillet mixture keeps excess liquid away from the bottoms. Fresh toppings go on only when you are ready to eat.
Serve the cups for a casual dinner with a salad or put them on a game-day table with sour cream, salsa, and avocado on the side. They are substantial portions, so two or three can make a meal depending on the size of your tortillas and appetite.
Recipe Overview
- Yield: About 12 standard muffin-size cups, with possible extra filling
- Dinner servings: 4–6
- Appetizer servings: Up to 12 substantial portions
- Preparation: About 20 minutes
- Cooking and baking: About 25–30 minutes, with some overlap
- Rest: 3–5 minutes
- Total: Approximately 45–55 minutes
- Oven: 375°F
The supplied recipe is expanded here with sizing and moisture-management details. It has not been independently kitchen-tested for this article. Muffin wells, tortilla thickness, and canned bean sauces vary, so use the visual cues as well as the clock.
What Makes These Cups Work
A flour tortilla can become a sturdy little shell when it is warmed, pressed into a greased muffin well, and baked briefly before filling. The exposed edges dry and brown during the final bake, while the protected base stays a little more tender.
The filling needs to be thick enough to mound on a spoon. Chili that tastes good in a bowl can still be too wet for a tortilla shell. Drained tomatoes, controlled bean sauce, and a short uncovered simmer help prevent soggy bottoms.
These cups are crispest soon after baking. They are not sealed shells, and moisture gradually moves from the filling into the tortilla. Small batches assembled near serving time give the best texture.
Ingredients
Tortilla Shells
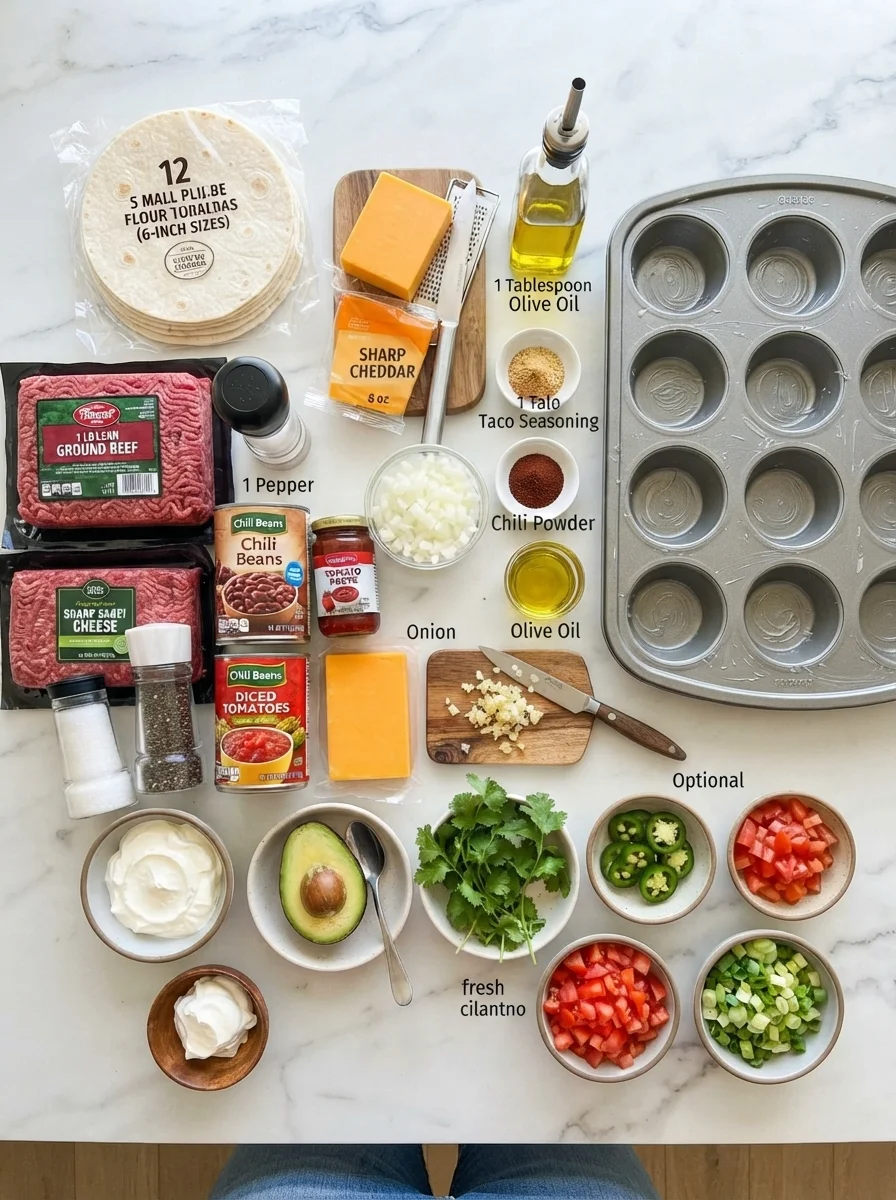
- 12 small, thin flour tortillas, about 6 inches across, trimmed if needed to fit
- A little oil or cooking spray, for the muffin pan and optional light brushing
Beef and Bean Chili Filling
- 1 pound lean ground beef, preferably 90% lean
- 1 can chili beans, 15 ounces, with some sauce reserved
- 1 can diced tomatoes with green chiles, 10 ounces, drained
- 2 tablespoons tomato paste
- 2 cups shredded sharp cheddar, divided
- ½ small onion, finely diced
- 2 garlic cloves, minced
- 1 tablespoon taco seasoning
- ½ teaspoon chili powder
- Up to 1 tablespoon olive oil, only as needed for the skillet
- Salt and black pepper, to taste
Optional Toppings
- Sour cream
- Diced avocado or guacamole
- Chopped cilantro
- Sliced jalapeños
- Drained diced tomatoes or thick salsa
- Sliced green onions
Pan grease and optional toppings are separate from the measured filling ingredients. You may not need the full tablespoon of skillet oil with beef that releases sufficient fat.
Ingredient Notes
Flour Tortillas and Pan Size
Six-inch tortillas can form tall, overlapping folds in a standard muffin pan. Test one before shaping the whole batch. If it creates a thick wad at the base or crowds the adjacent wells, trim it to about 4½–5 inches across.
Thin, flexible tortillas shape more easily than thick, fluffy ones. The goal is an even base with loose pleats up the sides, not several compressed layers of tortilla in the center.
If you want to keep full six-inch tortillas intact, a jumbo muffin pan may fit better, but the yield and filling per cup will change. The standard-pan version is the method described here.
Ground Beef
Lean beef limits grease in the shells. If using a fattier blend, drain thoroughly before adding seasonings and tomatoes.
Ground turkey can be used as a variation, but cook it to 165°F rather than the ground beef target of 160°F. It may need a little skillet oil and will have a different flavor.
Chili Beans
Use canned, fully cooked beans in chili-style sauce. Depending on the brand, the sauce may already contain salt, spices, and tomato flavor.
Tip the beans into a strainer over a bowl and let some sauce drain, reserving it. Add the beans first and return sauce only as needed to keep the filling moist. This gives more control than pouring the entire can into the skillet.
Plain pinto beans can replace chili beans as a variation, but the filling may need additional seasoning. Dry beans must be cooked fully beforehand; they do not belong directly in this short skillet method.
Tomatoes and Tomato Paste
Drain the diced tomatoes with green chiles well. Keep the pieces, but leave excess juice out of the filling. Tomato paste adds concentrated flavor without much liquid.
Mild canned tomatoes with chiles keep the heat manageable. Hot varieties and hot taco seasoning can add up quickly, so taste the cooked filling before adding jalapeños or hot sauce.
Cheese and Seasoning
Sharp cheddar provides a pronounced flavor. Freshly shredded cheese usually melts smoothly, while pre-shredded cheese can be a convenient alternative with a slightly different melt.
Taco seasoning, chili powder, chili beans, and cheese all contribute seasoning. Additional salt may be unnecessary. In this recipe, chili powder means a chili-style seasoning blend, not an equal amount of pure hot ground chile.
Equipment
Use a standard 12-well metal muffin pan, a large skillet, a spatula, a spoon, and an instant-read thermometer. Kitchen scissors or a round cutter are useful if the tortillas need trimming.
A metal pan generally browns the shells more effectively than silicone molds. Have a rack or platter ready so finished cups do not sit in the pan long enough for steam to soften the bottoms.
How to Make the Tortilla Crunch Cups
1. Heat the Oven and Prepare the Ingredients
Heat the oven to 375°F. Lightly grease the muffin wells, including the upper edges where the tortilla pleats will rest.
Drain tomatoes and partially drain the beans, reserving their sauce. Dice the onion finely and mince the garlic. Shred the cheese and divide it into two 1-cup portions.
2. Warm and Shape the Tortillas
Warm tortillas in small stacks, covered with a slightly damp paper towel, for about 15–20 seconds or until flexible. Timing varies with the microwave and tortilla thickness.
Press one into a well, forming loose pleats around the sides. Trim if needed. Repeat with the remaining tortillas, keeping excess folds from overlapping neighboring cups.
Do not force cold tortillas into the pan; cracking is easier to prevent than to repair. A small tear near the rim may be manageable, but a split through the base can let filling leak underneath.
3. Prebake the Shells
Brush lightly with oil if desired and bake for about 5–7 minutes, until beginning to hold their shape. They should look slightly dry at the edges, not deeply golden yet.
Remove the pan. If a center puffs, gently settle it with the back of a spoon while warm. The shells will finish crisping after the filling goes in.
4. Cook the Beef and Onion
Heat the skillet over medium-high heat. Add a little of the oil only if needed, then add beef and onion.
Cook for about 6–8 minutes, breaking the meat into small crumbles. Continue as needed until the beef reaches 160°F and the onion softens. Check the meat with a thermometer rather than judging by color alone.
Drain excess fat. The filling should retain moisture, but a pool of grease at the bottom of the skillet will work against the tortilla texture.
5. Add Seasonings and Tomato Paste
Stir in garlic, taco seasoning, chili powder, and tomato paste. Cook for about a minute, stirring to prevent the garlic or paste from scorching.
If the pan is very dry, a spoonful of reserved bean sauce can loosen the paste. Do not add a large amount of water simply to make mixing easier.
6. Add Tomatoes and Beans
Fold in the drained tomatoes and beans. Simmer uncovered for about 4–8 minutes, stirring gently, until the mixture thickens.
Drag a spatula across the skillet bottom. The filling should settle slowly rather than immediately flooding the cleared space with liquid. It should mound on a spoon without dripping sauce freely.
Add reserved bean sauce only if the mixture is dry. If it is wet, continue reducing before adding cheese. Avoid crushing all the beans while stirring.
7. Stir in Cheese
Remove from the heat and fold in 1 cup cheddar until it begins melting. Taste the fully cooked mixture and add salt or pepper only as needed.
The filling should be cohesive and scoopable. Cheese helps bind it, but it is not a substitute for reducing a watery mixture first.
8. Fill the Shells
Divide filling among the shells, starting with about 3 tablespoons in each. Add more only if the well has room, keeping filling near or below the tortilla rim.
The skillet can produce more filling than some standard muffin pans hold. Reserve any excess for a second batch, a rice bowl, or nachos rather than packing the cups too tightly.
Sprinkle the remaining cup of cheese evenly across the tops.
9. Bake Until Melted and Golden
Bake for another 8–12 minutes, until the cheddar melts and the exposed tortilla edges are golden. Check early if the tortillas are thin or already browned during prebaking.
The beef is cooked before assembly. This short final bake heats the assembled cups and melts the cheese; it is not intended to cook raw meat.
10. Rest and Garnish
Let stand in the pan for 3–5 minutes. Loosen gently around the edges and lift with a small spatula.
Transfer to a serving platter or rack. Add fresh toppings just before serving and offer wet sauces separately. A small spoonful of sour cream or salsa is easier to manage than a generous pool over the entire tray.
Tips for Keeping the Cups Crisp
Prebake the shells and use a thick filling. Those two steps make more difference than simply baking the assembled cups longer.
Use a light oil coating. Too much oil can leave a greasy shell rather than a crisp one.
Keep the base free of thick tortilla folds. A dense, compressed layer of overlapping tortilla can remain chewy while exposed edges become dark.
Do not fill far above the rim. Overfilled cups spill, and melted cheese can glue the tortilla to the pan.
Serve promptly after topping. Salsa, guacamole, tomatoes, and sour cream add moisture, so set them out separately for a longer meal or gathering.
Troubleshooting
| Problem | Likely cause | Adjustment |
|---|---|---|
| Tortillas crack | Cold or thick tortillas | Warm briefly and use flexible, thinner rounds. |
| Shell base stays chewy | Thick overlapping folds or insufficient prebake | Trim oversized tortillas and pleat loosely. |
| Bottoms become soggy | Watery filling or early toppings | Reduce filling thoroughly and garnish at serving. |
| Edges burn | Long prebake or fast-browning tortillas | Check early and shorten one baking stage. |
| Cups stick | Cheese overflow or too little pan grease | Grease well and keep filling below the rim. |
| Filling tastes salty | Seasoned beans, taco mix, and cheese | Taste before adding extra salt. |
| Filling does not fit | Pan capacity is smaller than expected | Reserve extra filling instead of overpacking. |
Variations
Spicy chili cups: Add finely diced jalapeño with the onion or use a hotter tomato-and-chile product. Start with one heat source before increasing several at once.
Pepper Jack topping: Replace some cheddar with Pepper Jack. The flavor and heat change, but the basic assembly remains the same.
Plain bean version: Use drained cooked pinto or black beans and adjust the cooked filling’s seasoning. You may need a small amount of liquid, but keep the finished consistency thick.
Ground turkey: Use ground turkey cooked to 165°F. Assess fat and moisture before deciding whether extra oil or bean sauce is needed.
Chili bowls: Serve extra filling over rice or chopped lettuce instead of forcing it into the shells. This changes the portion and nutrition but is an easy way to use leftovers.
Vegetarian variation: Replacing beef with more beans or a plant-based crumble changes the filling volume and moisture. Cook according to the chosen product’s instructions and reduce until scoopable.
Serving Ideas
For dinner, pair two or three cups with a salad, slaw, or roasted vegetables. For a party, one cup makes a substantial appetizer, with extra toppings offered in small bowls.
Set out sour cream, avocado, cilantro, and jalapeños so guests can choose. Keep salsa thick and drained if spooning it directly into the cups.
The tortillas already provide a starch component. Rice is optional rather than necessary, and all sides should be counted separately from the cup’s nutrition.
Make-Ahead Options
Cook the filling up to two days ahead and refrigerate promptly in a shallow covered container. Store tortillas and fresh toppings separately.
Before assembly, reheat the filling to 165°F on the stovetop or in the microwave, stirring for even heating. Let excess moisture evaporate, then fill freshly prebaked shells and add the topping cheese.
Using hot filling makes the short final bake more predictable. Cold filling can remain cool inside even when the exposed tortilla edges and cheese look ready.
Do not assemble the cups the night before if crispness is the goal. The filling gradually moistens the shells during storage.
Storage and Reheating
Refrigerate leftovers within 2 hours of cooking, or within 1 hour if temperatures exceed 90°F. Keep at 40°F or below and use within 3–4 days from the original filling preparation.
Store fresh toppings separately. Place cups in a shallow container without crushing the edges. Refrigeration softens the tortillas, so expect a different texture from freshly baked cups.
Reheat on a baking sheet at 350°F until the center reaches 165°F, beginning to check around 10–15 minutes and allowing longer as needed. Tent loosely if the edges darken early.
An air fryer can help restore exposed edges, but appliance size and heat vary. Use a single layer, check early, and verify the filling temperature. Microwaving works for convenience but leaves softer shells.
For freezing, cool promptly and freeze untopped cups in a single layer, then package airtight for up to 2 months for best quality. Thaw in the refrigerator and reheat thoroughly. Freezing the filling separately and baking fresh shells gives better control over crunch.
Do not reset the storage period when reheating or adding new toppings. If filling was made two days before assembly, those two days count toward the total refrigerated period.
Nutrition Notes
A broad estimate is approximately 240–310 calories and 14–18 grams of protein per cup when the entire recipe is divided into 12 portions, before optional toppings. Tortilla brands and cheese amounts are major sources of variation.
If you trim tortillas and do not use all the filling, the actual amount per cup differs. These figures are illustrative estimates rather than a calculated nutrition label.
The recipe contains wheat and dairy and is not low-carb. Beans contribute carbohydrates and fiber. Check taco seasoning, chili beans, and other labels for allergy or dietary needs.
Frequently Asked Questions
Will six-inch tortillas fit a standard muffin pan?
Sometimes, but they can create bulky folds. Test one and trim to about 4½–5 inches if necessary. Thin tortillas are easier to shape than thick ones.
Do I need to drain chili beans completely?
Reserve their sauce so you can control the filling. Add some back only if needed. Different brands contain different amounts and thicknesses of sauce.
Can I use leftover chili?
Yes, if safely stored and thick enough. Reheat to 165°F and reduce excess liquid before filling. Its original preparation date still determines storage time.
Can I skip prebaking?
You can, but the base is more likely to be soft. The short prebake is part of the method for a sturdier shell.
Can I use corn tortillas?
They need different handling and can crack more easily. This method is written for flour tortillas, so a corn-tortilla version requires adjustments rather than an assumed direct swap.
Can I make mini cups?
A mini pan needs smaller tortilla pieces, much less filling, and different baking times. The stated yield and timing are for a standard muffin pan.
Can I double the recipe?
Use two pans and cook the filling in a sufficiently large skillet or in batches. Check each pan separately, since oven position affects browning.
Recipe Card
Crispy Loaded Cheesy Beef & Bean Chili Tortilla Crunch Cups
Golden flour tortilla cups with thick beef-and-bean chili and melted cheddar.
Yield: About 12 cups, with possible extra filling
Servings: 4–6 dinners or up to 12 appetizers
Prep: 20 minutes
Cook and bake: 25–30 minutes with overlap
Rest: 3–5 minutes
Oven: 375°F
Ingredients
- 12 small thin flour tortillas, about 6 inches, trimmed to fit if needed
- Oil or cooking spray for pan and light brushing
- 1 pound lean ground beef
- 1 can chili beans, 15 ounces, partially drained; reserve sauce
- 1 can diced tomatoes with green chiles, 10 ounces, drained
- 2 tablespoons tomato paste
- 2 cups shredded sharp cheddar, divided
- ½ small onion, finely diced
- 2 garlic cloves, minced
- 1 tablespoon taco seasoning
- ½ teaspoon chili powder blend
- Up to 1 tablespoon olive oil for skillet, only if needed
- Salt and black pepper, to taste
- Optional toppings: sour cream, avocado, cilantro, jalapeños, salsa, and green onions
Instructions
- Heat oven to 375°F and grease a standard 12-well muffin pan.
- Warm tortillas until flexible. Press into wells with loose pleats, trimming oversized rounds if needed. Prebake 5–7 minutes until beginning to hold shape.
- Cook beef and onion in a skillet with oil only if needed, about 6–8 minutes or until beef reaches 160°F. Drain excess fat.
- Stir in garlic, taco seasoning, chili powder, and tomato paste for about 1 minute.
- Fold in drained tomatoes and beans. Simmer uncovered 4–8 minutes until thick and scoopable. Add reserved bean sauce only if needed. Season to taste.
- Remove from heat and stir in 1 cup cheddar.
- Divide among shells, starting with about 3 tablespoons each. Do not overfill; reserve excess. Top with remaining cheese.
- Bake 8–12 minutes until melted and golden. Rest 3–5 minutes, remove carefully, and add fresh toppings just before serving.
Storage: Refrigerate promptly for 3–4 days from original filling preparation. Reheat to 165°F. Freeze untopped cups up to 2 months for quality, expecting softer shells.
Estimated nutrition: About 240–310 calories per cup at 12 portions, before toppings; ingredients and filling used vary.
Texture note: Prebaked shells and thick filling are the main controls for crunch. Six-inch tortillas may need trimming for a standard pan.

Crispy Loaded Cheesy Beef & Bean Chili Tortilla Crunch Cups
Description
Golden flour tortilla cups with thick beef-and-bean chili and melted cheddar.
Yield: About 12 cups, with possible extra filling
Servings: 4–6 dinners or up to 12 appetizers
Prep: 20 minutes
Cook and bake: 25–30 minutes with overlap
Rest: 3–5 minutes
Oven: 375°F
Ingredients
- 12 small thin flour tortillas, about 6 inches, trimmed to fit if needed
- Oil or cooking spray for pan and light brushing
- 1 pound lean ground beef
- 1 can chili beans, 15 ounces, partially drained; reserve sauce
- 1 can diced tomatoes with green chiles, 10 ounces, drained
- 2 tablespoons tomato paste
- 2 cups shredded sharp cheddar, divided
- ½ small onion, finely diced
- 2 garlic cloves, minced
- 1 tablespoon taco seasoning
- ½ teaspoon chili powder blend
- Up to 1 tablespoon olive oil for skillet, only if needed
- Salt and black pepper, to taste
- Optional toppings: sour cream, avocado, cilantro, jalapeños, salsa, and green onions
Instructions
- Heat oven to 375°F and grease a standard 12-well muffin pan.
- Warm tortillas until flexible. Press into wells with loose pleats, trimming oversized rounds if needed. Prebake 5–7 minutes until beginning to hold shape.
- Cook beef and onion in a skillet with oil only if needed, about 6–8 minutes or until beef reaches 160°F. Drain excess fat.
- Stir in garlic, taco seasoning, chili powder, and tomato paste for about 1 minute.
- Fold in drained tomatoes and beans. Simmer uncovered 4–8 minutes until thick and scoopable. Add reserved bean sauce only if needed. Season to taste.
- Remove from heat and stir in 1 cup cheddar.
- Divide among shells, starting with about 3 tablespoons each. Do not overfill; reserve excess. Top with remaining cheese.
- Bake 8–12 minutes until melted and golden. Rest 3–5 minutes, remove carefully, and add fresh toppings just before serving.
Storage: Refrigerate promptly for 3–4 days from original filling preparation. Reheat to 165°F. Freeze untopped cups up to 2 months for quality, expecting softer shells.
Estimated nutrition: About 240–310 calories per cup at 12 portions, before toppings; ingredients and filling used vary.
Texture note: Prebaked shells and thick filling are the main controls for crunch. Six-inch tortillas may need trimming for a standard pan.