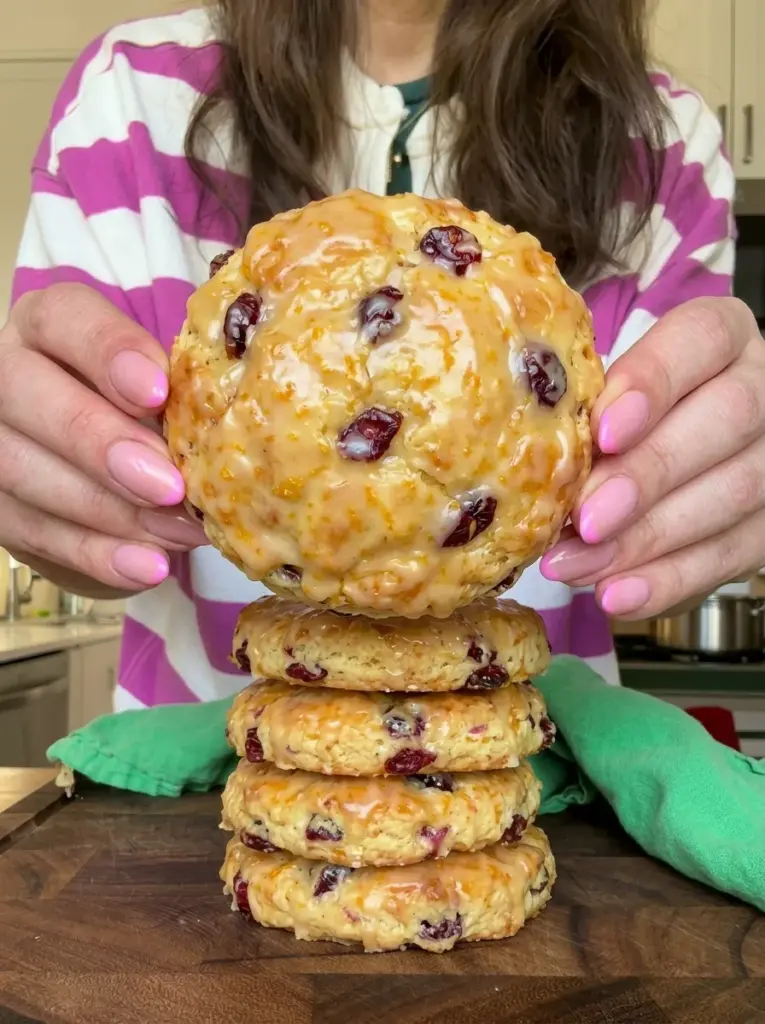
Few things make a weekend morning feel more special than warm, freshly baked scones. These Soft & Flaky Cranberry Orange Scones have crisp, lightly golden edges, soft and tender centers, and delicate buttery layers filled with sweet-tart dried cranberries and bright orange flavor.
The secret to their bakery-style texture is keeping the butter cold and handling the dough gently. Small pieces of butter remain throughout the dough and create flaky pockets as the scones bake, while a few gentle folds help build additional layers without making the scones tough.
Fresh orange zest and juice bring plenty of citrus flavor, and a simple orange-vanilla glaze provides the perfect sweet finish. Serve these scones warm with coffee or tea for breakfast, brunch, afternoon tea, or a cozy homemade treat.
Why You’ll Love These Soft & Flaky Cranberry Orange Scones
These scones deliver the tender texture and bright flavor you expect from a bakery-style treat without requiring complicated techniques.
Soft and flaky inside. Cold butter and gentle folding help create tender layers throughout the dough.
Bright citrus flavor. Fresh orange zest and juice give every bite a vibrant orange flavor.
Packed with cranberries. Dried cranberries add chewy little bursts of sweet-tart fruit.
Buttery and tender. Heavy cream, egg, and butter create a rich dough with a soft center.
Finished with orange glaze. A simple powdered sugar glaze reinforces the citrus flavor and adds just the right amount of sweetness.
Perfect for breakfast or brunch. Pair the scones with coffee, tea, fruit, or your favorite breakfast dishes.
Freezer-friendly. Unglazed scones can be frozen for up to three months.
What Makes These Scones Extra Flaky?
Flaky scones depend heavily on two things: cold butter and minimal handling.
When cold butter is cut into the flour, you intentionally leave small pea-sized pieces rather than blending everything into a completely uniform mixture. Those pieces remain throughout the dough until they enter the hot oven.
The dough is also gently pressed and folded 2 to 3 times. This helps create subtle layers without developing too much gluten or warming the butter excessively.
Another helpful step is chilling the shaped scones for 10 to 15 minutes before baking. This is optional, but especially useful if your kitchen is warm or the dough has softened while being shaped.
Once the cold scones enter the 400°F oven, the high heat helps them puff and develop golden edges while the centers remain soft and tender.
Ingredients for Soft & Flaky Cranberry Orange Scones
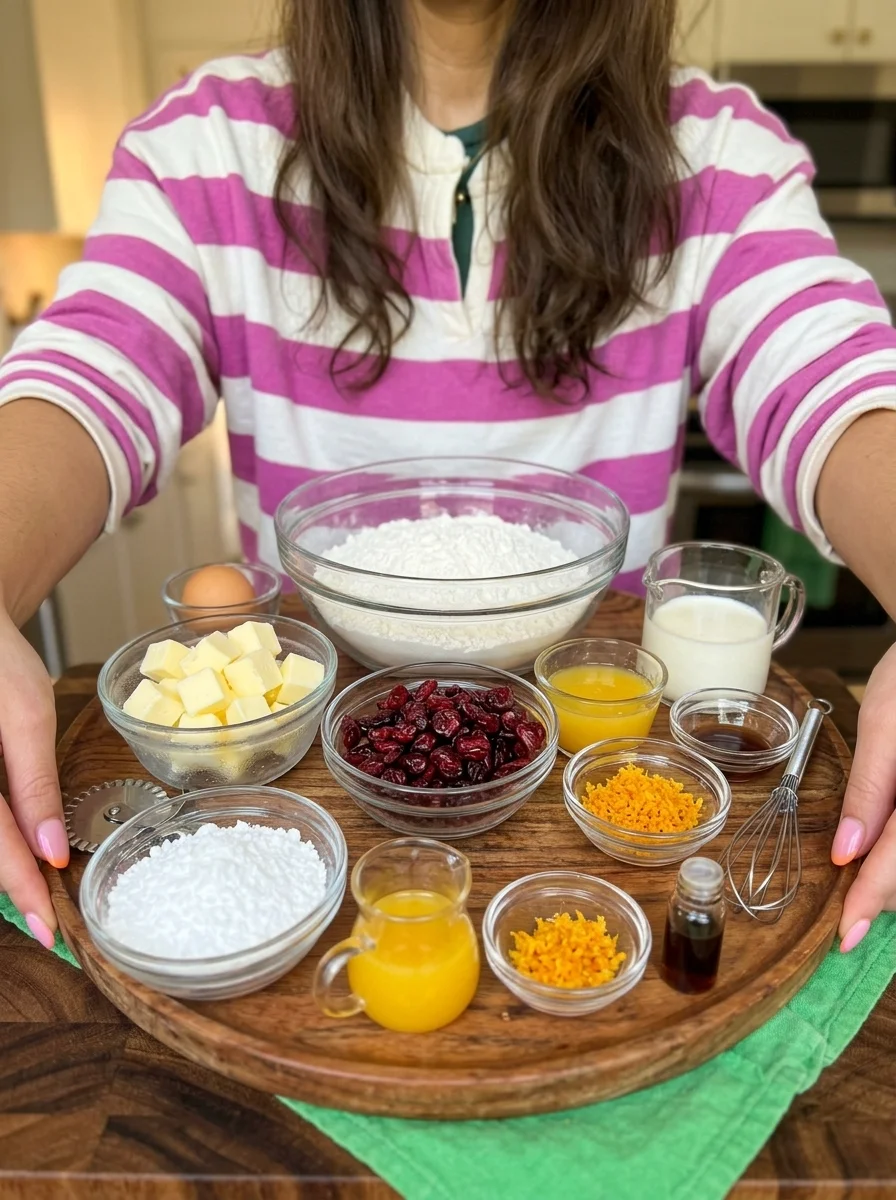
For the Scones
- 2 cups all-purpose flour
- 1/3 cup granulated sugar
- 2 tsp baking powder
- 1/2 tsp salt
- 1 tbsp finely grated orange zest
- 1/2 cup cold unsalted butter, cubed
- 2/3 cup dried cranberries
- 1 large egg
- 1/2 cup heavy cream
- 2 tbsp fresh orange juice
- 1 tsp vanilla extract
For the Orange Glaze
- 1 cup powdered sugar
- 2 tbsp fresh orange juice
- 1 tsp finely grated orange zest
- 1/2 tsp vanilla extract
Ingredient Notes
All-purpose flour: Provides the structure needed for the scones while still allowing them to remain tender when the dough is handled gently.
Granulated sugar: Adds enough sweetness to balance the tart cranberries and citrus without making the scones overly sweet.
Baking powder: Gives the scones their lift and helps create a soft, light interior.
Salt: Enhances the butter, vanilla, cranberry, and orange flavors.
Fresh orange zest: Orange zest contains concentrated citrus oils and provides a strong orange aroma without adding unnecessary moisture.
Cold unsalted butter: One of the most important ingredients in the recipe. Keeping the butter cold helps create those desirable flaky layers.
Dried cranberries: Provide concentrated cranberry flavor and a pleasant chewy texture throughout the scones.
Egg: Adds richness and helps provide structure to the dough.
Heavy cream: Creates a rich, tender scone and provides the moisture needed to bring the dough together.
Fresh orange juice: Adds citrus flavor directly to both the scone dough and glaze.
Vanilla extract: Softens and rounds out the bright citrus flavor with a warm bakery-style note.
Powdered sugar: Creates a smooth, sweet glaze when combined with orange juice.
How to Make Soft & Flaky Cranberry Orange Scones
Step 1: Prepare the Oven and Baking Sheet
Preheat your oven to 400°F (200°C).
Line a baking sheet with parchment paper and set it aside.
A properly preheated oven is important because the scones need immediate heat to begin rising and developing their flaky texture.
Step 2: Combine the Dry Ingredients
Add the all-purpose flour, granulated sugar, baking powder, salt, and finely grated orange zest to a large mixing bowl.
Whisk until everything is evenly combined and the orange zest is distributed throughout the flour.
Step 3: Cut in the Cold Butter
Add the cold cubed butter to the flour mixture.
Using a pastry cutter or your fingertips, work the butter into the dry ingredients until the mixture resembles coarse crumbs.
Leave several small pea-sized pieces of butter intact.
Don’t try to make the mixture completely uniform. Those visible pieces of cold butter are exactly what you want for flaky scones.
Step 4: Add the Cranberries
Add the dried cranberries and gently stir until they are evenly distributed.
This ensures that each of the eight scones contains plenty of cranberry pieces.
Step 5: Combine the Wet Ingredients
In a separate bowl, whisk together the egg, heavy cream, 2 tablespoons fresh orange juice, and vanilla extract.
Mix until smooth and evenly combined.
Step 6: Form the Dough
Pour the wet mixture into the dry ingredients.
Using a fork or wooden spoon, gently stir until the dough just begins to come together.
The goal is not to create a perfectly smooth dough. Stop mixing as soon as the ingredients are mostly combined.
Overmixing can develop too much gluten and make the finished scones tougher.
Step 7: Fold the Dough
Transfer the dough to a lightly floured work surface.
Gently press it together, then fold the dough over itself.
Repeat this process only 2 to 3 times.
These gentle folds help create additional layers while minimizing how much the dough and butter are handled.
Step 8: Shape the Scones
Shape the dough into a round approximately 1 inch thick.
Avoid pressing it too thin, since thicker dough helps produce substantial scones with soft centers.
Step 9: Cut Into Wedges
Using a sharp knife or bench scraper, divide the round into 8 wedges.
Cut straight down rather than aggressively sawing through the dough.
Transfer the wedges to the prepared baking sheet, leaving space between them.
Step 10: Chill for Extra Flakiness
For especially flaky scones, place the shaped scones in the refrigerator for 10 to 15 minutes before baking.
This short chill helps firm the butter again, particularly if it softened while the dough was being mixed and shaped.
Step 11: Brush With Heavy Cream
Lightly brush the tops of the chilled or freshly shaped scones with a little heavy cream.
This helps the tops develop an attractive golden finish.
Step 12: Bake
Bake at 400°F (200°C) for 17 to 21 minutes.
The scones should become visibly puffed with lightly golden edges.
Avoid baking them significantly beyond this stage, since overbaking can dry out the centers.
Step 13: Cool
Remove the scones from the oven and let them cool for approximately 10 minutes.
They can remain slightly warm when glazed, but they shouldn’t be extremely hot.
Step 14: Prepare the Orange Glaze
Add the powdered sugar, fresh orange juice, orange zest, and vanilla extract to a small bowl.
Whisk until smooth and free of lumps.
The glaze should be thick enough to remain visible on the scones but fluid enough to drizzle easily.
Step 15: Glaze and Serve
Drizzle the orange glaze over the slightly cooled scones.
Let the glaze set for a few minutes before serving.
Enjoy them warm with coffee, tea, butter, or your favorite breakfast spread.
Time and Yield
Prep time: 20 minutes
Cook time: 19 minutes
Total time: 39 minutes
Servings: 8 scones
Estimated calories: approximately 350 calories per serving
If you use the optional 10 to 15-minute chilling step, allow a little additional time before baking.
Tips for the Flakiest Cranberry Orange Scones
Keep everything cold. Cold butter is essential for creating flaky layers. Avoid letting it soften before mixing.
Leave visible butter pieces. Don’t completely work the butter into the flour. Small pea-sized pieces are desirable.
Work quickly. The warmth of your hands and kitchen can soften the butter, so avoid unnecessarily handling the dough.
Don’t overmix. Mix only until the dough begins to come together.
Fold instead of kneading. Two or three gentle folds help create layers without developing too much gluten.
Don’t flatten the dough too much. Keep the round approximately 1 inch thick for tall, substantial scones.
Chill before baking. A short 10 to 15-minute refrigeration period is particularly helpful for maintaining cold butter.
Use a hot oven. Make sure your oven has reached 400°F before the scones go in.
Watch the edges. Once the scones are puffed and lightly golden around the edges, begin checking them for doneness.
Let them cool slightly before glazing. If they’re extremely hot, the glaze may melt and disappear into the surface.
What to Serve With Cranberry Orange Scones
These scones work beautifully for breakfast, brunch, afternoon tea, or a special holiday spread.
Coffee: Their sweet orange glaze and buttery crumb pair naturally with freshly brewed coffee.
Tea: Serve them warm with black tea, Earl Grey, or your favorite tea.
Butter: Split a warm scone and spread it with a little butter for an extra-rich treat.
Breakfast spreads: Serve with your favorite jam or other breakfast spread.
Brunch: Add them to a table with eggs, fresh fruit, yogurt, and other brunch favorites.
Afternoon tea: Their individual wedge shape and citrus flavor make them ideal for a homemade afternoon tea.
Holiday breakfast: Cranberry and orange are especially appealing flavors for fall and winter gatherings.
Variations and Flavor Ideas
The basic cranberry-orange combination already provides plenty of flavor, but small adjustments can create different versions.
Extra-orange scones: Add a little more fresh orange zest for an even stronger citrus aroma.
Extra-cranberry version: Increase the amount of dried cranberries slightly if you want more fruit in every bite.
Lightly glazed scones: Use a smaller amount of glaze for a less-sweet breakfast version.
Unglazed scones: Leave off the glaze entirely to emphasize the buttery dough, cranberries, and fresh orange flavor.
Extra-vanilla glaze: Slightly emphasize the vanilla in the glaze for a sweeter bakery-style finish.
Troubleshooting Common Problems
Why aren’t my scones flaky?
The butter may have become too warm or may have been completely incorporated into the flour.
For better layers, start with very cold butter, leave several pea-sized pieces visible, and avoid overworking the dough.
Why are my scones tough?
Overmixing and excessive kneading can make scones tough.
Mix just until the dough begins coming together, then gently fold it only 2 to 3 times.
Why did my scones spread instead of rising?
Warm butter can encourage spreading.
If the dough feels soft after shaping, refrigerate the wedges for 10 to 15 minutes before baking.
Why are my scones dry?
Too much flour, excessive mixing, or overbaking can all result in dry scones.
Measure the flour carefully, handle the dough gently, and remove the scones once they’re puffed and lightly golden.
My dough looks rough. Did I do something wrong?
Not necessarily.
Scone dough doesn’t need to look perfectly smooth. A slightly rough dough that just holds together is preferable to an overworked dough.
Why isn’t my glaze staying on top?
The scones may still be too hot.
Let them cool for about 10 minutes before glazing so the glaze remains visible instead of immediately melting into the surface.
My glaze is too thick.
A very thick glaze may be difficult to drizzle. The goal is a smooth consistency that flows from a spoon while still coating the scones.
My glaze is too thin.
A thin glaze can disappear into the scones rather than creating a visible finish. It should have enough body to cling to the surface.
Storage and Reheating
Cranberry orange scones are especially good fresh, but leftovers store well when properly covered.
Room temperature: Keep leftover scones in an airtight container for up to 2 days.
Refrigerator: Store them in an airtight container in the refrigerator for up to 5 days.
Microwave: Reheat an individual scone for approximately 10 to 15 seconds.
Oven: Warm the scones in a 300°F oven until heated through.
Freezer: Unglazed scones can be frozen in a freezer-safe container for up to 3 months.
For the best freezer results, freeze the scones without glaze and add fresh glaze after thawing and reheating.
Frequently Asked Questions
What’s the secret to flaky scones?
Cold butter and gentle handling are two of the most important factors. Leave small pieces of butter throughout the dough, avoid overmixing, and gently fold the dough only a few times.
Why should I chill scones before baking?
Chilling helps firm the butter after the dough has been handled. This can help the scones maintain their structure and flaky texture as they bake.
Do I have to refrigerate the shaped scones?
No. The 10 to 15-minute chilling period is optional, but it’s useful when you want extra-flaky scones or when the dough has become warm.
Can I skip the orange glaze?
Yes. The scone dough already contains fresh orange zest, orange juice, vanilla, and cranberries, so the scones are flavorful without glaze.
Can I freeze Cranberry Orange Scones?
Yes. Unglazed scones can be frozen in a freezer-safe container for up to 3 months.
How thick should I shape the dough?
Aim for approximately 1 inch thick before cutting the dough into eight wedges.
How do I know when the scones are finished baking?
They should look puffed and have lightly golden edges. The recipe typically requires 17 to 21 minutes at 400°F (200°C).
Why shouldn’t I knead scone dough like bread dough?
Traditional kneading develops gluten, which is desirable in many breads but can make scones tougher. Gentle pressing and folding are better for maintaining a tender texture.
Can I glaze the scones while they’re warm?
Yes. Let them cool for about 10 minutes first. Slightly warm scones can be glazed, but very hot scones may cause the glaze to melt excessively.
What’s the best way to reheat leftover scones?
For a quick option, microwave one for 10 to 15 seconds. For a more oven-fresh texture, warm the scones briefly in a 300°F oven.
Final Thoughts
These Soft & Flaky Cranberry Orange Scones are all about contrast: crisp, lightly golden edges surrounding a soft and tender center filled with buttery layers, chewy dried cranberries, and bright citrus flavor.
The key is keeping the butter cold, handling the dough gently, and using just a few folds to encourage those beautiful layers. A short chill before baking can make the process even more reliable, especially in a warm kitchen.
Once baked, finish the scones with the simple orange glaze and serve them slightly warm alongside coffee or tea. Whether you’re preparing a weekend breakfast, holiday brunch, afternoon tea, or cozy homemade treat, these cranberry orange scones bring bakery-style flavor straight to your kitchen.
Print
Soft & Flaky Cranberry Orange Scones
- Total Time: 39 minutes
Ingredients
For the Scones
- 2 cups all-purpose flour
- 1/3 cup granulated sugar
- 2 tsp baking powder
- 1/2 tsp salt
- 1 tbsp finely grated orange zest
- 1/2 cup cold unsalted butter, cubed
- 2/3 cup dried cranberries
- 1 large egg
- 1/2 cup heavy cream
- 2 tbsp fresh orange juice
- 1 tsp vanilla extract
For the Orange Glaze
- 1 cup powdered sugar
- 2 tbsp fresh orange juice
- 1 tsp finely grated orange zest
- 1/2 tsp vanilla extract
Instructions
Preheat your oven to 400°F (200°C).
Line a baking sheet with parchment paper and set it aside.
A properly preheated oven is important because the scones need immediate heat to begin rising and developing their flaky texture.
Step 2: Combine the Dry Ingredients
Add the all-purpose flour, granulated sugar, baking powder, salt, and finely grated orange zest to a large mixing bowl.
Whisk until everything is evenly combined and the orange zest is distributed throughout the flour.
Step 3: Cut in the Cold Butter
Add the cold cubed butter to the flour mixture.
Using a pastry cutter or your fingertips, work the butter into the dry ingredients until the mixture resembles coarse crumbs.
Leave several small pea-sized pieces of butter intact.
Don’t try to make the mixture completely uniform. Those visible pieces of cold butter are exactly what you want for flaky scones.
Step 4: Add the Cranberries
Add the dried cranberries and gently stir until they are evenly distributed.
This ensures that each of the eight scones contains plenty of cranberry pieces.
Step 5: Combine the Wet Ingredients
In a separate bowl, whisk together the egg, heavy cream, 2 tablespoons fresh orange juice, and vanilla extract.
Mix until smooth and evenly combined.
Step 6: Form the Dough
Pour the wet mixture into the dry ingredients.
Using a fork or wooden spoon, gently stir until the dough just begins to come together.
The goal is not to create a perfectly smooth dough. Stop mixing as soon as the ingredients are mostly combined.
Overmixing can develop too much gluten and make the finished scones tougher.
Step 7: Fold the Dough
Transfer the dough to a lightly floured work surface.
Gently press it together, then fold the dough over itself.
Repeat this process only 2 to 3 times.
These gentle folds help create additional layers while minimizing how much the dough and butter are handled.
Step 8: Shape the Scones
Shape the dough into a round approximately 1 inch thick.
Avoid pressing it too thin, since thicker dough helps produce substantial scones with soft centers.
Step 9: Cut Into Wedges
Using a sharp knife or bench scraper, divide the round into 8 wedges.
Cut straight down rather than aggressively sawing through the dough.
Transfer the wedges to the prepared baking sheet, leaving space between them.
Step 10: Chill for Extra Flakiness
For especially flaky scones, place the shaped scones in the refrigerator for 10 to 15 minutes before baking.
This short chill helps firm the butter again, particularly if it softened while the dough was being mixed and shaped.
Step 11: Brush With Heavy Cream
Lightly brush the tops of the chilled or freshly shaped scones with a little heavy cream.
This helps the tops develop an attractive golden finish.
Step 12: Bake
Bake at 400°F (200°C) for 17 to 21 minutes.
The scones should become visibly puffed with lightly golden edges.
Avoid baking them significantly beyond this stage, since overbaking can dry out the centers.
Step 13: Cool
Remove the scones from the oven and let them cool for approximately 10 minutes.
They can remain slightly warm when glazed, but they shouldn’t be extremely hot.
Step 14: Prepare the Orange Glaze
Add the powdered sugar, fresh orange juice, orange zest, and vanilla extract to a small bowl.
Whisk until smooth and free of lumps.
The glaze should be thick enough to remain visible on the scones but fluid enough to drizzle easily.
Step 15: Glaze and Serve
Drizzle the orange glaze over the slightly cooled scones.
Let the glaze set for a few minutes before serving.
Enjoy them warm with coffee, tea, butter, or your favorite breakfast spread.
- Prep Time: 20 minutes
- Cook Time: 19 minutes
Nutrition
- Serving Size: 8 scones
- Calories: approximately 350 calories per serving