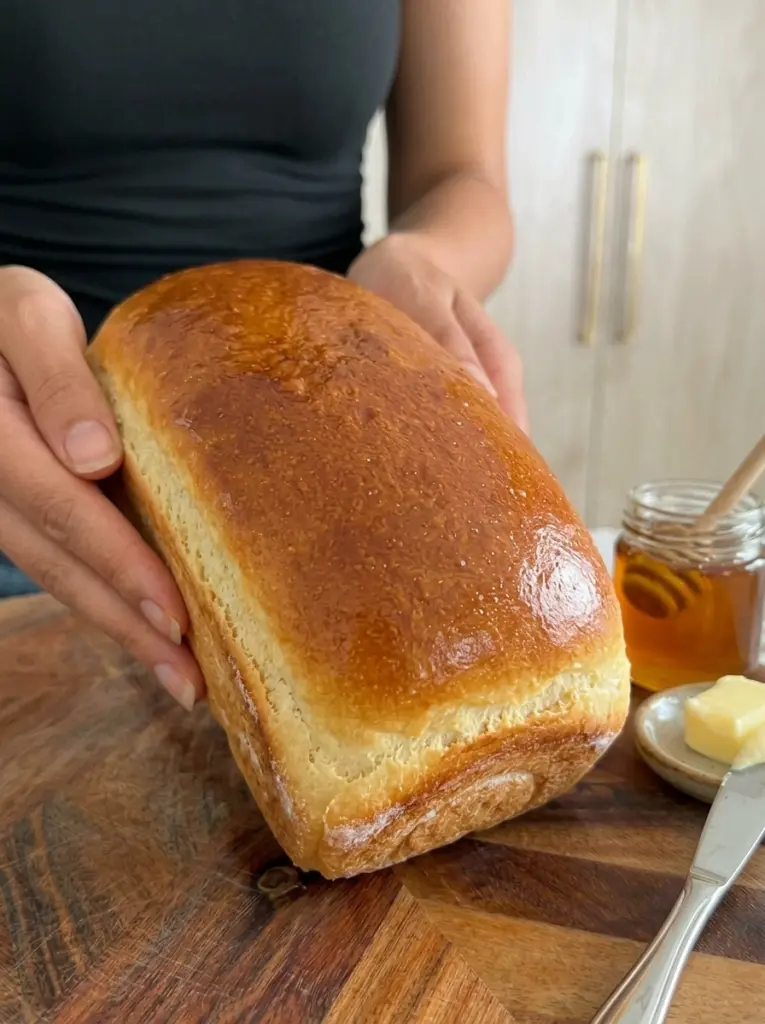
This Homemade Wonder Bread is soft, fluffy, buttery, and beautifully golden with the classic pillowy texture of traditional white sandwich bread. Made with just six simple ingredients and no stand mixer required, it’s perfect for sandwiches, toast, grilled cheese, French toast, and everyday lunches.
If you love the soft, tender texture of classic store-bought sandwich bread but want the satisfaction of baking it yourself, this Homemade Wonder Bread is the perfect recipe to try. It has a light, pillowy crumb, a beautifully golden crust, and just enough butter and sugar to give every slice a subtle richness without making the bread overly sweet.
Best of all, you don’t need a stand mixer, bread machine, or years of bread-baking experience. The dough comes together with basic pantry ingredients and can be kneaded completely by hand. After two simple rises and about 35 minutes in the oven, you’ll have a gorgeous homemade loaf ready for everything from school lunches and breakfast toast to gooey grilled cheese sandwiches.
Let’s dive into everything you need to know to make incredibly soft Homemade Wonder Bread from scratch.
Why You’ll Love This Homemade Wonder Bread
There’s so much to love about this simple homemade sandwich bread:
Incredibly soft and fluffy. Warm milk, butter, and proper kneading create a tender, pillowy crumb that’s ideal for sandwiches.
Only six ingredients. There’s no complicated ingredient list—just flour, milk, butter, sugar, salt, and yeast.
No stand mixer required. The entire dough can be mixed and kneaded by hand, making this recipe accessible even if you don’t own special bread-making equipment.
Perfect everyday sandwich bread. The loaf is soft enough for peanut butter and jelly yet sturdy enough for grilled cheese and loaded sandwiches.
Beginner-friendly. Straightforward mixing, kneading, shaping, and rising steps make this a great introduction to homemade yeast bread.
Freezer-friendly. Slice the cooled loaf before freezing and you can grab individual slices whenever you need them.
Versatile. Use it for toast, sandwiches, French toast, breakfast sandwiches, or simply enjoy a warm slice with butter and honey.
Ingredients You’ll Need
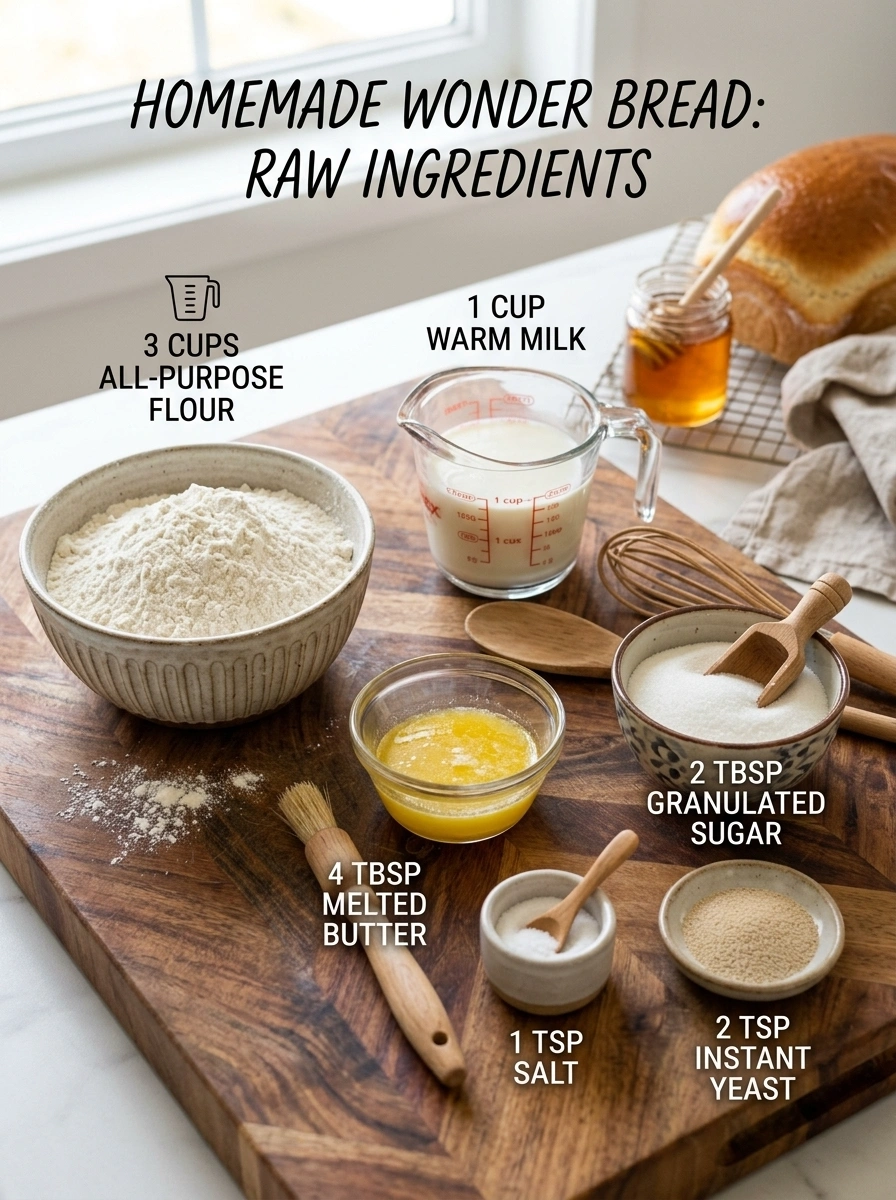
Only six simple ingredients are needed to create this beautifully soft homemade loaf.
- 3 cups all-purpose flour — Provides the structure of the bread while keeping the crumb tender and soft. Avoid adding excessive additional flour during kneading.
- 1 cup warm milk — Adds moisture, richness, and tenderness to the dough. The milk should be comfortably warm rather than hot so it doesn’t damage the yeast.
- 4 tbsp melted butter — Gives the bread a richer flavor and contributes to its soft, tender texture.
- 2 tbsp granulated sugar — Adds a subtle sweetness while also helping support yeast activity and encouraging beautiful browning in the oven.
- 1 tsp salt — Balances the sweetness, enhances the bread’s flavor, and helps control yeast activity.
- 2 tsp instant yeast — Provides the lift that transforms the dough into a light, fluffy loaf.
How to Make Homemade Wonder Bread
Making soft sandwich bread at home is easier than it looks. The most important parts are developing the dough properly and giving it enough time to rise.
Step 1: Mix the Dry Ingredients
In a large mixing bowl, whisk together the all-purpose flour, instant yeast, granulated sugar, and salt.
Mix until the yeast, sugar, and salt are evenly distributed throughout the flour.
Step 2: Make the Dough
Pour the warm milk and melted butter into the dry ingredients.
Stir everything together with a wooden spoon until a shaggy dough forms and you no longer see large patches of dry flour.
At this stage, the dough doesn’t need to look perfectly smooth. Kneading will transform it into a much softer, more elastic dough.
Step 3: Knead by Hand
Transfer the dough onto a lightly floured work surface.
Knead by hand for approximately 8–10 minutes, folding, pressing, and turning the dough repeatedly.
As you knead, the dough should gradually become smoother, softer, and more elastic.
The finished dough should remain slightly tacky but manageable. Think of a soft texture similar to an earlobe rather than a stiff, dry dough.
Avoid continuously adding flour simply because the dough feels slightly sticky. Too much flour can produce a heavier, denser loaf instead of the soft texture you’re looking for.
Step 4: First Rise
Lightly grease a clean bowl and place the kneaded dough inside.
Turn the dough once so its surface receives a light coating of oil or butter.
Cover the bowl with plastic wrap or a clean kitchen towel.
Place it somewhere comfortably warm and allow the dough to rise for approximately 1–2 hours, or until roughly doubled in size.
Room temperature can significantly affect rising time, so pay more attention to the size of the dough than the clock.
Step 5: Shape the Loaf
Once the dough has doubled, gently press it down to release some of the trapped gas.
Transfer the dough onto a lightly floured surface.
Gently pat or roll it into a rectangle approximately 8 inches wide.
Starting from one short end, roll the rectangle tightly into a log. Keep the roll snug as you work so you don’t create large air pockets inside the finished loaf.
Pinch the final seam firmly closed.
Step 6: Second Rise
Place the shaped dough seam-side down into a parchment-lined loaf pan.
Cover loosely with plastic wrap or a clean kitchen towel.
Allow it to rise for approximately 1 hour, or until the dough looks noticeably light and puffy and domes approximately 1 inch above the rim of the pan.
Don’t rush this stage. A properly risen loaf will have a lighter, softer finished texture.
Step 7: Bake
Preheat the oven to 350°F (175°C).
Place the loaf on the lower oven rack and bake for approximately 30–35 minutes.
The finished bread should have a beautiful deep golden-brown top.
You can also carefully remove the loaf from the pan and gently tap the bottom. Properly baked bread should sound hollow.
Step 8: Cool Before Slicing
Remove the finished loaf from the pan immediately and transfer it to a wire cooling rack.
Allow the bread to cool for at least 30 minutes before slicing.
As tempting as warm bread can be, cutting it immediately after baking can compress the delicate interior and create a gummy texture.
For an even softer crust, lightly brush the top of the hot loaf with melted butter.
Serving Ideas for Homemade Wonder Bread
This soft white bread is perfect for everyday meals and snacks. Try it:
- Toasted with butter and honey
- Spread with peanut butter and jam
- As a classic ham and cheese sandwich
- For crispy grilled cheese
- With egg and breakfast sandwiches
- Toasted with avocado and salt
- Alongside soups and stews
- With butter and homemade jam
- As French toast
- For school or work lunches
- With chicken or tuna salad
- Toasted and topped with cinnamon sugar
Fresh slices are also delicious simply spread with softened butter while the bread is still slightly warm.
Flavor Variations
Honey White Bread: Replace the granulated sugar with honey for a slightly deeper sweetness.
Buttery Sandwich Bread: Brush the loaf generously with melted butter immediately after baking for an especially soft, buttery crust.
Cinnamon Swirl Bread: Before rolling the dough into its final loaf shape, sprinkle the rectangle with cinnamon sugar and roll it tightly.
Herb Sandwich Bread: Add dried Italian herbs or finely chopped fresh herbs to the dough for a savory version.
Garlic Butter Bread: Brush baked slices with garlic butter and toast them until lightly golden.
Seeded Top: Brush the risen loaf lightly with milk and sprinkle sesame or poppy seeds over the surface before baking.
Whole Wheat Blend: Replace a portion of the all-purpose flour with whole wheat flour for a heartier loaf. Keep in mind that increasing the whole wheat content can make the bread slightly denser.
Pro Tips for the Best Homemade Wonder Bread
Use warm milk, not hot milk. The milk should feel pleasantly warm. Excessively hot liquid can damage the yeast and prevent the bread from rising properly.
Don’t add too much flour. Slightly tacky dough is normal and helps create a softer finished loaf. Excess flour is one of the easiest ways to accidentally make homemade bread dense.
Knead thoroughly. Those 8–10 minutes of kneading help develop the gluten structure necessary for a soft, stretchy, well-risen loaf.
Watch the dough instead of relying entirely on time. A cool kitchen can significantly extend rising time, while a warm environment may speed it up.
Give the second rise enough time. The shaped loaf should look noticeably airy and puffy before it enters the oven.
Roll the loaf snugly. Tight shaping helps create an even interior crumb without large unwanted holes.
Cool before slicing. The interior continues setting as the loaf cools. Cutting too early can compress the crumb.
Brush with butter for a softer crust. A little melted butter brushed over the hot loaf keeps the crust tender while adding extra flavor.
Storage Information
Allow the Homemade Wonder Bread to cool completely before storing it.
Keep the loaf in an airtight bread bag, storage container, or tightly sealed wrapping at room temperature for approximately 3–4 days.
Avoid refrigerating the bread unless necessary, as refrigeration can cause bread to become stale more quickly.
For longer storage, slice the completely cooled loaf and place the slices in a freezer-safe bag or container. Freeze for up to 2–3 months.
Individual frozen slices can be placed directly into the toaster, making this a convenient bread to keep on hand for quick breakfasts and sandwiches.
Frequently Asked Questions
Can I really make this bread without a stand mixer?
Absolutely. This recipe is designed to be kneaded by hand. About 8–10 minutes of consistent kneading should develop enough gluten for a beautifully soft loaf.
How warm should the milk be?
The milk should be comfortably warm rather than hot. If it feels uncomfortably hot against your skin, allow it to cool before adding it to the yeast mixture.
Why is my homemade sandwich bread dense?
Dense bread can result from adding too much flour, insufficient kneading, not allowing enough rising time, or yeast that isn’t sufficiently active.
Why is my dough sticky?
A slightly tacky dough is desirable for soft sandwich bread. Resist adding large amounts of additional flour. Lightly flour your hands or work surface only as needed.
How do I know when the first rise is finished?
The dough should be approximately doubled in size and noticeably airy and expanded.
How do I know when the second rise is finished?
The shaped dough should look puffy and should dome approximately 1 inch above the loaf pan’s rim.
Can I use active dry yeast instead of instant yeast?
Yes, but active dry yeast is generally best activated in warm liquid before being incorporated into the dough. Rising times may also vary slightly.
Why should I wait before slicing homemade bread?
Freshly baked bread is still setting internally when it leaves the oven. Cutting it immediately can compress the soft crumb and make the interior seem gummy.
Can I freeze Homemade Wonder Bread?
Yes. For convenience, slice the cooled bread first, freeze the slices in a freezer-safe bag, and remove only what you need. Frozen slices can go directly into the toaster.
Recipe Summary
Prep Time: 20 minutes
Cook Time: 30–35 minutes
Rise Time: Approximately 3 hours
Total Time: Approximately 3 hours 55 minutes
Servings: 1 loaf
This Homemade Wonder Bread proves that beautifully soft sandwich bread doesn’t require complicated techniques or expensive equipment. With six everyday ingredients, a loaf pan, and a little patience while the dough rises, you can create a pillowy-soft, buttery loaf with a gorgeous golden crust right in your own kitchen.
Whether you turn it into peanut butter and jelly sandwiches, gooey grilled cheese, buttery morning toast, or thick slices of French toast, this simple homemade white bread is the kind of everyday recipe you’ll want to make again and again.
Once that warm, freshly baked bread aroma fills your kitchen, store-bought sandwich bread may have some serious competition.

Homemade Wonder Bread
- Author: Luna
Ingredients
Only six simple ingredients are needed to create this beautifully soft homemade loaf.
- 3 cups all-purpose flour — Provides the structure of the bread while keeping the crumb tender and soft. Avoid adding excessive additional flour during kneading.
- 1 cup warm milk — Adds moisture, richness, and tenderness to the dough. The milk should be comfortably warm rather than hot so it doesn’t damage the yeast.
- 4 tbsp melted butter — Gives the bread a richer flavor and contributes to its soft, tender texture.
- 2 tbsp granulated sugar — Adds a subtle sweetness while also helping support yeast activity and encouraging beautiful browning in the oven.
- 1 tsp salt — Balances the sweetness, enhances the bread’s flavor, and helps control yeast activity.
- 2 tsp instant yeast — Provides the lift that transforms the dough into a light, fluffy loaf.
Instructions
Making soft sandwich bread at home is easier than it looks. The most important parts are developing the dough properly and giving it enough time to rise.
In a large mixing bowl, whisk together the all-purpose flour, instant yeast, granulated sugar, and salt.
Mix until the yeast, sugar, and salt are evenly distributed throughout the flour.
Pour the warm milk and melted butter into the dry ingredients.
Stir everything together with a wooden spoon until a shaggy dough forms and you no longer see large patches of dry flour.
At this stage, the dough doesn’t need to look perfectly smooth. Kneading will transform it into a much softer, more elastic dough.
Transfer the dough onto a lightly floured work surface.
Knead by hand for approximately 8–10 minutes, folding, pressing, and turning the dough repeatedly.
As you knead, the dough should gradually become smoother, softer, and more elastic.
The finished dough should remain slightly tacky but manageable. Think of a soft texture similar to an earlobe rather than a stiff, dry dough.
Avoid continuously adding flour simply because the dough feels slightly sticky. Too much flour can produce a heavier, denser loaf instead of the soft texture you’re looking for.
Lightly grease a clean bowl and place the kneaded dough inside.
Turn the dough once so its surface receives a light coating of oil or butter.
Cover the bowl with plastic wrap or a clean kitchen towel.
Place it somewhere comfortably warm and allow the dough to rise for approximately 1–2 hours, or until roughly doubled in size.
Room temperature can significantly affect rising time, so pay more attention to the size of the dough than the clock.
Once the dough has doubled, gently press it down to release some of the trapped gas.
Transfer the dough onto a lightly floured surface.
Gently pat or roll it into a rectangle approximately 8 inches wide.
Starting from one short end, roll the rectangle tightly into a log. Keep the roll snug as you work so you don’t create large air pockets inside the finished loaf.
Pinch the final seam firmly closed.
Place the shaped dough seam-side down into a parchment-lined loaf pan.
Cover loosely with plastic wrap or a clean kitchen towel.
Allow it to rise for approximately 1 hour, or until the dough looks noticeably light and puffy and domes approximately 1 inch above the rim of the pan.
Don’t rush this stage. A properly risen loaf will have a lighter, softer finished texture.
Preheat the oven to 350°F (175°C).
Place the loaf on the lower oven rack and bake for approximately 30–35 minutes.
The finished bread should have a beautiful deep golden-brown top.
You can also carefully remove the loaf from the pan and gently tap the bottom. Properly baked bread should sound hollow.
Remove the finished loaf from the pan immediately and transfer it to a wire cooling rack.
Allow the bread to cool for at least 30 minutes before slicing.
As tempting as warm bread can be, cutting it immediately after baking can compress the delicate interior and create a gummy texture.
For an even softer crust, lightly brush the top of the hot loaf with melted butter.