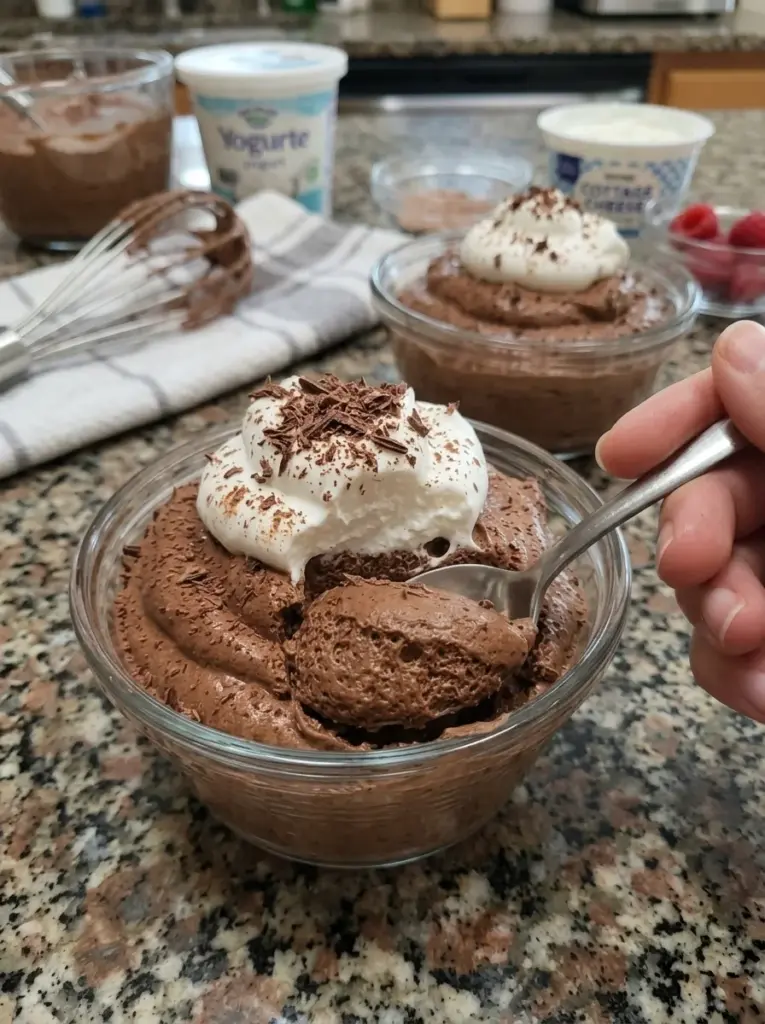
Rich cocoa, creamy cottage cheese, and thick Greek yogurt make a quick chocolate dessert with plenty of protein from ordinary dairy ingredients. This Easy High-Protein Chocolate Mousse needs no eggs, cooking, or protein powder. Blend the base until smooth, add cocoa and sweetness, and chill in small cups until ready to serve.
The flavor is chocolate-forward with a gentle dairy tang. Vanilla rounds out the cocoa, and a little sweetener balances its bitterness. You can keep the finish simple with a dusting of cocoa or add a few berries for contrast.
This is a mousse-inspired blended dairy dessert. It is thick and silky rather than as airy as a classic mousse made with whipped cream or egg foam. A separately whipped cream variation is included for anyone who wants more lightness, but the basic version prioritizes simplicity and protein from cottage cheese and yogurt.
The formula below is a suggested starting recipe rather than a kitchen-tested one. Dairy brands, cocoa, and sweeteners vary, so taste and adjust gradually. The most useful step is blending thoroughly before deciding the mixture needs extra liquid.
Recipe at a Glance
- Preparation: About 10 minutes
- Chilling: 30–60 minutes
- Cooking: None
- Total: About 40–70 minutes
- Yield: 2 dessert portions
- Texture: Thick, smooth, and spoonable
- Equipment: Blender or food processor
Ingredients
For the Chocolate Base
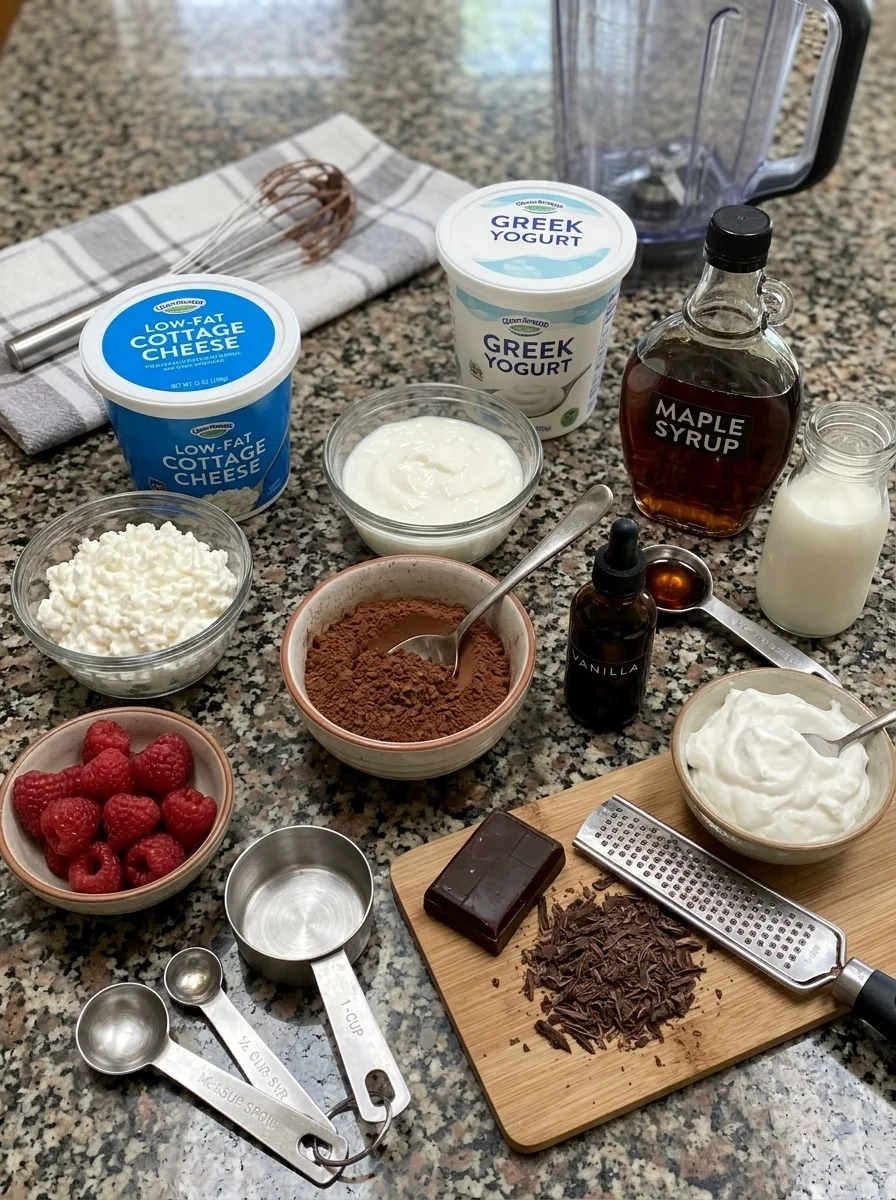
- 1 cup low-fat cottage cheese
- ½ cup plain nonfat Greek yogurt
- 2 tablespoons unsweetened cocoa powder
- 2 tablespoons maple syrup, or a suitable powdered sweetener to taste
- ½ teaspoon vanilla extract
- 1–2 tablespoons milk, available only if needed for blending
Optional Toppings
- Fresh raspberries or sliced strawberries
- A little shaved dark chocolate
- A small spoonful of whipped topping
- A light dusting of cocoa powder
Optional toppings are not included in the base nutrition estimate. Maple syrup and a noncaloric sweetener also produce different calorie and carbohydrate totals.
Why This Recipe Works
Cottage cheese provides a substantial, protein-rich base. Its curds disappear with sufficient blending, leaving a creamy mixture that is very different from the original spoonful of cheese.
Greek yogurt contributes smoothness and tang. Using a smaller amount than the cottage cheese keeps the dessert from tasting overwhelmingly like chocolate yogurt while helping the blender circulate.
Cocoa provides chocolate flavor without requiring melted chocolate. Sweetener balances its bitterness, and vanilla makes the flavor feel more rounded. The short chilling period makes the dessert colder and allows the cocoa to hydrate more fully.
There is no raw flour or uncooked egg in this preparation. The simplicity makes it convenient for a small dessert without a full baking project.
Ingredient Notes
Cottage Cheese
Choose a mild-tasting cottage cheese that you enjoy. Brands vary in salt, moisture, and acidity, all of which are noticeable in a recipe with few ingredients.
Low-fat cottage cheese is a useful starting point. Full-fat cottage cheese gives a richer result and changes the calories. Nonfat products can also vary in texture because of their formulation.
Pour off a pool of loose surface whey if present, but do not squeeze the curds completely dry. Both small and large curds can become smooth with appropriate blending.
Greek Yogurt
Use thick, plain, unsweetened Greek yogurt. Sweetened vanilla yogurt adds its own flavor and sweetness, so you would need to reassess the sweetener.
Regular unstrained yogurt contains more moisture and is less predictable here. If you substitute it, begin without milk and expect a softer dessert.
Cocoa Powder
Unsweetened cocoa powder gives concentrated chocolate flavor. Natural cocoa tends to have a sharper edge, while Dutch-process cocoa often tastes mellower and looks darker. Either can be used because this recipe has no leavening reaction to manage.
Start with two level tablespoons. Adding much more can make the mixture bitter or dry-tasting. If you want stronger chocolate flavor, increase by a teaspoon at a time after tasting.
Hot chocolate drink mix is not a direct substitute. It commonly contains sugar, milk ingredients, or other additions and will change the balance.
Sweetener
Maple syrup blends easily and gives straightforward sweetness, but it adds sugar and a little liquid. A powdered noncaloric sweetener can make a lower-sugar version; use the package conversion and your taste rather than assuming an identical tablespoon amount.
A concentrated stevia product, for example, is not interchangeable by volume with a sugar-equivalent blend. Coarse sweetener may also feel gritty in a cold dessert.
The base contains naturally occurring dairy sugar even when no added sugar is used. Describe the finished dessert according to the actual ingredients rather than automatically calling it sugar-free.
Milk
Milk is an optional blending aid, not an amount that must be added. The yogurt may supply enough moisture on its own.
Use dairy milk or an unsweetened alternative you enjoy. Add only a teaspoon or two at a time so you do not turn the mixture into a drink.
Equipment
A food processor or capable blender is the main tool. A spatula helps scrape down the sides, and two small cups or ramekins make portioning straightforward.
A small batch may circulate more easily in a compact processor than in a large blender jar. Follow the appliance instructions, stop the motor before scraping, and never push a utensil into moving blades.
A hand mixer can mix ingredients but will not reliably remove cottage cheese curds. A smooth blended base is the intended starting point.
How to Make High-Protein Chocolate Mousse
1. Blend the Dairy
Add cottage cheese and Greek yogurt to the appliance. Blend until smooth, stopping to scrape as needed.
Check a small amount on a spoon. If curds remain, continue processing before adding the cocoa. The color of the chocolate mixture can make remaining small lumps harder to see later.
If the blades struggle, scrape the mixture toward them according to the appliance instructions. Add a teaspoon of the optional milk only if necessary.
2. Add Chocolate and Vanilla
Add cocoa powder, vanilla, and the chosen sweetener. If the cocoa is visibly lumpy, sift it first.
Blend briefly, scrape the sides, and blend again until the color is uniform. Check the bottom of the jar for dry cocoa pockets.
3. Let the Cocoa Hydrate
Pause for a few minutes before adjusting. Cocoa absorbs moisture, and the mixture may feel smoother after a brief rest.
Do not add a large splash of milk immediately. Some dairy combinations are already soft enough, particularly when using liquid syrup.
4. Adjust Texture and Sweetness
Taste a small spoonful. Add sweetener gradually if the cocoa is too bitter or the yogurt too tangy for your preference.
If the mixture is too thick to blend smoothly, add milk by teaspoons. Stop when it is thick, creamy, and able to hold a soft mound on a spoon.
If it is already loose, skip the milk. A chilling period can help it settle, but it will not transform a heavily diluted mixture into a firm mousse.
5. Divide and Chill
Spoon into two small cups. Cover and refrigerate for 30–60 minutes.
Expect a chilled chocolate cream rather than a gelatin-set dessert. There is no ingredient here intended to make it sliceable.
6. Finish and Serve
Add a few berries, a little shaved chocolate, or another optional topping. Keep crunchy additions separate until this step so they retain their texture.
Serve cold. The dairy tang is part of the flavor; it will not taste exactly like a traditional cream-and-chocolate mousse.
Tips for the Smoothest Texture
Choose a pleasant dairy base. Strong saltiness or sharp acidity will remain noticeable even after adding cocoa.
Blend before thinning. Time and scraping are often more useful than extra liquid for removing curds.
Use powdered sweetener when appropriate. Coarse crystals may not dissolve fully in a cold mixture.
Measure cocoa lightly. A heaped spoon can add much more bitterness than a level tablespoon.
Keep expectations realistic. Blending makes this dessert smooth; it does not create the same stable air structure as whipped cream.
Troubleshooting
| Problem | Possible cause | Helpful adjustment |
|---|---|---|
| Curds remain | Insufficient blending or poor circulation | Scrape and blend again, adding minimal milk only if needed. |
| Dessert is runny | Thin yogurt, excess whey, or too much milk | Chill first and use thicker dairy with less liquid next time. |
| Flavor is bitter | Too much cocoa or insufficient sweetness | Add suitable sweetener in small increments. |
| Texture is gritty | Coarse sweetener or undispersed cocoa | Use powdered sweetener and sift lumpy cocoa. |
| Flavor is too tangy | Strong yogurt flavor | Extend with a little mild cottage cheese and rebalance cocoa and sweetness. |
| It is not airy | No separately whipped ingredient in the base | Enjoy it as a chocolate cream or use the whipped variation below. |
Optional Whipped Variation
For a lighter texture, whip ¼ cup cold heavy cream separately to soft or medium peaks, then fold it into the smooth chocolate base. Use suitable equipment for that small quantity; if your beaters cannot reach it well, whip a larger amount separately and measure the portion you intend to add.
First stir a small amount of whipped cream into the base to loosen it. Fold in the rest gently with a spatula. Avoid blending afterward, which would remove much of the air.
This adds calories and fat and lowers the protein density relative to the basic version. It is an optional texture variation, not part of the base nutrition estimate.
Flavor Variations
Chocolate Peanut Butter
Blend in one tablespoon of smooth peanut butter. It adds richness and a nutty flavor, along with calories and some protein. Adjust liquid only after assessing the thicker mixture.
Mocha Chocolate
Add a small pinch of instant espresso powder with the cocoa. Begin lightly, since coffee bitterness can dominate. Use decaffeinated powder if preferred.
Orange Chocolate
A little finely grated orange zest gives aroma without adding much liquid. Wash the fruit first and avoid the bitter white pith.
Raspberry Chocolate Cups
Top with a few fresh raspberries just before eating. Avoid blending a large quantity of fruit into the base unless you are prepared for a thinner texture.
Richer Chocolate Finish
A small amount of melted, cooled chocolate can enrich the base, but it changes the nutrition and may firm up during chilling. Add cautiously and blend evenly to avoid tiny hard chocolate flecks.
Serving Ideas
Small glasses or ramekins make the two portions easy to divide. A simple swirl on the surface and a little cocoa are enough for a finished appearance.
For a dessert board, serve the cups with berries and separate toppings. Let guests add their own rather than mixing everything into the entire batch.
For a snack, enjoy a portion as written. If serving as breakfast, pair it with other foods according to your appetite; a protein-containing dessert is not automatically a complete meal.
Make-Ahead and Storage
Prepare the base up to a day ahead for convenience. Store covered in the refrigerator at 40°F or below and enjoy within 3 days, considering the freshness and prior storage of the opened dairy ingredients.
If a little liquid separates, stir gently before serving. Keep toppings separate until eating.
Freezing is not recommended for the intended smooth texture. Cottage cheese and yogurt can become grainy or release moisture after thawing. Freezing this mixture solid does not give the same texture as churned chocolate ice cream.
Limit room-temperature exposure to 2 hours total, or 1 hour above 90°F. Keep reserve portions chilled rather than leaving the entire batch on the table.
Protein and Nutrition Notes
For two portions made with low-fat cottage cheese, nonfat Greek yogurt, cocoa, and two tablespoons maple syrup, a reasonable illustrative estimate is approximately 200–240 calories and 18–22 grams protein per portion, before toppings.
Using a noncaloric sweetener instead of maple syrup can reduce the calories by approximately 50 per portion, depending on the specific sweetener. Milk and toppings change the total as well.
These are planning estimates rather than a verified nutrient analysis. Cottage cheese protein varies, and measured cups can differ in density. Add the label values for your actual ingredients and divide by two for a closer result.
This dessert contains dairy and is not automatically low-carb, sugar-free, or suitable for every dietary preference. The maple syrup version contains added sugar. A noncaloric sweetener version still contains naturally occurring dairy carbohydrate.
Frequently Asked Questions
Do I need protein powder?
No. The cottage cheese and Greek yogurt supply the protein in this formula. Adding powder changes flavor, absorption, and nutrition, so it is not required.
Can I use only cottage cheese?
You can explore that variation, but the yogurt helps the mixture circulate and contributes tang. A cottage-cheese-only version may require a different milk adjustment.
Can I use only Greek yogurt?
That makes a chocolate yogurt dessert with a different protein and moisture balance. It will not necessarily have the same body as this cottage cheese base.
Is it a traditional mousse?
It is mousse-inspired. The basic version is a smooth blended dairy cream without a dedicated whipped foam. Use the optional whipped cream variation if you prefer more airiness.
Can I skip chilling?
Yes, if you enjoy the freshly blended consistency. Chilling improves the cold dessert experience and gives the cocoa time to hydrate.
Can I double it?
Yes. Use an appliance with enough capacity and continue adding optional milk slowly. Divide into four portions for comparable serving sizes.
Why can I still taste cottage cheese?
Its salt and tang vary by brand. Choose a mild product, blend thoroughly, and balance the cocoa and sweetness without expecting every dairy flavor to disappear.
Recipe Card
Easy High-Protein Chocolate Mousse
A smooth, no-bake chocolate dairy dessert made without protein powder. Suggested formula; not kitchen-tested here.
Prep: 10 minutes | Chill: 30–60 minutes | Servings: 2
Ingredients
- 1 cup low-fat cottage cheese
- ½ cup plain nonfat Greek yogurt
- 2 tablespoons unsweetened cocoa powder
- 2 tablespoons maple syrup, or suitable powdered sweetener to taste
- ½ teaspoon vanilla extract
- 1–2 tablespoons milk, only as needed
- Optional toppings: berries, shaved chocolate, or whipped topping
Instructions
- Blend cottage cheese and yogurt until completely smooth, scraping as needed.
- Add cocoa, sweetener, and vanilla. Blend until uniform.
- Let stand briefly, then taste and adjust sweetness.
- Add milk only by teaspoons if needed for blending. Keep the mixture thick and spoonable.
- Divide into two cups, cover, and refrigerate for 30–60 minutes.
- Add optional toppings just before serving.
Storage: Refrigerate covered for up to 3 days. Freezing is not recommended for the intended texture.
Illustrative nutrition: Approximately 200–240 calories and 18–22 grams protein per portion with maple syrup, excluding toppings. A suitable noncaloric sweetener changes the estimate.
Easy High-Protein Chocolate Mousse
Description
A smooth, no-bake chocolate dairy dessert made without protein powder. Suggested formula; not kitchen-tested here.
Prep: 10 minutes | Chill: 30–60 minutes | Servings: 2
Ingredients
- 1 cup low-fat cottage cheese
- ½ cup plain nonfat Greek yogurt
- 2 tablespoons unsweetened cocoa powder
- 2 tablespoons maple syrup, or suitable powdered sweetener to taste
- ½ teaspoon vanilla extract
- 1–2 tablespoons milk, only as needed
- Optional toppings: berries, shaved chocolate, or whipped topping
Instructions
- Blend cottage cheese and yogurt until completely smooth, scraping as needed.
- Add cocoa, sweetener, and vanilla. Blend until uniform.
- Let stand briefly, then taste and adjust sweetness.
- Add milk only by teaspoons if needed for blending. Keep the mixture thick and spoonable.
- Divide into two cups, cover, and refrigerate for 30–60 minutes.
- Add optional toppings just before serving.
Storage: Refrigerate covered for up to 3 days. Freezing is not recommended for the intended texture.
Illustrative nutrition: Approximately 200–240 calories and 18–22 grams protein per portion with maple syrup, excluding toppings. A suitable noncaloric sweetener changes the estimate.