
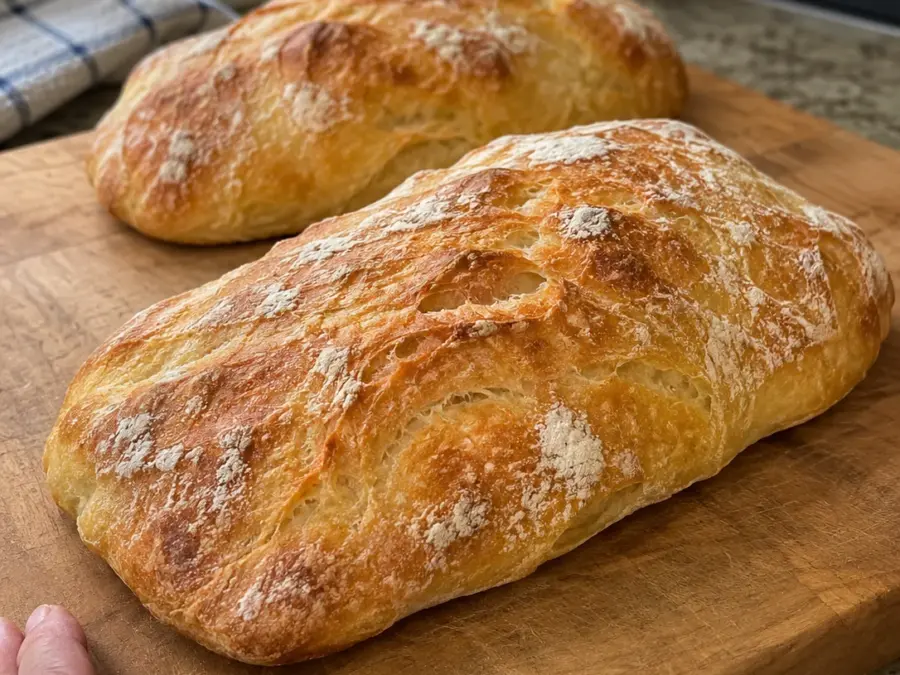
Homemade No-Knead Ciabatta Bread has a thin, crisp crust, a chewy interior, and the irregular air pockets that make it so good for sandwiches and dipping. The dough takes just four ingredients: bread flour, water, salt, and instant yeast. Stir it together in the evening, give it two quick folds, and let it rise overnight. In the morning, divide it into two rustic loaves and bake them on a sheet pan.
Ciabatta dough will feel wetter and looser than sandwich bread dough. That’s exactly what you want. Use damp hands for the folds, flour the counter before turning the dough out, and handle it gently once it’s full of bubbles. The less you press it during shaping, the more of those bubbles make it into the oven.
The finished loaves are low and wide, with lightly floured tops and golden edges. Let them cool before you split one lengthwise for a sandwich, or tear off pieces for a bowl of soup and save the second loaf for another day.
What Is Ciabatta Bread?
Ciabatta is an Italian bread with a broad, slightly flattened shape, a crisp crust, and an open, chewy crumb. The name means “slipper,” a fitting description for its long, low shape. The dough uses a high proportion of water to flour, which makes it soft and stretchy and gives it room to expand around the gas bubbles as it rises. King Arthur Baking
This overnight version uses a small amount of instant yeast and two sets of folds to give the wet dough some strength. Once it has risen, divide it gently and let the pieces keep their natural shape. A crooked corner or uneven edge is part of the look.
Why You’ll Love This Recipe
You can mix the dough with a spoon. There’s no stand mixer or countertop kneading. The folds happen right in the bowl and take less than a minute each.
The overnight rise fits around your schedule. Mix the dough after dinner and bake it the next morning. Look for bubbles and visible expansion to judge when it’s ready.
Two smaller loaves are easy to use. Split one lengthwise for sandwiches or slice it crosswise for toast. Freeze the second loaf whole or in portions.
A sheet pan is all you need for baking. The loaves bake side by side on parchment, so there’s no hot pot to lift or transfer the dough into.
Ingredient Breakdown
Bread flour. Use 400 grams, or about 3¼ cups. Bread flour helps the wet dough stretch around its air bubbles and gives the baked loaves their chew. A kitchen scale is especially helpful here. A packed cup of flour can make the dough stiffer and change the crumb.
Water. Use 320 grams, or about 1⅓ cups plus 1 teaspoon. This gives the dough 80% hydration, meaning the water weighs 80% as much as the flour. Expect a sticky dough that relaxes back into the bowl between folds. Room-temperature water works well in a moderately cool kitchen. shop.kingarthurbaking.com
Fine sea salt. Use 1¼ teaspoons, or about 8 grams. Fine salt disperses easily when stirred into the flour. If you substitute coarse kosher salt, weigh it because the same spoonful can contain a different amount of salt.
Instant yeast. A level ¼ teaspoon is enough for the long rise. Stir it into the dry ingredients before adding water. Check the dough earlier if your kitchen runs warm, since a small amount of yeast can still work quickly in a warm room.
How to Make Homemade No-Knead Ciabatta Bread
Step 1. Mix the dough. Stir the bread flour, salt, and instant yeast together in a large bowl. Add the water and mix with a sturdy spoon or spatula until all the flour is moistened. Scrape the bottom of the bowl to catch any dry patches. Cover and let the dough rest for 30 minutes.
Step 2. Give the dough two sets of folds. Wet one hand, reach under an edge of the dough, and gently pull it up until you feel resistance. Fold it over the middle. Turn the bowl a quarter turn and repeat until you’ve folded all four sides. Cover and rest for 30 minutes, then repeat once more. The dough should feel a little smoother and more elastic after the second set.
Step 3. Let it rise overnight. Cover the bowl and leave it at cool room temperature, ideally around 68 to 72°F. Allow about 12 to 16 hours from the time you mixed the dough, including the two rests for folding. If your kitchen is warmer, start checking earlier. The dough is ready when it has expanded noticeably, shows bubbles across the surface and along the sides, and jiggles when you gently move the bowl.
Step 4. Turn out and divide. Line a large baking sheet with parchment rated for 450°F. Flour your work surface well. Ease the dough out of the bowl with a flexible scraper and let it settle naturally. Dust the top, then use a floured bench scraper to divide it into two roughly equal rectangles. Avoid pressing down on the tops or rolling the pieces into tight loaves.
Step 5. Transfer and let the loaves puff. Slip a bench scraper under one end of a loaf and support the other end with your floured hand or a second scraper. Move it onto the lined sheet, then repeat with the second loaf. Leave a few inches between them. Cover loosely with lightly floured parchment or a clean, lightly floured kitchen towel. Let them rest for 30 to 45 minutes, until slightly puffy and relaxed. Preheat the oven to 450°F with a rack in the middle.
Step 6. Bake until golden. Uncover the loaves and bake for 24 to 29 minutes. Look for golden tops, deeper brown ridges, and firm sides. If you have an instant-read thermometer, the center should be around 205°F. Start checking at the lower end of the range, especially if one loaf is smaller than the other.
Step 7. Cool before slicing. Transfer the loaves to a wire rack and let them cool for at least 45 minutes. The crust will firm as it cools, and the interior will be easier to slice without compressing it.
Tips for the Best No-Knead Ciabatta
Use damp hands in the bowl and flour on the counter. Water keeps your fingers from sticking during the folds. Flour helps when you turn out and divide the risen dough. Keep most of that flour on the outside so the crumb stays light.
Let the dough tell you when it’s ready. A clock helps you plan, but bubbles, expansion, and a gentle jiggle are better cues. A dough that’s still tight and mostly smooth needs more time. If the top has sunk and the dough pours out with very little structure, it likely rose too long.
Handle the dough lightly after the overnight rise. Use the scraper to lift and guide it. Pulling, punching down, or squeezing the pieces can knock out the bubbles you spent the night making.
Expect the loaves to spread a little. Ciabatta has a low profile. Give the dough enough space on the sheet for the sides to color, and let each loaf keep its irregular outline.
Let the color develop. A pale loaf can soften quickly as it cools. Look for golden color along the sides as well as the top, then move the bread onto a rack so steam can escape from underneath.
Variations to Try
Rosemary ciabatta. Stir 1 tablespoon of finely chopped fresh rosemary into the flour. The fragrant loaf is especially good with tomato soup or white bean dip.
Olive ciabatta. Pat dry ⅓ cup of chopped pitted olives and scatter them over the dough during the second set of folds. Fold gently to tuck them in. A few pieces may peek through the crust as the loaves bake.
Ciabatta sandwich rolls. Divide the risen dough into six rectangles and transfer them to the sheet with space between them. Start checking around 18 minutes. They’re ready when the tops are golden and the sides feel set.
Sesame ciabatta. Mist the tops very lightly with water after transferring the loaves to the baking sheet, then sprinkle with sesame seeds. The seeds toast as the crust browns.
What to Serve with Homemade Ciabatta
- Olive oil and balsamic vinegar. Tear the loaf into pieces so the uneven interior catches the oil.
- Soup or stew. Serve thick slices with tomato soup, minestrone, or beef stew.
- Caprese sandwiches. Split a loaf lengthwise and layer it with fresh mozzarella, sliced tomatoes, basil, and a little olive oil.
- Roasted pepper bruschetta. Toast slices and spread them with ricotta, then top with roasted red peppers and black pepper.
- Pressed sandwiches. Use ciabatta for a turkey and provolone panini or a grilled vegetable sandwich. Toasting the cut faces first helps them hold up to juicy fillings.
Storage and Reheating
Room temperature. Let the bread cool completely before storing. Use a paper bag if you’ll serve it the same day and want to preserve the crisp crust. For a day or two of storage, use a bread bag or airtight container and refresh the loaf in the oven before serving.
Freezing. Freeze the cooled loaves whole, split lengthwise, or sliced. Wrap the bread well and freeze for up to 2 months for best quality. Slicing first makes it easy to take out only what you need.
Refreshing the crust. Warm a thawed loaf in a 350°F oven for 8 to 10 minutes. Individual slices can go straight from the freezer to the toaster.
Frequently Asked Questions
Why is my ciabatta dough so sticky? The dough contains more water than a typical sandwich loaf. It should cling to your fingers and spread somewhat when you turn it out. Use damp hands for folding and a floured scraper for dividing.
Can I use all-purpose flour? Yes. Start with 300 grams of water and add the remaining 20 grams a little at a time if the dough can take it. The dough should be soft and sticky, but you should still be able to lift an edge to fold it. The finished bread may be slightly softer and flatter.
Why did my ciabatta have small holes? The dough may have needed a longer first rise, or it may have lost air when you divided and moved it. Wait until the dough looks bubbly and feels airy before turning it out. Then cut with a scraper and transfer each piece with as little handling as possible.
Do I need to score ciabatta? You can bake these loaves as shaped. The surface can open naturally in the oven, and the small cracks and ridges are part of the rustic crust.
Can I bake the dough as one large loaf? Yes. Leave it as one broad rectangle and expect it to take longer. Start checking at the end of the listed bake range and leave it in until the sides are firm and the center is around 205°F.
Final Thoughts
Plan around the overnight rise and give the dough a light touch in the morning. Once it’s bubbly, all it needs is a floured counter, one clean cut down the middle, and a hot oven. Cool the loaves whole, then split one for sandwiches or tear it into pieces for dipping.
Homemade No-Knead Ciabatta Bread
Description
- Prep time — About 15 minutes of hands-on work
- First rise — 12 to 16 hours, including the folds
- Final rest — 30 to 45 minutes
- Bake time — 24 to 29 minutes
- Cooling time — At least 45 minutes
- Total time — About 14 to 18½ hours
- Yield — 2 small loaves
Ingredients
Ingredients
- 400 grams bread flour (about 3¼ cups), plus more for dusting
- 8 grams fine sea salt (about 1¼ teaspoons)
- ¼ teaspoon instant yeast
- 320 grams room-temperature water (about 1⅓ cups plus 1 teaspoon)
Instructions
Instructions
- Stir together the bread flour, salt, and yeast. Add the water and mix until no dry flour remains. Cover and rest for 30 minutes.
- With a damp hand, lift one side of the dough and fold it over the center. Turn the bowl and repeat on all four sides. Cover and rest for 30 minutes, then repeat the folds once.
- Cover and let rise at cool room temperature until bubbly, expanded, and jiggly, about 12 to 16 hours from initial mixing.
- Turn the dough onto a well-floured surface. Dust the top and cut it into two rough rectangles with a floured bench scraper. Gently transfer to a large baking sheet lined with parchment rated for 450°F.
- Cover loosely and rest for 30 to 45 minutes, until slightly puffy. Meanwhile, preheat the oven to 450°F with a rack in the middle.
- Uncover and bake for 24 to 29 minutes, until golden with firm sides. Transfer to a wire rack and cool for at least 45 minutes before slicing.