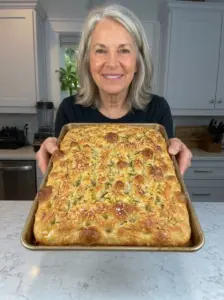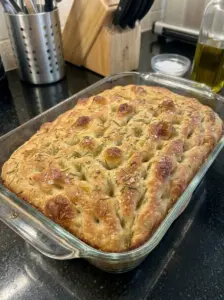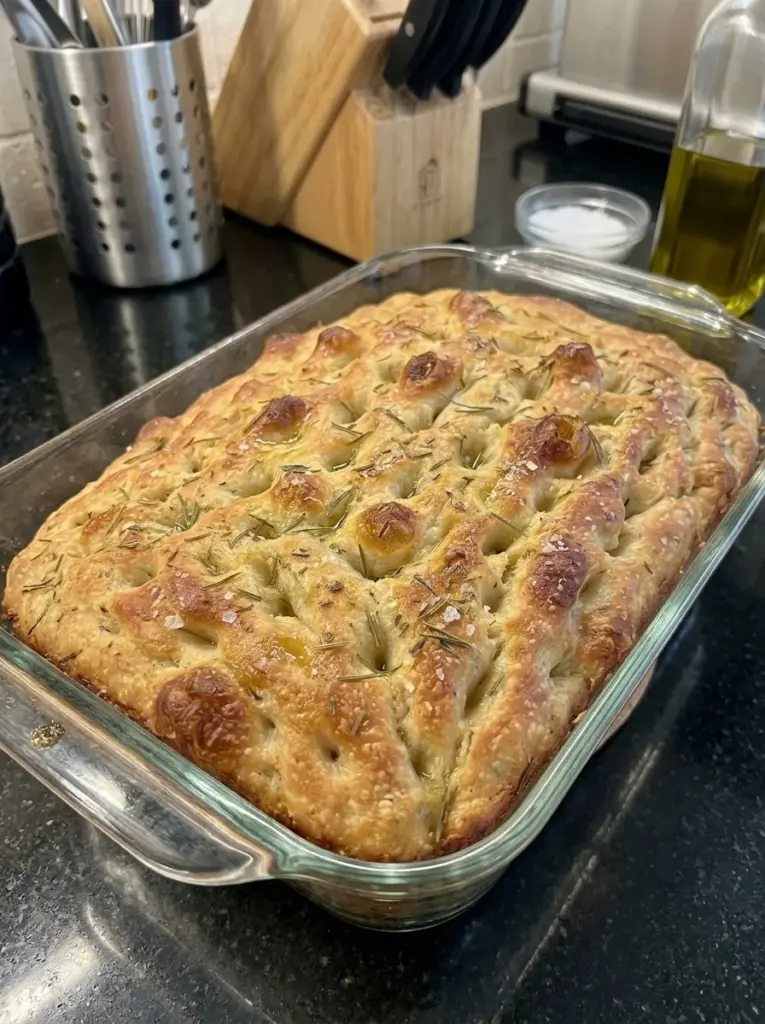
Soft, airy, golden, and wonderfully crisp around the edges, this Easy One-Pan Focaccia Bread gives you bakery-style homemade bread with surprisingly little hands-on work. 🫒🍞🌿
The dough is intentionally wet and sticky, which helps create that light, bubbly interior focaccia is known for. There’s no traditional kneading required—simply stir the dough together, let it rise until pillowy, transfer it to an olive-oil-coated pan, dimple the surface, and bake until deeply golden.
Fresh rosemary, flaky sea salt, and plenty of extra-virgin olive oil keep the flavor simple and classic. Serve it warm with soup or pasta, slice it for sandwiches, or tear off pieces and dip them into seasoned olive oil.
Why You’ll Love This Easy One-Pan Focaccia
No kneading required. The high-hydration dough develops structure while it rests and rises.
One-pan simplicity. After the first rise, the dough goes directly into the pan where it rises again and bakes.
Soft and airy inside. The wet dough encourages a moist, open, bubbly crumb.
Golden and crisp outside. Olive oil and a hot oven create beautifully browned edges and a crisp bottom.
Classic focaccia flavor. Rosemary, flaky salt, and extra-virgin olive oil are all you need.
Beginner-friendly. You don’t need complicated shaping or advanced bread-making techniques.
Versatile. Serve it with dinner, make sandwiches, use it for dipping, or turn leftovers into croutons.
Easy to customize. Garlic, tomatoes, olives, Parmesan, onions, and herbs can all be added.
What Is One-Pan Focaccia?
Focaccia is an Italian-style flatbread known for its generous use of olive oil, characteristic fingertip dimples, golden crust, and soft interior.
Unlike a lean bread dough that is shaped into a tight loaf, focaccia dough is generally wetter and is allowed to spread inside an oiled pan.
This easy version uses:
Flour + instant yeast + salt + honey + water + olive oil.
The dough is mixed with a spoon rather than kneaded traditionally.
After the first rise, it goes into a generously greased 9×13-inch pan, where it rises again until soft and puffy.
The final step is what gives focaccia its unmistakable appearance: olive oil is drizzled over the surface and your fingertips are pressed deeply into the dough to create dozens of little dimples.
Fresh rosemary and flaky sea salt finish the bread before baking.
Ingredients
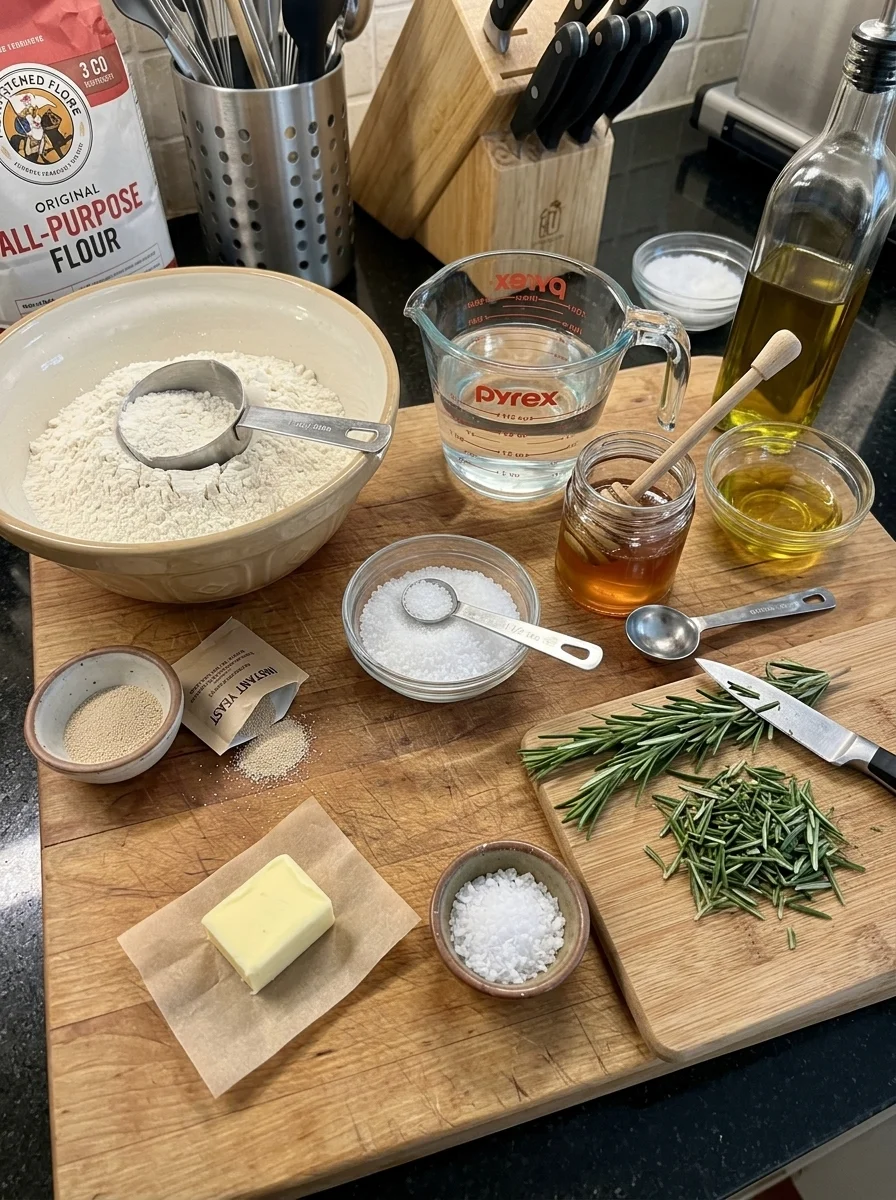
- 3 cups all-purpose flour
- 2 1/4 tsp instant yeast
- 1 1/2 tsp kosher salt
- 1 tbsp honey
- 1 1/2 cups lukewarm water
- 4 tbsp extra-virgin olive oil, divided
- 1 tbsp butter, for greasing the pan
- 1 tsp flaky sea salt
- 1 tbsp fresh rosemary, chopped
Ingredient Notes
All-Purpose Flour
Regular all-purpose flour works very well for this easy focaccia.
It provides enough structure to trap the gases produced by the yeast while still creating a soft crumb.
For consistent results, measure the flour carefully.
If you’re measuring with cups, spoon the flour lightly into the measuring cup and level it rather than packing it tightly.
Adding too much flour can turn an airy focaccia into a dense, dry bread.
Instant Yeast
This recipe uses 2 1/4 teaspoons instant yeast, approximately the amount found in one standard packet.
Instant yeast can be mixed directly into the flour without being dissolved separately first.
Make sure your yeast is still active and hasn’t been stored far beyond its best-quality period.
Kosher Salt
Salt is important for both flavor and dough development.
It’s mixed into the flour so it distributes evenly.
Honey 🍯
A tablespoon of honey provides a small amount of sweetness and complements the savory olive oil and rosemary.
The finished focaccia should not taste noticeably sweet.
Lukewarm Water
The water should feel pleasantly warm rather than hot.
Extremely hot water can damage yeast.
Aim for approximately 100–110°F if you’re checking with a thermometer.
Extra-Virgin Olive Oil 🫒
Olive oil is one of the defining ingredients in focaccia.
It’s used in the dough, during the rise, on the bottom of the pan, and across the top.
The oil contributes:
- Flavor
- Moisture
- Golden browning
- Crisp edges
- A beautifully fried-like bottom crust
Because olive oil is such a prominent flavor, use one you enjoy.
Butter
Butter is used to grease the pan before the olive oil goes in.
It adds flavor and provides another layer of protection against sticking.
Flaky Sea Salt
Flaky sea salt is sprinkled over the surface immediately before baking.
The larger crystals provide little bursts of saltiness.
Don’t substitute an equal amount of fine table salt on top because it will taste substantially saltier.
Fresh Rosemary 🌿
Rosemary and focaccia are a classic combination.
Fresh rosemary gives the bread a fragrant, woodsy flavor.
Chop it so large needles don’t dominate individual bites.
How to Make Easy One-Pan Focaccia Bread
Step 1: Combine the Dry Ingredients
In a large mixing bowl, whisk together:
- 3 cups all-purpose flour
- 2 1/4 teaspoons instant yeast
- 1 1/2 teaspoons kosher salt
Mix until the yeast and salt are evenly distributed through the flour.
Step 2: Add the Wet Ingredients
Add:
- 1 tablespoon honey
- 1 1/2 cups lukewarm water
- 2 tablespoons extra-virgin olive oil
Stir with a sturdy wooden spoon or silicone spatula.
Continue mixing until there are no large pockets of dry flour.
The dough should look very wet, sticky, and somewhat shaggy.
That’s exactly what you want.
Don’t Add Extra Flour Just Because the Dough Is Sticky
This is one of the most important parts of the recipe.
Focaccia dough is supposed to be much wetter and stickier than a typical sandwich-bread dough.
It may look too wet if you’re accustomed to firm bread dough.
Resist the temptation to keep adding flour until it becomes easy to handle.
The higher hydration helps create the soft, airy interior and irregular bubbles that make focaccia so appealing.
Step 3: Coat the Dough with Olive Oil
Drizzle approximately 1 tablespoon olive oil over the dough.
Using a spatula or lightly oiled hand, gently fold the dough over itself a few times.
You’re not trying to knead it aggressively.
Simply fold it enough to coat the surface and bring the dough together.
Step 4: First Rise
Cover the bowl.
Allow the dough to rise at room temperature for approximately 2–3 hours.
The exact time depends on your room temperature and yeast activity.
Rather than relying entirely on the clock, watch the dough.
It should become:
- Approximately doubled in size
- Soft and jiggly
- Puffy
- Filled with visible bubbles
A warmer kitchen may produce a faster rise.
A cooler kitchen may require longer.
What Should Focaccia Dough Look Like After the First Rise?
This is a better indicator than a strict timer.
The dough should look dramatically different from when you first mixed it.
Initially, it will be sticky and rough.
After fermentation, it should appear:
Puffy + elastic + bubbly + airy.
You may see bubbles across the top and around the sides of the bowl.
That’s a good sign.
Those bubbles are exactly what you want to preserve when transferring the dough to the pan.
Step 5: Prepare the Pan
Generously grease a 9×13-inch baking pan with approximately 1 tablespoon butter.
Pour approximately 1 tablespoon olive oil into the pan.
Spread the oil across the bottom and slightly up the sides.
Don’t be overly conservative with the oil.
The oil underneath the dough is what helps create that wonderfully crisp, deeply golden focaccia bottom.
Step 6: Transfer the Dough
Gently scrape the risen dough into the prepared pan.
Try not to aggressively punch down or deflate it.
Use lightly oiled fingertips to gently encourage the dough toward the edges.
If it springs back and refuses to stretch, don’t fight it.
Let the dough rest for approximately 10–15 minutes, then try again.
Relaxed dough stretches much more easily.
Don’t Force the Dough Into the Corners
Freshly transferred dough may resist stretching.
That’s normal.
Pulling aggressively can tear the dough and destroy the gas bubbles you’ve spent hours developing.
Instead:
- Stretch gently.
- Stop when the dough resists.
- Let it rest.
- Return a few minutes later.
- Stretch again.
Eventually it should relax enough to fill most or all of the pan.
Step 7: Second Rise
Cover the pan loosely.
Let the dough rise for another 45–60 minutes.
By the end of this rise, it should look noticeably puffier.
The dough may develop large bubbles across the surface.
Don’t pop them unnecessarily.
Those bubbles contribute to the focaccia’s characteristic airy texture.
Step 8: Preheat the Oven
During the second rise, preheat the oven to 425°F.
Allow enough time for the oven to become fully heated before the focaccia goes in.
A properly preheated oven encourages good oven spring and helps the bottom and edges become crisp.
Step 9: Add the Final Olive Oil
Drizzle the remaining olive oil over the surface of the dough.
Let some of the oil naturally settle into the low spots.
Step 10: Dimple the Focaccia
Lightly oil your fingertips.
Spread your fingers apart and press them deeply into the dough.
Continue across the entire surface until you have the classic focaccia pattern.
Press deeply enough to create obvious indentations, but avoid tearing completely through the dough.
Some bubbles will naturally shift or deflate during dimpling.
That’s fine.
Why Do You Dimple Focaccia?
The dimples aren’t just decorative.
They help distribute olive oil across and into the surface of the dough.
Those little pockets hold:
- Olive oil
- Rosemary
- Salt
- Any additional toppings
They also create the distinctive irregular surface that gives focaccia its mix of soft and crisp textures.
Step 11: Add Rosemary and Sea Salt
Sprinkle the top evenly with:
- 1 tablespoon chopped fresh rosemary
- 1 teaspoon flaky sea salt
If you’d like an especially rich surface, finish with another small drizzle of olive oil.
Step 12: Bake
Transfer the pan to the preheated 425°F oven.
Bake for approximately 25–30 minutes.
The focaccia should become:
- Puffy
- Deeply golden on top
- Crisp around the edges
- Nicely browned underneath
The exact baking time depends on your oven and pan.
Start checking around 25 minutes.
Step 13: Check the Bottom
Carefully lift an edge with a spatula.
The bottom should look golden and sturdy rather than pale and soft.
If the top is browned but the bottom still looks pale, give it a few additional minutes if necessary.
Step 14: Cool Briefly
Remove the focaccia from the oven.
Let it rest in the pan for approximately 5–10 minutes.
This brief cooling period allows the structure to set while the bread remains warm.
Step 15: Remove from the Pan
Carefully loosen the edges with a thin spatula.
Transfer the focaccia to a cutting board or cooling rack.
Avoid leaving it in the pan for an excessively long time because trapped steam can gradually soften the crisp bottom crust.
Step 16: Slice and Serve
Cut into approximately 12 squares.
Serve warm.
For an extra finish, drizzle the sliced bread with a little good-quality olive oil before serving.
Recipe Information ⏱️
Prep Time: 10 minutes
First Rise: 2–3 hours
Second Rise: 45–60 minutes
Cook Time: approximately 28 minutes
Total Time: approximately 3 hours 45 minutes, depending on rise time
Servings: 12
Estimated Calories: approximately 185 calories per serving
Nutrition is an estimate and can vary depending on the exact flour, honey, olive oil, butter, toppings, and serving size.
What Does Homemade Focaccia Taste Like?
The flavor is intentionally simple.
Extra-virgin olive oil is prominent, followed by fragrant rosemary and little bursts of flaky salt.
Honey provides only subtle background sweetness.
The bread itself develops a mild fermented flavor during its several hours of rising.
The combination is:
Savory + olive-oil-rich + rosemary-scented + lightly salty + subtly sweet.
Because the ingredient list is so simple, good olive oil and fresh rosemary make a noticeable difference.
What Should Focaccia Texture Be Like?
Great focaccia should have contrasting textures.
The top should be golden and lightly crisp.
The edges should become even crispier where they meet the oil-coated pan.
The bottom should be sturdy and nicely browned.
Inside, however, the bread should remain:
Soft + moist + airy + slightly chewy + full of irregular bubbles.
It shouldn’t have the tight, uniform crumb of ordinary sandwich bread.
The Secret to Airy Focaccia
There are several important factors.
Use Enough Water
This dough has relatively high hydration.
The wet dough encourages larger internal bubbles.
Don’t Add Unnecessary Flour
Adding lots of extra flour makes the dough easier to handle but can produce a heavier loaf.
Give the Yeast Time
Fermentation creates the gas responsible for the airy crumb.
Handle the Risen Dough Gently
Aggressive handling destroys those bubbles.
Don’t Skip the Second Rise
The dough needs time to become puffy again after being transferred to the pan.
Bake in a Hot Oven
The 425°F oven helps produce rapid expansion and good browning.
Why Is My Focaccia Dough So Sticky?
Because it’s supposed to be.
Sticky dough is not automatically failed dough.
This recipe intentionally uses a generous amount of water relative to flour.
Rather than adding more flour, use:
- Olive-oiled fingertips
- A flexible dough scraper
- A silicone spatula
Oil makes wet focaccia dough much easier to handle.
Do I Really Need to Knead Focaccia?
Not with this method.
Traditional bread kneading helps organize and strengthen gluten.
But gluten can also develop through hydration, time, fermentation, and gentle folding.
That’s why this easy focaccia can achieve a good structure without 10 minutes of vigorous kneading.
Why Two Rises?
Each rise serves a purpose.
First Rise
This develops the dough’s structure, flavor, and gas bubbles.
Second Rise
Transferring and stretching the dough inevitably removes some gas.
The second rise allows the dough to relax and become puffy again before baking.
Skipping it usually produces flatter, denser focaccia.
How Do I Know When the First Rise Is Finished?
Don’t rely exclusively on time.
Look for the dough to become roughly doubled in size and visibly bubbly.
Depending on your kitchen, that may take less than two hours or more than three.
Yeast works faster in warmer environments and more slowly in cooler ones.
How Do I Know When the Second Rise Is Finished?
The dough should look noticeably inflated and pillowy.
When you gently move the pan, the dough may jiggle slightly.
You may also notice bubbles forming underneath or across the surface.
At that point, it’s ready to dimple and bake.
What Is the Best Pan for Focaccia?
A 9×13-inch metal baking pan works particularly well for this recipe.
Metal conducts heat efficiently, helping create crisp edges and a browned bottom.
A large cast-iron skillet can also produce excellent results, particularly if you love crispy crust.
Glass can work, but browning and baking behavior may differ from metal.
Always monitor the bread rather than relying only on the timer.
Can I Make It in Cast Iron?
Yes.
A generously greased cast-iron skillet is excellent for focaccia.
Cast iron retains heat well and can produce especially crisp edges and bottom crust.
Make sure the skillet is large enough to accommodate the rising dough without overflowing.
Why Butter AND Olive Oil the Pan?
Butter provides flavor and helps coat the pan.
Olive oil creates the characteristic focaccia crust.
Together they produce an especially flavorful bottom and help reduce sticking.
You can use only olive oil if preferred, but the butter adds another layer of richness.
How Much Olive Oil Should I Use?
Don’t be afraid of olive oil when making focaccia.
This recipe uses approximately 4 tablespoons, divided throughout the process.
The oil isn’t simply mixed into the dough.
It also coats the surface, pan, and dimples.
That’s part of what separates focaccia from ordinary bread.
Tips for the Best One-Pan Focaccia
Measure flour carefully. Too much flour can make the bread dense.
Use lukewarm—not hot—water. Extremely hot water can damage yeast.
Don’t fear sticky dough. Wet dough is desirable here.
Don’t add extra flour unnecessarily. Use olive oil on your hands instead.
Watch the dough, not just the clock. Rise times depend on temperature.
Be gentle after the first rise. Preserve as many bubbles as possible.
Let stubborn dough rest. If it won’t stretch, give it 10–15 minutes.
Oil the pan generously. This creates crisp edges and prevents sticking.
Let the second rise finish. The dough should be soft and pillowy.
Dimple deeply. Press almost to the bottom without tearing the dough.
Use flaky salt on top. It gives the classic focaccia finish.
Bake until deeply golden. Pale focaccia usually lacks the best crust flavor.
Remove it from the pan after a short rest. This helps preserve the crisp bottom.
How to Get Bigger Air Bubbles
For an especially open crumb:
Don’t overmix.
Keep the dough wet.
Allow a complete first rise.
Avoid punching down the dough.
Transfer it gently.
Don’t aggressively flatten it into the pan.
Give it enough time for the second rise.
Handle it gently while dimpling.
Some bubbles may become extremely large.
You can leave most of them alone unless they’re so large that they threaten to create giant hollow pockets.
Why Didn’t My Focaccia Rise?
Possible causes include:
- Old or inactive yeast
- Water that was too hot
- A very cold room
- Insufficient rise time
- Too much flour
- Excessive salt
- Incorrect measurements
If your kitchen is cool, the dough may simply need more time.
Why Is My Focaccia Dense?
The most common reasons are:
Too much flour. This is especially common with cup measurements.
Not enough rise time. The dough wasn’t sufficiently fermented.
Aggressive handling. The bubbles were pushed out.
Skipping the second rise. The dough didn’t have time to recover.
Inactive yeast. Little gas was produced.
For an airy result, keep the dough wet and let it become visibly bubbly before proceeding.
Why Is My Focaccia Pale?
It probably needs more baking time.
Good focaccia should have substantial golden color.
Olive oil and a sufficiently hot oven help with browning.
If your bread is cooked but consistently pale, your particular oven or pan may require a slightly longer baking time.
Why Is the Bottom Soggy?
Several things can cause this.
There may not have been enough oil underneath the dough.
The bread may have been underbaked.
A glass or ceramic pan may brown more slowly than metal.
Or the finished focaccia may have remained in the pan long enough for trapped steam to soften the crust.
For a crisper bottom:
- Use a metal pan.
- Oil it generously.
- Bake until the bottom is browned.
- Transfer the bread out of the pan after the initial cooling period.
Why Did My Focaccia Stick to the Pan?
The pan may not have been greased thoroughly enough.
Make sure both butter and olive oil cover the bottom and corners.
A well-oiled focaccia pan should release fairly easily.
If necessary, run a thin spatula around and underneath the bread before lifting.
Why Did My Focaccia Collapse When I Dimpled It?
Some deflation is completely normal.
You’re pressing your fingers deeply into an airy dough.
The goal isn’t to preserve every single bubble.
However, if the entire loaf collapses dramatically and doesn’t recover at all, it may have overproofed.
Overproofed dough can become fragile because the gluten structure has stretched beyond its ideal capacity.
How Deep Should Focaccia Dimples Be?
Press your fingertips deeply into the dough, almost toward the bottom of the pan.
You want real indentations rather than tiny marks on the surface.
Keep your fingers spread apart and work across the entire dough.
The olive oil should naturally collect in some of those dimples.
Easy Focaccia Topping Variations
Garlic Rosemary Focaccia 🧄🌿
Add finely minced or roasted garlic along with the rosemary.
Be cautious with large pieces of raw garlic on the surface because they can burn.
Parmesan Rosemary Focaccia 🧀
Sprinkle finely grated Parmesan over the top before baking.
Tomato Focaccia 🍅
Press halved cherry tomatoes gently into the surface before baking.
Olive Focaccia 🫒
Add sliced Kalamata or green olives.
Pat wet olives dry before using so they don’t add unnecessary surface moisture.
Garlic Parmesan Focaccia
Combine garlic, Parmesan, rosemary, olive oil, and flaky salt.
Caramelized Onion Focaccia 🧅
Scatter cooled caramelized onions over the top.
Jalapeño Cheddar Focaccia 🌶️🧀
Add thinly sliced jalapeños and shredded cheddar for a bold variation.
Everything Seasoning Focaccia
Replace or supplement the rosemary with everything bagel seasoning.
Because the seasoning already contains salt, reduce the flaky salt accordingly.
Herb Focaccia 🌿
Try rosemary with thyme, oregano, basil, or sage.
Hot Honey Focaccia 🍯🌶️
Bake the bread with rosemary and salt, then drizzle lightly with hot honey after baking.
Roasted Garlic Focaccia 🧄
Press pieces of soft roasted garlic into the dimples before baking.
Roasted garlic is less likely to burn than large pieces of raw garlic.
Can I Add Cheese?
Absolutely.
Parmesan, mozzarella, cheddar, Asiago, and Pecorino can all work.
For classic rosemary focaccia, Parmesan or Pecorino is especially good.
Remember that cheese adds salt, so adjust the flaky salt if you’re using a particularly salty cheese.
Can I Add Vegetables?
Yes.
Popular options include:
- Cherry tomatoes
- Thinly sliced onions
- Roasted peppers
- Olives
- Jalapeños
- Artichoke hearts
Avoid covering the entire surface with very wet vegetables because excess moisture can interfere with browning.
What to Serve with Focaccia
Soup 🍲
Focaccia is perfect for dipping into tomato soup, vegetable soup, chicken soup, or hearty beef soup.
Stew
Use thick slices to soak up flavorful broth from beef, chicken, pork, or vegetable stews.
Pasta 🍝
Serve alongside spaghetti, lasagna, baked ziti, Alfredo pasta, or marinara-based dishes.
Salad 🥗
A large salad and warm focaccia make an easy light dinner.
Olive Oil Dip 🫒
Serve warm focaccia with extra-virgin olive oil, herbs, pepper, and a little balsamic vinegar.
Charcuterie
Cut the focaccia into small pieces and serve alongside cheese, olives, cured meats, roasted peppers, and spreads.
Sandwiches 🥪
Slice larger squares horizontally and fill them with:
- Turkey and cheese
- Chicken and pesto
- Mozzarella and tomato
- Italian deli meats
- Roasted vegetables
- Tuna salad
- Grilled chicken
How to Make Focaccia Sandwiches
Allow the bread to cool before slicing.
Cut it into large squares or rectangles.
Slice each piece horizontally through the center.
Because focaccia already contains olive oil and herbs, it works particularly well with simple sandwich fillings.
For a crisp sandwich, toast the cut surfaces briefly before assembling.
Can I Make This Focaccia Ahead?
Yes.
Focaccia is at its absolute best on the day it’s baked, but there are several ways to plan ahead.
You can bake it earlier in the day and reheat it shortly before serving.
You can also prepare the dough ahead using a slower refrigerator fermentation.
Overnight Focaccia Option
For a more developed flavor, the dough can be given a longer cold fermentation.
After mixing the dough, cover it securely and refrigerate it overnight.
Cold fermentation slows the yeast while allowing additional flavor to develop.
The next day, transfer the dough to the prepared pan and allow enough time for it to warm, relax, spread, and become puffy before dimpling and baking.
Because dough temperature and refrigerator temperature vary, use its appearance rather than a strict clock to determine when it’s ready.
Why Cold Fermentation Improves Flavor
Yeast fermentation doesn’t only make bread rise.
It also creates flavor compounds.
Slower fermentation generally gives those flavors more time to develop.
That’s why overnight focaccia can have a slightly more complex, bakery-style flavor than a faster same-day loaf.
The same-day method in this recipe is still delicious and much faster.
Can I Double the Recipe?
Yes, but use two 9×13-inch pans rather than putting twice as much dough into one pan.
Overloading a single pan creates a much thicker bread that requires different proofing and baking times.
Two pans give you much more predictable results.
Can I Halve the Recipe?
Yes.
Use a smaller baking pan and monitor the baking time.
The exact time will depend on the dimensions of your pan and thickness of the dough.
Storage Information 🥖
Allow the focaccia to cool completely.
Store leftovers in an airtight container or tightly wrapped at room temperature for up to 2 days.
Focaccia is best the day it’s baked because that’s when the contrast between the crisp crust and soft interior is strongest.
Avoid refrigerating it unless necessary.
Refrigeration tends to accelerate the firming and staling of bread.
How to Reheat Focaccia
For the best texture, use the oven.
Preheat to 350°F.
Place the focaccia directly on a baking sheet.
Heat for approximately 5–8 minutes, or until warmed through and lightly crisp again.
This method restores the crust much better than a microwave.
Can You Microwave Focaccia?
Yes, but the texture will be softer.
Microwave individual pieces briefly—only until warm.
Too much microwave time can make bread chewy or rubbery.
For crisp edges, the oven or toaster oven is better.
How to Freeze Focaccia
Focaccia freezes very well.
Allow it to cool completely.
Cut into individual portions.
Wrap each piece tightly and place the wrapped portions in a freezer-safe container or bag.
Freeze for up to approximately 1 month for best quality.
How to Reheat Frozen Focaccia
Thaw at room temperature.
Then place the bread in a 350°F oven for approximately 5–8 minutes until warm and crisp.
For an especially fresh-tasting finish, drizzle it with a tiny amount of olive oil before reheating.
What to Do with Leftover Focaccia
Make Sandwiches
One of the easiest options.
Make Croutons
Cut stale focaccia into cubes, toss lightly with olive oil if needed, and bake until crisp.
Make Breadcrumbs
Dry the bread and pulse it into flavorful seasoned crumbs.
Toast It
Toast slices and serve with eggs or soup.
Make Focaccia Pizza
Top leftover slices with tomato sauce and cheese, then bake until hot and bubbly.
Serve with Dips
Warm leftover focaccia and serve it with hummus, whipped feta, spinach-artichoke dip, or olive tapenade.
Troubleshooting
My Dough Looks Too Wet
That’s usually normal.
This is a wet focaccia dough.
Use olive oil rather than extra flour to make handling easier.
My Dough Isn’t Rising
Give it more time if your kitchen is cool.
If nothing happens after an extended period, the yeast may be inactive.
My Dough Won’t Stretch Across the Pan
Let it rest for 10–15 minutes.
The gluten will relax and stretching will become easier.
My Focaccia Is Dense
Possible causes include too much flour, insufficient proofing, inactive yeast, or aggressive handling.
My Focaccia Is Dry
It may contain too much flour or have baked too long.
My Focaccia Is Pale
Bake longer until the surface and edges become deeply golden.
My Bottom Isn’t Crispy
Use enough olive oil, consider a metal pan, and bake until the bottom is properly browned.
My Rosemary Burned
Large pieces exposed directly to high heat can darken.
Chop the rosemary and make sure it’s lightly coated with the surface olive oil.
My Focaccia Is Too Salty
Remember that flaky salt is a finishing ingredient.
If you’re also adding salty olives, Parmesan, or other toppings, reduce the finishing salt.
My Focaccia Didn’t Develop Bubbles
The dough may not have risen long enough, may contain too much flour, or may have been handled too aggressively after fermentation.
My Focaccia Rose and Then Collapsed
It may have overproofed.
Next time, bake once the dough is clearly puffy and bubbly rather than allowing it to continue rising indefinitely.
Frequently Asked Questions
Is focaccia difficult to make?
No. This no-knead version is particularly beginner-friendly.
Do I need a stand mixer?
No. A wooden spoon or sturdy spatula is enough.
Do I need to knead the dough?
No traditional kneading is required.
Why is the dough so sticky?
The relatively high hydration helps produce an airy, soft focaccia.
Should I add more flour?
Only if the measurements are clearly wrong. The dough is intentionally wet and sticky.
Can I use bread flour?
Yes. Bread flour can create a slightly chewier texture and stronger gluten structure, although this recipe is designed to work with all-purpose flour.
What temperature should the water be?
Approximately 100–110°F is a useful range.
Can I use active dry yeast?
You can, although the process may need slight adjustment and rise times may differ. This recipe is written specifically for instant yeast.
How long should the first rise take?
Approximately 2–3 hours, depending on room temperature and yeast activity.
How long is the second rise?
Approximately 45–60 minutes.
What size pan should I use?
A 9×13-inch baking pan works well.
Can I use cast iron?
Yes. Cast iron can produce especially crisp edges.
Why do you dimple focaccia?
The dimples create its characteristic surface and hold olive oil, herbs, and salt.
How deeply should I dimple it?
Press deeply with oiled fingertips, nearly to the bottom without intentionally tearing through the dough.
What temperature does focaccia bake at?
425°F.
How long does it bake?
Approximately 25–30 minutes.
How do I know when it’s done?
The top should be deeply golden, the edges crisp, and the bottom nicely browned.
Can I add garlic?
Yes. Roasted garlic is particularly good because it’s less likely to burn.
Can I add tomatoes?
Yes. Halved cherry tomatoes make an excellent topping.
Can I add olives?
Absolutely.
Can I make it overnight?
Yes. A refrigerator fermentation is an excellent option and can deepen the flavor.
How long does focaccia stay fresh?
It’s best the day it’s baked but can be stored at room temperature for up to approximately 2 days.
Can I freeze focaccia?
Yes. Freeze individual pieces for up to approximately 1 month for best quality.
What’s the best way to reheat it?
Warm it in a 350°F oven for 5–8 minutes.
Final Thoughts
This Easy One-Pan Focaccia Bread proves that homemade bread doesn’t need complicated kneading or shaping to be incredibly satisfying. 🫒🍞🌿
A simple mixture of flour, instant yeast, honey, water, salt, and olive oil transforms into a bubbly, pillowy dough while you mostly leave it alone.
The key is embracing the wet dough rather than trying to turn it into a firm bread dough. Give it enough time to rise, handle those precious bubbles gently, coat the pan generously with olive oil, and let the second rise make the dough soft and puffy.
Then comes the best part: press deep dimples across the surface, drizzle with olive oil, scatter over fresh rosemary and flaky sea salt, and bake until deeply golden.
The result is focaccia with crispy olive-oil edges, a beautifully browned bottom, and a soft, airy center that’s perfect for tearing, dipping, slicing into sandwiches, or serving beside a warm bowl of soup, pasta, or stew.
And because there’s no traditional kneading required, it’s an excellent recipe for anyone who wants to start making impressive homemade bread without making the process complicated.
Print
Easy One-Pan Focaccia Bread
Ingredients
- 3 cups all-purpose flour
- 2 1/4 tsp instant yeast
- 1 1/2 tsp kosher salt
- 1 tbsp honey
- 1 1/2 cups lukewarm water
- 4 tbsp extra-virgin olive oil, divided
- 1 tbsp butter, for greasing the pan
- 1 tsp flaky sea salt
- 1 tbsp fresh rosemary, chopped
Instructions
Step 1: Combine the Dry Ingredients
In a large mixing bowl, whisk together:
- 3 cups all-purpose flour
- 2 1/4 teaspoons instant yeast
- 1 1/2 teaspoons kosher salt
Mix until the yeast and salt are evenly distributed through the flour.
Step 2: Add the Wet Ingredients
Add:
- 1 tablespoon honey
- 1 1/2 cups lukewarm water
- 2 tablespoons extra-virgin olive oil
Stir with a sturdy wooden spoon or silicone spatula.
Continue mixing until there are no large pockets of dry flour.
The dough should look very wet, sticky, and somewhat shaggy.
That’s exactly what you want.
Don’t Add Extra Flour Just Because the Dough Is Sticky
This is one of the most important parts of the recipe.
Focaccia dough is supposed to be much wetter and stickier than a typical sandwich-bread dough.
It may look too wet if you’re accustomed to firm bread dough.
Resist the temptation to keep adding flour until it becomes easy to handle.
The higher hydration helps create the soft, airy interior and irregular bubbles that make focaccia so appealing.
Step 3: Coat the Dough with Olive Oil
Drizzle approximately 1 tablespoon olive oil over the dough.
Using a spatula or lightly oiled hand, gently fold the dough over itself a few times.
You’re not trying to knead it aggressively.
Simply fold it enough to coat the surface and bring the dough together.
Step 4: First Rise
Cover the bowl.
Allow the dough to rise at room temperature for approximately 2–3 hours.
The exact time depends on your room temperature and yeast activity.
Rather than relying entirely on the clock, watch the dough.
It should become:
- Approximately doubled in size
- Soft and jiggly
- Puffy
- Filled with visible bubbles
A warmer kitchen may produce a faster rise.
A cooler kitchen may require longer.
What Should Focaccia Dough Look Like After the First Rise?
This is a better indicator than a strict timer.
The dough should look dramatically different from when you first mixed it.
Initially, it will be sticky and rough.
After fermentation, it should appear:
Puffy + elastic + bubbly + airy.
You may see bubbles across the top and around the sides of the bowl.
That’s a good sign.
Those bubbles are exactly what you want to preserve when transferring the dough to the pan.
Step 5: Prepare the Pan
Generously grease a 9×13-inch baking pan with approximately 1 tablespoon butter.
Pour approximately 1 tablespoon olive oil into the pan.
Spread the oil across the bottom and slightly up the sides.
Don’t be overly conservative with the oil.
The oil underneath the dough is what helps create that wonderfully crisp, deeply golden focaccia bottom.
Step 6: Transfer the Dough
Gently scrape the risen dough into the prepared pan.
Try not to aggressively punch down or deflate it.
Use lightly oiled fingertips to gently encourage the dough toward the edges.
If it springs back and refuses to stretch, don’t fight it.
Let the dough rest for approximately 10–15 minutes, then try again.
Relaxed dough stretches much more easily.
Don’t Force the Dough Into the Corners
Freshly transferred dough may resist stretching.
That’s normal.
Pulling aggressively can tear the dough and destroy the gas bubbles you’ve spent hours developing.
Instead:
- Stretch gently.
- Stop when the dough resists.
- Let it rest.
- Return a few minutes later.
- Stretch again.
Eventually it should relax enough to fill most or all of the pan.
Step 7: Second Rise
Cover the pan loosely.
Let the dough rise for another 45–60 minutes.
By the end of this rise, it should look noticeably puffier.
The dough may develop large bubbles across the surface.
Don’t pop them unnecessarily.
Those bubbles contribute to the focaccia’s characteristic airy texture.
Step 8: Preheat the Oven
During the second rise, preheat the oven to 425°F.
Allow enough time for the oven to become fully heated before the focaccia goes in.
A properly preheated oven encourages good oven spring and helps the bottom and edges become crisp.
Step 9: Add the Final Olive Oil
Drizzle the remaining olive oil over the surface of the dough.
Let some of the oil naturally settle into the low spots.
Step 10: Dimple the Focaccia
Lightly oil your fingertips.
Spread your fingers apart and press them deeply into the dough.
Continue across the entire surface until you have the classic focaccia pattern.
Press deeply enough to create obvious indentations, but avoid tearing completely through the dough.
Some bubbles will naturally shift or deflate during dimpling.
That’s fine.
Why Do You Dimple Focaccia?
The dimples aren’t just decorative.
They help distribute olive oil across and into the surface of the dough.
Those little pockets hold:
- Olive oil
- Rosemary
- Salt
- Any additional toppings
They also create the distinctive irregular surface that gives focaccia its mix of soft and crisp textures.
Step 11: Add Rosemary and Sea Salt
Sprinkle the top evenly with:
- 1 tablespoon chopped fresh rosemary
- 1 teaspoon flaky sea salt
If you’d like an especially rich surface, finish with another small drizzle of olive oil.
Step 12: Bake
Transfer the pan to the preheated 425°F oven.
Bake for approximately 25–30 minutes.
The focaccia should become:
- Puffy
- Deeply golden on top
- Crisp around the edges
- Nicely browned underneath
The exact baking time depends on your oven and pan.
Start checking around 25 minutes.
Step 13: Check the Bottom
Carefully lift an edge with a spatula.
The bottom should look golden and sturdy rather than pale and soft.
If the top is browned but the bottom still looks pale, give it a few additional minutes if necessary.
Step 14: Cool Briefly
Remove the focaccia from the oven.
Let it rest in the pan for approximately 5–10 minutes.
This brief cooling period allows the structure to set while the bread remains warm.
Step 15: Remove from the Pan
Carefully loosen the edges with a thin spatula.
Transfer the focaccia to a cutting board or cooling rack.
Avoid leaving it in the pan for an excessively long time because trapped steam can gradually soften the crisp bottom crust.
Step 16: Slice and Serve
Cut into approximately 12 squares.
Serve warm.
For an extra finish, drizzle the sliced bread with a little good-quality olive oil before serving.