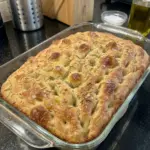
Ingredients
- 3 cups all-purpose flour
- 2 1/4 tsp instant yeast
- 1 1/2 tsp kosher salt
- 1 tbsp honey
- 1 1/2 cups lukewarm water
- 4 tbsp extra-virgin olive oil, divided
- 1 tbsp butter, for greasing the pan
- 1 tsp flaky sea salt
- 1 tbsp fresh rosemary, chopped
Instructions
Step 1: Combine the Dry Ingredients
In a large mixing bowl, whisk together:
- 3 cups all-purpose flour
- 2 1/4 teaspoons instant yeast
- 1 1/2 teaspoons kosher salt
Mix until the yeast and salt are evenly distributed through the flour.
Step 2: Add the Wet Ingredients
Add:
- 1 tablespoon honey
- 1 1/2 cups lukewarm water
- 2 tablespoons extra-virgin olive oil
Stir with a sturdy wooden spoon or silicone spatula.
Continue mixing until there are no large pockets of dry flour.
The dough should look very wet, sticky, and somewhat shaggy.
That’s exactly what you want.
Don’t Add Extra Flour Just Because the Dough Is Sticky
This is one of the most important parts of the recipe.
Focaccia dough is supposed to be much wetter and stickier than a typical sandwich-bread dough.
It may look too wet if you’re accustomed to firm bread dough.
Resist the temptation to keep adding flour until it becomes easy to handle.
The higher hydration helps create the soft, airy interior and irregular bubbles that make focaccia so appealing.
Step 3: Coat the Dough with Olive Oil
Drizzle approximately 1 tablespoon olive oil over the dough.
Using a spatula or lightly oiled hand, gently fold the dough over itself a few times.
You’re not trying to knead it aggressively.
Simply fold it enough to coat the surface and bring the dough together.
Step 4: First Rise
Cover the bowl.
Allow the dough to rise at room temperature for approximately 2–3 hours.
The exact time depends on your room temperature and yeast activity.
Rather than relying entirely on the clock, watch the dough.
It should become:
- Approximately doubled in size
- Soft and jiggly
- Puffy
- Filled with visible bubbles
A warmer kitchen may produce a faster rise.
A cooler kitchen may require longer.
What Should Focaccia Dough Look Like After the First Rise?
This is a better indicator than a strict timer.
The dough should look dramatically different from when you first mixed it.
Initially, it will be sticky and rough.
After fermentation, it should appear:
Puffy + elastic + bubbly + airy.
You may see bubbles across the top and around the sides of the bowl.
That’s a good sign.
Those bubbles are exactly what you want to preserve when transferring the dough to the pan.
Step 5: Prepare the Pan
Generously grease a 9×13-inch baking pan with approximately 1 tablespoon butter.
Pour approximately 1 tablespoon olive oil into the pan.
Spread the oil across the bottom and slightly up the sides.
Don’t be overly conservative with the oil.
The oil underneath the dough is what helps create that wonderfully crisp, deeply golden focaccia bottom.
Step 6: Transfer the Dough
Gently scrape the risen dough into the prepared pan.
Try not to aggressively punch down or deflate it.
Use lightly oiled fingertips to gently encourage the dough toward the edges.
If it springs back and refuses to stretch, don’t fight it.
Let the dough rest for approximately 10–15 minutes, then try again.
Relaxed dough stretches much more easily.
Don’t Force the Dough Into the Corners
Freshly transferred dough may resist stretching.
That’s normal.
Pulling aggressively can tear the dough and destroy the gas bubbles you’ve spent hours developing.
Instead:
- Stretch gently.
- Stop when the dough resists.
- Let it rest.
- Return a few minutes later.
- Stretch again.
Eventually it should relax enough to fill most or all of the pan.
Step 7: Second Rise
Cover the pan loosely.
Let the dough rise for another 45–60 minutes.
By the end of this rise, it should look noticeably puffier.
The dough may develop large bubbles across the surface.
Don’t pop them unnecessarily.
Those bubbles contribute to the focaccia’s characteristic airy texture.
Step 8: Preheat the Oven
During the second rise, preheat the oven to 425°F.
Allow enough time for the oven to become fully heated before the focaccia goes in.
A properly preheated oven encourages good oven spring and helps the bottom and edges become crisp.
Step 9: Add the Final Olive Oil
Drizzle the remaining olive oil over the surface of the dough.
Let some of the oil naturally settle into the low spots.
Step 10: Dimple the Focaccia
Lightly oil your fingertips.
Spread your fingers apart and press them deeply into the dough.
Continue across the entire surface until you have the classic focaccia pattern.
Press deeply enough to create obvious indentations, but avoid tearing completely through the dough.
Some bubbles will naturally shift or deflate during dimpling.
That’s fine.
Why Do You Dimple Focaccia?
The dimples aren’t just decorative.
They help distribute olive oil across and into the surface of the dough.
Those little pockets hold:
- Olive oil
- Rosemary
- Salt
- Any additional toppings
They also create the distinctive irregular surface that gives focaccia its mix of soft and crisp textures.
Step 11: Add Rosemary and Sea Salt
Sprinkle the top evenly with:
- 1 tablespoon chopped fresh rosemary
- 1 teaspoon flaky sea salt
If you’d like an especially rich surface, finish with another small drizzle of olive oil.
Step 12: Bake
Transfer the pan to the preheated 425°F oven.
Bake for approximately 25–30 minutes.
The focaccia should become:
- Puffy
- Deeply golden on top
- Crisp around the edges
- Nicely browned underneath
The exact baking time depends on your oven and pan.
Start checking around 25 minutes.
Step 13: Check the Bottom
Carefully lift an edge with a spatula.
The bottom should look golden and sturdy rather than pale and soft.
If the top is browned but the bottom still looks pale, give it a few additional minutes if necessary.
Step 14: Cool Briefly
Remove the focaccia from the oven.
Let it rest in the pan for approximately 5–10 minutes.
This brief cooling period allows the structure to set while the bread remains warm.
Step 15: Remove from the Pan
Carefully loosen the edges with a thin spatula.
Transfer the focaccia to a cutting board or cooling rack.
Avoid leaving it in the pan for an excessively long time because trapped steam can gradually soften the crisp bottom crust.
Step 16: Slice and Serve
Cut into approximately 12 squares.
Serve warm.
For an extra finish, drizzle the sliced bread with a little good-quality olive oil before serving.