Easy Homemade Greek Pita Bread
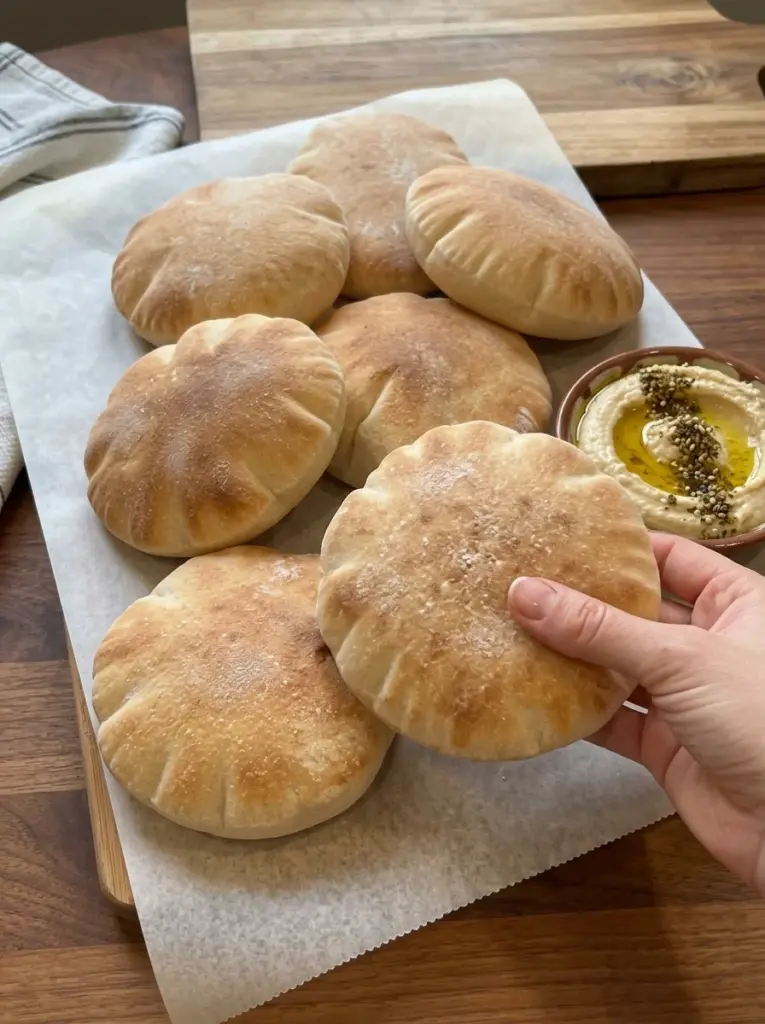
There’s something special about pulling a warm pita straight from a hot skillet. The surface is lightly blistered with golden-brown spots, the center is soft and chewy, and the bread is flexible enough to wrap around all your favorite Mediterranean fillings.
This Easy Homemade Greek Pita Bread gives you that fresh-from-the-kitchen experience with simple pantry ingredients. A little olive oil keeps the dough tender, while Greek yogurt adds moisture and helps create a wonderfully soft texture.
Whether you’re making chicken gyros, serving hummus and tzatziki, or simply tearing off warm pieces to enjoy alongside dinner, these homemade pitas are versatile, satisfying, and surprisingly straightforward to make.
Why You’ll Love This Easy Homemade Greek Pita Bread
Once you make pita bread at home, it’s easy to see why it’s worth the extra effort.
Soft and chewy. The combination of olive oil and Greek yogurt creates tender pita bread that stays flexible instead of becoming dry or brittle.
Beautiful golden spots. Cooking the pita directly in a very hot skillet gives the surface those characteristic toasted patches and lightly charred flavor.
Simple ingredients. Flour, yeast, water, salt, sugar, olive oil, and yogurt are all you need.
No oven required. These pitas cook right on the stovetop in just a few minutes.
Perfect for wraps and dipping. Fill them with grilled chicken or vegetables, fold them around gyro meat, or tear them into pieces for hummus and tzatziki.
Freezer-friendly. Make a batch now and freeze the extras for quick meals later.
What Makes Greek Pita Bread So Good?
Greek-style pita is known for being soft, flexible, and slightly chewy. Instead of relying on a dry dough, this recipe uses olive oil and Greek yogurt to add tenderness and richness.
The dough also gets plenty of time to rise. During this rest, the yeast produces gas that gives the pita its light texture.
The real transformation happens when the rolled dough hits the hot skillet. The heat quickly cooks the exterior while moisture inside the dough turns to steam. Bubbles begin appearing across the surface, and the pita can puff as it cooks.
Covering the freshly cooked pitas with a kitchen towel is another important step. It traps just enough moisture to keep them warm, flexible, and soft while you finish cooking the remaining batch.
Ingredients for Easy Homemade Greek Pita Bread
For the Pita Bread
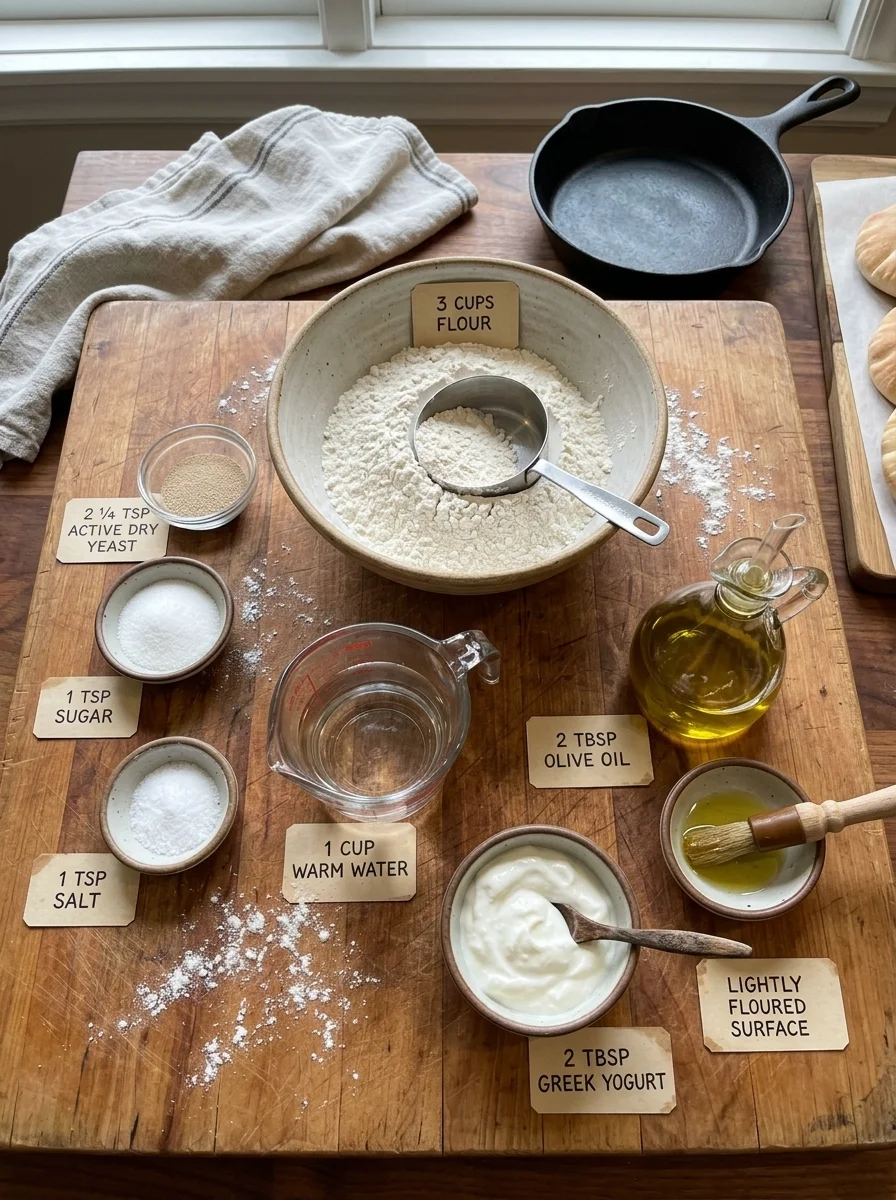
- 3 cups all-purpose flour
- 2 1/4 tsp active dry yeast
- 1 tsp sugar
- 1 tsp salt
- 1 cup warm water
- 2 tbsp olive oil
- 2 tbsp plain Greek yogurt
Ingredient Notes
All-purpose flour: Regular all-purpose flour provides enough structure for pita while still producing a soft, tender texture.
Active dry yeast: Yeast gives the dough its rise and creates the light interior. Letting it sit in warm water with sugar before mixing helps confirm that it is active.
Sugar: Just one teaspoon gives the yeast an easy source of food during activation. The pita itself will not taste noticeably sweet.
Salt: Salt balances the flavor and keeps the bread from tasting bland.
Warm water: The water should feel comfortably warm rather than hot. Excessively hot water can damage the yeast.
Olive oil: Olive oil contributes flavor and keeps the pita tender and flexible.
Greek yogurt: This is a particularly useful addition because it adds moisture and richness, helping create soft pita bread with a pleasant chew.
How to Make Easy Homemade Greek Pita Bread
Step 1: Activate the Yeast
Pour the warm water into a large mixing bowl. Add the active dry yeast and sugar and stir gently.
Let the mixture sit for 5 to 10 minutes, until it becomes slightly foamy on top.
Foaming is a good indication that your yeast is active and ready to use.
Step 2: Mix the Dough
Add the flour, salt, olive oil, and Greek yogurt to the yeast mixture.
Stir everything together until the ingredients begin forming a shaggy dough.
It doesn’t need to look perfectly smooth at this point. Kneading will develop the dough’s structure.
Step 3: Knead Until Smooth
Transfer the dough to a lightly floured work surface.
Knead for approximately 6 to 8 minutes, until the dough becomes smooth, soft, and elastic.
Try not to continuously add flour while kneading. Too much additional flour can make the finished pita dense or dry.
Step 4: Let the Dough Rise
Lightly oil a clean bowl and place the dough inside.
Cover with a clean kitchen towel or plastic wrap and leave it somewhere warm for approximately 60 to 90 minutes, or until doubled in size.
The exact rising time can vary depending on the temperature of your kitchen, so pay attention to the size of the dough rather than relying entirely on the clock.
Step 5: Divide the Dough
Gently punch down the risen dough to release excess gas.
Divide it into 8 approximately equal pieces.
Shape each piece into a smooth ball.
Step 6: Rest the Dough Balls
Cover the dough balls with a clean towel and allow them to rest for 10 to 15 minutes.
This short rest helps relax the gluten, making the dough much easier to roll without constantly springing back.
Step 7: Roll the Pitas
Working with one dough ball at a time, roll it into a round approximately 6 to 7 inches wide and 1/4-inch thick.
Try to maintain an even thickness across the entire pita. Uneven sections may cook at different speeds.
Keep the remaining dough balls covered while you work so their surfaces don’t dry out.
Step 8: Heat the Skillet
Place a large cast-iron skillet or heavy-bottomed pan over medium-high heat.
Allow it to become thoroughly hot before cooking the first pita.
There is no need to add oil to the skillet.
Step 9: Cook the First Side
Carefully place one rolled pita into the hot, dry skillet.
Cook for approximately 1 to 2 minutes.
Small bubbles should begin forming across the surface while the underside develops golden-brown spots.
Step 10: Flip and Finish Cooking
Flip the pita and cook the second side for another 1 to 2 minutes.
The pita may puff significantly as steam develops inside.
Once cooked through with attractive golden spots on both sides, remove it from the skillet.
Step 11: Keep the Pitas Soft
Immediately place the cooked pita beneath a clean kitchen towel.
This is important because the towel traps some of the bread’s natural moisture and prevents it from drying out while the remaining pitas cook.
Repeat the process with all the remaining dough.
Time and Yield
Prep time: 20 minutes
Rise time: 1 hour 15 minutes
Cook time: 15 minutes
Total time: approximately 1 hour 50 minutes
Yield: 8 pita breads
Estimated calories: approximately 190 calories per pita
Tips for the Best Homemade Pita Bread
Make sure your yeast is active. If the yeast mixture shows no activity after 10 minutes, the yeast may be old or the water temperature may have been unsuitable.
Don’t use hot water. Warm water encourages yeast activity, but very hot water can kill the yeast.
Avoid adding too much flour. The dough should be soft. Adding excessive flour while kneading can result in tougher pita.
Give the dough enough time to rise. Look for the dough to approximately double in volume rather than following the clock too strictly.
Don’t skip the second rest. Those 10 to 15 minutes after dividing the dough make rolling much easier.
Roll evenly. Keeping the pita approximately the same thickness from edge to edge encourages even cooking and better puffing.
Preheat the skillet properly. A sufficiently hot cooking surface helps produce bubbles, golden spots, and the characteristic pita texture.
Keep cooked pitas covered. Leaving freshly cooked pita exposed to the air can cause the surface to dry quickly.
Serving Ideas
Fresh pita bread works with far more than just one meal.
Chicken gyros: Wrap warm pita around seasoned chicken, tomatoes, onions, lettuce, and plenty of tzatziki.
Souvlaki: Serve alongside grilled chicken, beef, or vegetable skewers.
Hummus: Tear the pita into pieces and use them to scoop up creamy hummus.
Tzatziki: Warm pita and cool cucumber-garlic yogurt sauce make a simple and delicious pairing.
Falafel wraps: Fill pita with crispy falafel, vegetables, herbs, and your favorite sauce.
Grilled vegetables: Stuff the bread with zucchini, peppers, onions, eggplant, feta, and herbs.
Mediterranean platters: Serve alongside olives, feta cheese, hummus, vegetables, grilled meat, and dips for an easy sharing platter.
Variations and Flavor Ideas
The basic recipe is delicious as written, but you can easily add subtle flavors.
Garlic pita: Brush the warm pita lightly with olive oil mixed with minced or grated garlic.
Herb pita: Sprinkle the cooked pita with oregano, parsley, or another favorite Mediterranean herb.
Sesame pita: Lightly press sesame seeds into the rolled dough before cooking.
Za’atar pita: Brush with a small amount of olive oil after cooking and sprinkle with za’atar.
Extra olive oil pita: Brush each pita lightly with good-quality extra-virgin olive oil immediately after it leaves the skillet.
Keep additional toppings light so the pita remains flexible enough for wrapping and dipping.
Troubleshooting Common Problems
Why didn’t my pita puff?
A pita can fail to puff if the skillet isn’t hot enough, the dough is rolled unevenly, or the dough hasn’t risen sufficiently.
Make sure your skillet is properly preheated before adding the pita.
Also remember that a pita can still taste delicious even if it doesn’t completely balloon during cooking.
Why is my pita tough?
Too much flour or overcooking are common causes.
Keep the dough soft while kneading and remove the pita once it has cooked through and developed golden spots.
Why does the dough keep shrinking when I roll it?
The gluten is probably too tense.
Let the dough ball rest for another 5 to 10 minutes before trying again.
Why is my pita dry?
The pita may have cooked too long or been left uncovered after cooking.
Place each finished pita beneath a clean towel immediately after removing it from the skillet.
Why isn’t my yeast foaming?
Your yeast may be old, or the water may have been too hot or too cold.
If there is no sign of activity after about 10 minutes, using fresh yeast is the safest option.
Storage and Reheating
Homemade pita is at its best when freshly cooked, but it stores very well.
Room temperature: Let the pitas cool completely, then transfer them to an airtight bag or container. Store for up to 2 days.
Refrigerator: Refrigerate in an airtight container for up to 5 days.
Freezer: Place parchment paper between the individual pitas so they don’t freeze together. Store in a freezer-safe bag or container for up to 2 months.
Reheating: Warm the pita briefly in a skillet until soft and heated through. Avoid overheating it, which can make the bread dry.
Frequently Asked Questions
Can I make Greek pita bread without an oven?
Yes. This recipe is designed to cook entirely on the stovetop using a cast-iron skillet or another heavy-bottomed pan.
Do I need to oil the skillet?
No. Heat the skillet dry. The dough already contains olive oil, and a dry hot surface helps create the characteristic golden-brown spots.
How thick should I roll pita bread?
Aim for approximately 1/4 inch thick and about 6 to 7 inches across.
Why do you add Greek yogurt to pita dough?
Greek yogurt adds moisture and richness to the dough, helping the finished pita stay soft and tender.
Can I make the dough ahead of time?
You can prepare the dough ahead when needed, but you’ll want to account for the yeast continuing to ferment during storage. For the simplest results, prepare and cook the pita according to the recipe and refrigerate or freeze the finished breads.
Does pita have to puff completely?
No. Puffing is desirable, but a pita that only develops bubbles instead of completely ballooning can still be soft and delicious.
Can I freeze homemade pita bread?
Absolutely. Cool the pitas completely, separate them with parchment paper, and freeze for up to 2 months.
What’s the best way to reheat pita?
A hot skillet works especially well. Heat each pita briefly on both sides until warm and flexible again.
Can I use pita bread for sandwiches?
Yes. These pitas are excellent folded around gyro meat, grilled chicken, falafel, vegetables, feta, and sauces. You can also use them as a base for Mediterranean-style flatbread sandwiches.
Final Thoughts
Making Easy Homemade Greek Pita Bread is one of those kitchen projects that looks more complicated than it really is. With flour, yeast, water, olive oil, Greek yogurt, and a few basic ingredients, you can make eight warm, soft pitas right on your stovetop.
The hot skillet creates beautiful golden spots, while the olive oil and yogurt help keep the bread tender, chewy, and flexible. Keeping each freshly cooked pita tucked beneath a kitchen towel preserves that wonderful softness until the whole batch is ready.
Serve them warm with chicken gyros, souvlaki, hummus, tzatziki, falafel, feta, grilled vegetables, or your favorite Mediterranean fillings. And if you have extras, store or freeze them so homemade pita is ready whenever you need a quick wrap, sandwich, or dipping bread.
Print
Easy Homemade Greek Pita Bread
Ingredients
For the Pita Bread
- 3 cups all-purpose flour
- 2 1/4 tsp active dry yeast
- 1 tsp sugar
- 1 tsp salt
- 1 cup warm water
- 2 tbsp olive oil
- 2 tbsp plain Greek yogurt
Instructions
Pour the warm water into a large mixing bowl. Add the active dry yeast and sugar and stir gently.
Let the mixture sit for 5 to 10 minutes, until it becomes slightly foamy on top.
Foaming is a good indication that your yeast is active and ready to use.
Step 2: Mix the Dough
Add the flour, salt, olive oil, and Greek yogurt to the yeast mixture.
Stir everything together until the ingredients begin forming a shaggy dough.
It doesn’t need to look perfectly smooth at this point. Kneading will develop the dough’s structure.
Step 3: Knead Until Smooth
Transfer the dough to a lightly floured work surface.
Knead for approximately 6 to 8 minutes, until the dough becomes smooth, soft, and elastic.
Try not to continuously add flour while kneading. Too much additional flour can make the finished pita dense or dry.
Step 4: Let the Dough Rise
Lightly oil a clean bowl and place the dough inside.
Cover with a clean kitchen towel or plastic wrap and leave it somewhere warm for approximately 60 to 90 minutes, or until doubled in size.
The exact rising time can vary depending on the temperature of your kitchen, so pay attention to the size of the dough rather than relying entirely on the clock.
Step 5: Divide the Dough
Gently punch down the risen dough to release excess gas.
Divide it into 8 approximately equal pieces.
Shape each piece into a smooth ball.
Step 6: Rest the Dough Balls
Cover the dough balls with a clean towel and allow them to rest for 10 to 15 minutes.
This short rest helps relax the gluten, making the dough much easier to roll without constantly springing back.
Step 7: Roll the Pitas
Working with one dough ball at a time, roll it into a round approximately 6 to 7 inches wide and 1/4-inch thick.
Try to maintain an even thickness across the entire pita. Uneven sections may cook at different speeds.
Keep the remaining dough balls covered while you work so their surfaces don’t dry out.
Step 8: Heat the Skillet
Place a large cast-iron skillet or heavy-bottomed pan over medium-high heat.
Allow it to become thoroughly hot before cooking the first pita.
There is no need to add oil to the skillet.
Step 9: Cook the First Side
Carefully place one rolled pita into the hot, dry skillet.
Cook for approximately 1 to 2 minutes.
Small bubbles should begin forming across the surface while the underside develops golden-brown spots.
Step 10: Flip and Finish Cooking
Flip the pita and cook the second side for another 1 to 2 minutes.
The pita may puff significantly as steam develops inside.
Once cooked through with attractive golden spots on both sides, remove it from the skillet.
Step 11: Keep the Pitas Soft
Immediately place the cooked pita beneath a clean kitchen towel.
This is important because the towel traps some of the bread’s natural moisture and prevents it from drying out while the remaining pitas cook.
Repeat the process with all the remaining dough.