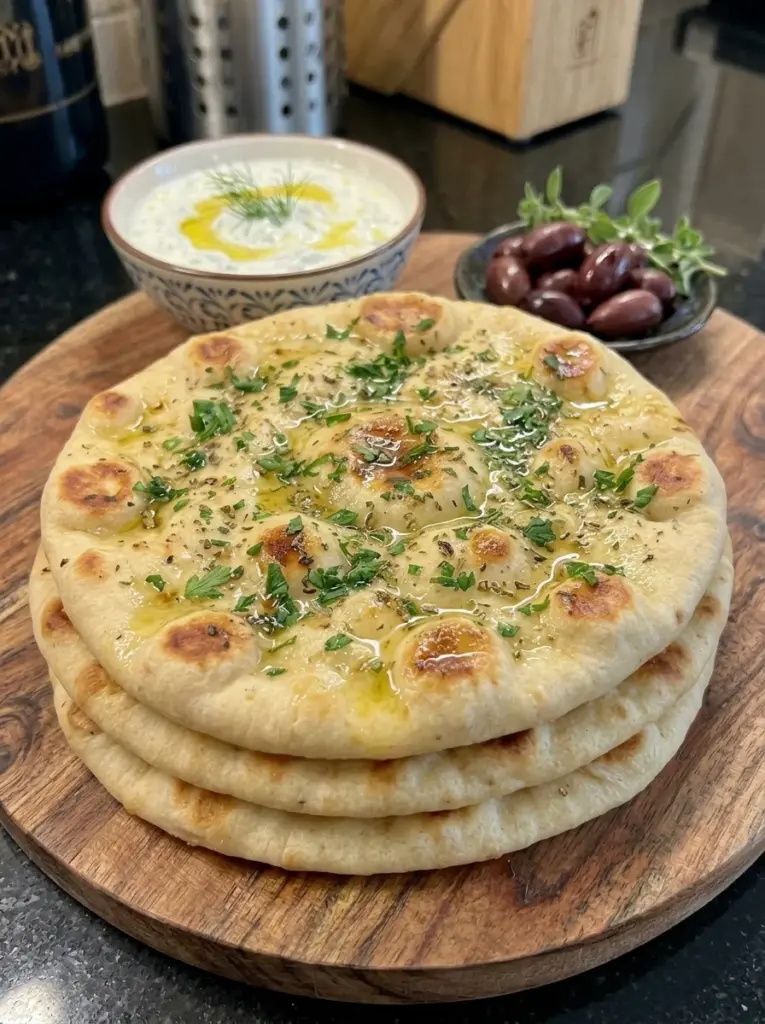
Soft, fluffy, chewy, and beautifully golden, this Easy Homemade Greek Flatbread is the kind of bread that makes almost any Mediterranean-inspired meal better. 🫓🇬🇷🫒
Made from a simple yeast dough flavored with extra-virgin olive oil, oregano, garlic, and fresh parsley, these homemade flatbreads cook quickly in a hot skillet until they develop golden-brown spots, lightly crisp edges, and a soft, flexible center.
There’s no oven required for baking the flatbreads. Once the dough has risen, simply divide it into portions, roll each one into a round, and cook them one at a time in a hot skillet.
Serve them warm alongside tzatziki, hummus, whipped feta, olives, grilled vegetables, souvlaki, or Greek salad, or use them as soft wraps for gyros and Mediterranean sandwiches.
Why You’ll Love This Homemade Greek Flatbread
Soft and flexible. The flatbreads stay tender enough to fold around gyro or souvlaki fillings.
Beautiful skillet char. A hot skillet creates those irresistible golden-brown spots across the surface.
Simple ingredients. Flour, water, yeast, olive oil, and a handful of seasonings create the entire dough.
No oven required for cooking. Once the dough has risen, the flatbreads cook directly on the stovetop.
Ready for wraps. Their soft, chewy texture makes them especially useful for gyros and Mediterranean-style sandwiches.
Flavorful dough. Olive oil, oregano, and garlic give the bread more flavor than a basic plain flatbread.
Freezer-friendly. Make a batch now and freeze extras for quick meals later.
Versatile. Serve them as bread, wraps, dippers, or alongside grilled meats and vegetables.
What Is Greek-Style Flatbread?
Greek-style flatbread is a soft, relatively thick flatbread commonly enjoyed with Mediterranean foods.
Unlike pocket-style pita that is designed to puff dramatically and separate internally, this skillet flatbread is intended to remain soft, chewy, flexible, and easy to fold.
That’s particularly useful when you’re making wraps.
The dough in this recipe contains:
- Yeast for rise and lightness
- Olive oil for tenderness and flavor
- Honey to provide subtle sweetness
- Oregano and garlic for Mediterranean-inspired flavor
After rising, the dough is divided into eight portions and cooked directly against a hot skillet.
The high heat creates browned areas on the outside while keeping the interior soft.
Ingredients for Easy Homemade Greek Flatbread 🫓
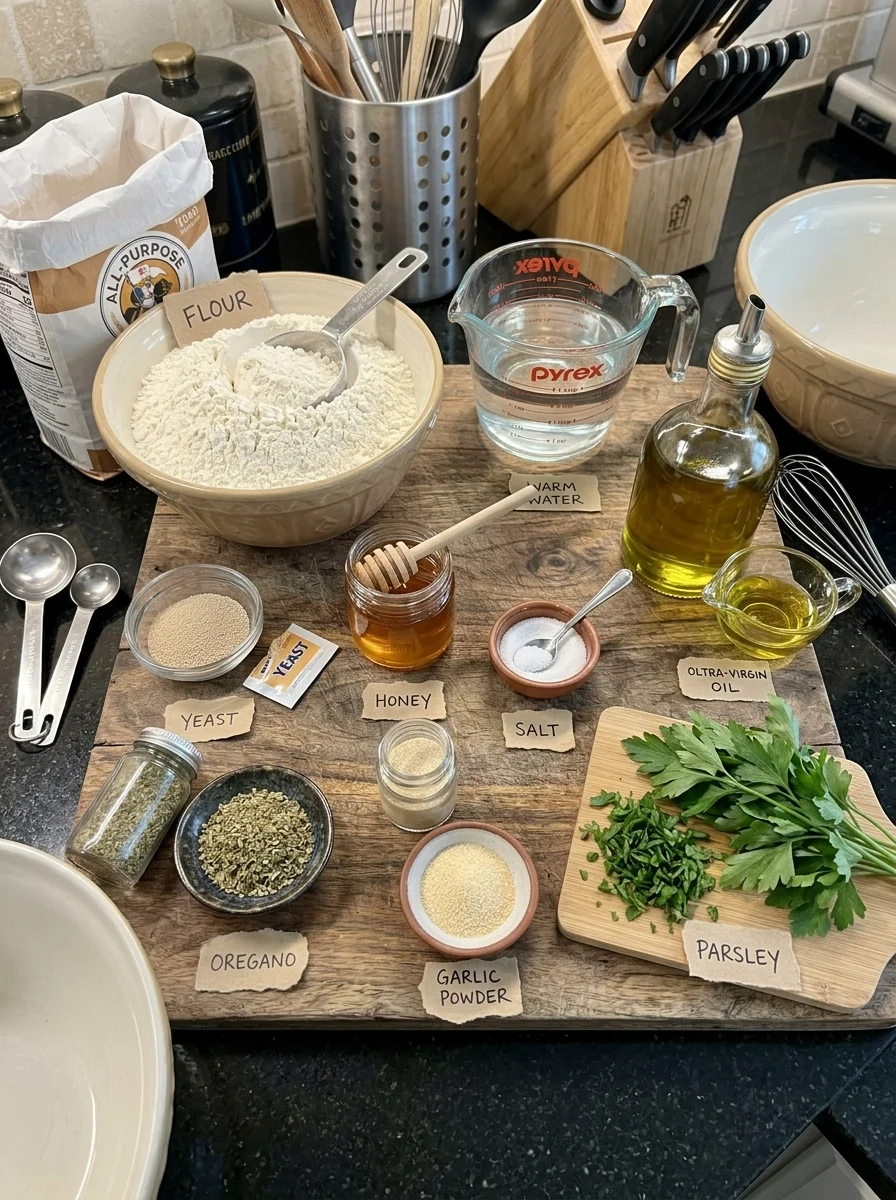
- 3 cups all-purpose flour
- 1 cup warm water, about 105–110°F
- 2 1/4 tsp instant yeast
- 1 tsp honey
- 1 tsp salt
- 2 tbsp extra-virgin olive oil
- 1 tsp dried oregano
- 1/2 tsp garlic powder
- 1 tbsp fresh parsley, finely chopped
- Extra olive oil, for cooking and brushing
Ingredient Notes
All-purpose flour: Provides enough structure to make a chewy but tender flatbread. Keep additional flour nearby for lightly dusting your work surface.
Warm water: Aim for approximately 105–110°F. Warm water helps encourage yeast activity without exposing the yeast to excessive heat.
Instant yeast: Provides the rise that gives these flatbreads their softer, lighter texture.
Honey: Adds a very subtle sweetness to the dough and accompanies the yeast mixture at the beginning of the recipe.
Salt: Essential for balanced flavor.
Extra-virgin olive oil: Adds richness, flavor, and tenderness. Additional olive oil is used for lightly coating the skillet and brushing the cooked breads.
Dried oregano: Gives the dough a Mediterranean-inspired herbal flavor.
Garlic powder: Adds mild garlic flavor throughout the dough without introducing pieces of fresh garlic that could burn during skillet cooking.
Fresh parsley: Sprinkled over the warm flatbreads for fresh herbal flavor and color.
How to Make Easy Homemade Greek Flatbread
Step 1: Prepare the Yeast Mixture 🍞
Pour 1 cup warm water into a large mixing bowl.
The water should be approximately 105–110°F.
Add:
- 1 teaspoon honey
- 2 1/4 teaspoons instant yeast
Stir gently.
Let the mixture stand for approximately 5 minutes.
Because this recipe uses instant yeast, a long activation period isn’t required, but this short rest allows the ingredients to begin hydrating before the flour is added.
Step 2: Add the Dry Ingredients
Add to the bowl:
- 3 cups all-purpose flour
- 1 teaspoon salt
- 1 teaspoon dried oregano
- 1/2 teaspoon garlic powder
Pour in 2 tablespoons extra-virgin olive oil.
Begin stirring everything together.
Step 3: Form the Dough
Continue mixing until a soft dough forms.
The dough should be soft and slightly sticky rather than extremely dry or stiff.
If necessary, use your hands to bring the final pieces together.
Avoid immediately adding large quantities of extra flour simply because the dough feels slightly tacky.
A softer dough helps produce a softer flatbread.
Step 4: Knead Until Smooth
Transfer the dough to a lightly floured work surface.
Knead until the dough becomes smoother and more elastic.
You can also knead it directly in the mixing bowl if you prefer.
The goal is to develop enough structure for the dough to hold its shape while keeping it soft.
If it sticks excessively, dust the work surface with a small amount of additional flour.
Avoid incorporating unnecessary flour, which can make the finished flatbreads tougher.
Step 5: Let the Dough Rise
Place the dough in a lightly oiled bowl.
Turn it once so the surface has a very thin coating of oil.
Cover the bowl with plastic wrap or a clean kitchen towel.
Place it in a warm, draft-free area.
Allow the dough to rise for approximately 60–90 minutes, or until it has doubled in size and looks noticeably puffy.
The exact rise time depends on the temperature of your kitchen.
A warmer environment generally produces a faster rise.
Step 6: Divide the Dough
Transfer the risen dough onto a lightly floured work surface.
Gently press it down to release large pockets of air.
Divide the dough into 8 equal portions.
For especially uniform flatbreads, you can weigh the entire dough and divide its weight by eight.
Step 7: Shape Into Dough Balls
Gently shape each portion into a smooth ball.
Arrange the dough balls on your work surface with a little space between them.
Cover them with a clean kitchen towel.
Step 8: Rest for 10–15 Minutes
Allow the dough balls to rest for approximately 10–15 minutes.
Don’t skip this step.
Resting relaxes the gluten developed during mixing and shaping.
Relaxed dough is much easier to roll without constantly shrinking back.
Step 9: Roll the Flatbreads 🫓
Working with one dough ball at a time, lightly flour your work surface.
Roll each piece into a round approximately:
6–7 inches across and about 1/4 inch thick.
Try to keep the thickness reasonably even from the center to the edges.
The rounds don’t need to be perfectly circular.
Slight irregularity gives homemade flatbread its rustic appearance.
Step 10: Keep the Dough Covered
Place the shaped rounds under a clean kitchen towel while you finish rolling the remaining pieces.
This prevents their surfaces from drying out before cooking.
Avoid stacking uncooked rounds directly on top of one another unless they’re well separated, because they may stick together.
Step 11: Heat the Skillet 🔥
Place a large cast-iron skillet or heavy-bottomed pan over medium-high heat.
Allow it to become thoroughly hot.
Lightly brush the cooking surface with olive oil.
You only need a thin coating rather than a deep layer of oil.
The skillet should be hot enough that the flatbread begins bubbling relatively quickly after it touches the surface.
Step 12: Cook the First Side
Carefully place one flatbread into the hot skillet.
Cook for approximately 1–2 minutes.
You should begin seeing bubbles forming across the upper surface.
Lift an edge carefully and check underneath.
The bottom should have developed attractive golden-brown spots.
Step 13: Flip
Flip the flatbread.
Cook the second side for another 1–2 minutes.
The bread should become cooked through while remaining soft and flexible.
Some darker toasted areas are desirable, but avoid allowing the surface to burn.
Step 14: Adjust the Heat as Needed
Continue cooking the remaining flatbreads one at a time.
The skillet may become increasingly hot as you work.
If the bread begins burning before the interior has enough time to cook, reduce the heat slightly.
If you’re not getting browned spots after two minutes, increase the heat slightly.
Finding the correct skillet temperature is one of the keys to great homemade flatbread.
Step 15: Brush with Olive Oil 🫒
As soon as each flatbread leaves the skillet, lightly brush the surface with extra-virgin olive oil.
Sprinkle with:
- Finely chopped fresh parsley
- A little additional oregano, if desired
The warm bread absorbs some of the olive oil and herbal flavor.
Step 16: Stack and Cover
Stack the finished flatbreads on a plate.
Cover them immediately with a clean kitchen towel.
This is an important technique for maintaining softness.
Steam released from the warm breads becomes trapped inside the stack, helping keep the flatbreads tender and flexible instead of dry and crisp.
Step 17: Serve Warm 🇬🇷
Serve the flatbreads while they’re still warm.
They are especially delicious with:
- Tzatziki
- Hummus
- Whipped feta
- Olives
- Souvlaki
- Grilled chicken
- Grilled vegetables
- Greek salad
- Gyro fillings
Or simply tear them into pieces and dip them into olive oil, hummus, or your favorite Mediterranean dip.
Time and Yield
Prep time: 20 minutes
Rise time: 60–90 minutes
Dough-ball rest: 10–15 minutes
Cook time: approximately 15 minutes
Total time: approximately 1 hour 50 minutes
Yield: 8 flatbreads
Serving size: 1 flatbread
Estimated calories: approximately 195 calories per flatbread
Exact nutrition will vary depending on the flour and amount of olive oil used during cooking and brushing.
What Texture Should Greek Flatbread Have?
The ideal flatbread should combine several textures.
The exterior should have golden-brown skillet spots with lightly crisp areas around the edges.
Inside, however, the bread should remain:
- Soft
- Tender
- Chewy
- Flexible
- Easy to fold
You don’t want the entire flatbread to become crisp like a cracker.
That would make it difficult to wrap around gyro or souvlaki fillings.
The combination of a soft yeast dough, olive oil, hot skillet, and covered stacking method helps create the desired texture.
Tips for the Best Homemade Greek Flatbread
Check the water temperature. Aim for approximately 105–110°F.
Keep the dough soft. A slightly sticky dough is preferable to an overly dry dough.
Don’t add too much extra flour. Excess flour can create tougher flatbread.
Give the dough enough time to rise. Look for the dough to double and become noticeably puffy rather than watching the clock alone.
Rest the divided dough. This makes rolling much easier.
Roll evenly. Uneven flatbread can develop burnt thin spots while thicker areas remain undercooked.
Preheat the skillet properly. A lukewarm skillet won’t produce the same bubbling and browning.
Use only a light coating of oil. You’re skillet-cooking the bread rather than deep-frying it.
Watch the heat between batches. Cast iron holds heat exceptionally well, so you may need to lower the burner slightly after the first few flatbreads.
Cover cooked flatbreads immediately. This traps steam and helps maintain flexibility.
Serve them warm. Freshly cooked flatbread has its best flavor and texture while still warm.
Why Does the Dough Need to Rise?
Yeast fermentation creates gas inside the dough.
As the dough rests, those gas bubbles expand and make it noticeably puffier.
This contributes to a flatbread that’s lighter and softer rather than dense and heavy.
The rise also gives the dough time to develop flavor.
Don’t rely entirely on a specific number of minutes.
A dough rising in a warm kitchen might be ready closer to 60 minutes, while dough in a cooler environment may require the full 90 minutes or slightly longer.
The visual cue is more important:
Look for approximately doubled volume and a noticeably airy, puffy appearance.
Why Rest the Dough After Dividing?
After the risen dough is divided and shaped into balls, the gluten can become tense again.
If you immediately try to roll those balls into flatbreads, they may continually spring back toward their original shape.
A 10–15-minute covered rest allows the gluten to relax.
After resting, the dough should roll much more easily into 6–7-inch rounds.
If a particular piece still keeps shrinking back, set it aside for another few minutes and work on a different piece.
How Hot Should the Skillet Be?
The skillet needs to be properly preheated before the first flatbread goes in.
Medium-high heat is a good starting point.
When the dough touches the skillet, it should begin developing bubbles relatively quickly.
After approximately one or two minutes, the underside should have visible golden-brown areas.
If the flatbread remains pale after two minutes, your skillet may not be hot enough.
If dark spots develop almost immediately while the rest of the dough remains raw, the skillet is too hot.
Adjust the burner throughout cooking rather than assuming one exact setting will work for every stove.
Why Stack Flatbreads Under a Towel?
Fresh flatbread loses moisture as it sits uncovered.
That moisture loss can make the bread firmer and less flexible.
Stacking the freshly cooked breads and covering them with a clean towel traps some of the steam naturally released from the hot dough.
This helps keep them:
- Soft
- Warm
- Flexible
- Easy to fold
It’s especially useful if you’re preparing all eight flatbreads before sitting down to eat.
By the time the final one is cooked, the earlier flatbreads should still be soft inside the covered stack.
Serving Ideas 🫓
Chicken Gyros
Fill a warm flatbread with grilled or seasoned chicken, tomato, onion, lettuce, and tzatziki.
Souvlaki
Wrap the bread around grilled chicken or pork souvlaki with vegetables and sauce.
Hummus Platter
Cut the flatbread into wedges and serve with hummus, olives, cucumber, tomatoes, and feta.
Tzatziki Dip
Serve freshly cooked flatbread alongside a bowl of cold tzatziki.
Whipped Feta
Warm bread and creamy whipped feta make a simple appetizer or snack.
Greek Salad
Serve flatbread alongside tomato, cucumber, red onion, olives, and feta.
Grilled Vegetables
Fill the bread with grilled zucchini, peppers, onions, eggplant, and your favorite Mediterranean sauce.
Mediterranean Sandwiches
Use the bread as a flexible wrap for chicken, turkey, vegetables, cheese, hummus, or other sandwich fillings.
Breakfast Flatbread
Fill with scrambled eggs, feta, tomatoes, and herbs for a Mediterranean-inspired breakfast.
Easy Greek Flatbread Variations
Garlic Herb Flatbread 🧄
Increase the garlic flavor and brush the warm breads with olive oil mixed with garlic and herbs.
Extra-Oregano Flatbread 🌿
Sprinkle additional dried oregano over each bread immediately after cooking.
Parsley Garlic Flatbread
Combine chopped parsley with olive oil and garlic, then brush it over the hot flatbreads.
Sesame Flatbread
Add sesame seeds to the surface before cooking.
Za’atar Flatbread
Sprinkle za’atar over the olive-oil-brushed bread for a Mediterranean and Middle Eastern-inspired variation.
Chili Flatbread 🌶️
Add crushed red pepper flakes to the finishing olive oil for a spicy version.
Feta Flatbread
Serve the freshly cooked bread topped with crumbled feta, olive oil, oregano, and black pepper.
How to Use Flatbread for Gyros
If you’re specifically making these for gyros, avoid rolling them excessively thin.
A slightly thicker flatbread stays softer and is less likely to crack when folded around the filling.
Cook until browned and cooked through, but don’t continue cooking until the entire surface becomes crisp.
Once cooked, stack and cover the breads immediately.
When ready to assemble, place your fillings down the center.
Good options include:
- Grilled chicken
- Gyro-style meat
- Tomato
- Red onion
- Cucumber
- Lettuce
- Tzatziki
- Feta
- Fresh herbs
Fold the sides inward and serve while the flatbread is still warm and flexible.
Make-Ahead Instructions
You can prepare the flatbreads earlier in the day and reheat them shortly before serving.
Cook according to the recipe and allow them to cool.
Once cool, place them in an airtight bag or container.
When you’re ready to serve, briefly warm each flatbread in a skillet.
Another option is to prepare the dough ahead and refrigerate it after the initial preparation, allowing more time for flavor development.
If working with refrigerated dough, allow it enough time to become workable before shaping and cooking.
Troubleshooting Common Problems
Why is my flatbread tough?
The dough may contain too much flour, or the bread may have been cooked too long.
Keep the dough soft and slightly sticky, and cook only until the flatbread is browned and cooked through.
Why is my dough extremely sticky?
Some stickiness is normal.
Humidity and differences between flour brands can affect dough consistency.
Lightly flour your hands and work surface rather than immediately adding a large amount of extra flour.
Why does the dough keep shrinking when I roll it?
The gluten needs more time to relax.
Cover the dough and let it rest for another 5–10 minutes before rolling again.
Why isn’t my flatbread bubbling?
The skillet may not be hot enough.
Give it additional preheating time and try again.
Why does my flatbread burn before cooking through?
The skillet is too hot or the flatbread is too thick.
Reduce the heat slightly and make sure the dough is rolled to approximately 1/4 inch thick.
Why is my flatbread dry?
Overcooking and leaving freshly cooked bread uncovered can both cause dryness.
Cook only until done and immediately place each finished flatbread under a clean towel.
Why didn’t my dough rise?
The environment may have been too cool, the yeast may have been old, or the water temperature may have been unsuitable.
Give the dough more time if your kitchen is cool.
Why are my flatbreads crispy instead of soft?
They may have cooked too long or remained uncovered after cooking.
Stacking and covering them while hot traps steam and restores softness.
Why aren’t my flatbreads perfectly round?
That’s completely fine.
Homemade flatbreads don’t need to be perfectly circular to cook or taste good.
Focus more on creating an even thickness.
How to Reheat Greek Flatbread
Skillet Method
Place the flatbread in a dry skillet over medium heat.
Warm for approximately 20–30 seconds per side.
This is one of the best methods because it restores warmth without making the bread excessively soft.
Microwave Method
Place a flatbread on a microwave-safe plate.
Cover it with a slightly damp paper towel.
Microwave briefly until warm and flexible.
Avoid overheating because prolonged microwaving can eventually make bread chewy or tough.
Reheating Several Flatbreads
Stack several flatbreads, wrap them loosely, and warm them together.
Keep them covered until serving so they retain their softness.
Storage Information 🥡
Allow the cooked flatbreads to cool completely before storing.
Place them in an airtight container or zip-top bag.
Store at room temperature for up to 3 days.
Keep the bag tightly sealed to prevent moisture loss.
For the best texture, briefly reheat the flatbread before serving.
Freezer Instructions ❄️
These Greek flatbreads freeze very well.
Allow them to cool completely first.
Place a piece of parchment paper between each flatbread.
Stack them inside a freezer-safe bag or airtight container.
Remove as much excess air as practical and seal securely.
Freeze for up to 3 months.
The parchment prevents the breads from freezing together, allowing you to remove only as many as you need.
Thaw at room temperature or warm individual flatbreads directly from frozen in a skillet until soft and heated through.
Frequently Asked Questions
Is Greek flatbread the same as pita bread?
They can be similar, but this recipe is designed as a soft, skillet-cooked flatbread rather than a dramatically puffed pocket pita.
Can I use this flatbread for gyros?
Yes. Its soft, flexible texture makes it particularly well suited to gyro-style wraps.
Can I use it for souvlaki?
Absolutely. Fill warm flatbread with grilled souvlaki, vegetables, tzatziki, and your preferred toppings.
Do I need an oven?
No. These flatbreads are cooked directly in a hot skillet.
What skillet works best?
A cast-iron skillet or another heavy-bottomed pan works particularly well because it retains heat and encourages attractive browning.
Can I make the dough without oregano?
Yes. The oregano adds Mediterranean-inspired flavor but can be omitted if you prefer a more neutral flatbread.
Can I leave out the garlic powder?
Yes. It can be omitted without affecting the basic dough structure.
Why should I cover the cooked flatbreads?
Covering them traps steam and helps maintain their soft, flexible texture.
Can I make them ahead?
Yes. Cook them ahead, store them properly, and briefly reheat before serving.
Can I freeze Greek flatbread?
Yes. Freeze with parchment between each piece for up to 3 months.
How thick should I roll them?
Approximately 1/4 inch thick works well for a soft, substantial flatbread.
How large should each flatbread be?
Approximately 6–7 inches in diameter.
How long should each flatbread cook?
Usually about 1–2 minutes per side, depending on the heat of your skillet and the thickness of the dough.
Why is resting the dough important?
The first rise allows the yeast to create a softer, airier dough. The shorter rest after dividing relaxes the gluten and makes the individual pieces easier to roll.
What’s the best way to reheat them?
A skillet for approximately 20–30 seconds per side is an excellent method for restoring warmth and flexibility.
Final Thoughts
This Easy Homemade Greek Flatbread transforms a handful of simple pantry ingredients into soft, chewy, golden skillet breads that are incredibly versatile. 🫓🇬🇷🫒
The yeast gives the dough its soft, puffy structure, while extra-virgin olive oil, oregano, and garlic provide plenty of Mediterranean-inspired flavor.
Cooking each round in a hot skillet creates those beautiful toasted spots and lightly crisp edges, while stacking the finished flatbreads under a towel keeps their centers soft and flexible.
Serve them alongside tzatziki, hummus, whipped feta, olives, Greek salad, grilled chicken, vegetables, or souvlaki, or fold them around your favorite gyro and Mediterranean sandwich fillings.
And because the flatbreads can be stored for several days or frozen for up to three months, they’re an excellent recipe to make in batches and keep ready for easy homemade meals.
Print
Easy Homemade Greek Flatbread
Ingredients
- 3 cups all-purpose flour
- 1 cup warm water, about 105–110°F
- 2 1/4 tsp instant yeast
- 1 tsp honey
- 1 tsp salt
- 2 tbsp extra-virgin olive oil
- 1 tsp dried oregano
- 1/2 tsp garlic powder
- 1 tbsp fresh parsley, finely chopped
- Extra olive oil, for cooking and brushing
Instructions
Step 1: Prepare the Yeast Mixture 🍞
Pour 1 cup warm water into a large mixing bowl.
The water should be approximately 105–110°F.
Add:
- 1 teaspoon honey
- 2 1/4 teaspoons instant yeast
Stir gently.
Let the mixture stand for approximately 5 minutes.
Because this recipe uses instant yeast, a long activation period isn’t required, but this short rest allows the ingredients to begin hydrating before the flour is added.
Step 2: Add the Dry Ingredients
Add to the bowl:
- 3 cups all-purpose flour
- 1 teaspoon salt
- 1 teaspoon dried oregano
- 1/2 teaspoon garlic powder
Pour in 2 tablespoons extra-virgin olive oil.
Begin stirring everything together.
Step 3: Form the Dough
Continue mixing until a soft dough forms.
The dough should be soft and slightly sticky rather than extremely dry or stiff.
If necessary, use your hands to bring the final pieces together.
Avoid immediately adding large quantities of extra flour simply because the dough feels slightly tacky.
A softer dough helps produce a softer flatbread.
Step 4: Knead Until Smooth
Transfer the dough to a lightly floured work surface.
Knead until the dough becomes smoother and more elastic.
You can also knead it directly in the mixing bowl if you prefer.
The goal is to develop enough structure for the dough to hold its shape while keeping it soft.
If it sticks excessively, dust the work surface with a small amount of additional flour.
Avoid incorporating unnecessary flour, which can make the finished flatbreads tougher.
Step 5: Let the Dough Rise
Place the dough in a lightly oiled bowl.
Turn it once so the surface has a very thin coating of oil.
Cover the bowl with plastic wrap or a clean kitchen towel.
Place it in a warm, draft-free area.
Allow the dough to rise for approximately 60–90 minutes, or until it has doubled in size and looks noticeably puffy.
The exact rise time depends on the temperature of your kitchen.
A warmer environment generally produces a faster rise.
Step 6: Divide the Dough
Transfer the risen dough onto a lightly floured work surface.
Gently press it down to release large pockets of air.
Divide the dough into 8 equal portions.
For especially uniform flatbreads, you can weigh the entire dough and divide its weight by eight.
Step 7: Shape Into Dough Balls
Gently shape each portion into a smooth ball.
Arrange the dough balls on your work surface with a little space between them.
Cover them with a clean kitchen towel.
Step 8: Rest for 10–15 Minutes
Allow the dough balls to rest for approximately 10–15 minutes.
Don’t skip this step.
Resting relaxes the gluten developed during mixing and shaping.
Relaxed dough is much easier to roll without constantly shrinking back.
Step 9: Roll the Flatbreads 🫓
Working with one dough ball at a time, lightly flour your work surface.
Roll each piece into a round approximately:
6–7 inches across and about 1/4 inch thick.
Try to keep the thickness reasonably even from the center to the edges.
The rounds don’t need to be perfectly circular.
Slight irregularity gives homemade flatbread its rustic appearance.
Step 10: Keep the Dough Covered
Place the shaped rounds under a clean kitchen towel while you finish rolling the remaining pieces.
This prevents their surfaces from drying out before cooking.
Avoid stacking uncooked rounds directly on top of one another unless they’re well separated, because they may stick together.
Step 11: Heat the Skillet 🔥
Place a large cast-iron skillet or heavy-bottomed pan over medium-high heat.
Allow it to become thoroughly hot.
Lightly brush the cooking surface with olive oil.
You only need a thin coating rather than a deep layer of oil.
The skillet should be hot enough that the flatbread begins bubbling relatively quickly after it touches the surface.
Step 12: Cook the First Side
Carefully place one flatbread into the hot skillet.
Cook for approximately 1–2 minutes.
You should begin seeing bubbles forming across the upper surface.
Lift an edge carefully and check underneath.
The bottom should have developed attractive golden-brown spots.
Step 13: Flip
Flip the flatbread.
Cook the second side for another 1–2 minutes.
The bread should become cooked through while remaining soft and flexible.
Some darker toasted areas are desirable, but avoid allowing the surface to burn.
Step 14: Adjust the Heat as Needed
Continue cooking the remaining flatbreads one at a time.
The skillet may become increasingly hot as you work.
If the bread begins burning before the interior has enough time to cook, reduce the heat slightly.
If you’re not getting browned spots after two minutes, increase the heat slightly.
Finding the correct skillet temperature is one of the keys to great homemade flatbread.
Step 15: Brush with Olive Oil 🫒
As soon as each flatbread leaves the skillet, lightly brush the surface with extra-virgin olive oil.
Sprinkle with:
- Finely chopped fresh parsley
- A little additional oregano, if desired
The warm bread absorbs some of the olive oil and herbal flavor.
Step 16: Stack and Cover
Stack the finished flatbreads on a plate.
Cover them immediately with a clean kitchen towel.
This is an important technique for maintaining softness.
Steam released from the warm breads becomes trapped inside the stack, helping keep the flatbreads tender and flexible instead of dry and crisp.
Step 17: Serve Warm 🇬🇷
Serve the flatbreads while they’re still warm.
They are especially delicious with:
- Tzatziki
- Hummus
- Whipped feta
- Olives
- Souvlaki
- Grilled chicken
- Grilled vegetables
- Greek salad
- Gyro fillings
Or simply tear them into pieces and dip them into olive oil, hummus, or your favorite Mediterranean dip.