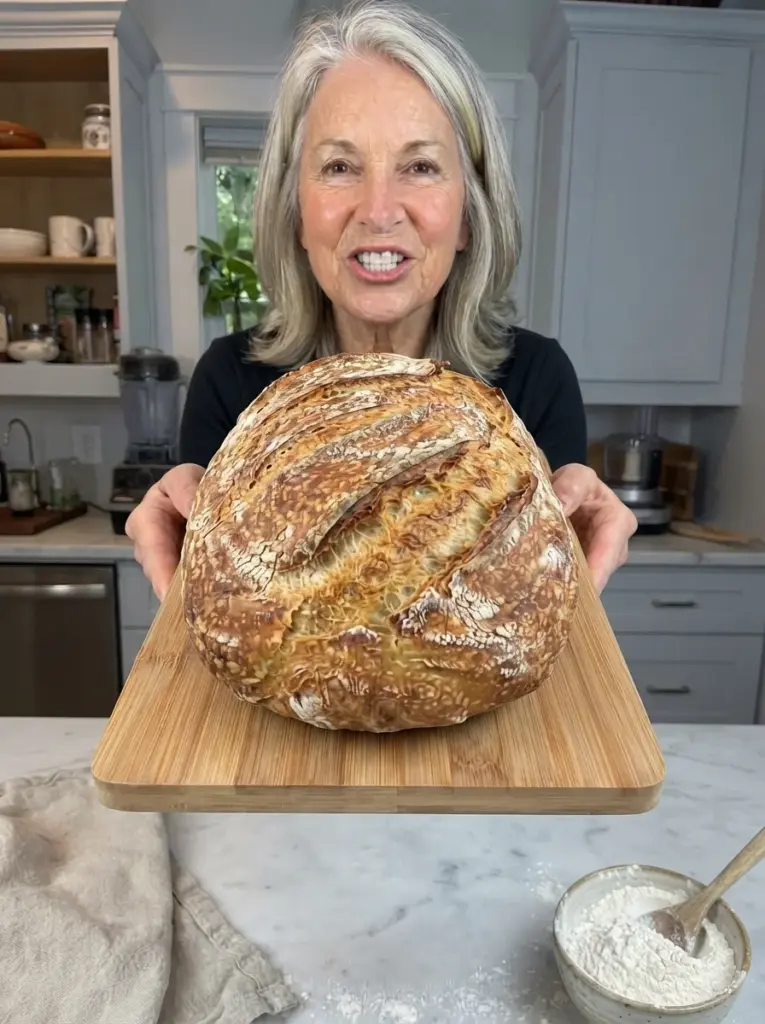
Delicious Crunch Bread is a rustic white loaf with a well-browned crust and a soft, chewy center. Slice it for toast, tear pieces to serve with soup, or use thick slices for open-faced sandwiches. Its simple flavor makes the contrast between the crunchy exterior and tender crumb the main attraction.
This version uses a no-knead dough and a covered Dutch oven. Mix in the evening, let the dough ferment overnight in a cool kitchen, then shape and bake the next day. The covered pot holds moisture around the loaf during the first part of baking, while the uncovered finish develops color and crust.
“Crunch bread” is interpreted here as a crusty rustic loaf, rather than a sweet crunch-topped bread or Dutch crunch loaf with a rice-flour topping. This suggested formula has not been kitchen-tested. Follow the dough and baking cues alongside the approximate schedule.
Recipe at a Glance
- Yield: 1 medium round loaf, approximately 10–12 slices
- Active preparation: Approximately 15 minutes
- First rise: Approximately 12–16 hours at a cool room temperature around 68–72°F
- Final rise: Approximately 45–75 minutes
- Baking: Approximately 40–50 minutes
- Cooling: At least 1½ hours
- Total: Approximately 15–20 hours, including overnight fermentation and cooling
- Oven: 450°F
- Cookware: A suitable 4–6-quart Dutch oven with lid
The final rise and oven preheating overlap. Warm rooms shorten fermentation; cold rooms can extend it. “Overnight” is a planning guide, not a reason to ignore dough that is ready early.
Why You’ll Love This Bread
- Four ingredients: Flour, yeast, salt, and water.
- No mixer: A bowl and sturdy spoon handle the initial mixing.
- Hands-off fermentation: Most of the time is resting rather than active work.
- A crisp exterior: Covered baking followed by an uncovered finish develops the crust.
- Useful leftovers: Toast slices or freeze portions for another meal.
What Creates the Crunch?
The dough contains no milk, butter, or oil, so it is a lean bread rather than a soft enriched loaf. During baking, the surface dries and browns into a firm crust.
The covered pot delays drying during the early expansion stage. Removing the lid then lets the crust finish coloring. Cooling on a rack allows steam to escape instead of collecting beneath the loaf.
Fresh crust naturally softens as moisture moves outward from the crumb, especially when the bread is wrapped. That does not mean the recipe failed. Brief oven refreshing can restore some crispness the next day.
Ingredients
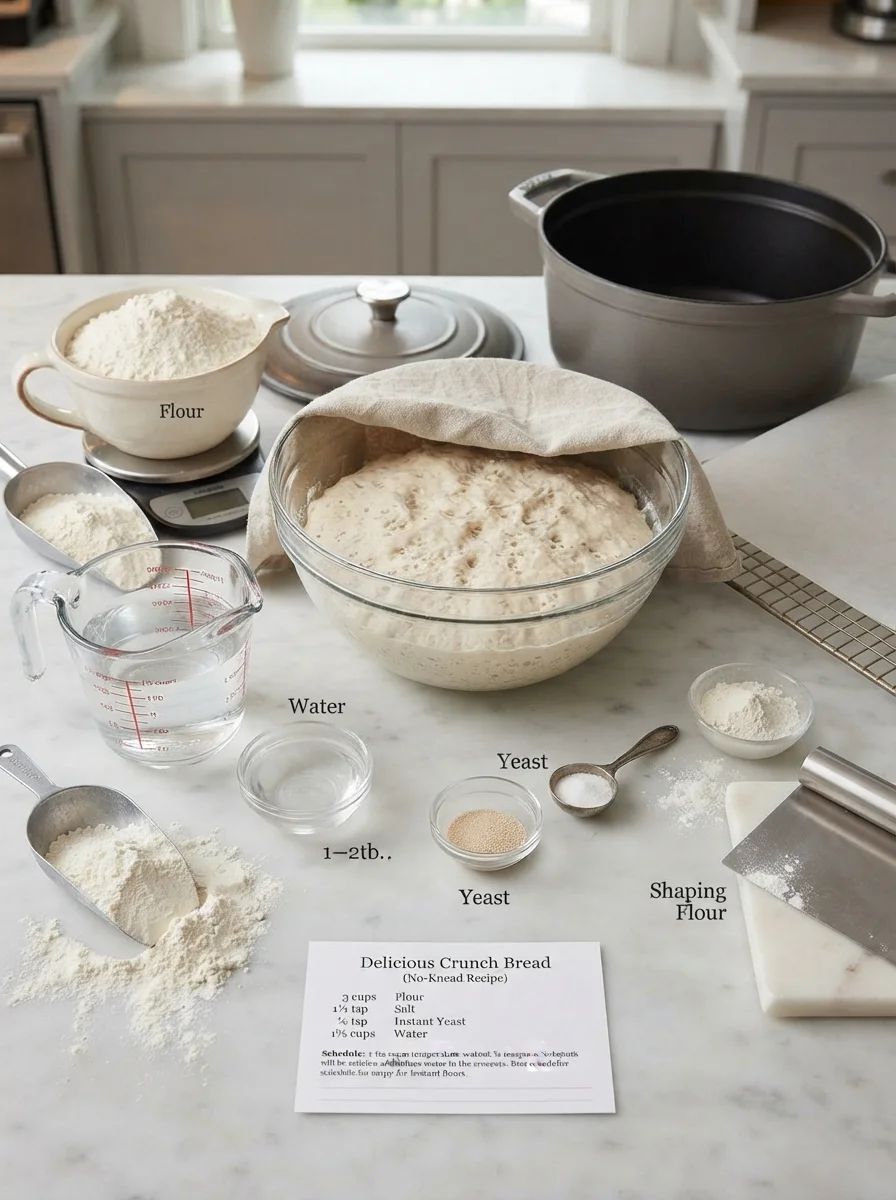
- 3 cups all-purpose flour, spooned and leveled, plus a little for shaping
- 1¼ teaspoons fine salt
- ¼ teaspoon instant yeast
- 1⅓ cups room-temperature water
- 1–2 tablespoons additional water, only if needed
No sugar or oil is required. Butter, dipping oil, seeds, or other toppings are optional additions outside the basic formula.
Ingredient Notes
Flour
Use all-purpose flour for a tender rustic loaf. Bread flour can give more chew, but absorption varies by product.
Fluff the flour, spoon into the measuring cup, and level. Scooping directly from a packed bag can add enough extra flour to make the dough stiff.
Self-rising flour contains added leavening and salt and is not suitable for the listed method. Whole wheat flour and gluten-free blends need their own adjusted formulas.
Yeast
Measure the small amount carefully. A long rest gives a little yeast time to work; a whole packet would change the schedule substantially.
Instant yeast can be mixed with the dry ingredients. For active dry yeast, follow its hydration directions using some of the measured water, and expect timing to vary.
Water
Use room-temperature water rather than hot water. Warm water speeds fermentation and is unnecessary for this overnight approach.
Start with the listed 1⅓ cups. If the flour seems dry, rest briefly before adding more. A tablespoon can make a noticeable difference in a small dough.
Salt
Fine salt distributes readily. Coarse salt products differ by volume, so a teaspoon of every variety does not season identically.
Salt contributes flavor and affects dough behavior. Keep the listed amount for the starting formula rather than omitting it casually.
Equipment and Cookware
Use a large bowl, cover, spoon, spatula or bench scraper, suitable parchment, and a Dutch oven rated for 450°F.
Check the cookware manufacturer’s instructions before heating an empty pot. Some cookware does not permit dry preheating, and some lid knobs have lower temperature limits. Only use the method below with equipment that allows it.
Check parchment temperature guidance too. Keep excess paper away from heating elements and oven walls. A wire rack and serrated knife are useful after baking.
An Example Schedule
| Stage | Example timing |
|---|---|
| Mix | Early evening |
| Check the first rise | The next morning, earlier if the room is warm |
| Shape and proof | Approximately 45–75 minutes |
| Preheat oven and suitable pot | During the latter part of proofing |
| Bake | Approximately 40–50 minutes |
| Cool | At least 1½ hours before slicing |
Plan around dough readiness rather than assuming a fixed breakfast-time bake. The loaf also needs cooling time before clean slicing.
How to Make Delicious Crunch Bread
1. Mix the Dry Ingredients
Stir flour, salt, and instant yeast together in a roomy bowl. Distribute the small yeast quantity throughout the flour.
Leave enough space for the dough to expand without reaching the cover.
2. Add Water
Pour in the measured water and stir firmly until no dry flour remains. Scrape the bowl bottom and sides.
The dough should be sticky, shaggy, and cohesive rather than smooth. It should not pour like thin batter.
If dry flour remains, cover and rest for about 10 minutes before reassessing. Add extra water a tablespoon at a time only if necessary. Do not add large amounts of flour simply to make handling easy.
3. Cover and Ferment
Cover to prevent a dry surface. Leave at a cool room temperature, approximately 68–72°F, for around 12–16 hours.
Ready dough is noticeably expanded, bubbly on top, and soft enough to wobble when the bowl moves. It may show strands when an edge is lifted.
Check earlier in a warm kitchen. Do not wait deliberately for a sunken surface, very strong alcoholic smell, or collapsed dough. Those can indicate fermentation has gone beyond the intended stage.
4. Shape Gently
Lightly flour the counter and your hands. Scrape out the dough without aggressively pulling or tearing it.
Fold the edges toward the middle a few times, then gently tuck into a round. Use a scraper to manage stickiness. This is brief shaping, not extended kneading.
Preserve some air while creating a coherent shape. Avoid coating the dough in excessive flour.
5. Give the Final Rise
Place seam-side down on parchment rated for the baking temperature. Support it in a bowl or shallow basket and cover loosely.
Let rise for approximately 45–75 minutes until puffy. A light fingertip indentation should return slowly. If it springs back quickly, it may need more time. If fragile and sinking, bake promptly.
6. Preheat
Heat the oven to 450°F. If the pot permits empty preheating, place it inside with its lid and allow approximately 30 minutes once the oven is hot.
Use substantial dry oven mitts and a stable heatproof surface. The lid and handle remain hot even after being set aside.
7. Score and Load
Just before baking, make a shallow slash across the top using a sharp blade. Work carefully without pressing the loaf flat.
Remove the hot pot and lid. Lift the dough by the parchment and lower it gently inside. Replace the lid and return to the oven.
8. Bake Covered
Bake for approximately 25–30 minutes with the lid on. Avoid opening repeatedly during this expansion stage.
9. Brown Uncovered
Remove the lid carefully, keeping clear of escaping steam. Continue baking for approximately 15–20 minutes until the loaf is well browned and firm at the sides.
A central temperature around 205–210°F is a useful guide for this lean loaf, alongside crust color and structure. Allow more time if the center needs it rather than relying on the hollow sound alone.
10. Cool on a Rack
Remove from the pot and set on a rack, taking away the parchment if practical. Cool for at least 1½ hours, until the middle is no longer warm.
Do not wrap while warm. Trapped steam softens the crust and can dampen the base. Cutting early also compresses the crumb and can create a gummy impression.
Tips for a Crisp Crust and Tender Center
Give the dough enough time. Underfermented dough is less likely to expand well.
Avoid excess shaping flour. Too much creates a dry, heavy loaf.
Bake to a real finish. A pale crust is usually softer and less developed.
Use the rack. Cooling inside the pot traps moisture underneath.
Leave butter off the crust. A butter brush deliberately softens it; serve butter separately if crunch is your priority.
Expect normal softening. A wrapped loaf will not retain its first-hour texture indefinitely.
Troubleshooting
| Problem | Possible cause | What to try |
|---|---|---|
| Little expansion overnight | Cool room, stiff dough, or weak yeast | Allow more time if activity is visible; check yeast and measurement. |
| Dough collapses | Too much time or warmth | Check earlier next batch and shape when expanded, before collapse. |
| Dough is hard to handle | Normal stickiness or too much liquid | Use a scraper and light flour; control water adjustments. |
| Flat loaf | Weak shaping, slack dough, or overproofing | Fold gently and support during the final rise. |
| Gummy center | Underbaking or slicing hot | Check the center and cool fully. |
| Crust softens | Moisture redistribution or airtight storage | Refresh in the oven before serving. |
| Bottom darkens excessively | Pot material or oven heat pattern | Review rack placement and cookware; do not stop baking with a raw center. |
Variations
Rosemary Bread
Mix 1–2 teaspoons finely chopped fresh rosemary into the dry ingredients for a savory aroma.
Seeded Surface
Lightly dampen the shaped surface and add a small amount of sesame or poppy seeds before baking.
Olive Bread
A small quantity of well-drained chopped olives can be folded in during shaping. Olives add salt and moisture, so try the plain loaf first and keep additions modest.
Serving Flavors
Leave the dough unchanged and serve with garlic butter, herb oil, jam, or cheese. This changes the meal without complicating fermentation.
These variations are suggestions and have not been separately tested.
Serving Suggestions
Serve wedges alongside tomato soup, lentil stew, or roasted vegetables. Toasted slices work for bruschetta or open-faced sandwiches.
For a sandwich, cool fully and cut with a serrated knife. The rustic crust is firmer than a soft sandwich loaf, so choose a slice thickness that is comfortable to eat.
Slightly stale bread can become breadcrumbs, croutons, or bread salad. Freeze portions while fresh if you will not use the whole loaf soon.
Storage and Refreshing
Room Temperature
Store the cooled plain loaf for approximately 2 days in a cool, dry kitchen. A paper bag allows airflow but the bread dries faster; airtight wrapping keeps the center softer but softens the crust.
Warm or humid conditions shorten keeping quality. Discard the loaf if mold develops.
Refrigerator
Refrigeration can make plain bread stale faster. Freeze extras for longer storage instead.
Freezer
Slice or divide the cooled loaf into portions, wrap well, and freeze in a freezer-safe bag for up to 2–3 months for best quality.
Restoring Some Crunch
Warm a portion in a 350°F oven for approximately 8–12 minutes, checking to avoid drying it out. Toast individual slices directly from frozen if preferred.
Perishable toppings and fillings need storage appropriate to those additions.
Frequently Asked Questions
Is this Dutch crunch bread?
No. Dutch crunch bread has a distinctive crackled topping. This recipe is a rustic loaf whose crunch comes from its baked crust.
Is it sourdough?
No. It uses commercial yeast, not a starter.
Can I use a whole packet of yeast?
Not with the same overnight schedule. More yeast can make the dough ready much earlier.
Does overnight mean refrigerated?
This formula uses a small yeast quantity for a cool room-temperature rest. A refrigerated schedule needs different timing.
Can I use a loaf pan?
That changes the shape and baking environment. These instructions describe a covered-pot loaf rather than a tested pan conversion.
What if my pot cannot be preheated empty?
Do not disregard its instructions. Choose suitable cookware or a separate method developed for a cold pot.
Can I slice it warm?
Waiting gives a better-set crumb. Reheat a cooled slice if you want a warm serving.
Will it stay crunchy for days?
Not unchanged. Moisture naturally softens the crust, especially when wrapped. Oven refreshing helps.
Recipe Card: Delicious Crunch Bread
Yield: 1 rustic loaf, approximately 10–12 slices
Active preparation: 15 minutes
First rise: Approximately 12–16 hours
Final rise: 45–75 minutes
Bake: 40–50 minutes
Cool: At least 1½ hours
Total: Approximately 15–20 hours
Oven: 450°F
Ingredients
- 3 cups all-purpose flour, spooned and leveled
- 1¼ teaspoons fine salt
- ¼ teaspoon instant yeast
- 1⅓ cups room-temperature water
- 1–2 tablespoons extra water, only if needed
- A little flour for shaping
Instructions
- Mix flour, salt, and yeast. Add water and stir thoroughly until no dry flour remains. Rest briefly before making a small water adjustment if necessary.
- Cover and ferment at approximately 68–72°F for around 12–16 hours, checking earlier in warmer conditions. Dough should be expanded and bubbly.
- Turn onto a lightly floured surface, fold gently, and shape a round.
- Place on suitable parchment in a supportive bowl. Cover and rise until puffy, approximately 45–75 minutes.
- Preheat the oven to 450°F and a suitable Dutch oven according to its guidance, approximately 30 minutes once hot.
- Score the dough and carefully lower into the pot using the parchment. Cover.
- Bake 25–30 minutes covered, then 15–20 minutes uncovered, until well browned and baked through. Around 205–210°F in the center is a useful guide.
- Cool on a rack for at least 1½ hours before cutting.
Approximate Nutrition
For 12 slices, estimate 110–125 calories and 3–4 grams of protein per slice, before spreads and toppings. Ten larger slices contain more per slice. These are approximate ingredient-based estimates, not verified nutrition data.
Notes
- This suggested formula has not been kitchen-tested.
- The title is interpreted as a crusty white loaf, not a sweet or crackle-topped bread.
- Use only cookware and parchment suited to the method and temperature.
- Follow dough readiness rather than a fixed overnight clock.
- Cool completely and refresh later if the crust softens.
Final Thoughts
A simple dough, patient fermentation, and a well-finished crust make this rustic loaf useful for everyday meals. Shape gently, bake until the center is done, and cool with air circulating underneath. Serve fresh for the strongest contrast between crisp crust and soft crumb.
Print
Delicious Crunch Bread
Description
Yield: 1 rustic loaf, approximately 10–12 slices
Active preparation: 15 minutes
First rise: Approximately 12–16 hours
Final rise: 45–75 minutes
Bake: 40–50 minutes
Cool: At least 1½ hours
Total: Approximately 15–20 hours
Oven: 450°F
Ingredients
- 3 cups all-purpose flour, spooned and leveled
- 1¼ teaspoons fine salt
- ¼ teaspoon instant yeast
- 1⅓ cups room-temperature water
- 1–2 tablespoons extra water, only if needed
- A little flour for shaping
Instructions
- Mix flour, salt, and yeast. Add water and stir thoroughly until no dry flour remains. Rest briefly before making a small water adjustment if necessary.
- Cover and ferment at approximately 68–72°F for around 12–16 hours, checking earlier in warmer conditions. Dough should be expanded and bubbly.
- Turn onto a lightly floured surface, fold gently, and shape a round.
- Place on suitable parchment in a supportive bowl. Cover and rise until puffy, approximately 45–75 minutes.
- Preheat the oven to 450°F and a suitable Dutch oven according to its guidance, approximately 30 minutes once hot.
- Score the dough and carefully lower into the pot using the parchment. Cover.
- Bake 25–30 minutes covered, then 15–20 minutes uncovered, until well browned and baked through. Around 205–210°F in the center is a useful guide.
- Cool on a rack for at least 1½ hours before cutting.