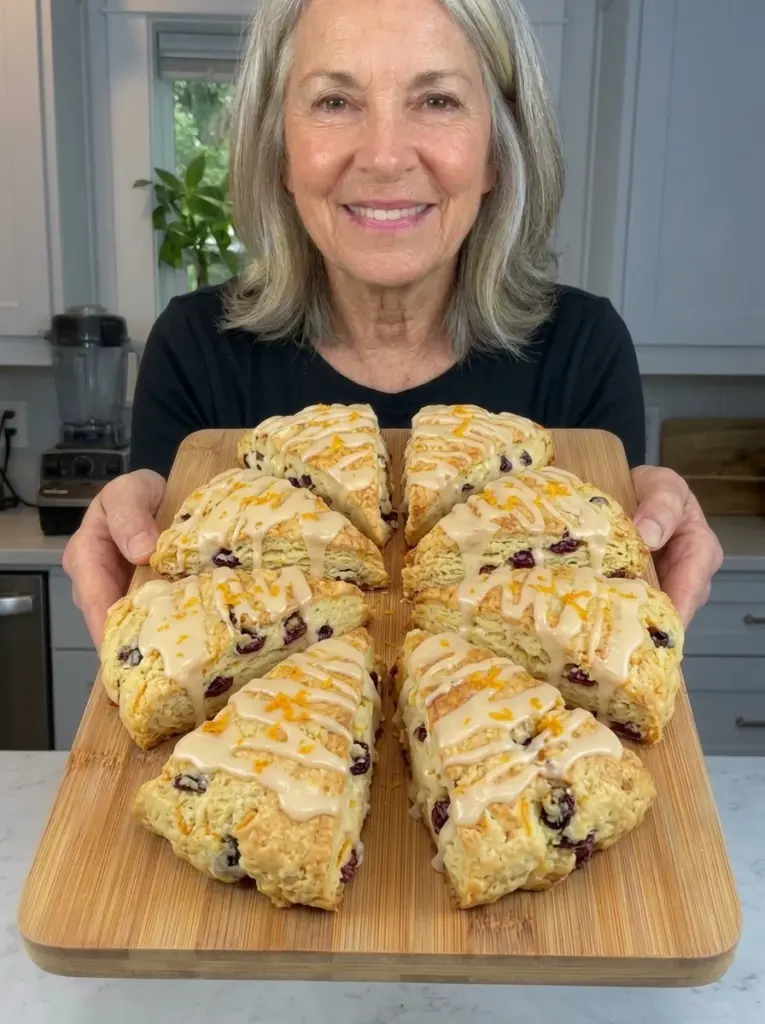
There’s something special about a freshly baked scone, especially when it’s filled with bright citrus flavor, sweet-tart cranberries, and a delicate hint of vanilla. These Cranberry Orange Vanilla Scones bring together everything you love about a classic bakery-style pastry: golden edges, a tender buttery center, beautiful flaky layers, and a sweet glaze that makes every bite feel like a special treat.
The combination of cranberry and orange is particularly delicious. Dried cranberries add little bursts of fruity sweetness and tartness, while freshly grated orange zest brings a bright, fragrant citrus flavor to the dough. Vanilla extract softens the sharper fruit notes and gives the scones a warm, comforting flavor that pairs beautifully with coffee or tea.
What makes these homemade scones even better is the smooth orange-vanilla glaze. Made with powdered sugar, fresh orange juice, cream, orange zest, and vanilla, it adds just the right amount of sweetness while highlighting the citrus flavor already present in the pastry.
Despite their bakery-style appearance, these scones are surprisingly easy to prepare at home. You don’t need a stand mixer, special baking equipment, or advanced pastry skills. The dough comes together in one bowl, gets shaped into a simple round, and is cut into eight wedges before baking.
The secret to their tender, flaky texture is keeping the butter cold and handling the dough as little as possible. Small pieces of cold butter melt in the oven, creating pockets of steam that help produce those beautiful layers.
Whether you’re planning a weekend brunch, preparing a holiday breakfast, or simply craving something homemade and comforting, these Cranberry Orange Vanilla Scones are a wonderful recipe to keep on hand.
This guide covers everything you need to know, including ingredients, detailed preparation instructions, tips for achieving flaky scones, delicious variations, serving suggestions, storage methods, troubleshooting, and frequently asked questions.
Why You’ll Love These Cranberry Orange Vanilla Scones
These homemade scones offer the perfect balance of rich buttery flavor, refreshing citrus, and sweet-tart fruit.
Soft, tender, and beautifully flaky. Cold butter and gentle mixing create a delicate interior with lightly crisp, golden edges.
Bright orange flavor. Fresh orange zest and juice bring natural citrus flavor to both the dough and the glaze.
Sweet-tart cranberries in every bite. Dried cranberries add chewy texture and a pleasant contrast to the sweet vanilla glaze.
Rich buttery taste. Unsalted butter and heavy cream create a flavorful pastry with a tender crumb.
Easy to make from scratch. The recipe uses simple baking techniques and doesn’t require a stand mixer or complicated shaping.
Perfect for breakfast or brunch. These scones are delicious with coffee, tea, fresh fruit, or other breakfast favorites.
Beautiful homemade glaze. The orange-vanilla glaze gives the scones an attractive bakery-style finish while adding extra citrus flavor.
Great for holidays and gatherings. Cranberry and orange are especially popular during fall and winter, making these scones a wonderful addition to holiday breakfast tables.
Easy to prepare ahead. You can freeze unbaked or baked scones for convenient future breakfasts.
Customizable. Try adding white chocolate, chopped nuts, different citrus zest, or other dried fruits to create your own variation.
What Makes Cranberry Orange Vanilla Scones Special?
Cranberry Orange Vanilla Scones are a variation of traditional cream scones, combining a buttery pastry base with dried fruit, fresh citrus, and vanilla.
Unlike muffins or quick breads, scones have a distinctive texture that falls somewhere between a tender biscuit and a lightly sweet pastry.
Their texture comes from the way the butter is incorporated into the flour.
Instead of creaming softened butter with sugar, the recipe uses cold butter cut into small pieces. These pieces remain scattered throughout the dough until baking.
As the scones bake, the butter melts and releases moisture, helping create small pockets and flaky layers.
Heavy cream contributes richness and tenderness, while the egg provides structure and helps bind the dough.
The dried cranberries add concentrated fruit flavor without introducing as much moisture as fresh berries would.
Orange zest is especially important because the flavorful oils in the peel provide a stronger citrus aroma than juice alone.
Vanilla extract rounds out the flavors, making the finished pastry taste balanced rather than overly tart.
Finally, the orange-vanilla glaze adds sweetness and a smooth finish that complements the buttery scone underneath.
The result is a pastry that’s lightly crisp on the outside, soft and tender inside, and filled with cranberry-orange flavor.
Ingredients for Cranberry Orange Vanilla Scones
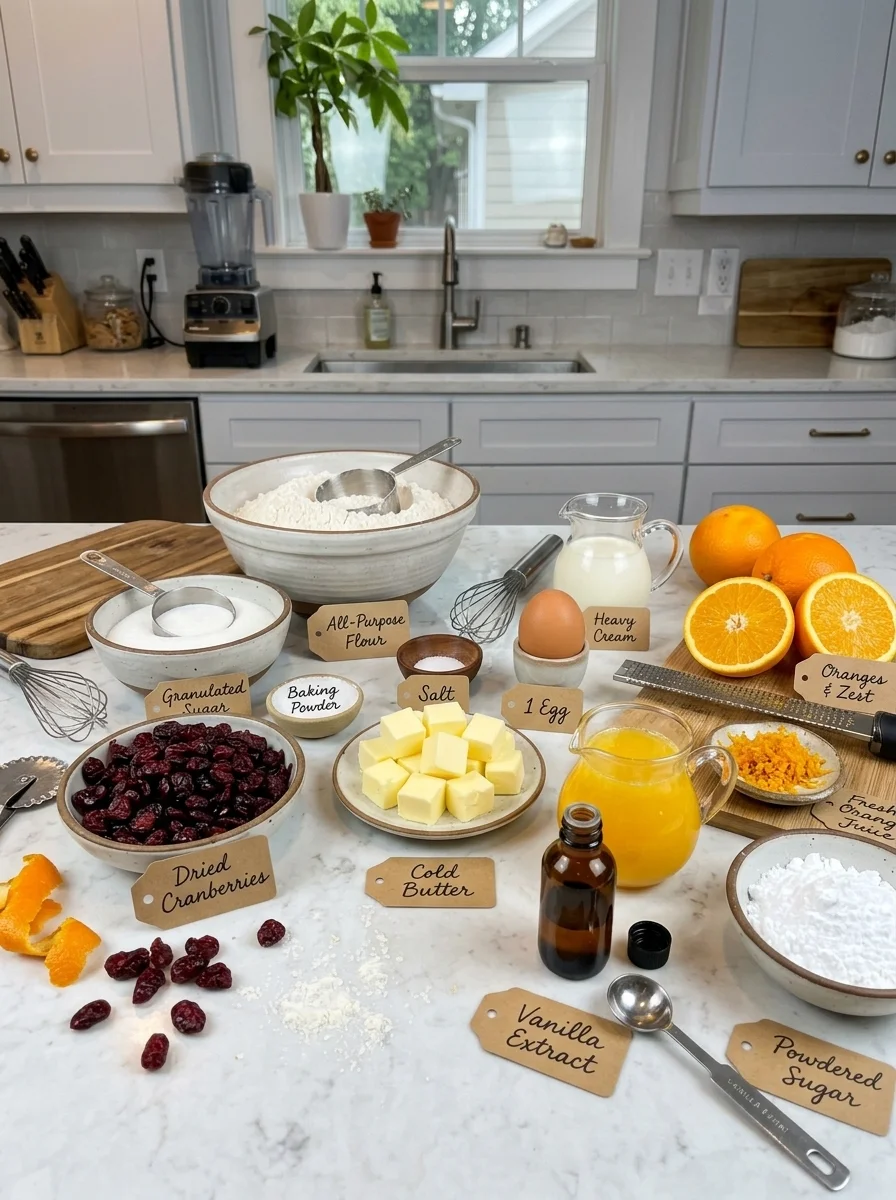
This recipe uses common baking ingredients and a simple homemade glaze.
For the Scones
-
2 cups all-purpose flour
-
1/3 cup granulated sugar
-
2 teaspoons baking powder
-
1/2 teaspoon salt
-
1 tablespoon finely grated orange zest
-
1/2 cup cold unsalted butter, cubed
-
2/3 cup dried cranberries
-
1 large egg
-
1/2 cup heavy cream
-
2 tablespoons fresh orange juice
-
1 1/2 teaspoons vanilla extract
For the Orange Vanilla Glaze
-
1 cup powdered sugar
-
1 tablespoon fresh orange juice
-
1 tablespoon heavy cream or milk
-
1 teaspoon finely grated orange zest
-
1/2 teaspoon vanilla extract
Additional Ingredient
– A little extra heavy cream for brushing the tops before baking
Ingredient Notes
All-purpose flour: All-purpose flour provides the structure for the scones while keeping them tender. Measure it carefully by spooning it into the measuring cup and leveling the top. Packing flour too tightly can result in dry, dense scones.
Granulated sugar: Sugar adds sweetness and helps the scones develop a lightly golden exterior. The amount is moderate because the cranberries and glaze contribute additional sweetness.
Baking powder: Baking powder helps the scones rise and creates a lighter texture. Use fresh baking powder for the best results. Old baking powder may produce flat, dense scones.
Salt: Salt balances the sweetness and enhances the buttery, citrus, and vanilla flavors. Even though the recipe is sweet, salt is important for a well-rounded taste.
Orange zest: Fresh orange zest is one of the most important ingredients in this recipe. It contains fragrant citrus oils that give the scones their bright orange flavor. Grate only the orange-colored outer peel, avoiding the bitter white pith underneath.
Cold unsalted butter: Cold butter is essential for creating flaky scones. As the butter melts during baking, it creates small pockets that contribute to a tender, layered texture. Unsalted butter allows you to control the amount of salt in the recipe.
Dried cranberries: Dried cranberries add chewy texture and concentrated sweet-tart flavor. They distribute easily throughout the dough and are less likely to release excess moisture during baking than fresh cranberries.
Egg: The egg helps bind the ingredients and gives the scones structure. It also contributes to their tender interior.
Heavy cream: Heavy cream adds richness and moisture, helping create a soft, buttery crumb. Its fat content is one reason these scones taste so tender.
Fresh orange juice: Orange juice adds moisture and a gentle citrus flavor to the dough. Freshly squeezed juice is recommended for the brightest taste.
Vanilla extract: Vanilla adds warmth and sweetness to the overall flavor. It complements both the cranberries and the orange zest.
Powdered sugar: Powdered sugar creates the smooth base of the glaze. Its fine texture dissolves easily into the orange juice and cream.
Milk or cream for the glaze: A small amount of cream or milk helps create a smooth, pourable glaze. Heavy cream produces a slightly richer finish, while milk creates a lighter consistency.
How to Make Cranberry Orange Vanilla Scones
Making homemade scones is straightforward, but the best results come from using cold ingredients and avoiding excessive mixing.
Step 1: Preheat the Oven and Prepare the Baking Sheet
Preheat your oven to 400°F.
Line a large baking sheet with parchment paper.
The parchment prevents the scones from sticking and makes cleanup easier.
Position an oven rack near the center of the oven so the scones bake evenly.
Allow the oven to fully preheat before placing the scones inside.
A properly heated oven helps the cold butter melt at the right rate and encourages the dough to rise.
Step 2: Combine the Dry Ingredients
In a large mixing bowl, add the all-purpose flour, granulated sugar, baking powder, and salt.
Whisk until everything is evenly combined.
Add the finely grated orange zest.
Whisk again to distribute the zest throughout the flour mixture.
You can also rub the orange zest into the sugar with your fingertips before combining it with the other dry ingredients.
This helps release the fragrant citrus oils and gives the dough an even stronger orange aroma.
Step 3: Cut in the Cold Butter
Add the cold cubed butter to the flour mixture.
Using a pastry cutter, two forks, or your fingertips, work the butter into the flour.
Continue until the mixture resembles coarse crumbs with some pea-sized pieces of butter remaining.
Avoid blending the butter completely into the flour.
Those small visible pieces of butter are important because they help create flaky layers during baking.
If using your hands, work quickly so the warmth of your fingers doesn’t melt the butter.
If the butter begins to soften too much, place the bowl in the refrigerator for a few minutes before continuing.
Step 4: Add the Dried Cranberries
Add the dried cranberries to the flour and butter mixture.
Stir gently until they’re evenly distributed.
Make sure the cranberries aren’t all concentrated in one area of the bowl.
Even distribution helps ensure that each scone contains plenty of sweet-tart fruit.
If the cranberries are unusually large, you can chop them roughly before adding them.
There’s no need to soak them for this recipe unless they’re exceptionally dry and firm.
Step 5: Mix the Wet Ingredients
In a separate small bowl, crack the egg.
Add the heavy cream, fresh orange juice, and vanilla extract.
Whisk until the ingredients are completely combined.
The mixture should look smooth and uniform.
Using a separate bowl ensures the egg is evenly incorporated before the liquid is added to the flour mixture.
This helps prevent overmixing later.
Step 6: Combine the Wet and Dry Ingredients
Pour the wet ingredients into the bowl containing the flour, butter, and cranberries.
Using a spatula or wooden spoon, gently stir until a soft, slightly shaggy dough begins to form.
The mixture may look a little crumbly at first.
Continue folding just until the dry ingredients are mostly incorporated.
Avoid vigorous mixing.
Overmixing develops too much gluten and can make the scones tough rather than tender.
The dough should be soft and slightly sticky, but not excessively wet.
Step 7: Shape the Dough
Lightly flour a clean work surface.
Transfer the dough onto the surface.
Using your hands, gently bring the dough together.
Knead it only 2–3 times, just enough to form a cohesive mass.
Avoid treating it like bread dough.
Press the dough into a round approximately 1 inch thick.
Try to keep the thickness even so all the scones bake at the same rate.
If the dough feels sticky, lightly flour your hands rather than adding large amounts of flour to the mixture.
Step 8: Cut Into Eight Wedges
Using a sharp knife or bench scraper, cut the dough round in half.
Cut each half into quarters, creating eight triangular wedges.
Try to make the pieces approximately equal in size.
Carefully transfer the wedges to the prepared baking sheet.
Leave about 2 inches of space between them.
This gives the scones room to expand and allows hot air to circulate around the edges.
For a more defined triangular shape, avoid twisting or dragging the knife excessively through the dough.
Step 9: Chill the Shaped Scones
For extra flaky scones, place the baking sheet in the refrigerator for 10–15 minutes.
This optional chilling step helps firm up the butter after handling.
Cold butter is important because it creates steam pockets during baking, contributing to the flaky texture.
Chilling can also help the scones maintain their shape rather than spreading too much in the oven.
If your kitchen is particularly warm, this step is especially helpful.
Step 10: Brush With Heavy Cream
Remove the chilled scones from the refrigerator.
Using a pastry brush, lightly coat the tops with a little heavy cream.
The cream helps the tops develop a beautiful golden color.
Try not to let too much cream drip down the cut sides, as this can slightly interfere with the scones’ rise.
A thin, even coating is enough.
Step 11: Bake Until Golden
Place the baking sheet in the preheated oven.
Bake at 400°F for approximately 17–21 minutes.
The scones should rise, become lightly golden on top, and develop golden edges.
The centers should be set rather than wet or doughy.
Because ovens vary, begin checking around the 17-minute mark.
If the scones still look pale or underbaked, continue baking for a few additional minutes.
Avoid overbaking because the scones can become dry.
Step 12: Cool the Scones Slightly
Remove the baking sheet from the oven.
Allow the scones to cool for approximately 10 minutes.
Then transfer them to a wire rack if desired.
The scones should still be slightly warm when glazed, but not so hot that the glaze immediately melts and runs off.
If you prefer a thicker, more visible glaze, allow the scones to cool a little longer.
Step 13: Prepare the Orange Vanilla Glaze
In a small mixing bowl, combine the powdered sugar, fresh orange juice, heavy cream or milk, orange zest, and vanilla extract.
Whisk until smooth.
The glaze should be thick enough to coat a spoon but thin enough to drizzle.
If it’s too thick, add a few drops of orange juice or milk.
If it’s too thin, add a little more powdered sugar.
Whisk until no lumps remain.
Step 14: Glaze the Scones
Using a spoon, drizzle the orange-vanilla glaze over the slightly cooled scones.
You can create thin lines across the surface or spread a thicker layer over the tops.
For a bakery-style appearance, drizzle the glaze in a back-and-forth pattern.
Allow the glaze to set for a few minutes before serving.
The glaze will firm up slightly as it sits.
Step 15: Serve and Enjoy
Serve the scones slightly warm or at room temperature.
They’re especially delicious with freshly brewed coffee, hot tea, or a glass of milk.
The combination of tender pastry, sweet-tart cranberries, bright orange flavor, and creamy vanilla glaze makes these scones a wonderful breakfast or afternoon treat.
Time and Yield
-
Prep Time: 20 minutes
-
Optional Chill Time: 10–15 minutes
-
Bake Time: 17–21 minutes
-
Cooling Time Before Glazing: Approximately 10 minutes
-
Total Time: Approximately 39 minutes without optional chilling and cooling, or about 1 hour with both
-
Yield: 8 scones
-
Servings: 8
-
Calories: Approximately 355 per serving, based on the supplied estimate
The actual calorie content will depend on the ingredients, glaze quantity, and size of each scone.
Tips for the Best Cranberry Orange Vanilla Scones
A few simple baking techniques can make a big difference in the texture and flavor of homemade scones.
Keep the butter very cold. Cold butter creates pockets in the dough that contribute to flaky layers. If the butter becomes soft while mixing, refrigerate the dough briefly before continuing.
Don’t overmix the dough. Stir just until the ingredients come together. Too much mixing can make the scones tough and dense.
Measure the flour correctly. Too much flour produces dry, crumbly scones. Spoon the flour into the measuring cup and level it rather than scooping directly from the bag.
Use fresh orange zest. Freshly grated zest provides a brighter, more aromatic citrus flavor than dried orange peel.
Rub the zest into the sugar. This optional technique helps release the oils in the orange peel and distributes the citrus flavor throughout the dough.
Use cold heavy cream. Keeping the cream cold helps maintain the temperature of the butter and prevents the dough from becoming too warm.
Leave small butter pieces visible. Don’t work the butter into a completely smooth mixture. Pea-sized pieces help create a flaky texture.
Handle the dough gently. Press it into shape rather than kneading it repeatedly.
Keep the dough thick. A round approximately 1 inch thick produces taller, softer scones.
Chill before baking. A short refrigeration period helps the scones hold their shape and improves the flaky texture.
Avoid overbaking. Remove the scones once they’re lightly golden and cooked through. Baking too long can make them dry.
Let the scones cool before glazing. Very hot scones cause the glaze to melt and disappear into the pastry.
Adjust the glaze consistency carefully. Add liquid a few drops at a time until the glaze is smooth and easy to drizzle.
Use parchment paper. Parchment helps prevent sticking and makes it easier to remove the scones without breaking them.
Variations and Customizations
These Cranberry Orange Vanilla Scones are delicious as written, but there are several easy ways to change the flavor.
White Chocolate Cranberry Orange Scones
Add 1/3 cup white chocolate chips to the dough along with the dried cranberries.
The white chocolate adds extra sweetness and a creamy flavor that pairs beautifully with orange.
Because white chocolate is sweet, you may want to drizzle the glaze more lightly.
Cranberry Orange Almond Scones
Add 1/4 cup chopped almonds to the dough.
For a stronger almond flavor, replace a small portion of the vanilla extract with almond extract.
Top the glazed scones with sliced almonds for extra crunch.
Cranberry Lemon Vanilla Scones
Replace the orange zest and orange juice with lemon zest and lemon juice.
This creates a brighter, slightly more tart variation.
Lemon pairs especially well with the sweetness of dried cranberries.
Cranberry Orange Pecan Scones
Add 1/3 cup chopped pecans to the dough.
The pecans provide a buttery crunch and complement the orange and cranberry flavors.
This variation is especially nice during fall and winter.
Cranberry Orange Cream Cheese Scones
Add small pieces of chilled cream cheese to the dough before shaping.
The cream cheese creates rich, tangy pockets throughout the pastry.
Keep the pieces small and cold so they don’t make the dough difficult to handle.
Cinnamon Cranberry Orange Scones
Add 1/2 teaspoon ground cinnamon to the dry ingredients.
Cinnamon provides a subtle warmth that pairs beautifully with orange and cranberry.
This variation is especially good for holiday breakfasts.
Orange Vanilla Scones Without Cranberries
Omit the dried cranberries for a simpler orange-vanilla scone.
The citrus flavor will become more prominent.
You can add a little extra orange zest if desired.
Cranberry Orange Scones With Fresh Cranberries
You can substitute chopped fresh cranberries for dried cranberries, but the result will be more tart and slightly moister.
Fresh cranberries release more moisture during baking, so the texture may differ.
Chop them into small pieces and fold them into the dough gently.
You may also want to adjust the sweetness slightly.
What to Serve With Cranberry Orange Vanilla Scones
These scones are wonderful on their own, but they also pair beautifully with a variety of breakfast and brunch favorites.
Freshly brewed coffee: The rich, slightly bitter flavor of coffee balances the sweetness of the orange-vanilla glaze.
Hot black tea: A classic cup of black tea complements the buttery texture and fruity flavor of the scones.
Earl Grey tea: The citrus notes of Earl Grey work especially well with the orange zest in the pastry.
Fresh fruit: Serve the scones with strawberries, orange slices, grapes, or a mixed fruit bowl for a refreshing breakfast.
Greek yogurt: Plain or vanilla Greek yogurt adds a creamy contrast and can make breakfast more substantial.
Scrambled eggs: Pairing a sweet scone with savory eggs creates a balanced brunch plate.
Butter: A small amount of softened butter adds extra richness, especially if the scones are served warm.
Orange marmalade: A little orange marmalade enhances the citrus flavor and adds a traditional breakfast touch.
Cream cheese spread: A thin layer of plain or lightly sweetened cream cheese complements the cranberry-orange combination.
Whipped cream: For a more dessert-like presentation, serve with a small spoonful of lightly sweetened whipped cream.
These scones also make a lovely addition to holiday brunch spreads, afternoon tea trays, or weekend breakfast gatherings.
Troubleshooting Common Problems
Scones are relatively simple to make, but a few common issues can affect their texture and appearance.
My Scones Are Dry
Dry scones are often caused by too much flour, overmixing, or overbaking.
Measure the flour carefully and avoid packing it into the measuring cup.
Mix the dough only until it comes together.
Remove the scones from the oven once they’re lightly golden and fully baked.
If the dough seems unusually dry before shaping, add a very small splash of cream.
My Scones Are Dense
Dense scones can result from overworking the dough or using old baking powder.
Avoid kneading the dough like bread.
Handle it gently and stop mixing as soon as the ingredients are combined.
Check that your baking powder is fresh.
My Scones Spread Too Much
Excessive spreading usually happens when the butter becomes too warm before baking.
Keep the butter cold and refrigerate the shaped scones for 10–15 minutes before placing them in the oven.
Also make sure the oven is fully preheated.
My Scones Didn’t Rise
Flat scones may be caused by expired baking powder, overmixed dough, or an oven that isn’t hot enough.
Use fresh baking powder and preheat the oven to 400°F.
Avoid pressing the dough too thin.
My Scones Are Tough
Tough scones usually result from overmixing.
When flour is mixed with liquid, gluten begins to develop.
Too much mixing creates a stronger gluten structure, which can make the pastry chewy instead of tender.
Stir and knead only as much as necessary to bring the dough together.
My Dough Is Too Sticky
A slightly sticky dough is normal.
Lightly flour your work surface and hands to make shaping easier.
Avoid adding large amounts of extra flour because this can dry out the scones.
If the dough is extremely soft, refrigerate it briefly before shaping.
My Scones Are Crumbly and Falling Apart
A dough that’s too dry may not hold together properly.
Make sure the wet ingredients are measured accurately.
If the dough won’t come together, add a teaspoon or two of cream and gently press it together.
Avoid adding too much liquid at once.
My Cranberries Are Too Dry
Some dried cranberries are firmer than others.
If yours are especially dry, soak them briefly in warm water or orange juice, then drain and pat them dry before adding them to the dough.
This can help soften their texture.
My Glaze Is Too Thin
If the glaze runs off the scones immediately, it may contain too much liquid.
Add powdered sugar a tablespoon at a time until it reaches a thicker consistency.
Also make sure the scones have cooled enough before glazing.
My Glaze Is Too Thick
If the glaze won’t drizzle easily, add a few drops of orange juice, milk, or cream.
Whisk after each addition.
Continue until the glaze reaches your preferred consistency.
My Scones Are Browning Too Quickly
If the tops become dark before the centers are baked, your oven may be running hot.
Check the scones early and adjust the oven rack if necessary.
You can loosely cover them with foil near the end of baking to prevent excessive browning.
Storage and Reheating
Cranberry Orange Vanilla Scones taste best when freshly baked, but they can be stored and reheated successfully.
Room Temperature Storage
Allow the scones to cool completely.
Place them in an airtight container.
Store at room temperature for up to 2 days.
If the glaze is still soft, place parchment paper between layers to prevent sticking.
Keep the container in a cool, dry location away from direct sunlight.
Refrigerator Storage
For longer storage, place the cooled scones in an airtight container and refrigerate for up to 5 days.
Refrigeration can make baked goods firmer, so warming them slightly before serving can improve their texture.
How to Reheat Scones
For a quick option, microwave an individual scone for approximately 10–15 seconds.
This softens the pastry, although the glaze may melt slightly.
For a more freshly baked texture, warm unglazed scones in a 300°F oven for approximately 5–8 minutes.
If the scones are already glazed, use gentle heat and monitor them closely.
Can You Freeze Cranberry Orange Vanilla Scones?
Yes.
Unglazed scones freeze particularly well.
Allow baked scones to cool completely, then wrap them individually or place them in a freezer-safe airtight container.
Freeze for up to 3 months for best quality.
Thaw at room temperature or warm gently in the oven.
Prepare and add the glaze after thawing for the best appearance.
Freezing Unbaked Scones
You can also freeze the shaped, unbaked scones.
Arrange the wedges on a parchment-lined baking sheet and freeze until firm.
Transfer them to a freezer-safe container or bag.
When ready to bake, place the frozen scones on a lined baking sheet and bake at 400°F.
They may need a few additional minutes compared with freshly prepared dough.
Brush with cream before baking if desired.
This method is especially convenient when you want freshly baked scones without preparing the dough from scratch.
Frequently Asked Questions
What Makes Scones Flaky?
Cold butter is one of the main ingredients responsible for flaky scones.
As the butter melts in the oven, it releases moisture and creates small pockets within the dough.
Gentle mixing and minimal handling also help preserve the tender texture.
Can I Use Fresh Cranberries Instead of Dried Cranberries?
Yes.
Fresh cranberries can be used, but they have a more tart flavor and release more moisture during baking.
Chop them into smaller pieces before adding them to the dough.
You may need to adjust the sweetness slightly.
Can I Use Frozen Cranberries?
Yes.
Frozen cranberries can work, especially when chopped into smaller pieces.
Use them while still cold to prevent excess moisture from softening the dough.
The baking time may need a slight adjustment.
Can I Make These Scones Without Heavy Cream?
You can substitute half-and-half or another suitable dairy product, but the texture will be different.
Heavy cream adds fat and richness that help create tender scones.
Milk generally produces a slightly less rich result.
Can I Use Salted Butter?
Yes.
If using salted butter, reduce the added salt slightly.
The exact adjustment depends on the salt content of your butter.
Unsalted butter is recommended because it gives you more control over the flavor.
Can I Use Orange Extract Instead of Orange Zest?
Orange extract can add citrus flavor, but it won’t provide exactly the same fresh aroma as orange zest.
Use a small amount because extracts are concentrated.
For the best flavor, fresh orange zest is recommended.
Can I Make These Scones Without the Glaze?
Absolutely.
The scones are delicious on their own.
Without the glaze, they’ll be less sweet and the buttery cranberry-orange flavor will be more prominent.
You can also sprinkle a little coarse sugar over the tops before baking for a simple finish.
Can I Make the Dough Ahead of Time?
Yes.
You can prepare and shape the dough, then refrigerate the unbaked scones for several hours before baking.
Keep them covered so they don’t dry out.
For longer storage, freezing the shaped dough is a better option.
Can I Make These Scones the Night Before?
Yes.
You can bake them the night before and store them in an airtight container.
For the freshest presentation, prepare the glaze and drizzle it over the scones shortly before serving.
You can also prepare the unbaked dough ahead and bake the scones fresh in the morning.
Can I Double the Recipe?
Yes.
Double all the ingredients to make approximately 16 scones.
You may need to bake them on two baking sheets.
Leave enough space between the wedges for even air circulation.
If baking two sheets at once, rotate them as needed for even browning.
Can I Use a Food Processor to Cut in the Butter?
Yes.
A food processor can make the butter-cutting step faster.
Pulse the flour mixture and cold butter briefly until coarse crumbs form.
Avoid overprocessing because you want small pieces of butter to remain.
Transfer the mixture to a bowl before adding the cranberries and wet ingredients.
Why Should I Chill the Scones Before Baking?
Chilling helps firm up the butter after shaping.
Cold butter contributes to a flaky texture and helps the scones maintain their shape during baking.
A short 10–15-minute chill is especially useful if your kitchen is warm.
Can I Make These Scones Smaller?
Yes.
You can divide the dough into smaller wedges or shape two smaller rounds.
Smaller scones will bake more quickly, so begin checking them earlier.
The exact baking time depends on their size and thickness.
Can I Make Round Scones Instead of Wedges?
Yes.
You can use a round biscuit cutter to create individual scones.
Press the cutter straight down without twisting to help the scones rise evenly.
Gather scraps gently and avoid overworking the dough.
Why Are My Scones Dry the Next Day?
Scones naturally lose moisture as they sit.
Storing them in an airtight container helps slow this process.
A brief reheating can restore some softness.
For the best flavor and texture, enjoy them within the first day or freeze extras.
Can I Add White Chocolate Chips?
Yes.
White chocolate chips pair beautifully with cranberries and orange.
Add approximately 1/3 cup to the dough along with the dried cranberries.
Because white chocolate adds sweetness, you may want to use less glaze.
Can I Use Lemon Instead of Orange?
Yes.
Replace the orange zest and juice with lemon zest and juice.
The result will have a brighter, slightly sharper citrus flavor.
Lemon works especially well with cranberries and vanilla.
Are Cranberry Orange Vanilla Scones Good for Holiday Breakfasts?
Yes.
The combination of cranberry, orange, and vanilla makes these scones especially suitable for Thanksgiving, Christmas, and winter brunches.
Their golden appearance and citrus glaze also make them attractive on a breakfast platter.
Can I Make These Scones Gluten-Free?
You can experiment with a gluten-free all-purpose flour blend designed for baking.
However, the texture may differ from the original recipe.
Choose a blend that contains appropriate binding ingredients and follow any recommended adjustments.
A gluten-free version may require changes to the liquid quantity.
Can I Make These Scones Dairy-Free?
You can experiment with plant-based butter and a dairy-free cream alternative.
However, these substitutions may affect the flavor, texture, and browning.
Choose products designed for baking for the most reliable results.
How Do I Know When the Scones Are Fully Baked?
The tops should be lightly golden, the edges should have a little color, and the centers should feel set.
If you’re uncertain, gently separate one scone and check that the middle is no longer wet or doughy.
Avoid baking much longer than necessary because the scones can dry out.
Final Thoughts
Cranberry Orange Vanilla Scones are a wonderful example of how a few simple ingredients can come together to create something that feels truly special. The combination of cold butter, heavy cream, dried cranberries, fresh orange zest, and vanilla produces a pastry that’s tender, flaky, and full of bright, comforting flavor.
The sweet-tart cranberries provide little bursts of fruit in every bite, while the orange zest adds a refreshing citrus aroma. The smooth orange-vanilla glaze brings everything together with just the right amount of sweetness.
One of the best things about this recipe is how approachable it is. You don’t need special equipment or advanced baking experience to make beautiful homemade scones. By keeping the butter cold, handling the dough gently, and avoiding overbaking, you can achieve bakery-style results in your own kitchen.
These scones are perfect for slow weekend mornings, holiday brunches, afternoon tea, or simply enjoying with a cup of coffee. They also freeze well, making them convenient to prepare ahead of time.
Whether you serve them warm from the oven, drizzle them with extra orange glaze, or enjoy them alongside your favorite breakfast foods, these Cranberry Orange Vanilla Scones are a delicious homemade treat that’s worth making again and again.
Print
Cranberry Orange Vanilla Scones
Ingredients
This recipe uses common baking ingredients and a simple homemade glaze.
For the Scones
2 cups all-purpose flour
1/3 cup granulated sugar
2 teaspoons baking powder
1/2 teaspoon salt
1 tablespoon finely grated orange zest
1/2 cup cold unsalted butter, cubed
2/3 cup dried cranberries
1 large egg
1/2 cup heavy cream
2 tablespoons fresh orange juice
1 1/2 teaspoons vanilla extract
For the Orange Vanilla Glaze
1 cup powdered sugar
1 tablespoon fresh orange juice
1 tablespoon heavy cream or milk
1 teaspoon finely grated orange zest
1/2 teaspoon vanilla extract
Instructions
Making homemade scones is straightforward, but the best results come from using cold ingredients and avoiding excessive mixing.
Step 1: Preheat the Oven and Prepare the Baking Sheet
Preheat your oven to 400°F.
Line a large baking sheet with parchment paper.
The parchment prevents the scones from sticking and makes cleanup easier.
Position an oven rack near the center of the oven so the scones bake evenly.
Allow the oven to fully preheat before placing the scones inside.
A properly heated oven helps the cold butter melt at the right rate and encourages the dough to rise.
Step 2: Combine the Dry Ingredients
In a large mixing bowl, add the all-purpose flour, granulated sugar, baking powder, and salt.
Whisk until everything is evenly combined.
Add the finely grated orange zest.
Whisk again to distribute the zest throughout the flour mixture.
You can also rub the orange zest into the sugar with your fingertips before combining it with the other dry ingredients.
This helps release the fragrant citrus oils and gives the dough an even stronger orange aroma.
Step 3: Cut in the Cold Butter
Add the cold cubed butter to the flour mixture.
Using a pastry cutter, two forks, or your fingertips, work the butter into the flour.
Continue until the mixture resembles coarse crumbs with some pea-sized pieces of butter remaining.
Avoid blending the butter completely into the flour.
Those small visible pieces of butter are important because they help create flaky layers during baking.
If using your hands, work quickly so the warmth of your fingers doesn’t melt the butter.
If the butter begins to soften too much, place the bowl in the refrigerator for a few minutes before continuing.
Step 4: Add the Dried Cranberries
Add the dried cranberries to the flour and butter mixture.
Stir gently until they’re evenly distributed.
Make sure the cranberries aren’t all concentrated in one area of the bowl.
Even distribution helps ensure that each scone contains plenty of sweet-tart fruit.
If the cranberries are unusually large, you can chop them roughly before adding them.
There’s no need to soak them for this recipe unless they’re exceptionally dry and firm.
Step 5: Mix the Wet Ingredients
In a separate small bowl, crack the egg.
Add the heavy cream, fresh orange juice, and vanilla extract.
Whisk until the ingredients are completely combined.
The mixture should look smooth and uniform.
Using a separate bowl ensures the egg is evenly incorporated before the liquid is added to the flour mixture.
This helps prevent overmixing later.
Step 6: Combine the Wet and Dry Ingredients
Pour the wet ingredients into the bowl containing the flour, butter, and cranberries.
Using a spatula or wooden spoon, gently stir until a soft, slightly shaggy dough begins to form.
The mixture may look a little crumbly at first.
Continue folding just until the dry ingredients are mostly incorporated.
Avoid vigorous mixing.
Overmixing develops too much gluten and can make the scones tough rather than tender.
The dough should be soft and slightly sticky, but not excessively wet.
Step 7: Shape the Dough
Lightly flour a clean work surface.
Transfer the dough onto the surface.
Using your hands, gently bring the dough together.
Knead it only 2–3 times, just enough to form a cohesive mass.
Avoid treating it like bread dough.
Press the dough into a round approximately 1 inch thick.
Try to keep the thickness even so all the scones bake at the same rate.
If the dough feels sticky, lightly flour your hands rather than adding large amounts of flour to the mixture.
Step 8: Cut Into Eight Wedges
Using a sharp knife or bench scraper, cut the dough round in half.
Cut each half into quarters, creating eight triangular wedges.
Try to make the pieces approximately equal in size.
Carefully transfer the wedges to the prepared baking sheet.
Leave about 2 inches of space between them.
This gives the scones room to expand and allows hot air to circulate around the edges.
For a more defined triangular shape, avoid twisting or dragging the knife excessively through the dough.
Step 9: Chill the Shaped Scones
For extra flaky scones, place the baking sheet in the refrigerator for 10–15 minutes.
This optional chilling step helps firm up the butter after handling.
Cold butter is important because it creates steam pockets during baking, contributing to the flaky texture.
Chilling can also help the scones maintain their shape rather than spreading too much in the oven.
If your kitchen is particularly warm, this step is especially helpful.
Step 10: Brush With Heavy Cream
Remove the chilled scones from the refrigerator.
Using a pastry brush, lightly coat the tops with a little heavy cream.
The cream helps the tops develop a beautiful golden color.
Try not to let too much cream drip down the cut sides, as this can slightly interfere with the scones’ rise.
A thin, even coating is enough.
Step 11: Bake Until Golden
Place the baking sheet in the preheated oven.
Bake at 400°F for approximately 17–21 minutes.
The scones should rise, become lightly golden on top, and develop golden edges.
The centers should be set rather than wet or doughy.
Because ovens vary, begin checking around the 17-minute mark.
If the scones still look pale or underbaked, continue baking for a few additional minutes.
Avoid overbaking because the scones can become dry.
Step 12: Cool the Scones Slightly
Remove the baking sheet from the oven.
Allow the scones to cool for approximately 10 minutes.
Then transfer them to a wire rack if desired.
The scones should still be slightly warm when glazed, but not so hot that the glaze immediately melts and runs off.
If you prefer a thicker, more visible glaze, allow the scones to cool a little longer.
Step 13: Prepare the Orange Vanilla Glaze
In a small mixing bowl, combine the powdered sugar, fresh orange juice, heavy cream or milk, orange zest, and vanilla extract.
Whisk until smooth.
The glaze should be thick enough to coat a spoon but thin enough to drizzle.
If it’s too thick, add a few drops of orange juice or milk.
If it’s too thin, add a little more powdered sugar.
Whisk until no lumps remain.
Step 14: Glaze the Scones
Using a spoon, drizzle the orange-vanilla glaze over the slightly cooled scones.
You can create thin lines across the surface or spread a thicker layer over the tops.
For a bakery-style appearance, drizzle the glaze in a back-and-forth pattern.
Allow the glaze to set for a few minutes before serving.
The glaze will firm up slightly as it sits.
Step 15: Serve and Enjoy
Serve the scones slightly warm or at room temperature.
They’re especially delicious with freshly brewed coffee, hot tea, or a glass of milk.
The combination of tender pastry, sweet-tart cranberries, bright orange flavor, and creamy vanilla glaze makes these scones a wonderful breakfast or afternoon treat.