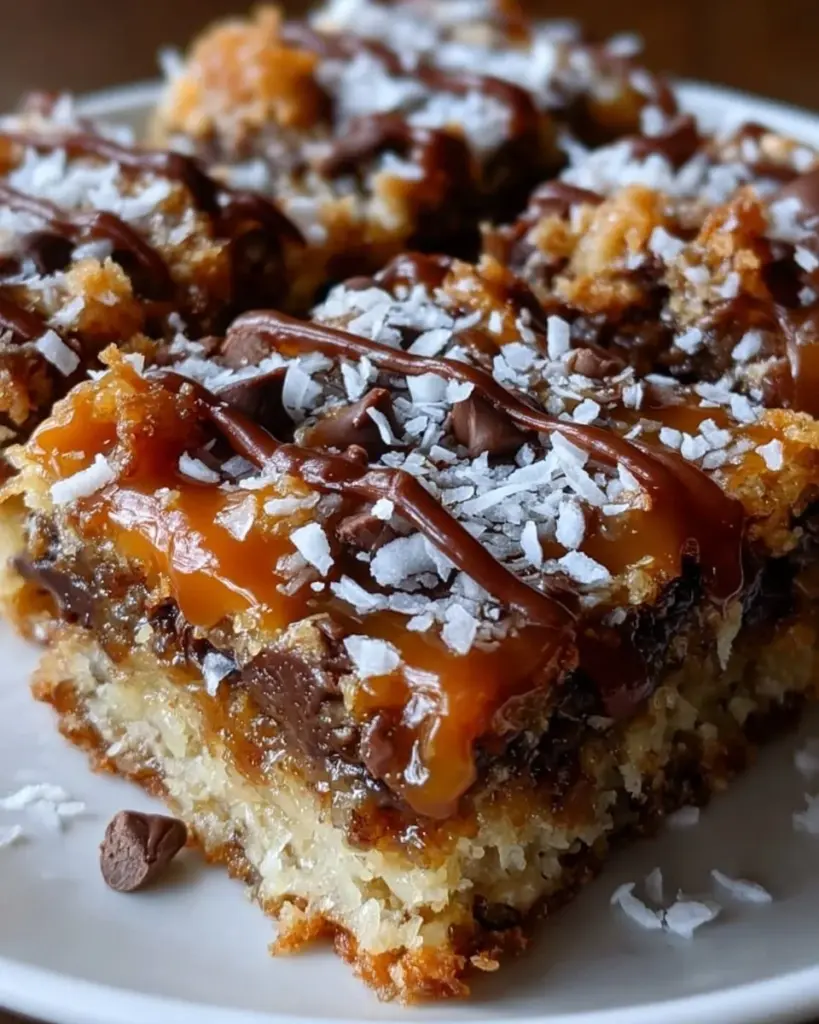
There’s something utterly enchanting about the way a simple dessert can transport you back to your happiest memories, filling your heart with warmth and your belly with delight. Picture this: a perfectly baked golden crust, whose edges flirt with just a hint of crispiness while the center remains soft yet sturdy enough to hold layers of indulgent toppings. As you take your first bite, the world fades away, and all that exists is the luscious blend of silky caramel, rich chocolate, and crunchy coconut, harmoniously merging in a decadent experience that feels both comforting and exhilarating.
Now, imagine that moment of blissfully pulling apart a square of these Salted Caramel Magic Bars as the aroma wafts through your kitchen, drawing everyone in. The sweet, buttery scent intertwines with the intoxicating notes of caramel and chocolate, creating an irresistible call that is impossible to ignore. Each bite leads you deeper into a sweet adventure, where the soft sweetness dances on your palate, complemented perfectly by a touch of sea salt that balances every layer. It’s a transcendent experience that not only satisfies your sweet cravings but also brings joy to every gathering, making these bars the ultimate crowd-pleaser.
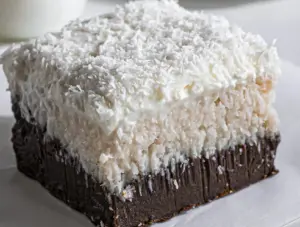
That’s what these magical bars bring to the table—a blend of textures that delight the senses. The chewy coconut provides a contrast to the rich chocolate chips, while the sticky caramel adds a glossy sheen that glistens invitingly under the light. As you sink your teeth into each square, the flavors explode, sending you on a delightful journey of sweet and salty sensations that linger long after the last morsel is gone.
Why You’ll Love This Salted Caramel Magic Bars
These Salted Caramel Magic Bars are not just any dessert; they’re a celebration of everything sweet. Perfect for birthdays, potlucks, or a simple indulgence after a long week, these bars encapsulate the essence of comfort food. Imagine bringing a plate of these beauties to a gathering—their jewel-like layers instantly win hearts and fill tummies.
What sets them apart is not only their sensational taste but also the symphony of textures: the creamy caramel blankets the heart of gooey chocolate, all cradled within a buttery crust that holds everything together. Each bite offers a delightful crunch from the toasted coconut, making it hard to stop at just one. With their lovely golden hue and sprinkling of coarse sea salt, they are as indulgent visually as they are flavorfully.
Preparation Phase & Tools to Use
Creating these bars is a rewarding journey that requires just a few essential tools, ensuring a seamless experience in your kitchen. Here’s what you’ll need:
- 9×13 inch Baking Pan: A sturdy baking pan is key to achieving the ideal thickness; a smaller pan will result in overly thick bars, while a larger one will spread them too thin.
- Mixing Bowls: Multiple mixing bowls help you keep your ingredients organized, allowing for easy combining and minimizing cleanup afterward.
- Wooden Spoon or Spatula: A trusty wooden spoon or spatula ensures you can mix the butter and sugar effectively, achieving that perfect creamy consistency.
- Measuring Cups and Spoons: Precision in measuring ensures that each layer is properly balanced, making for a delicious end result.
- Parchment Paper (optional): Lining the baking pan with parchment can make for easier removal and cleanup, ensuring each piece comes out beautifully.
Practical Preparation Tips
- Melt the butter carefully: To avoid separation, gently melt your butter in the microwave or on the stove until just softened and not bubbling.
- Press firmly: When spreading the crust mixture into the pan, press firmly but gently. This will create a solid base that won’t crumble when sliced.
- Let cool completely: Although tempting to dive in right away, allowing the bars to cool for at least an hour ensures that they set properly, yielding clean cuts.
Ingredients for Salted Caramel Magic Bars
Gather the following ingredients to bring this delicious recipe to life:
- 1 cup unsalted butter: The foundation for your base, helping to keep everything moist and flavorful.
- 1 cup brown sugar: This adds depth and a slightly chewy texture to the crust, creating a wonderful caramel flavor.
- 1 cup all-purpose flour: The backbone of your crust, flour provides the necessary structure to support the toppings.
- 3 cups shredded coconut: Toasted coconut adds a lovely crunch and chews, bringing an outer layer of flavor.
- 1 cup chocolate chips: A staple in dessert making, providing pockets of melty, silky sweetness.
- 1 cup caramel sauce: The star of this show, adding that classic gooey sweetness we all crave.
- 1/2 teaspoon sea salt: This sprinkle of salt enhances the sweetness and brings balance to every bite.
Possible Substitutions
- Coconut Flakes: If you’re not a fan of coconut, feel free to substitute with chopped nuts—walnuts or pecans make great alternatives!
- Chocolate Types: Experiment with dark chocolate chips for a richer flavor or white chocolate for a sweeter bite.
- Caramel Sauce: Store-bought caramel makes this recipe easier, but homemade caramel can elevate your bars further.
How to Make Salted Caramel Magic Bars
Creating these bars is easier than you might think. Follow these step-by-step instructions to uncover the magic.
- Preheat your oven to 350°F (175°C). While the oven warms up, prepare a 9×13 inch baking pan by greasing it lightly to prevent sticking. Consider lining it with parchment paper for an effortless release.
- Melt the butter. In a large mixing bowl, combine the melted unsalted butter with brown sugar until well incorporated and the mixture becomes slightly frothy in texture.
- Add in flour. Gradually stir in all-purpose flour, mixing until a dough forms. This dough should be thick and slightly sticky—it’s perfectly imperfect!
- Press dough into the pan. Using your hands or a spatula, evenly press the dough into the bottom of your prepared baking pan, creating a solid foundation for your layers.
- Bake the crust. Bake your crust in the preheated oven for 10-12 minutes until it turns lightly golden brown. The aroma that fills your kitchen will have everyone eagerly anticipating what’s to come!
- Add toppings. Once your crust is baked, sprinkle shredded coconut and chocolate chips evenly over the surface, allowing them to melt slightly into the warm base.
- Drizzle with caramel. Gently drizzle the caramel sauce over the layers, ensuring an even distribution across the entire surface. A little extra caramel never hurt anyone!
- Finish baking. Bake again for an additional 15-20 minutes until everything bubbles and takes on a golden hue. The magic is clearly happening as the layers meld together.
- Cool completely. Remove from the oven and let cool in the pan. Once cooled, slice into generous squares or bars, and prepare for compliments!
Chef’s Notes & Helpful Tips
As with any recipe, a few extra tips can elevate your Salted Caramel Magic Bars:
- Make-ahead tips: These bars can stay fresh in an airtight container for 3-5 days, making them an excellent dessert for planning ahead.
- Alternatives: If you have an air fryer, these bars can be made in molds specifically designed for an air frying method, making for an incredibly gooey treat.
- Customization ideas: Feel free to add in different flavors or partitions—stir in some nuts, drizzle with chocolate, or even try a hint of espresso powder to elevate that chocolate flavor even further.
Common Mistakes to Avoid
- Not cooling completely: Cutting into the bars while still warm can lead to a gooey mess. Patience is key!
- Overbaking the crust: Baking too long can create a dry base. Keep an eye on your crust, removing it as soon as it turns golden.
- Ignoring the sea salt: Skipping this key element will lessen the balance of sweet and salty flavors, which is the heart of these bars.
What to Serve With Salted Caramel Magic Bars
Consider pairing these bars with other delicious offerings to create a full dessert experience:
- Vanilla Ice Cream: A scoop of creamy vanilla ice cream against warm bars creates a delightful contrast.
- Chocolate Drizzle: A drizzle of melted dark chocolate on top enhances that indulgent factor.
- Fresh Berries: Tart raspberries or strawberries add brightness and a refreshing touch.
- Whipped Cream: Lightly sweetened whipped cream adds a billowy charm atop these indulgent squares.
- Coffee: The deep notes of a dark brew perfectly complement the sweetness of the bars.
- Hot Chocolate: Cozy and indulgent, a cup of rich hot chocolate elevates your dessert experience even further.
- Milk: The classic, ever-reliable glass of cold milk is a perfect match for any sweet treat.
Storage & Reheating Instructions
For optimal freshness, store the bars in an airtight container. They can sit at room temperature for up to 3 days, or they can be refrigerated for a week if you want to prolong the joy. You can also freeze extras for up to 3 months; simply thaw at room temperature before serving. For a warm treat, pop a bar in the microwave for 10-15 seconds to reclaim that gooey goodness.
Estimated Nutrition Information
While these numbers might vary based on specific ingredients used and portion sizes, you can expect:
- Calories: Approximately 320 per serving (1 square)
- Fat: 18g (saturated 10g)
- Carbohydrates: 38g
- Protein: 2g
- Sugar: 22g
Note: Values are approximate and can vary. Always check the specific brands used for accurate counts.
FAQs
Can I use sweetened coconut instead of unsweetened?
Absolutely! Sweetened coconut will make the bars even sweeter, which many people enjoy. Just adjust other sweet ingredients accordingly to taste.
Can I make these bars gluten-free?
Certainly! Substitute traditional all-purpose flour with a gluten-free flour blend designed for baking to achieve a similar result.
What if I don’t have caramel sauce?
You can make a quick homemade caramel by melting sugar in a pan until it turns golden and adding a little cream, though be mindful of the cooking process.
Can I double the recipe?
Yes, doubling is great for parties. Just ensure to adjust baking time if using a larger pan or split into two pans.
How do I avoid burnt coconut on top?
Keep an eye on your bars as they bake, especially in the last few minutes. If you notice the coconut browning too quickly, lightly cover your pan with foil.
Wrap-Up
Indulging in these Salted Caramel Magic Bars promises to be an unforgettable experience—one that melds flavors so well, that each bite feels like a warm hug on a cozy day. The sweetness, the texture, the pure joy of dessert—it all comes together seamlessly in this delightful recipe. So get ready to awaken your senses and treat yourself: once you take that first slice, you’ll join the ranks of those who have discovered the magic within these bars. Your friends and family will thank you, and who knows? You might just become the go-to dessert guru among your loved ones. Happy baking!
Print
Salted Caramel Magic Bars
- Total Time: 47 minutes
- Yield: 16 servings 1x
- Diet: Vegetarian
Description
Indulge in these delightful Salted Caramel Magic Bars, featuring a buttery crust, rich chocolate, chewy coconut, and smooth caramel, balanced perfectly with a sprinkle of sea salt.
Ingredients
- 1 cup unsalted butter
- 1 cup brown sugar
- 1 cup all-purpose flour
- 3 cups shredded coconut
- 1 cup chocolate chips
- 1 cup caramel sauce
- 1/2 teaspoon sea salt
Instructions
- Preheat your oven to 350°F (175°C) and prepare a 9×13 inch baking pan by greasing it or lining with parchment paper.
- Melt the butter in a large mixing bowl and combine with brown sugar until well incorporated.
- Add in the flour gradually and mix until a thick dough forms.
- Press the dough evenly into the bottom of the prepared pan.
- Bake the crust for 10-12 minutes until lightly golden brown.
- Add shredded coconut and chocolate chips evenly over the surface.
- Drizzle caramel sauce over the toppings.
- Finish baking for an additional 15-20 minutes until bubbly and golden.
- Cool completely before slicing into squares.
Notes
For best results, allow the bars to cool for at least an hour before slicing to ensure clean cuts. They keep well in an airtight container for 3-5 days.
- Prep Time: 15 minutes
- Cook Time: 32 minutes
- Category: Dessert
- Method: Baking
- Cuisine: American
Nutrition
- Serving Size: 1 square
- Calories: 320
- Sugar: 22g
- Sodium: 180mg
- Fat: 18g
- Saturated Fat: 10g
- Unsaturated Fat: 6g
- Trans Fat: 0g
- Carbohydrates: 38g
- Fiber: 1g
- Protein: 2g
- Cholesterol: 30mg
Keywords: dessert, bars, salted caramel, magic bars, chocolate, coconut