As the autumn leaves swirl around us, there’s a tangible excitement in the air. The days grow shorter, the nights grow colder, and we find ourselves yearning for the cozy comforts of home. Halloween is just around the corner, beckoning us with whispers of spooky fun and the promise of delicious treats. What could be more delightful than gathering in the kitchen, surrounded by loved ones, to bake enchanting Halloween Mask Cookies? These whimsical bites not only capture the spirit of the season but also make for a creative canvas to let your imagination run wild.
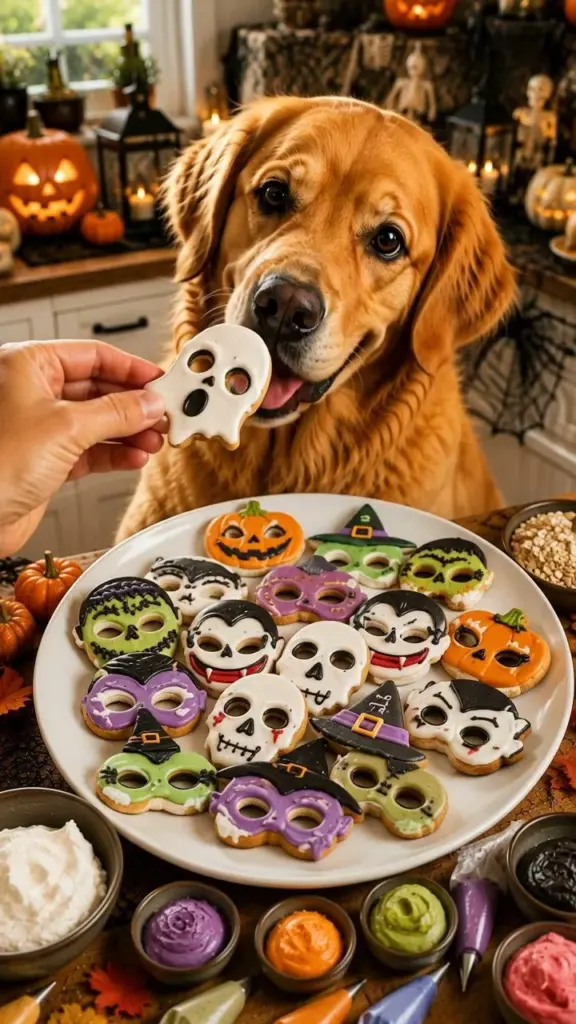
Envision the warm aroma of freshly baked cookies wafting through your home, wrapping you in a comforting embrace as you prepare to create edible masterpieces. Each cookie promises a satisfying crunch from wholesome oats and a tender bite thanks to the nourishing whole wheat flour. When combined with the rich, nutty flavor of peanut butter and a hint of sweetness from unsweetened applesauce, every mouthful bursts with cozy goodness. To take things to another level, you crown your creations with playful and vibrant Greek yogurt icing, transforming your simple cookies into charming Halloween masks that are sure to delight kids and pets alike.
Let’s explore why these cookies deserve a special place in your autumn festivities.
Why You’ll Love This Halloween Mask Cookies
These Halloween Mask Cookies stand out for so many reasons. With ingredients that are not only nutritious but also dog-friendly, you can involve your furry friends in the baking bonanza. Imagine your playful pup’s wagging tail as they await their tasty Halloween treat, knowing it’s made just for them. Not only do they look adorable with their cute mask designs, but they also taste fantastic! With a balance of wholesome ingredients, they nourish and satisfy, making them a perfect snack for your pet while retaining that delightful spirit of Halloween.
These cookies shine during any occasion, whether you’re hosting a festive gathering, attending a pet-friendly Halloween party, or simply sharing a special moment with your beloved companion at home. The personalization possibilities are endless; you can craft a myriad of mask designs, ensuring each cookie is unique. The icing serves as a chance for creativity, letting you play with colors and patterns to match your Halloween theme. Soon enough, you’ll have a tray full of captivating edible art that dazzles the eyes and warms the heart.
Preparation Phase & Tools to Use
Before stepping into the world of Halloween cookie creation, gather the essential tools that make the magic happen. You won’t need an elaborate set-up, just some simple, trusty kitchen gadgets:
- Mixing Bowl: A large bowl allows you to mix all ingredients thoroughly, creating a smooth dough. Choose one that feels comfortable and fits well in your hands.
- Rolling Pin: This is essential for rolling out your dough. Opt for a sturdy one to ensure even thickness, which helps in getting uniform cookies.
- Cookie Cutters: Halloween-themed cookie cutters transform your dough into fun shapes. From spooky bats to cheeky pumpkins, the choices are endless!
- Baking Sheet & Parchment Paper: Prepare your cookies for the oven on a lined baking sheet. The parchment paper prevents sticking and simplifies cleanup.
- Cooling Rack: Let your cookies breathe and cool entirely before adding icing. This ensures that the icing doesn’t melt away and lose its vibrant colors.
As you gather these tools, take a moment to prepare your workstation. A clean and organized area makes the baking journey joyful and efficient. Remember to preheat your oven to infuse your kitchen with warmth and anticipation!
Ingredients for Halloween Mask Cookies
Creating these delightful Halloween Mask Cookies only requires a few wholesome ingredients:
- 1 cup whole wheat flour: Brings a nutty flavor and hearty texture to the cookies. You can substitute it with all-purpose flour for a lighter version.
- 1/2 cup rolled oats: Adds chewiness and fiber, making the cookies nutritious. They contribute to a satisfyingly hearty bite.
- 1/2 cup unsweetened applesauce: This keeps the cookies moist while providing natural sweetness. If you’re leaning towards another flavor, consider using pureed pumpkin.
- 1/4 cup peanut butter (dog-friendly): This tasty ingredient provides creaminess and flavor. You can substitute it with almond butter to cater to various tastes.
- 1 egg: Acts as a binding agent and adds richness. For an alternative, try using a flaxseed egg for a vegan option.
- 1/4 cup Greek yogurt (for icing): This tasty component makes the icing tangy and smooth. You could use yogurt alternatives based on dietary needs.
- Natural food coloring (for decorating): These colors bring life to your creations! You can make your own colors using beet juice, turmeric, or spirulina.
With these wholesome and fun ingredients, you are on your way to creating memorable Halloween treats that stick with the spirit of the season.
How to Make Halloween Mask Cookies
Now, let’s dive into the baking process. Follow these steps to create your charming Halloween Mask Cookies:
- Preheat the oven: Set it to 350°F (175°C) to get things started.
- Combine the dry ingredients: In a large bowl, mix the whole wheat flour and rolled oats.
- Add the wet ingredients: Pour in the unsweetened applesauce, peanut butter, and the egg. Stir until well combined, creating a smooth and cohesive dough.
- Roll out the dough: On a lightly floured surface, roll out the dough to about 1/4 inch thick. This thickness yields a delightful texture once baked.
- Cut out shapes: Use your Halloween-themed cookie cutters to create spooky shapes from the dough. Place them carefully on a baking sheet lined with parchment paper, ensuring some space between each cookie.
- Bake the cookies: Slide the baking sheet into the preheated oven and let them bake for 20-25 minutes. Keep an eye on them—they’re ready once they turn golden brown.
- Cool completely: Transfer them to a cooling rack to let the cookies breathe and cool down fully before icing.
- Prepare the icing: In a bowl, mix Greek yogurt with natural food coloring. Stir until you achieve vibrant hues for decoration.
- Decorate: Use the colorful yogurt icing to create playful icing designs on your cooled cookies resembling Halloween masks. Let your creativity flow!
- Allow icing to dry: Before serving, give the icing some time to firm up. You want those beautiful designs to stay intact!
Now, you have a tray full of charming Halloween Mask Cookies waiting to impress.
Chef’s Notes & Helpful Tips
- Make-ahead tips: You can prepare the dough one day in advance. Wrap it tightly in plastic wrap and store it in the fridge until you’re ready to roll and cut.
- Cooking alternatives: You can also use an air fryer to cook these cookies. Simply adjust the temperature to 325°F (165°C) and reduce the baking time slightly.
- Customization ideas: Experiment with different cookie shapes and icing designs. Add sprinkles, nuts, or seeds before baking for extra flair.
Common Mistakes to Avoid
Baking is a science, and sometimes we can get lost along the way. Here are some common pitfalls to steer clear of:
- Not measuring ingredients accurately: Baking relies on exact measurements. Use measuring cups and spoons for accuracy to ensure your cookies turn out perfectly.
- Skipping the cooling process: Decorate while the cookies are still warm, and your icing will melt into a puddle. Patience is key!
- Overbaking: Keep a close watch during the final moments of baking. Cookies continue to firm up after coming out of the oven—perfect timing is crucial.
What to Serve With Halloween Mask Cookies
These cookies pair wonderfully with a variety of festive treats. Consider enhancing your Halloween experience with the following:
- Pumpkin spice latte: The spice balance complements the nutty flavors of the cookies beautifully.
- Warm apple cider: The sweetness of apples enhances the wholesome taste of the cookies, creating a delightful autumn treat.
- Dog-friendly ice cream: Reward your furry friend with a scoop of creamy goodness alongside their cookie.
- Fresh fruits: Serve sliced apples or pears for a refreshing and healthy contrast.
- Homemade yogurt: Offer a dip for your cookies to elevate the experience, enriching each bite!
- Cheese platter: Include components like cheddar or cream cheese for a savory complement to the sweetness of the cookies.
Storage & Reheating Instructions
For cookies that stay fresh and delightful, here’s how to store them properly:
- Fridge: Keep your cookies in an airtight container to maintain their chewy texture. They stay fresh for up to one week.
- Freezer: Store the unbaked dough in the freezer by wrapping it tightly. It can last up to three months. When ready, thaw in the fridge overnight before rolling and baking.
- Reheating: If your cookies lose a bit of their initial crunch, pop them in a warm oven for a 5-minute refresh or enjoy them cold—a delightful treat all on its own!
Estimated Nutrition Information
Approximate values per cookie (calculated based on the entire batch yielding around 12 cookies):
- Calories: 100
- Protein: 3g
- Carbohydrates: 12g
- Fat: 4g
- Fiber: 1.5g
- Sugar: 2g
(Due to variations in ingredients and portion sizes, these values may differ slightly.)
FAQs
-
Can I use almond flour instead of whole wheat flour?
Yes! Almond flour will yield a different texture and flavor profile, so adjust your measurements accordingly for best results. -
Are these cookies suitable for my dog?
Absolutely! All the ingredients are dog-friendly, making them a perfect treat for your furry companion. -
What if I don’t have Greek yogurt for icing?
Feel free to substitute with plain regular yogurt, or even a light cream cheese for a different flavor and texture. -
Can I make these cookies vegan?
Yes! Substitute the egg with a flaxseed egg (1 tablespoon ground flaxseed mixed with 2.5 tablespoons of water) and choose a plant-based yogurt. -
How long do the decorated cookies last?
Decorated cookies can be stored in an airtight container in the fridge for about a week, maintaining their flavorful integrity.
Indulging in the spirit of Halloween has never been sweeter or more wholesome. As the aroma of baking cookies fills your home and creates a joyous atmosphere, don’t forget to invite everyone to join in the fun—pets included! Gather your loved ones around to share in the magic of transforming simple ingredients into charming creations that embody the spirit of the season. This Halloween, make unforgettable memories with your Halloween Mask Cookies that yield not just smiles but joy and laughter in every bite. Embrace the flavors, the creativity, and the playful spirit of Halloween—your cookie adventure awaits!
Print
Halloween Mask Cookies
- Total Time: 40 minutes
- Yield: 12 cookies 1x
- Diet: Dog-Friendly
Description
Delightful and nutritious Halloween cookies that can be customized into playful mask designs, perfect for both kids and pets.
Ingredients
- 1 cup whole wheat flour
- 1/2 cup rolled oats
- 1/2 cup unsweetened applesauce
- 1/4 cup peanut butter (dog-friendly)
- 1 egg
- 1/4 cup Greek yogurt (for icing)
- Natural food coloring (for decorating)
Instructions
- Preheat the oven to 350°F (175°C).
- Combine the dry ingredients in a large bowl: whole wheat flour and rolled oats.
- Add the wet ingredients: unsweetened applesauce, peanut butter, and the egg. Stir until well combined.
- Roll out the dough on a lightly floured surface to about 1/4 inch thick.
- Cut out shapes using Halloween-themed cookie cutters and place them on a parchment-lined baking sheet.
- Bake in the preheated oven for 20-25 minutes until golden brown.
- Cool the cookies on a rack before icing.
- Prepare the icing by mixing Greek yogurt with natural food coloring.
- Decorate the cooled cookies with the colorful icing to create Halloween masks.
- Allow the icing to dry before serving.
Notes
You can prepare the dough one day in advance and store it in the fridge. Use an air fryer for cooking if preferred, adjusting temperature and time accordingly.
- Prep Time: 15 minutes
- Cook Time: 25 minutes
- Category: Dessert
- Method: Baking
- Cuisine: American
Nutrition
- Serving Size: 1 cookie
- Calories: 100
- Sugar: 2g
- Sodium: 50mg
- Fat: 4g
- Saturated Fat: 1g
- Unsaturated Fat: 3g
- Trans Fat: 0g
- Carbohydrates: 12g
- Fiber: 1.5g
- Protein: 3g
- Cholesterol: 30mg
Keywords: Halloween cookies, mask cookies, dog-friendly treats, autumn baking, festive desserts