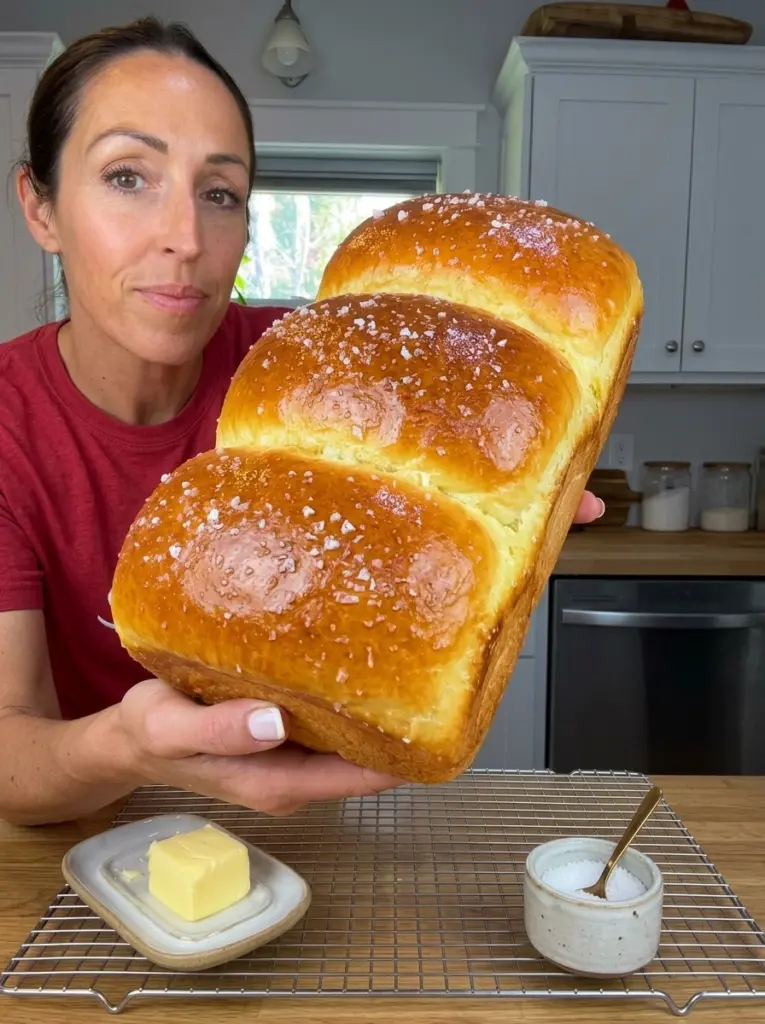
This Fluffy Salty Toast Bread is wonderfully soft, airy, lightly chewy, and beautifully golden, with a delicate salty finish that makes every slice irresistible. Made with warm milk, butter, egg, and bread flour, it has a fine, pillowy crumb that’s sturdy enough for sandwiches while remaining tender enough to enjoy simply toasted with butter.
A small amount of sugar balances the saltiness without turning the loaf into a sweet bread, while optional honey adds another layer of gentle sweetness. The finishing egg wash gives the loaf its glossy golden crust, and a light sprinkle of flaky sea salt creates that delicious sweet, buttery, and salty contrast.
It’s the kind of versatile homemade loaf you’ll want around for morning toast, grilled cheese, sandwiches, French toast, avocado toast, or warm slices spread generously with salted butter.
Why You’ll Love This Fluffy Salty Toast Bread
This bread combines the softness of an enriched sandwich loaf with a subtle savory finish.
Exceptionally soft and fluffy. Milk, egg, and butter enrich the dough and create a tender crumb.
Lightly salty flavor. Salt in the dough and optional flaky sea salt on top give the bread its distinctive savory character.
Beautifully golden crust. Egg yolk mixed with milk creates a glossy, bakery-style finish.
Perfect for toast. The bread becomes lightly crisp outside while remaining soft in the center.
Excellent sandwich texture. The fine crumb slices cleanly and holds fillings without falling apart.
Easy to customize. Add honey, sesame seeds, cheese, herbs, or extra butter depending on how you plan to serve it.
Freezer-friendly. Slice the cooled loaf and freeze it so individual pieces can go directly into the toaster.
Ingredients You’ll Need
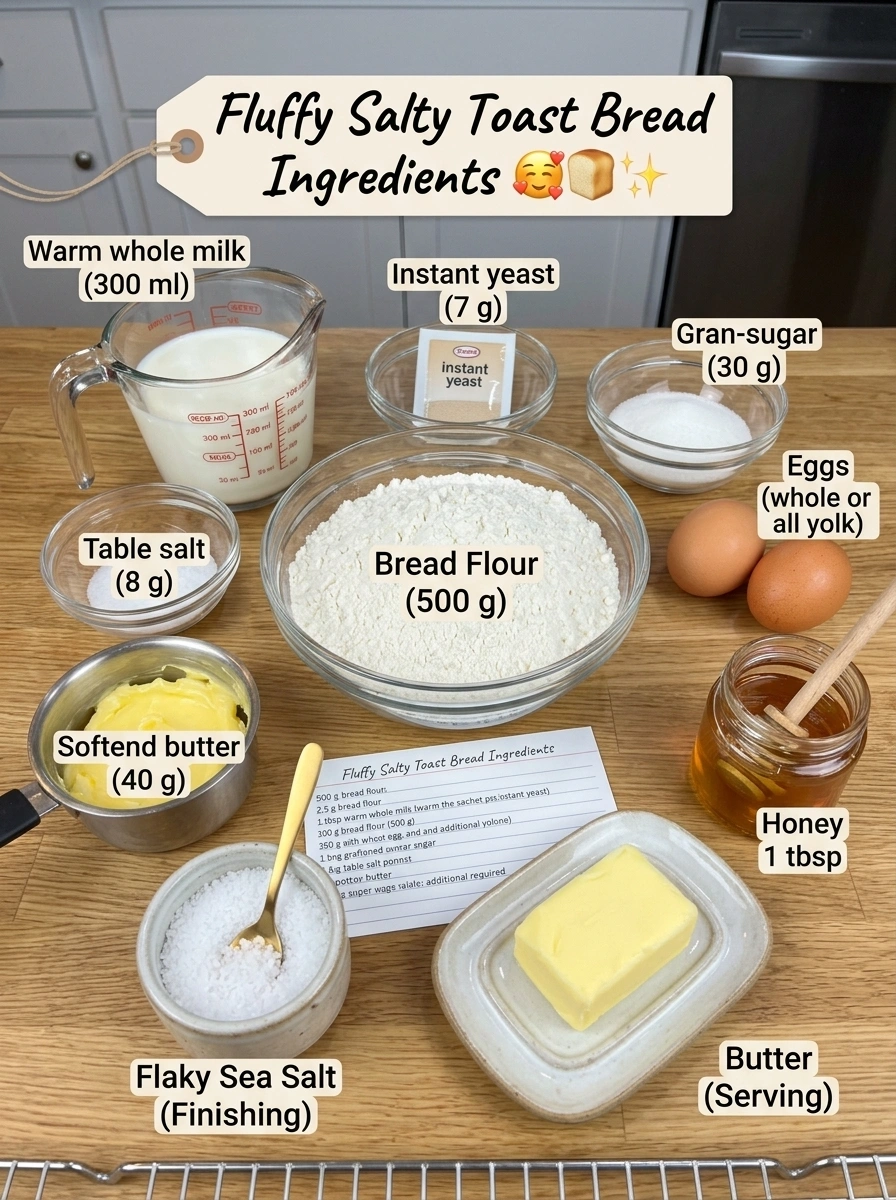
Here’s everything that goes into this Fluffy Salty Toast Bread and what each ingredient contributes.
For the Dough 🍞
- 500 g bread flour — Provides the gluten strength needed to create a tall loaf with a light but structured crumb.
- 300 ml warm milk — Adds moisture, richness, and tenderness while helping create a softer crumb than water alone.
- 7 g instant yeast — Provides the leavening that makes the bread rise and become airy.
- 30 g sugar — Adds subtle sweetness, supports browning, and balances the savory saltiness.
- 1 large egg — Enriches the dough and contributes softness, structure, and color.
- 8 g salt — Seasons the loaf and helps balance the richer ingredients.
- 40 g softened butter — Creates a tender, buttery crumb and keeps the bread soft.
- 1 tbsp honey, optional — Adds mild floral sweetness and enhances the sweet-and-salty character.
For Finishing ✨
- 1 egg yolk — Creates a rich golden color on the baked crust.
- 1 tbsp milk — Thins the yolk so it can be brushed evenly over the risen dough.
- Flaky sea salt, optional — Adds small bursts of saltiness across the golden crust.
- Butter, for serving — Especially delicious spread over warm toasted slices.
How to Make Fluffy Salty Toast Bread
The ingredients are straightforward, but proper kneading and patient proofing are essential for achieving the light, pillowy texture.
Step 1: Activate the Yeast
Add the warm milk, instant yeast, and sugar to a large mixing bowl.
Whisk gently until combined.
Allow the mixture to stand for approximately 5 minutes, until it begins looking slightly foamy.
The milk should be pleasantly warm rather than hot.
Step 2: Add the Egg and Honey
Add the large egg.
If you’re using the optional honey, add it now as well.
Whisk until everything is thoroughly combined.
Step 3: Make the Dough
Add the bread flour and salt.
Mix with a sturdy spoon, dough whisk, or your hands until a rough dough begins to form.
At this stage, don’t worry if the dough looks shaggy or uneven.
The texture will change significantly during kneading.
Step 4: Knead in the Butter 🧈
Add the softened butter gradually while kneading.
Continue kneading for approximately 8–12 minutes.
As the gluten develops and the butter becomes fully incorporated, the dough should become increasingly smooth, elastic, and supple.
The finished dough should feel soft and slightly tacky rather than stiff or dry.
Step 5: Check the Gluten Development
Gently stretch a small section of dough between your fingers.
Properly developed dough should stretch relatively thin before tearing.
This elasticity is important because the gluten network needs enough strength to capture the gases produced during fermentation.
Avoid adding unnecessary flour simply because the dough feels slightly tacky.
Step 6: First Rise
Shape the dough into a smooth ball.
Place it inside a lightly greased bowl and cover.
Leave it in a warm place for approximately 60–90 minutes, or until noticeably doubled in volume.
Rather than watching only the clock, look at the dough itself.
It should appear significantly larger, light, and aerated.
Step 7: Divide the Dough 🍞
Gently press the risen dough to release excess gas.
Transfer it to a clean work surface and divide it into 3 equal portions.
Shape each portion into a smooth ball.
Cover loosely and allow the dough to rest for approximately 10–15 minutes.
This short bench rest relaxes the gluten and makes the final shaping easier.
Step 8: Shape Each Portion
Take one dough ball and gently roll or press it into a long oval.
Fold the sides inward toward the center.
Starting at one end, roll the dough into a relatively tight log.
Position it seam-side down.
Repeat with the remaining two portions.
Step 9: Assemble the Loaf
Lightly grease a 9×5-inch loaf pan.
Arrange the three shaped dough logs side-by-side in the pan with their seams facing downward.
This shaping method helps create an attractive loaf with three soft, rounded sections across the top.
Step 10: Second Rise
Cover the loaf loosely.
Let it proof in a warm place for approximately 45–60 minutes.
The dough should become noticeably light and puffy and rise to around or slightly above the rim of the loaf pan.
Don’t rush this stage.
A properly proofed loaf will generally have a lighter texture than one that goes into the oven too early.
Step 11: Prepare the Egg Wash 🥚
Preheat the oven to 350°F (175°C).
Whisk the egg yolk with 1 tablespoon milk until smooth.
Very gently brush the egg wash over the fully proofed loaf.
Avoid pressing down hard enough to deflate the delicate dough.
Step 12: Add the Salty Finish
If desired, sprinkle a small amount of flaky sea salt over the egg-washed surface.
You don’t need much.
The goal is to create occasional salty bites rather than covering the entire loaf heavily with salt.
Step 13: Bake 🔥
Bake at 350°F (175°C) for approximately 25–30 minutes, until the bread develops a beautiful golden-brown exterior.
If the top becomes dark before the loaf has finished baking, loosely cover it with aluminum foil during the final portion of the baking time.
Step 14: Remove From the Pan
Once baked, carefully remove the loaf from its pan immediately.
Transfer it to a wire cooling rack.
Removing it from the pan prevents steam from becoming trapped against the sides and bottom.
Step 15: Cool Before Slicing
Allow the bread to cool for at least 45–60 minutes before slicing.
Although freshly baked bread is tempting to cut immediately, the crumb continues setting as the loaf cools.
Waiting gives you cleaner slices and a better final texture.
The Secret to Extra-Fluffy Toast Bread
A soft loaf isn’t created by simply adding more yeast. Several parts of the process work together.
Develop the gluten properly. Kneading creates the elastic structure needed to capture fermentation gases.
Keep the dough soft. Excessive additional flour can create a stiffer dough and denser loaf.
Use softened butter. It incorporates much more evenly than cold butter.
Give the first rise enough time. The dough should noticeably increase in volume.
Don’t skip the bench rest. Relaxed dough is easier to shape without tearing.
Don’t rush the final proof. The shaped loaf should look light and puffy before baking.
Cool before slicing. The internal structure continues stabilizing after the bread leaves the oven.
Flavor Variations ✨
Extra Buttery: Increase the butter slightly for a richer, more indulgent loaf with brioche-like qualities.
Milk Bread Style: Replace part of the milk with heavy cream for an even richer and softer crumb.
Honey Butter: Add the optional honey to the dough and serve toasted slices with whipped honey butter.
Garlic Herb Toast: Keep the basic loaf as written, then brush individual slices with garlic butter and fresh herbs before toasting.
Cheese Toast: Add shredded cheddar or Parmesan over the top for a savory cheese variation.
Sesame Salt Bread: Sprinkle sesame seeds and a small amount of flaky sea salt over the egg wash before baking.
Parmesan Herb: Add finely grated Parmesan and dried Italian herbs for a more savory sandwich loaf.
How to Serve Fluffy Salty Toast Bread
This loaf works beautifully with both sweet and savory toppings:
- Warm with salted butter — Simple and especially delicious while the bread is fresh.
- With jam or preserves — The salty bread creates a great contrast with sweet fruit.
- With honey — Toast until lightly crisp and drizzle with honey.
- As avocado toast — Top with avocado, black pepper, and eggs if desired.
- For grilled cheese — The soft crumb becomes beautifully crisp when buttered and toasted.
- For sandwiches — Use with turkey, ham, chicken, tuna, cheese, or vegetables.
- As French toast — The enriched dough works especially well for soaking up custard.
- With scrambled eggs — An easy savory breakfast.
- With cream cheese — Add tomatoes, cucumber, or herbs.
- Toasted with peanut butter — The slight saltiness complements nut butter beautifully.
Tips for the Best Fluffy Salty Toast Bread
Don’t overheat the milk. Warm milk is ideal; excessively hot milk can interfere with yeast activity.
Use bread flour for stronger structure. The extra gluten strength helps support the soft enriched dough.
Soften the butter before adding it. This makes incorporation significantly easier.
Keep the dough slightly tacky. Don’t try to make it completely dry with additional flour.
Knead until elastic. Proper gluten development is essential for the fluffy texture.
Watch the dough rather than relying entirely on time. Room temperature affects fermentation speed.
Don’t aggressively degas after the first rise. Gently pressing out large air pockets is enough.
Give the second rise enough time. The loaf should be visibly light and puffy.
Use flaky salt sparingly. There’s already salt in the dough, so the topping should provide an accent rather than overwhelm the bread.
Cool before slicing. This keeps the soft crumb from becoming compressed or gummy.
Common Toast Bread Problems
Why is my bread dense?
The dough may have been under-kneaded, under-proofed, or made too stiff by adding excess flour.
Why didn’t my loaf rise properly?
The yeast may have been inactive, the environment may have been too cool, or the dough may simply have needed more fermentation time.
Why is my bread dry?
Too much flour, excessive baking, or inaccurate ingredient measurements can produce a drier loaf.
Why did the loaf collapse?
Over-proofing can weaken the dough structure enough that it collapses during or after baking.
Why is the top browning too quickly?
The enriched dough and egg wash encourage browning. Loosely tent the loaf with foil if necessary.
Why is the inside gummy?
The bread may be underbaked or may have been sliced while still too hot.
Make-Ahead Instructions
Fluffy Salty Toast Bread is excellent for making ahead because the cooled loaf can be sliced and stored for several days.
For breakfast meal prep, slice the entire loaf after it has completely cooled and keep it tightly covered.
For longer storage, freeze individual slices so you can remove exactly what you need and toast them directly from frozen.
Storage Information
Allow the loaf to cool completely before storing it.
Store it in an airtight bread bag or container at room temperature for approximately 2–3 days.
Keep the bread well sealed to prevent the soft crumb from drying out.
For longer storage, slice the cooled loaf and place the slices in an airtight freezer bag.
Freeze for up to approximately 3 months.
Individual slices can go directly from the freezer into the toaster.
Frequently Asked Questions
What makes this bread different from regular sandwich bread?
It’s an enriched sandwich-style loaf made with milk, egg, and butter, with a slightly more noticeable salty character and optional flaky sea salt on the crust.
Is Fluffy Salty Toast Bread very salty?
It shouldn’t be. The salt is intended to balance the enriched dough, while the optional flaky salt creates occasional salty bites on the crust.
Can I skip the honey?
Yes. The honey is completely optional.
Can I skip the flaky sea salt?
Absolutely. The dough already contains salt, so the flaky topping is simply an optional finishing touch.
Can I use all-purpose flour?
It can work, although bread flour provides stronger gluten development and is particularly useful for producing a tall, structured loaf.
Why do I need to knead for 8–12 minutes?
Kneading develops the gluten network that allows the dough to retain fermentation gases and rise into a soft, airy loaf.
How do I know when the second rise is finished?
The dough should look noticeably puffy and reach around or slightly above the rim of the loaf pan.
Can I make French toast with this bread?
Yes. The milk, egg, and butter-enriched crumb makes it particularly suitable for French toast.
Can I freeze it?
Yes. Slice the cooled loaf and freeze it in an airtight freezer bag for up to approximately 3 months.
Can I toast the slices directly from frozen?
Yes. That’s one of the easiest ways to store and serve this bread.
Recipe Card
Prep Time: Approximately 25 minutes
First Rise: 60–90 minutes
Bench Rest: 10–15 minutes
Second Rise: 45–60 minutes
Bake Time: 25–30 minutes
Cooling Time: 45–60 minutes
Total Time: Approximately 3–4 hours
Yield: 1 standard 9×5-inch loaf
Oven Temperature: 350°F (175°C)
Leavening: Instant yeast
This Fluffy Salty Toast Bread combines everything you want from a homemade everyday loaf: a beautifully golden exterior, soft and pillowy interior, enough structure for sandwiches, and a delicate salty flavor that works with both sweet and savory toppings.
The biggest secret is patience. Develop the gluten properly and don’t rush either rise. Keep the dough soft, let it become noticeably airy before baking, and use only a light sprinkle of flaky sea salt for that distinctive savory finish.
Once completely cooled, slice it thick for French toast, thin for sandwiches, or pop a piece into the toaster and finish it with butter while it’s still warm.
Print
Fluffy Salty Toast Bread
Ingredients
Here’s everything that goes into this Fluffy Salty Toast Bread and what each ingredient contributes.
For the Dough 🍞
- 500 g bread flour — Provides the gluten strength needed to create a tall loaf with a light but structured crumb.
- 300 ml warm milk — Adds moisture, richness, and tenderness while helping create a softer crumb than water alone.
- 7 g instant yeast — Provides the leavening that makes the bread rise and become airy.
- 30 g sugar — Adds subtle sweetness, supports browning, and balances the savory saltiness.
- 1 large egg — Enriches the dough and contributes softness, structure, and color.
- 8 g salt — Seasons the loaf and helps balance the richer ingredients.
- 40 g softened butter — Creates a tender, buttery crumb and keeps the bread soft.
- 1 tbsp honey, optional — Adds mild floral sweetness and enhances the sweet-and-salty character.
For Finishing ✨
- 1 egg yolk — Creates a rich golden color on the baked crust.
- 1 tbsp milk — Thins the yolk so it can be brushed evenly over the risen dough.
- Flaky sea salt, optional — Adds small bursts of saltiness across the golden crust.
- Butter, for serving — Especially delicious spread over warm toasted slices.
Instructions
The ingredients are straightforward, but proper kneading and patient proofing are essential for achieving the light, pillowy texture.
Add the warm milk, instant yeast, and sugar to a large mixing bowl.
Whisk gently until combined.
Allow the mixture to stand for approximately 5 minutes, until it begins looking slightly foamy.
The milk should be pleasantly warm rather than hot.
Add the large egg.
If you’re using the optional honey, add it now as well.
Whisk until everything is thoroughly combined.
Add the bread flour and salt.
Mix with a sturdy spoon, dough whisk, or your hands until a rough dough begins to form.
At this stage, don’t worry if the dough looks shaggy or uneven.
The texture will change significantly during kneading.
Add the softened butter gradually while kneading.
Continue kneading for approximately 8–12 minutes.
As the gluten develops and the butter becomes fully incorporated, the dough should become increasingly smooth, elastic, and supple.
The finished dough should feel soft and slightly tacky rather than stiff or dry.
Gently stretch a small section of dough between your fingers.
Properly developed dough should stretch relatively thin before tearing.
This elasticity is important because the gluten network needs enough strength to capture the gases produced during fermentation.
Avoid adding unnecessary flour simply because the dough feels slightly tacky.
Shape the dough into a smooth ball.
Place it inside a lightly greased bowl and cover.
Leave it in a warm place for approximately 60–90 minutes, or until noticeably doubled in volume.
Rather than watching only the clock, look at the dough itself.
It should appear significantly larger, light, and aerated.
Gently press the risen dough to release excess gas.
Transfer it to a clean work surface and divide it into 3 equal portions.
Shape each portion into a smooth ball.
Cover loosely and allow the dough to rest for approximately 10–15 minutes.
This short bench rest relaxes the gluten and makes the final shaping easier.
Take one dough ball and gently roll or press it into a long oval.
Fold the sides inward toward the center.
Starting at one end, roll the dough into a relatively tight log.
Position it seam-side down.
Repeat with the remaining two portions.
Lightly grease a 9×5-inch loaf pan.
Arrange the three shaped dough logs side-by-side in the pan with their seams facing downward.
This shaping method helps create an attractive loaf with three soft, rounded sections across the top.
Cover the loaf loosely.
Let it proof in a warm place for approximately 45–60 minutes.
The dough should become noticeably light and puffy and rise to around or slightly above the rim of the loaf pan.
Don’t rush this stage.
A properly proofed loaf will generally have a lighter texture than one that goes into the oven too early.
Preheat the oven to 350°F (175°C).
Whisk the egg yolk with 1 tablespoon milk until smooth.
Very gently brush the egg wash over the fully proofed loaf.
Avoid pressing down hard enough to deflate the delicate dough.
If desired, sprinkle a small amount of flaky sea salt over the egg-washed surface.
You don’t need much.
The goal is to create occasional salty bites rather than covering the entire loaf heavily with salt.
Bake at 350°F (175°C) for approximately 25–30 minutes, until the bread develops a beautiful golden-brown exterior.
If the top becomes dark before the loaf has finished baking, loosely cover it with aluminum foil during the final portion of the baking time.
Once baked, carefully remove the loaf from its pan immediately.
Transfer it to a wire cooling rack.
Removing it from the pan prevents steam from becoming trapped against the sides and bottom.
Allow the bread to cool for at least 45–60 minutes before slicing.
Although freshly baked bread is tempting to cut immediately, the crumb continues setting as the loaf cools.
Waiting gives you cleaner slices and a better final texture.