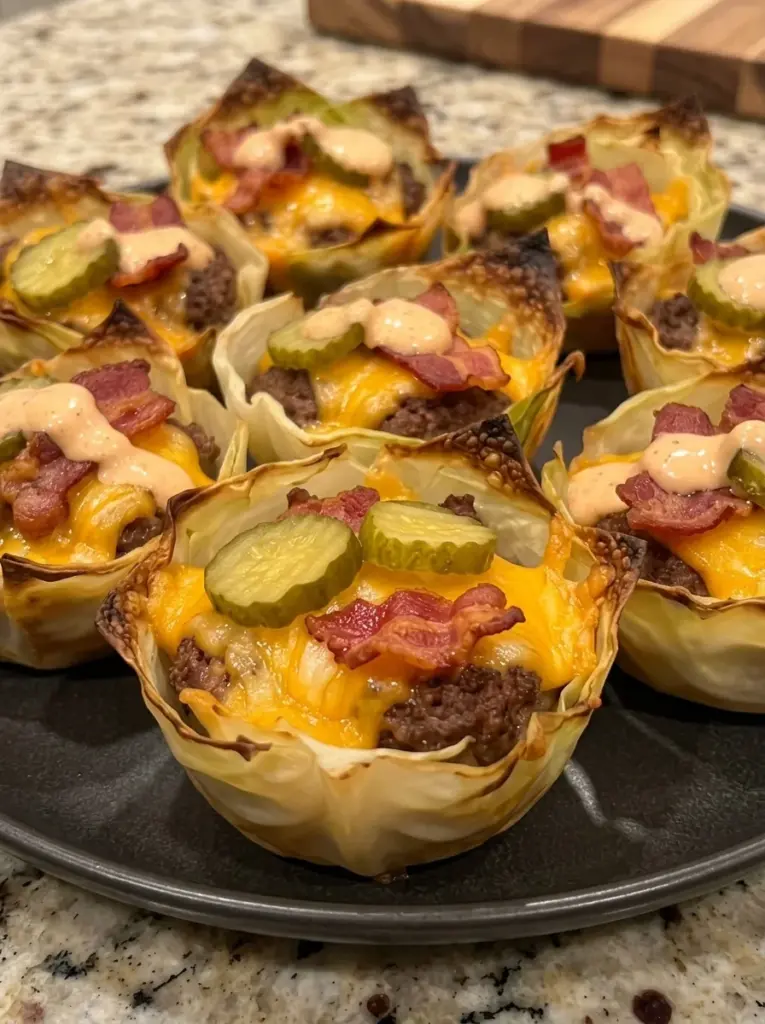
These Crispy Bacon Cheeseburger Cheddar Cabbage Cups bring together seasoned ground beef, smoky bacon, melted sharp cheddar, and a tangy burger sauce in tender cabbage leaves. Baking gives the exposed leaf edges a little golden color while the centers stay soft enough to cut with a fork.
They are a fun alternative to a cheeseburger bun and an easy way to turn familiar burger ingredients into a baked dinner. Serve two generously filled cups per person, with pickles and green onions added just before eating.
The key is drying the blanched cabbage thoroughly and draining excess fat from the filling. Cabbage holds moisture, so expect lightly crisped edges rather than a crunchy shell throughout. The bacon adds the most reliable crisp bite, especially if you reserve some for finishing.
Recipe at a glance: 8–10 cups · about 4 servings · 20–25 minutes prep · approximately 25–30 minutes cooking · about 45–55 minutes total, with cooked bacon ready.
Why You’ll Love This Recipe
- Familiar cheeseburger flavor: Beef, bacon, cheddar, mustard, and pickles work together in each serving.
- A vegetable base: Cabbage leaves hold the filling without a bread bun.
- Flexible portions: Make eight larger cups or ten smaller ones.
- Easy preparation ahead: Cook the filling in advance and assemble when ready to bake.
- Customizable toppings: Add burger sauce, pickles, and green onions at the table.
What Are Cheeseburger Cabbage Cups?
These are open cabbage cups filled with cooked cheeseburger-style beef and topped with cheese. Unlike cabbage rolls, they are not wrapped into closed parcels or simmered in tomato sauce. The tops remain open so the cheese melts and the exposed leaf edges can brown.
They are intended as a lower-carb alternative to a bread-based burger, but exact carbohydrate and calorie values depend on ingredient brands, portions, and toppings. No specific nutrition claim or calculated calorie figure is included here.
Ingredients
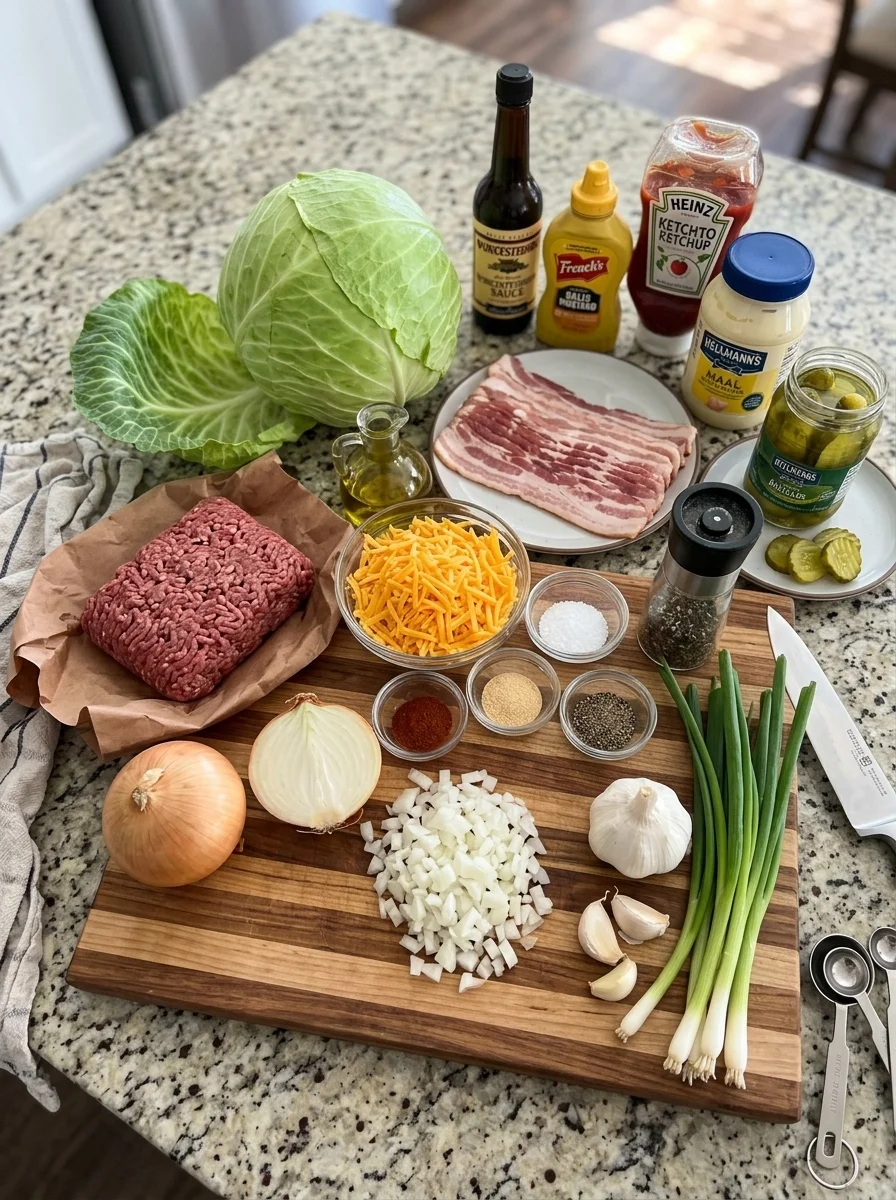
Cabbage Cups
- 1 large head green cabbage; use 8–10 large intact leaves
- 1 tablespoon olive oil, plus a little for greasing the pan if needed
- ½ teaspoon garlic powder
- ½ teaspoon smoked paprika
- Salt and black pepper, to taste
Cheeseburger Filling
- 1 lb lean ground beef
- 6 slices bacon, cooked until crisp and crumbled
- 1 cup shredded sharp cheddar cheese, divided
- ½ small yellow onion, finely diced
- 2 garlic cloves, minced
- 1 tablespoon Worcestershire sauce
- 1 tablespoon yellow mustard
- ½ teaspoon smoked paprika
- ½ teaspoon onion powder
- Salt and black pepper, to taste
Optional Burger Sauce and Toppings
- 2 tablespoons sugar-free ketchup
- 2 tablespoons mayonnaise
- 1 teaspoon yellow mustard
- 2 tablespoons chopped dill pickles
- 2 tablespoons sliced green onions
Ingredient Notes
Green cabbage: Choose a large head with broad leaves. Use the remaining cabbage for slaw, soup, or another meal. Only the leaves used for the cups belong in the recipe yield; you do not need to fit the entire head into the pan.
Lean ground beef: A 90/10 blend is a useful starting point. Even lean beef can release liquid and fat, so drain as necessary before filling the leaves. Very lean beef can become dry if browned extensively and then baked too long.
Cooked bacon: The listed prep schedule assumes the bacon is already cooked. If starting with raw bacon, allow extra time to cook it according to the package directions. Fold most into the filling and reserve a small amount for topping if you prefer a crisper finish.
Sharp cheddar: Gives a noticeable cheese flavor without needing a heavy layer. Freshly shredded cheese often melts smoothly, though packaged shredded cheddar is convenient and works here.
Onion and garlic: Dice the onion finely so it cooks alongside the beef. Add garlic near the end of the skillet step to keep it from burning.
Worcestershire and mustard: Provide savory depth and tang. Bacon, cheese, and Worcestershire already contain salt; taste the cooked filling before adding more.
Burger sauce: Sugar-free ketchup keeps added sugar lower than many standard versions, but labels vary. Use your preferred ketchup if that is not a priority. Keep the sauce separate until serving so it does not soften the baked edges prematurely.
Choose a Pan That Supports the Leaves
An oven-safe jumbo muffin pan gives these cups reliable support. A regular muffin pan may be too small for large leaves and this quantity of filling; use smaller leaf sections and make more cups if needed.
A rimmed metal baking sheet also works, but unsupported cabbage leaves tend to spread. Nest each leaf into a small open bowl shape and overlap the trimmed sides. If they will not stay upright, arrange them in individual oven-safe ramekins or a suitably sized muffin pan instead.
Use metal cookware if you plan to broil. Check its heat rating and avoid broiling parchment paper, silicone pans, or cookware that is not approved for that setting.
How to Make Them
1. Prepare the oven and cabbage
Preheat the oven to 400°F. Lightly grease your chosen pan.
Remove damaged cabbage leaves and carefully separate 8–10 large leaves. Shave down the thick center rib with a knife without cutting through the leaf. The goal is a thinner, flexible rib, not a hole through the center.
If the leaves resist separating, core the head and briefly soften it in a large pot of simmering water, lifting away outer leaves as they loosen. Use tongs and handle carefully.
2. Blanch and dry
Blanch the separated leaves in boiling water for approximately 2–3 minutes, just until flexible. Transfer to cold water to stop further cooking, then drain.
Pat both sides thoroughly dry with clean towels. Check the folds and ribs where water can collect. This step makes a noticeable difference to browning and prevents excess liquid beneath the cups.
3. Season and shape
Brush the leaves lightly with the tablespoon of olive oil. Sprinkle with garlic powder, smoked paprika, and a modest amount of salt and pepper.
Press into greased jumbo muffin wells or shape supported cups in your chosen pan. Overlap the sides where necessary. Leave an exposed rim above the filling so some cabbage can brown.
4. Cook the beef and onion
Heat a skillet over medium-high heat. Add the beef and finely diced onion. Cook for approximately 6–8 minutes, breaking the beef into crumbles, until the onion is tender and the beef is cooked through. Ground beef should reach 160°F, measured with a food thermometer.
Drain excess fat or liquid. Stir in the garlic, Worcestershire, mustard, smoked paprika, and onion powder. Cook for another minute, then remove from the heat. Taste and adjust salt and pepper.
5. Add bacon and cheese
Fold in the cooked bacon and ½ cup cheddar. If you reserved bacon for the tops, keep it aside now. The cheese may begin melting in the hot filling; that is expected.
6. Fill and bake
Divide the filling between the cabbage cups without packing it tightly. Sprinkle with the remaining ½ cup cheddar.
Bake for approximately 15–20 minutes, until the cheese is melted and bubbling and the exposed cabbage edges are lightly golden. The filling has already been cooked, so the baking step heats the assembled cups and browns the finish.
For more color, broil briefly for 1–2 minutes only in broiler-safe cookware, watching continuously. Cabbage edges and cheese can scorch quickly. Skip broiling if the rims are already dark.
7. Add the toppings and serve
Mix the ketchup, mayonnaise, and teaspoon of mustard. Let the cups stand for about 3 minutes so they are easier to lift with a thin spatula or spoon.
Drizzle with sauce and add pickles, green onions, and any reserved bacon. Serve promptly while the cheese is warm.
Tips for Better Texture
Dry thoroughly after blanching. Oil cannot create a browned edge effectively when the leaf is covered in water.
Drain the filling. Beef juices and excess grease collect inside the leaf instead of evaporating quickly.
Use support. A shaped pan gives more consistent cups than relying on a soft leaf to stand alone.
Leave some rim exposed. Completely burying the cabbage beneath filling and cheese limits browning.
Finish with some bacon. Bacon inside the filling softens as it absorbs moisture. A small amount added at the end gives a crisper bite.
Add sauce last. A thick drizzle before baking changes the texture and can make the tops wet.
Troubleshooting
| Problem | Practical fix |
|---|---|
| Leaves tear while separating | Soften the head briefly in simmering water and remove leaves with tongs as they loosen. |
| Leaves will not bend | Blanch slightly longer and shave the thick rib thinner. |
| Cups collapse | Use a jumbo muffin pan or individual oven-safe ramekins. |
| Liquid collects in the pan | Dry the leaves more thoroughly and drain the beef filling. |
| Cabbage stays soft | The centers are supposed to be tender. Only exposed edges are likely to crisp; avoid overcrowding and excessive sauce. |
| Edges burn | Remove from the broiler immediately or loosely shield dark areas with foil during baking. |
| Filling tastes too salty | Use less added salt next time and check the bacon, cheese, and sauce labels. |
Variations
Spicy cheeseburger cups: Add a little minced jalapeño to the onion while browning, or use pepper Jack for part of the cheddar.
Turkey filling: Replace beef with ground turkey and cook it to 165°F. The flavor and fat content differ; avoid overcooking the lean filling.
Mushroom cheeseburger cups: Cook ½ cup finely chopped mushrooms with the onion until their liquid evaporates, then continue with the beef.
Different cheese: Use Monterey Jack, Colby Jack, or a cheddar blend. Cheese varieties affect melt, saltiness, and flavor.
Keep additions relatively dry and modest so the cups do not become overloaded.
Serving Suggestions
For dinner, serve two large cups with a crisp salad, roasted vegetables, or a cucumber-and-pickle salad. For an appetizer, make smaller cups and offer the sauce on the side.
Fries or roasted potatoes complement the cheeseburger flavor if carbohydrate reduction is not your goal. For a lighter plate, use a vegetable side and a measured amount of sauce.
These are easiest to eat with a fork and knife rather than as handheld snacks, especially when warm and generously filled.
Make-Ahead Instructions
Prepare the beef-and-bacon filling in advance, cool promptly in a shallow container, and refrigerate. Blanch and dry the cabbage leaves separately, then store covered in the refrigerator.
Assemble near serving time for better texture. Reheat chilled filling to 165°F before assembling, then bake until the cheese melts and the cups are hot. Alternatively, bake assembled chilled cups until the center reaches 165°F, allowing extra time and covering the top if it browns early.
Preparing components ahead does not restart their storage clock. Use them within the original refrigerated storage window.
Storage and Reheating
Refrigerate leftover cups in shallow airtight containers within 2 hours, or within 1 hour if the surrounding temperature exceeds 90°F. Store at 40°F or below and use within 3–4 days. Keep sauce and fresh toppings separate.
For freezing, the beef filling generally keeps a better texture than the assembled cups. Freeze cooled portions for up to 2–3 months for best quality. Cabbage leaves can soften and release water after thawing.
Thaw frozen filling in the refrigerator. Reheat cooked cups in a 375°F oven, checking after 8–12 minutes and continuing until the center reaches 165°F. Actual timing depends on their size and starting temperature. An air fryer can restore some edge texture, but use a suitable temperature and check often so the leaves do not burn before the filling heats through.
Add burger sauce, pickles, and green onions after reheating.
Frequently Asked Questions
Are these completely crispy?
No. The cabbage centers remain tender, while some exposed edges brown and become lightly crisp. Bacon gives an additional crunchy element, particularly when added just before serving.
Do I need to blanch the cabbage?
Blanching makes large leaves easier to bend into cups. Raw leaves are more likely to split at the rib and may bake unevenly.
Can I use red cabbage?
Its leaves are often firmer, and the appearance and cooking behavior differ. Green cabbage is recommended for this version.
Can I use a regular muffin pan?
Yes, with smaller leaf sections and less filling per cup. You will make more cups, and the baking time may be shorter. Jumbo wells are more convenient for the stated yield.
Do I cook the beef before baking?
Yes. Fully cook the ground beef in the skillet before filling the cabbage leaves. The oven step is not intended to cook a raw beef filling.
Are they low-carb or keto?
They omit the bread bun and use cabbage, but suitability depends on your ingredient brands, portions, and dietary targets. Check labels and calculate the finished recipe rather than assuming a precise carbohydrate count.
Recipe Card
Crispy Bacon Cheeseburger Cheddar Cabbage Cups
Tender cabbage cups filled with seasoned beef, bacon, and cheddar, finished with optional burger sauce and pickles.
Prep: Approximately 20–25 minutes, with cooked bacon ready
Cook: Approximately 25–30 minutes
Total: Approximately 45–55 minutes
Yield: 8–10 cups
Servings: About 4
Equipment: Large pot, skillet, oven-safe jumbo muffin pan or supported metal baking pan
Ingredients
Cabbage cups
- 1 large head green cabbage; use 8–10 large leaves
- 1 tablespoon olive oil, plus a little for greasing if needed
- ½ teaspoon garlic powder
- ½ teaspoon smoked paprika
- Salt and black pepper, to taste
Filling
- 1 lb lean ground beef
- 6 slices bacon, cooked crisp and crumbled
- 1 cup shredded sharp cheddar, divided
- ½ small yellow onion, finely diced
- 2 garlic cloves, minced
- 1 tablespoon Worcestershire sauce
- 1 tablespoon yellow mustard
- ½ teaspoon smoked paprika
- ½ teaspoon onion powder
- Salt and black pepper, to taste
Optional toppings
- 2 tablespoons sugar-free ketchup
- 2 tablespoons mayonnaise
- 1 teaspoon yellow mustard
- 2 tablespoons chopped dill pickles
- 2 tablespoons sliced green onions
Instructions
- Preheat the oven to 400°F and lightly grease the pan. Separate 8–10 cabbage leaves and shave the thick ribs so they bend.
- Blanch leaves for 2–3 minutes, until flexible. Transfer to cold water, drain, and dry thoroughly.
- Brush leaves with olive oil and season with garlic powder, smoked paprika, salt, and pepper. Shape into supported cups in the pan.
- Brown beef and onion in a skillet for about 6–8 minutes, until the beef reaches 160°F. Drain excess fat. Add garlic, Worcestershire, mustard, smoked paprika, and onion powder; cook 1 minute. Taste and adjust seasoning.
- Remove from heat. Stir in bacon and half the cheddar, reserving a little bacon for finishing if desired.
- Divide filling between the cups and top with remaining cheddar. Bake 15–20 minutes, until hot, melted, and lightly golden at the edges. Broil briefly only if needed and only in suitable cookware.
- Mix ketchup, mayonnaise, and mustard for the sauce. Rest cups about 3 minutes, then add sauce, pickles, green onions, and reserved bacon. Serve hot.
Notes
- The prep estimate assumes the bacon is already cooked. Allow additional time if starting with raw bacon.
- The centers remain tender; browning is concentrated at the exposed cabbage edges.
- Nutritional values have not been calculated, so the original approximate calorie figure is not retained.
- Check ingredient labels for allergens and dietary requirements.
Final Thoughts
Dry cabbage leaves, a well-drained filling, and a supported pan make these cups easier to assemble and serve. Finish them with sauce and pickles at the table so the browned edges and bacon retain as much texture as possible.
Crispy Bacon Cheeseburger Cheddar Cabbage Cups
- Total Time: Approximately 45-55 minutes
- Yield: 8–10 cups 1x
Ingredients
Cabbage Cups
- 1 large head green cabbage; use 8–10 large intact leaves
- 1 tablespoon olive oil, plus a little for greasing the pan if needed
- ½ teaspoon garlic powder
- ½ teaspoon smoked paprika
- Salt and black pepper, to taste
Cheeseburger Filling
- 1 lb lean ground beef
- 6 slices bacon, cooked until crisp and crumbled
- 1 cup shredded sharp cheddar cheese, divided
- ½ small yellow onion, finely diced
- 2 garlic cloves, minced
- 1 tablespoon Worcestershire sauce
- 1 tablespoon yellow mustard
- ½ teaspoon smoked paprika
- ½ teaspoon onion powder
- Salt and black pepper, to taste
Optional Burger Sauce and Toppings
- 2 tablespoons sugar-free ketchup
- 2 tablespoons mayonnaise
- 1 teaspoon yellow mustard
- 2 tablespoons chopped dill pickles
- 2 tablespoons sliced green onions
Instructions
- Preheat the oven to 400°F and lightly grease the pan. Separate 8–10 cabbage leaves and shave the thick ribs so they bend.
- Blanch leaves for 2–3 minutes, until flexible. Transfer to cold water, drain, and dry thoroughly.
- Brush leaves with olive oil and season with garlic powder, smoked paprika, salt, and pepper. Shape into supported cups in the pan.
- Brown beef and onion in a skillet for about 6–8 minutes, until the beef reaches 160°F. Drain excess fat. Add garlic, Worcestershire, mustard, smoked paprika, and onion powder; cook 1 minute. Taste and adjust seasoning.
- Remove from heat. Stir in bacon and half the cheddar, reserving a little bacon for finishing if desired.
- Divide filling between the cups and top with remaining cheddar. Bake 15–20 minutes, until hot, melted, and lightly golden at the edges. Broil briefly only if needed and only in suitable cookware.
- Mix ketchup, mayonnaise, and mustard for the sauce. Rest cups about 3 minutes, then add sauce, pickles, green onions, and reserved bacon. Serve hot.
- Prep Time: Approximately 20–25 minutes, with cooked bacon ready
- Cook Time: Approximately 25–30 minutes