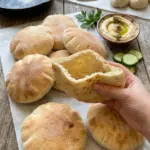
Ingredients
- 3 cups all-purpose flour
- 1 cup warm water, approximately 105–110°F
- 2 1/4 tsp instant yeast
- 1 tbsp honey or granulated sugar
- 1 tsp salt
- 2 tbsp extra-virgin olive oil
- 2–3 tbsp additional flour, only if needed
Instructions
Step 1: Prepare the Yeast Mixture 🍞
Pour 1 cup warm water into a large mixing bowl.
Aim for approximately 105–110°F.
Add:
- 1 tablespoon honey or granulated sugar
- 2 1/4 teaspoons instant yeast
Stir gently.
Allow the mixture to stand for approximately 5 minutes.
With instant yeast, this short rest isn’t strictly necessary for activation, but it gives the ingredients time to begin hydrating before the flour is added.
Step 2: Add the Flour
Add 3 cups all-purpose flour to the bowl.
Then add:
- 1 teaspoon salt
- 2 tablespoons extra-virgin olive oil
Begin stirring with a wooden spoon or sturdy spatula.
Continue until the mixture comes together into a shaggy dough.
Step 3: Check the Dough Consistency
The dough should be soft and slightly sticky.
Don’t try to make it completely dry.
If it’s extremely wet and impossible to handle, add additional flour gradually.
Use only 1 tablespoon at a time, up to approximately 2–3 tablespoons if necessary.
Flour absorption varies with brands, measuring methods, and humidity.
The goal is a soft dough that can be kneaded—not a stiff, dry dough.
Step 4: Knead the Dough
Turn the dough onto a lightly floured work surface.
Knead for approximately 5–7 minutes.
Use a push-fold-turn motion until the dough becomes smoother and more elastic.
As you knead, it should become easier to handle.
Avoid continually dusting the surface with flour unless genuinely necessary.
Adding too much flour during kneading can make the finished pitas dry and less flexible.
Step 5: Prepare the Dough for Rising
Lightly oil a clean mixing bowl.
Shape the kneaded dough into a ball and place it inside.
Turn it once so the exterior receives a very light coating of oil.
Cover the bowl with plastic wrap or a clean kitchen towel.
Step 6: Let the Dough Rise
Place the covered bowl somewhere warm and free from drafts.
Allow the dough to rise for approximately 60–90 minutes.
Rather than relying entirely on the clock, watch the dough.
It should approximately double in volume and look noticeably puffy.
In a warm kitchen this may happen closer to 60 minutes.
In a cooler kitchen it may require 90 minutes or slightly longer.
Step 7: Divide the Dough
Transfer the risen dough onto a lightly floured surface.
Gently press it down to release large pockets of gas.
Divide it into 8 equal pieces.
For extremely uniform pita breads, weigh the entire dough and divide the total weight by eight.
Step 8: Shape Into Balls
Take each portion and gently shape it into a smooth ball.
Try to create a relatively smooth outer surface.
Arrange the eight dough balls on your work surface.
Cover them with a clean kitchen towel.
Step 9: Rest for 10–15 Minutes
Let the dough balls rest for 10–15 minutes.
This short rest is important because dividing and shaping tightens the gluten.
Resting allows the gluten to relax, making the dough much easier to roll without springing back.
If a dough ball still resists rolling after the rest, leave it covered for another few minutes and move on to another piece.
How to Shape Pita Bread for the Best Pocket 🫓
Step 10: Roll the First Pita
Lightly flour your work surface and rolling pin.
Place one dough ball on the surface and flatten it gently.
Roll it into a round approximately 6–7 inches wide and about 1/4 inch thick.
Step 11: Keep the Thickness Even
Uniform thickness is one of the most important factors for pocket formation.
If one section is very thin while another is thick, steam can escape through the thin section before enough pressure develops to inflate the entire pita.
Roll from the center outward and rotate the dough occasionally.
Aim for consistent thickness from one edge to the other.
Step 12: Don’t Roll Too Thin
It can be tempting to roll pita dough extremely thin.
Avoid doing that for this recipe.
Approximately 1/4 inch thick gives the dough enough substance to remain soft and provides a good environment for steam to develop internally.
Step 13: Keep the Rolled Pitas Covered
Place the rolled pita rounds under a clean kitchen towel while shaping the remaining dough.
Keeping them covered prevents their surfaces from drying out.
A dried surface can interfere with proper expansion during cooking.
How to Cook Pita Bread on a Skillet 🔥
Step 14: Preheat the Skillet Thoroughly
Place a large cast-iron skillet or heavy-bottomed pan over medium-high to high heat.
Allow it to become thoroughly hot before cooking.
This step is critical.
A skillet that isn’t hot enough may slowly cook the pita without creating the rapid steam production needed for dramatic inflation.
Step 15: Don’t Add Oil
Cook the pita on a dry skillet.
Do not brush the skillet with olive oil.
Direct contact between the dough and the hot dry surface encourages rapid cooking and puffing.
Step 16: Add the First Pita
Carefully place one rolled pita into the hot skillet.
Cook for approximately 30–45 seconds.
Small bubbles should begin appearing across the surface.
Step 17: Flip
Flip the pita with a spatula or tongs.
Cook the second side for another 30–45 seconds.
You should see additional bubbles developing.
Step 18: Flip Again
Turn the pita back to the original side.
Continue cooking for approximately 30–60 seconds.
At this stage, steam should begin accumulating inside the pita.
Ideally, the bread will dramatically expand into a balloon.
Step 19: Encourage the Pocket if Needed
If only part of the pita is inflating, gently press around the edges with a spatula.
Don’t aggressively flatten the center.
Gentle pressure near uninflated areas can sometimes encourage trapped steam to move through the interior and expand the remaining section.
Step 20: Finish Cooking
Continue cooking just until the pita is cooked through and lightly browned in spots.
Avoid leaving it on the skillet unnecessarily after it’s done.
Overcooking can dry the bread and make it less flexible.
Step 21: Repeat
Transfer the cooked pita from the skillet.
Cook the remaining seven pitas using the same process.
Monitor the skillet temperature throughout.
Cast iron in particular can continue accumulating heat, so you may need to reduce the burner slightly after several pitas.