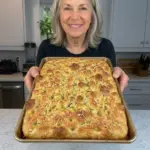
Ingredients
For the Focaccia
- 3 cups all-purpose flour
- 2 1/4 tsp instant yeast
- 1 1/2 tsp kosher salt
- 1 tbsp honey
- 1 1/2 cups lukewarm water
- 3 tbsp extra-virgin olive oil, divided
- 1 tbsp butter, for greasing the pan
Garlic Parmesan Topping 🧀
- 3 tbsp extra-virgin olive oil
- 3 garlic cloves, finely minced
- 1/2 cup finely grated Parmesan cheese
- 1 tsp fresh rosemary, chopped
- 1/2 tsp flaky sea salt
- 1/4 tsp black pepper
- 1/4 tsp garlic powder, optional
Instructions
Step 1: Mix the Dough
In a large mixing bowl, combine:
- 3 cups all-purpose flour
- 2 1/4 teaspoons instant yeast
- 1 1/2 teaspoons kosher salt
Add:
- 1 tablespoon honey
- 1 1/2 cups lukewarm water
- 2 tablespoons extra-virgin olive oil
Stir with a wooden spoon or sturdy spatula until everything comes together.
The dough will be very wet, sticky, and shaggy.
That’s exactly how it should look.
Don’t Add Extra Flour Because the Dough Looks Wet
This is important.
Focaccia dough isn’t supposed to resemble a firm sandwich-bread dough.
Its high moisture level helps create the soft, open crumb and large irregular bubbles associated with good focaccia.
If you keep adding flour until the dough becomes easy to handle, you can end up with a much denser bread.
Embrace the sticky dough.
Use olive oil on your hands when you need to touch it.
Step 2: Add the Remaining Olive Oil
Drizzle the remaining 1 tablespoon olive oil over the dough.
Gently fold the dough over itself a few times.
You don’t need to knead vigorously.
The goal is simply to coat the dough and give it a little structure.
Step 3: First Rise
Cover the bowl tightly.
Let the dough rise at room temperature for approximately 2–3 hours.
The exact time depends on the temperature of your kitchen and the activity of your yeast.
Instead of relying entirely on the clock, watch the dough.
It’s ready when it looks:
Puffy + bubbly + airy + approximately doubled in volume.
You should see obvious fermentation activity.
How to Tell When Focaccia Dough Has Risen Enough
Look at the dough rather than only watching the timer.
Properly risen dough should appear dramatically puffier than when you mixed it.
You may notice:
- Bubbles underneath the surface
- Bubbles around the edges of the bowl
- A soft, jiggly texture
- Considerable increase in volume
If your kitchen is cool, the rise may take longer than three hours.
Give the yeast the time it needs.
Step 4: Prepare the Pan
Generously butter a 9-inch cast-iron skillet or 9×9-inch baking pan.
Add a drizzle of olive oil and spread it across the bottom.
The combination of butter and olive oil adds flavor and helps create beautifully crisp edges.
Make sure the corners and sides are well coated.
Step 5: Transfer the Dough
Gently scrape the risen dough into the prepared pan.
Avoid punching it down.
Using lightly oiled fingertips, gently stretch the dough toward the edges.
Don’t worry if it immediately springs back.
That’s normal.
If the dough strongly resists stretching, leave it alone for 10–15 minutes.
Then return and gently stretch it again.
The gluten will relax during the rest, making the dough much easier to spread.
Step 6: Second Rise
Cover the pan loosely.
Let the dough rise for another 45–60 minutes.
The dough should become noticeably:
- Softer
- Puffier
- Airier
- More relaxed
You may see large bubbles forming across the surface.
Try not to pop them unnecessarily.
Why Focaccia Needs a Second Rise
Some gas is inevitably lost when you transfer and stretch the dough.
The second rise gives the yeast another opportunity to inflate the dough before baking.
This is one of the keys to achieving a pillowy interior rather than a flat, dense focaccia.
Step 7: Make the Garlic-Infused Olive Oil
While the dough completes its second rise, combine:
- 3 tablespoons extra-virgin olive oil
- 3 finely minced garlic cloves
Let the mixture sit for at least 10 minutes.
This allows the fresh garlic to infuse the oil.
How to Prevent Garlic from Burning
Fresh garlic can burn in a 425°F oven if large pieces sit exposed on the surface.
Finely mincing it helps.
When you pour the garlic oil over the dough, distribute the garlic evenly and allow some of it to settle into the dimples rather than leaving large clumps on top.
Keep an eye on the focaccia near the end of baking.
If the Parmesan and garlic are becoming too dark before the bread is done, loosely tent the top with foil.
Step 8: Preheat the Oven
Preheat your oven to 425°F.
Allow it to become fully heated before baking.
A hot oven gives the focaccia good oven spring and helps create the deeply golden crust.
Step 9: Add the Garlic Oil
Pour the garlic-infused olive oil evenly over the risen dough.
Use the back of a spoon or your fingertips to distribute it gently if necessary.
Let the oil naturally settle across the surface.
Step 10: Dimple the Focaccia
Lightly oil your fingertips.
Spread your fingers apart and press deeply into the dough.
Continue dimpling across the entire surface.
Press nearly to the bottom without intentionally tearing through the dough.
The garlic-infused olive oil should collect inside some of the dimples.
Why Are Focaccia Dimples Important?
Those famous dimples aren’t merely decorative.
They help:
- Hold olive oil
- Distribute garlic
- Trap herbs and seasonings
- Create varied surface texture
- Produce little crisp and tender areas
Deep dimples give focaccia its unmistakable appearance.
Step 11: Add the Parmesan and Seasonings
Sprinkle 1/2 cup finely grated Parmesan evenly over the dough.
Finish with:
- 1 teaspoon chopped fresh rosemary
- 1/2 teaspoon flaky sea salt
- 1/4 teaspoon black pepper
- 1/4 teaspoon garlic powder, if desired
Try to distribute everything evenly so each slice gets garlic, Parmesan, rosemary, and salt.
Step 12: Bake
Bake at 425°F for approximately 25–30 minutes.
The focaccia should become:
Deeply golden + puffed + crisp around the edges + browned underneath.
The Parmesan should melt into the surface and develop golden toasted areas.
Step 13: Watch the Parmesan
Parmesan can brown faster than plain focaccia.
Start checking the bread toward the lower end of the baking range.
If the cheese is becoming deeply browned while the bread still needs additional baking time, loosely tent the top with aluminum foil.
Continue baking until the bread itself is done.
Step 14: Cool Briefly
Remove the focaccia from the oven.
Let it cool in the pan for approximately 10 minutes.
This allows the interior structure to set.
Step 15: Remove from the Pan
Carefully loosen the edges and transfer the bread to a cutting board or cooling rack.
Removing it from the pan prevents trapped steam from gradually softening that crisp bottom crust.
Step 16: Finish and Serve
For an extra-rich finish, brush or drizzle the warm surface with a little additional extra-virgin olive oil.
Slice into approximately 8 generous pieces.
Serve warm.