Ingredients
For the Dough 🍞
- 500 g bread flour — provides the structure and chew characteristic of a farmhouse-style loaf.
- 350 g lukewarm water — hydrates the dough and activates the yeast.
- 7 g instant yeast — leavens the dough, creating the rise needed for a light, airy crumb.
- 10 g fine sea salt — essential for flavor and for regulating the yeast’s activity.
- 1 tbsp honey — feeds the yeast and adds a subtle depth of flavor.
- 1 tbsp olive oil — contributes to a tender crumb and helps the dough handle more easily.
For Finishing 🌾
- 1 tbsp all-purpose flour, for dusting — used to dust the loaf for a rustic, bakery-style finish.
- 1 tsp olive oil, optional — can be brushed on for extra shine.
- Flaky sea salt, optional — for a beautiful, salty finishing touch.
Instructions
Add the bread flour, instant yeast, salt, and honey to a large mixing bowl. Pour in the lukewarm water and olive oil, then mix with a wooden spoon or your hands until a shaggy dough forms and no large patches of dry flour remain.
Cover the bowl with a clean kitchen towel or plastic wrap and allow the dough to rest for approximately 20 minutes. This resting period gives the flour time to fully absorb the water, making the dough much easier to develop during kneading.
Transfer the dough to a lightly floured work surface and knead for approximately 8–10 minutes, until it becomes smooth, elastic, and slightly tacky. If you’re using a stand mixer, knead with the dough hook for approximately 6–8 minutes on low to medium speed. Try to avoid adding excessive flour during this process, as a properly hydrated dough is key to a tender crumb.
Place the dough into a lightly greased bowl, cover, and allow it to rise at room temperature for approximately 1½–2 hours, or until it’s noticeably puffy and nearly doubled in size. Keep in mind that a warmer kitchen may shorten the rising time.
Turn the dough onto a lightly floured surface and gently press it into a rough rectangle without completely deflating it. Fold the top third toward the center, then fold the bottom third upward. Roll the dough into a tight loaf and pinch the seam closed, then gently shape it into a round or slightly oval farmhouse-style loaf.
Place the shaped loaf seam-side down on a parchment-lined baking sheet, or alternatively place it into a well-floured proofing basket. Dust the surface lightly with flour for that classic rustic look.
Cover the loaf loosely and allow it to proof for approximately 45–60 minutes. It should become noticeably puffy by the end of this time. To check if it’s ready, gently press the dough with one fingertip — the indentation should slowly spring back, indicating proper proofing.
About 30 minutes before baking, preheat the oven to 450°F (230°C). If you’re using a Dutch oven, place it inside the oven while it preheats so it becomes thoroughly hot. A well-heated baking surface is essential for helping the loaf develop a beautiful, golden crust.
Using a sharp bread lame or knife, make one deep slash across the top of the loaf. You can also create a simple cross, a wheat pattern, or three diagonal cuts for a classic, rustic farmhouse appearance.
If using a Dutch oven, carefully transfer the loaf inside, cover with the lid, and bake for approximately 20 minutes. Remove the lid and continue baking for another 20–25 minutes, until the loaf is deeply golden brown.
If baking directly on a sheet pan, place the loaf in the preheated oven and add a small oven-safe pan of hot water to the bottom rack to create steam. Bake for approximately 35–40 minutes, until the crust is deeply golden and the loaf sounds hollow when tapped on the bottom.
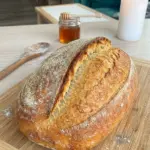
The finished loaf should have a rich, golden-brown crust. If you’re using a thermometer, the center of the loaf should reach approximately 200–205°F (93–96°C).
Transfer the loaf to a wire rack and allow it to cool for at least 1 hour before slicing. Cutting into the bread too early can compress the tender crumb and make the center seem gummy, so patience here really pays off.