Ingredients
This recipe uses a handful of basic ingredients, with a few simple seasonings to give the finished bread extra flavor.
For the Focaccia Dough
-
1/2 cup plus 2 tablespoons all-purpose flour
-
1/4 teaspoon instant yeast
-
1/4 teaspoon kosher salt
-
1/4 teaspoon honey
-
1/4 cup plus 1 tablespoon lukewarm water
-
2 teaspoons extra-virgin olive oil, plus more for the pan
-
1 teaspoon butter, for greasing
For the Topping
-
1 teaspoon extra-virgin olive oil
-
1/4 teaspoon flaky sea salt
-
1/4 teaspoon Italian seasoning
-
1/4 teaspoon garlic powder
-
1 teaspoon fresh rosemary, chopped, optional
-
Freshly cracked black pepper, optional
Instructions
Making this personal-sized focaccia is simple, but allowing the dough enough time to rise is essential for achieving a soft, airy interior.
Step 1: Mix the Dry Ingredients
Add the all-purpose flour, instant yeast, and kosher salt to a small mixing bowl.
Stir everything together with a spoon until the yeast and salt are evenly distributed throughout the flour.
This helps ensure the dough rises consistently and the seasoning is balanced.
Because the recipe uses a small amount of flour, take care when measuring. Spoon the flour into the measuring cup and level it rather than packing it tightly.
Too much flour can make the dough stiff and prevent the focaccia from developing its characteristic airy texture.
Step 2: Add the Wet Ingredients
Pour the lukewarm water into the bowl with the dry ingredients.
Add the honey and 2 teaspoons of extra-virgin olive oil.
Using a spoon or small spatula, stir until the ingredients come together into a soft, sticky dough.
Continue mixing until no dry flour remains at the bottom of the bowl.
The dough should look slightly shaggy and feel sticky.
This is completely normal.
Avoid adding extra flour simply because the dough sticks to the spoon. Focaccia dough is supposed to be softer and wetter than ordinary bread dough.
There’s no need to knead it.
Once everything is combined, the dough is ready for its first rise.
Step 3: Let the Dough Rise
Cover the bowl with plastic wrap, a reusable cover, or a clean kitchen towel.
Place it somewhere warm and free from drafts.
Allow the dough to rise for approximately 1 1/2–2 hours.
During this time, the yeast will produce gas that creates bubbles throughout the dough.
The dough should become noticeably larger, softer, and puffier.
You may also see small bubbles forming on the surface.
The exact rising time depends on your kitchen temperature.
In a warmer kitchen, the dough may rise more quickly. In a cooler environment, it may need additional time.
Rather than relying only on the clock, look for a dough that appears airy and bubbly.
Step 4: Prepare the Cast-Iron Skillet
Once the dough has completed its first rise, prepare a 6-inch cast-iron skillet.
Add 1 teaspoon of butter to the skillet and spread it across the bottom and sides.
Drizzle in a little extra-virgin olive oil and coat the pan evenly.
Make sure the bottom and lower sides are well coated.
This layer of fat helps prevent sticking and contributes to the crispy, golden crust.
If your skillet is not well seasoned, take extra care to grease it thoroughly.
A small oven-safe baking dish can also work, although the crust may turn out slightly different from one baked in cast iron.
Step 5: Transfer the Dough Into the Skillet
Lightly coat your hands with olive oil to prevent the sticky dough from clinging to your fingers.
Gently lift the risen dough from the mixing bowl and place it in the prepared skillet.
Fold the dough over itself once or twice to give it a little structure.
Be gentle during this process.
You want to preserve as much of the air inside the dough as possible.
Carefully stretch the dough toward the edges of the skillet.
If it resists stretching or springs back, allow it to rest for 5–10 minutes before trying again.
Avoid pressing the dough flat or squeezing out the bubbles.
The dough doesn’t need to reach every edge immediately because it will continue relaxing and expanding during the second rise.
Step 6: Let the Dough Rise Again
Cover the skillet loosely and place it in a warm location.
Allow the dough to rise for another 45–60 minutes.
During this second rise, the dough should become soft, airy, and noticeably puffy.
It may spread farther toward the edges of the skillet as it relaxes.
This step helps create the light interior that makes focaccia so enjoyable.
Don’t rush the second rise.
If the dough hasn’t become puffy after 45 minutes, give it a little more time.
A properly risen dough should look soft and slightly jiggly when the skillet is moved gently.
Step 7: Preheat the Oven
Toward the end of the second rise, preheat your oven to 425°F.
Allow the oven to reach the correct temperature before baking.
A properly preheated oven helps the focaccia rise quickly during the first few minutes of baking and encourages the surface to develop a golden crust.
Place an oven rack near the middle of the oven for even baking.
Step 8: Dimple the Dough
Once the dough is puffy and ready to bake, drizzle 1 teaspoon of extra-virgin olive oil over the surface.
Lightly oil your fingertips.
Gently press your fingertips into the dough to create deep dimples across the top.
Press firmly enough to make visible indentations, but avoid tearing through the dough.
The dimples should create small pockets that hold olive oil and seasonings.
Work carefully so you don’t completely deflate the dough.
A little deflation is normal during dimpling, but the dough should retain most of its airy structure.
Step 9: Add the Seasonings
Sprinkle the flaky sea salt evenly over the dimpled dough.
Add the Italian seasoning and garlic powder.
If using fresh rosemary, scatter the chopped leaves across the surface.
Finish with a little freshly cracked black pepper if desired.
Try to distribute the seasonings evenly so every bite has a balanced flavor.
The olive oil on the surface will help the herbs and seasonings adhere to the dough.
Step 10: Bake the Focaccia
Carefully transfer the skillet to the preheated oven.
Bake at 425°F for approximately 18–22 minutes.
As the bread bakes, the dough will expand slightly and the top will begin turning golden.
The olive oil around the edges helps create a crisp crust.
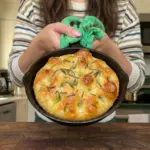
The focaccia is ready when the surface is golden brown, the edges look crisp, and the center appears fully baked.
If the bread still looks pale after 18 minutes, continue baking for a few more minutes while watching closely.
Because this is a small focaccia, it can brown quickly near the end of baking.
Avoid leaving it in the oven longer than necessary, as overbaking can dry out the center.
Step 11: Cool Slightly and Serve
Remove the skillet from the oven and place it on a heat-safe surface.
Allow the focaccia to cool in the skillet for approximately 5 minutes.
This short cooling period helps the bread settle and makes it easier to remove.
Carefully loosen the edges with a spatula if needed.
Lift the focaccia out of the skillet and transfer it to a cutting board or cooling rack.
The bottom should be golden, while the inside remains soft and chewy.
Serve warm.
You can tear it apart with your hands, cut it into wedges, or slice it horizontally to make a small sandwich