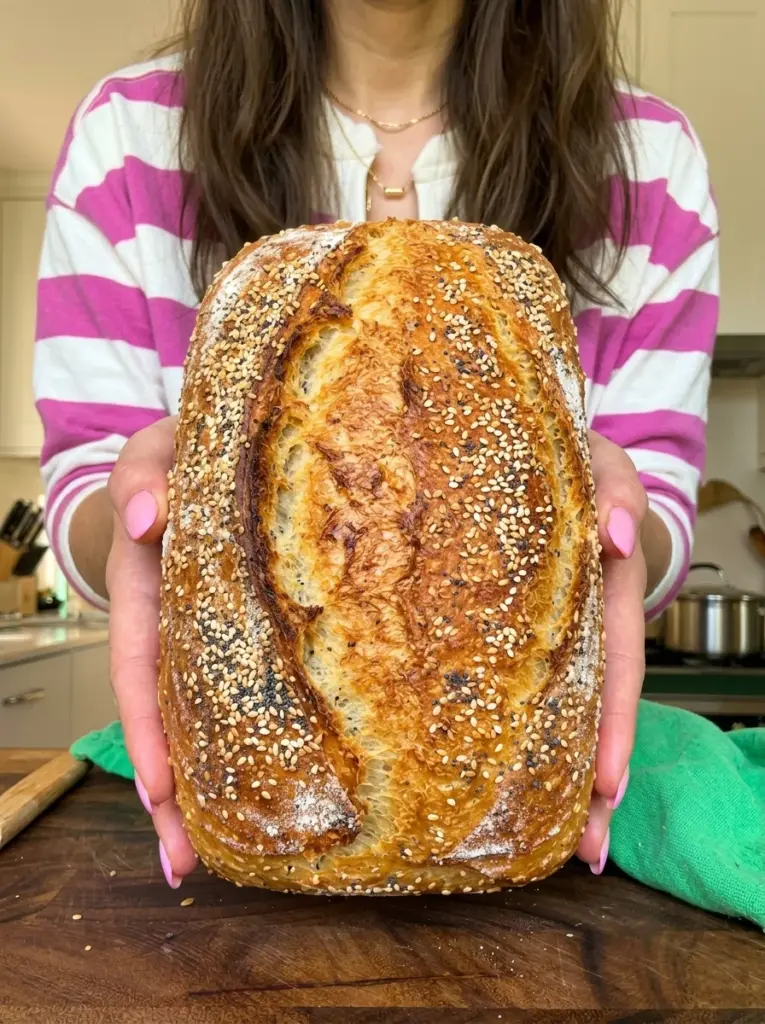
This Easy No-Knead Rustic Sandwich Bread is soft, chewy, golden, and wonderfully rustic, giving you bakery-style flavor without the work of traditional kneading. A simple overnight rise creates a beautifully airy crumb and crisp golden crust, while the tender interior makes it perfect for everyday sandwiches, toast, and breakfast.
If you love the flavor and texture of rustic homemade bread but want something practical enough for sandwiches, this Easy No-Knead Rustic Sandwich Bread brings the best of both worlds together. It has the golden exterior and airy character of an artisan-style loaf while baking neatly in a standard loaf pan for easy slicing.
The preparation couldn’t be simpler. Flour, yeast, salt, warm water, honey, and olive oil are stirred together until a sticky, shaggy dough forms. There’s no kneading required. Instead, the dough rests for 8–12 hours, allowing it to become bubbly and puffy while you sleep.
In the morning, simply transfer the dough to a loaf pan, give it a short second rise, add your favorite rustic topping, and bake until deeply golden. The result is an easy homemade loaf that’s equally delicious topped with butter at breakfast or filled with turkey, cheese, and avocado for lunch.
Let’s dive into everything you need to know to make this easy rustic no-knead sandwich bread at home.
Why You’ll Love This Easy No-Knead Rustic Sandwich Bread
There’s plenty to love about this simple homemade loaf:
Absolutely no kneading required. Mix everything with a wooden spoon or spatula and let the long rise handle the rest.
Rustic bakery-style texture. The loaf develops a golden exterior and pleasantly chewy, airy crumb.
Perfect for sandwiches. Baking the dough in a 9×5-inch loaf pan gives you convenient, sliceable bread.
Easy overnight preparation. Mix the dough in the evening, let it rise overnight, and bake it the following day.
Made with everyday ingredients. No specialty bread flour or complicated equipment is required.
Customizable rustic topping. Finish the loaf with sesame seeds, poppy seeds, melted butter, or a light dusting of flour.
Versatile for any meal. Use it for breakfast toast, sandwiches, grilled cheese, avocado toast, or alongside soup.
Ingredients You’ll Need
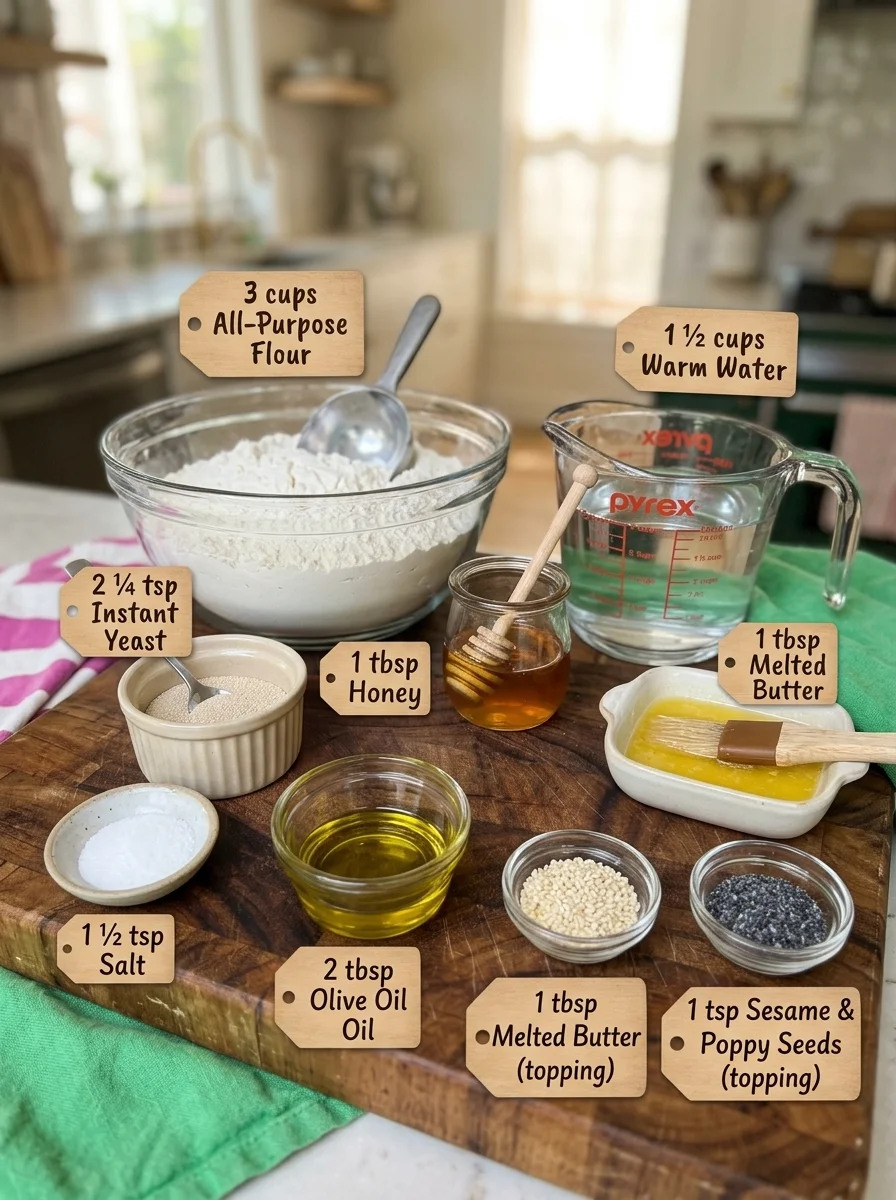
Here’s everything you’ll need to make this rustic no-knead sandwich loaf and why each ingredient matters.
- 3 cups all-purpose flour — Provides structure while creating a pleasantly soft and chewy interior.
- 1 ½ cups warm water — Hydrates the flour and helps create the sticky dough needed for the no-knead method.
- 2 ¼ tsp instant yeast — Gives the bread its rise and helps create an airy crumb.
- 1 tbsp honey — Adds subtle sweetness that balances the savory flavor of the bread.
- 1 ½ tsp salt — Enhances the overall flavor of the loaf.
- 2 tbsp olive oil — Adds richness and helps keep the interior tender.
- 1 tbsp melted butter, optional — Can be brushed over the top for additional richness and flavor.
- 1 tsp sesame seeds, optional — Adds a lightly nutty flavor and rustic appearance.
- 1 tsp poppy seeds, optional — Adds subtle crunch and a classic bakery-style finish.
How to Make Easy No-Knead Rustic Sandwich Bread
This recipe requires only about 10 minutes of hands-on preparation. Most of the process happens while the dough rests overnight.
Step 1: Combine the Dry Ingredients
In a large mixing bowl, combine the all-purpose flour, instant yeast, and salt.
Stir until the yeast and salt are evenly distributed throughout the flour.
Step 2: Add the Wet Ingredients
Pour in the warm water, honey, and olive oil.
Using a wooden spoon or sturdy spatula, stir everything together until a sticky, shaggy dough forms.
Don’t knead the dough. The soft, sticky consistency is exactly what you want for this recipe.
Step 3: Let the Dough Rise Overnight
Cover the bowl tightly with plastic wrap or a clean kitchen towel.
Leave the dough to rise at room temperature for 8–12 hours, or overnight.
By the end of the rise, the dough should look bubbly, puffy, and nearly doubled in size.
Step 4: Prepare the Loaf Pan
Lightly grease a 9×5-inch loaf pan.
Using lightly oiled hands or a spatula, gently transfer the risen dough into the prepared pan.
Smooth the top carefully without pressing down too firmly or aggressively deflating the dough.
Step 5: Give the Dough a Second Rise
Loosely cover the loaf pan.
Allow the dough to rest for another 30–45 minutes.
This short second rise helps the dough become puffy again after being transferred to the pan.
Step 6: Preheat the Oven
Preheat your oven to 425°F (220°C).
If desired, lightly brush the top of the dough with melted butter.
Step 7: Add the Rustic Topping
Sprinkle the loaf with sesame seeds, poppy seeds, or a light dusting of flour.
You can use one topping or a combination depending on the finish you prefer.
Step 8: Bake Until Golden
Bake the loaf for 30–35 minutes, or until the exterior is deeply golden brown.
The finished loaf should sound hollow when lightly tapped.
Step 9: Cool Completely
Remove the bread from the loaf pan and transfer it to a wire rack.
Allow it to cool completely for at least 1 hour before slicing.
This resting period allows the crumb to finish setting and makes the bread much easier to slice cleanly.
How to Serve No-Knead Rustic Sandwich Bread
This loaf is designed to be versatile enough for everyday meals. Try it:
- With butter — Toast a thick slice and spread it with softened butter.
- With eggs — Serve toasted slices alongside scrambled, fried, or poached eggs.
- For turkey sandwiches — Layer with turkey, cheese, lettuce, avocado, and your favorite spread.
- With cheese — Use it for cold sandwiches or turn it into a crispy grilled cheese.
- For avocado toast — The rustic crumb and crisp toasted edges make an excellent base for avocado.
- Alongside soup — Serve thick slices with tomato soup, vegetable soup, or your favorite hearty bowl.
- For breakfast toast — Toast and top with butter, honey, jam, or other favorite toppings.
Tips for the Best Rustic Sandwich Bread
Don’t worry about sticky dough. The dough should be sticky and shaggy. Avoid adding excessive flour simply to make it easier to handle.
Use warm, not hot, water. Water that’s excessively hot can damage the yeast.
Give the dough plenty of time. The 8–12 hour overnight rise is an important part of developing the bread’s texture.
Look for bubbles. A properly risen dough should appear noticeably expanded and bubbly before you transfer it to the loaf pan.
Handle the risen dough gently. Avoid kneading or aggressively pressing the dough after its overnight rise.
Oil your hands when necessary. A little olive oil makes the sticky dough much easier to transfer and smooth.
Don’t skip the second rise. Giving the dough another 30–45 minutes in the loaf pan helps produce a lighter finished loaf.
Customize the topping. Sesame seeds, poppy seeds, melted butter, or a little flour can each give the loaf a slightly different appearance and finish.
Cool for at least an hour. Rustic breads benefit from plenty of cooling time before slicing because the crumb continues setting after leaving the oven.
Use a serrated knife. A bread knife makes it easier to cut neat slices without crushing the airy interior.
Storage Information
Allow the Easy No-Knead Rustic Sandwich Bread to cool completely before storing.
Keep it in an airtight container or bread bag at room temperature for up to 3 days.
For longer storage, slice the cooled loaf and wrap the individual slices before freezing them for up to 2 months.
Thaw the slices before serving and toast them if you’d like to restore some of the crisp texture around the edges.
Frequently Asked Questions
Do I really not need to knead this bread?
Correct. This recipe is designed specifically for a no-knead method. Stir everything together until a sticky, shaggy dough forms and let the long rise do the work.
Can I leave the dough overnight?
Yes. The dough should rise at room temperature for approximately 8–12 hours, making overnight preparation convenient.
Why is my dough so sticky?
That’s expected. This is a relatively wet dough, which contributes to the rustic, airy texture. Avoid adding lots of additional flour.
Why bake rustic bread in a loaf pan?
The loaf pan gives the bread a practical shape for sandwiches and toast while allowing you to keep the rustic texture and flavor.
Can I leave off the seeds?
Absolutely. Both sesame and poppy seeds are optional. You can leave the top plain or use a light dusting of flour instead.
Do I need to brush the bread with butter?
No. The melted butter is optional and simply adds additional richness and flavor to the top of the loaf.
How do I know when the bread is finished baking?
The loaf should be deeply golden brown and sound hollow when lightly tapped. Baking takes approximately 30–35 minutes.
Why should I wait an hour before slicing?
The crumb continues setting as the loaf cools. Cutting it too early can compress the airy interior and make the center seem gummy.
Can I freeze rustic sandwich bread?
Yes. Slice the completely cooled loaf, wrap the slices, and freeze them for up to 2 months. Thaw and toast before serving.
Recipe Card
Prep Time: 10 minutes
Rise Time: 8–12 hours
Second Rise: 30–45 minutes
Cook Time: 30–35 minutes
Total Time: About 9 hours
Servings: 12 slices
Calories: ~175 per serving
This Easy No-Knead Rustic Sandwich Bread combines the satisfying texture of rustic homemade bread with the convenience of an everyday sandwich loaf. The long overnight rise creates an airy, chewy crumb, while the hot oven gives the exterior a beautiful golden finish—all without kneading.
Mix the dough before bed, let it rise overnight, and bake a fresh loaf that’s ready for butter, eggs, cheese, turkey, avocado, soup, toast, or your favorite sandwich fillings.
Print
Easy No-Knead Rustic Sandwich Bread
Ingredients
Here’s everything you’ll need to make this rustic no-knead sandwich loaf and why each ingredient matters.
- 3 cups all-purpose flour — Provides structure while creating a pleasantly soft and chewy interior.
- 1 ½ cups warm water — Hydrates the flour and helps create the sticky dough needed for the no-knead method.
- 2 ¼ tsp instant yeast — Gives the bread its rise and helps create an airy crumb.
- 1 tbsp honey — Adds subtle sweetness that balances the savory flavor of the bread.
- 1 ½ tsp salt — Enhances the overall flavor of the loaf.
- 2 tbsp olive oil — Adds richness and helps keep the interior tender.
- 1 tbsp melted butter, optional — Can be brushed over the top for additional richness and flavor.
- 1 tsp sesame seeds, optional — Adds a lightly nutty flavor and rustic appearance.
- 1 tsp poppy seeds, optional — Adds subtle crunch and a classic bakery-style finish.
Instructions
This recipe requires only about 10 minutes of hands-on preparation. Most of the process happens while the dough rests overnight.
Step 1: Combine the Dry Ingredients
In a large mixing bowl, combine the all-purpose flour, instant yeast, and salt.
Stir until the yeast and salt are evenly distributed throughout the flour.
Step 2: Add the Wet Ingredients
Pour in the warm water, honey, and olive oil.
Using a wooden spoon or sturdy spatula, stir everything together until a sticky, shaggy dough forms.
Don’t knead the dough. The soft, sticky consistency is exactly what you want for this recipe.
Step 3: Let the Dough Rise Overnight
Cover the bowl tightly with plastic wrap or a clean kitchen towel.
Leave the dough to rise at room temperature for 8–12 hours, or overnight.
By the end of the rise, the dough should look bubbly, puffy, and nearly doubled in size.
Step 4: Prepare the Loaf Pan
Lightly grease a 9×5-inch loaf pan.
Using lightly oiled hands or a spatula, gently transfer the risen dough into the prepared pan.
Smooth the top carefully without pressing down too firmly or aggressively deflating the dough.
Step 5: Give the Dough a Second Rise
Loosely cover the loaf pan.
Allow the dough to rest for another 30–45 minutes.
This short second rise helps the dough become puffy again after being transferred to the pan.
Step 6: Preheat the Oven
Preheat your oven to 425°F (220°C).
If desired, lightly brush the top of the dough with melted butter.
Step 7: Add the Rustic Topping
Sprinkle the loaf with sesame seeds, poppy seeds, or a light dusting of flour.
You can use one topping or a combination depending on the finish you prefer.
Step 8: Bake Until Golden
Bake the loaf for 30–35 minutes, or until the exterior is deeply golden brown.
The finished loaf should sound hollow when lightly tapped.
Step 9: Cool Completely
Remove the bread from the loaf pan and transfer it to a wire rack.
Allow it to cool completely for at least 1 hour before slicing.
This resting period allows the crumb to finish setting and makes the bread much easier to slice cleanly.