Colorful Baking Soda Galaxy Ornaments: The Sparkling DIY Craft That Looks Like a Universe in Your Hands
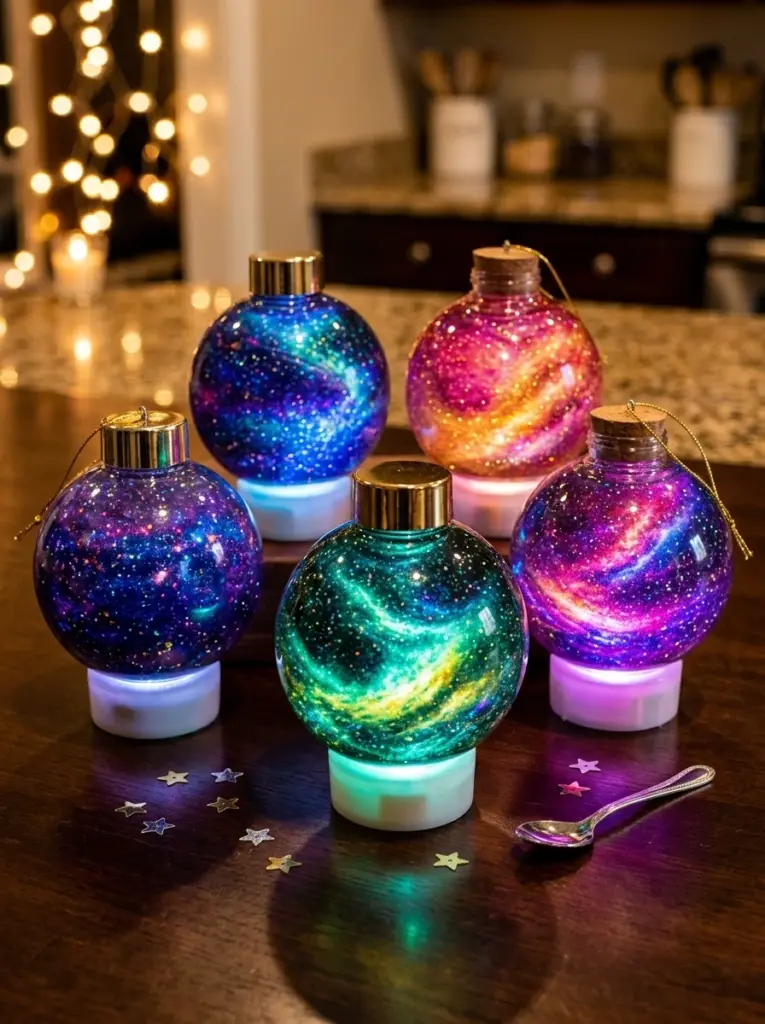
Hold one up to the light and something extraordinary happens. The layers inside shift and swirl — deep purple bleeding into midnight blue, electric pink dissolving into teal, silver glitter suspended throughout like a field of frozen stars — and for a moment the clear plastic globe in your hand looks exactly like a photograph of the cosmos. Like someone captured a nebula, shrank it down to ornament size, and handed it to you.
Colorful Baking Soda Galaxy Ornaments are one of those crafts that produces results that look genuinely, almost embarrassingly impressive for the effort involved. They’re made from baking soda, food coloring, white glue, glitter, and a clear plastic ornament — materials that cost almost nothing — and they come together in a process that is creative, tactile, completely accessible, and quietly thrilling.
The fizz. The layering. The glitter catching the light as you swirl the ornament to blend the colors. And then the finished piece — glowing on a Christmas tree, or placed over a small light, the colors illuminated from within like stained glass — looking like something you’d find in a boutique for three times the price.
Here’s everything you need to make them perfectly.
What Are Baking Soda Galaxy Ornaments?
Baking soda galaxy ornaments are clear plastic ornament balls filled with layers of colored, glitter-dusted baking soda mixture — each layer a different color, blended just enough at the edges to create the soft, smoky color transitions that define the galaxy aesthetic.
The baking soda is colored with food coloring and bound slightly with white glue, which gives each layer enough cohesion to hold its shape while still allowing the colors to blend beautifully when the ornament is swirled. Glitter sprinkled between layers becomes suspended stars. A few drops of vinegar added before sealing produces a brief, satisfying fizz that enhances the texture of the layers as they interact.
The finished ornaments are sealed and displayable — beautiful as Christmas tree decorations, hanging window ornaments, shelf displays, or placed over a small battery-operated light for a glowing, stained-glass-like effect that looks genuinely extraordinary in a dark room.
Every ornament is unique — the colors you choose, the way the layers blend when swirled, the distribution of the glitter — meaning no two are ever exactly the same.
What You’ll Need
For the filling:
- Baking soda — The base of the entire filling. Fine, white, and absorbent, baking soda takes food coloring beautifully and has a powdery texture that creates the soft, cloud-like layers inside the ornament.
- White glue (PVA) — Added in small amounts to each colored portion, white glue gives the baking soda a slightly clumpy, textured consistency that holds its shape in layers.
- Food coloring — In as many colors as you want to use. For a classic galaxy effect: deep purple, midnight blue, hot pink, and teal are the essential palette. Black adds depth. White or pale lavender adds a soft nebula quality.
- White vinegar — For the optional fizz effect before sealing.
- Fine glitter — Iridescent, holographic, or silver fine glitter distributed between layers represents stars. The finer the glitter, the more realistic and beautiful the starfield effect.
For the ornament:
- Clear plastic ornaments — Available at craft stores, dollar stores, and online. Look for ones with a removable top cap that allows easy filling. Standard 80mm or 100mm ornaments are the most practical size.
- A funnel — For directing the baking soda mixture into the ornament without spilling.
- A spoon — For mixing and transferring the colored mixture.
- Small bowls — One for each color.
Step-by-Step Instructions
Step 1: Color the Baking Soda
Divide your baking soda into separate small bowls — one for each color you plan to use. For a classic galaxy palette, four to six colors is ideal: deep purple, dark blue, hot pink, teal, and black, with an optional pale lavender or white for contrast.
Add several drops of food coloring to each bowl and mix thoroughly with a spoon until the color is completely and evenly distributed — no white streaks, no concentrated color pockets. The more saturated the color at this stage, the more vivid and dramatic the finished ornament will be.
Gel food coloring produces deeper, more saturated colors than liquid and is worth using if you have it. Standard liquid food coloring works well but requires more drops to achieve the same depth of color.
Step 2: Add White Glue for Texture
To each bowl of colored baking soda, add a small amount of white glue — approximately half a teaspoon per cup of baking soda — and stir lightly. You’re not trying to create a smooth, fully mixed paste. You’re trying to create a slightly clumpy, textured mixture that holds together loosely but still has some grain and variation to it.
This texture is important. Too smooth, and the layers inside the ornament look flat and uniform. Too dry, and the baking soda settles into compacted powder without the layered, cloud-like quality that makes the galaxy effect work. Visible clumps of different sizes are a feature, not a problem.
Stir just enough to distribute the glue — over-mixing destroys the texture you’re working to create.
Step 3: Layer the Colors into the Ornament
Remove the cap from the ornament and set it aside. Position your funnel in the opening.
Begin adding your first color — ideally the darkest, deepest color — into the bottom of the ornament. Add enough to create a visible layer of about a centimeter when you look through the side. Then add your second color. Then your third. Continue working through your color palette, building up distinct layers from bottom to top.
The key to beautiful layering is restraint — don’t overfill any single layer, and don’t rush. Each layer should be visible as its own color band when you look at the ornament from the side. Natural variation in layer depth looks more realistic than perfectly uniform bands, mimicking the irregular color regions visible in real nebula photography.
Step 4: Sprinkle Glitter Between Layers
Between each color layer, add a small pinch of fine glitter. Let it fall naturally onto the surface of the layer below before adding the next color on top. This suspends the glitter throughout the depth of the ornament — stars distributed at different depths in the galaxy, not just concentrated on one surface.
Fine iridescent or holographic glitter catches light from multiple angles as you turn the ornament, producing the constant, shifting sparkle of a real starfield. For an even more dramatic effect, add a slightly larger pinch of glitter in the very center of the ornament — the brightest, most star-dense region of the galaxy.
Step 5: Swirl to Create the Galaxy Effect
Once all your layers are in place, hold the ornament gently in both hands and give it a slow, deliberate swirl — rotating it slightly so the contents shift and the color edges blend into each other.
This is the most satisfying and most critical moment of the whole process. A single gentle swirl blends the color boundaries just enough — hot pink bleeding softly into purple, teal dissolving into blue — creating the soft, smoky color transitions that define the galaxy look. Two or three swirls creates more blending.
The goal is to preserve the distinct layers while softening their edges. Resist the urge to keep swirling. One or two deliberate rotations is almost always enough — more than that blends everything into a muddy, undifferentiated mass.
Step 6: Add the Vinegar Fizz (Optional but Magical)
Before sealing, add two or three drops of white vinegar into the ornament. Then watch.
The vinegar encounters the baking soda in the layers and produces a chemical reaction — carbon dioxide gas is released as tiny bubbles, and the mixture will briefly fizz and churn. This fizzing creates additional textural variation in the layers as the reaction moves through them, and produces a small amount of carbon dioxide gas that will be sealed inside when you close the ornament.
The fizzing lasts only a few seconds. It is brief, satisfying, and entirely optional — but for children, this moment of unexpected bubbling inside the ornament is often the most exciting part of the entire process.
Step 7: Seal and Display
Replace the cap of the ornament and press or twist it firmly into place. Ensure it’s fully and securely closed.
Your galaxy ornament is complete.
Hold it up to a window. Light from outside passes through the clear plastic and illuminates the colored layers from within, making the whole ornament glow with transmitted color. The glitter catches the light from multiple angles simultaneously, sparkling at different points as you rotate the ornament.
For the most dramatic effect of all, place the ornament over a small battery-operated LED tea light or tuck it near a string of fairy lights. The warm glow from within transforms the ornament into something genuinely luminous — a tiny, glowing galaxy suspended in glass.
The Science Behind the Galaxy Ornament
The Vinegar and Baking Soda Reaction
The brief fizzing when vinegar meets baking soda is one of the most satisfying demonstrations in kitchen chemistry. Baking soda is sodium bicarbonate — a base. Vinegar is a dilute solution of acetic acid — an acid. When an acid and a base meet, they react to produce sodium acetate, water, and carbon dioxide gas. It’s the carbon dioxide — rapidly forming and escaping — that you see as bubbles and hear as fizzing.
The reaction is entirely safe and produces only harmless compounds. The carbon dioxide gas is the same gas we exhale when we breathe.
Why the Colors Stay in Layers
The baking soda mixture stays in visible layers rather than mixing completely because of its physical properties. The slightly glued, clumpy texture gives each layer structural integrity — the particles hold loosely together rather than freely flowing and mixing like liquid would. When you swirl the ornament gently, the layers at the color boundaries soften and blend, but the mass of each color layer maintains its essential form. This is the same principle behind sand art in bottles, where layers of colored sand remain distinct because the particles don’t flow like liquid.
How Light Creates the Glow Effect
Clear plastic ornaments transmit light — they allow light to pass through them rather than reflecting all of it back. When placed near a light source, light enters through the plastic, passes through the translucent layers of colored baking soda, and is scattered and filtered by the different colors and the glitter particles. Different colors filter out different wavelengths of light, and as light passes through multiple colored layers, it is progressively filtered into the complex, multicolored glow that makes a backlit galaxy ornament so beautiful.
The glitter particles add directional sparkle — each particle reflects light in a specific direction depending on its angle, and as the ornament is turned, different particles catch and reflect the light, creating the shifting, moving sparkle of a starfield.
Color Palette Guide: Building Your Perfect Galaxy
The colors you choose make or break the galaxy effect. Here are some curated palettes to guide you:
Classic Nebula: Deep purple, midnight blue, hot pink, and teal with silver glitter. The quintessential galaxy palette — inspired by famous nebula photographs like the Pillars of Creation. Vivid, dramatic, and instantly recognizable.
Rose Galaxy: Blush pink, dusty rose, deep burgundy, and soft purple with gold glitter. Warm, romantic, and unexpectedly beautiful — a galaxy in sunset tones.
Ice Galaxy: Pale blue, white, silver, and icy teal with holographic silver glitter. Cool, ethereal, and winter-perfect. This palette looks stunning over a cool white LED light.
Aurora Galaxy: Electric green, deep teal, purple, and midnight blue with iridescent glitter. Inspired by the northern lights — dramatic color transitions and an otherworldly atmosphere.
Golden Galaxy: Deep orange, burnt gold, rich amber, and dark brown with gold glitter. Warm, glowing, and autumnal — a galaxy that looks like a sunset seen from space.
Monochrome Galaxy: Multiple shades of a single color — from near-white through mid-tone to deep and dark — with silver glitter. Surprisingly effective and sophisticated. A blue monochrome galaxy ranges from pale sky blue through cobalt to near-black, with glitter catching light at every layer.
Tips for the Most Spectacular Results
Use contrasting colors. You need at least one strong color contrast in the palette to create visual drama. Pink next to blue. Purple next to teal. That contrast is what makes the eye read “galaxy” rather than just “pretty swirled colors.”
Add a dark layer. Every galaxy has a deep void region. A thin layer of black or very dark blue baking soda creates depth and drama and makes the lighter, brighter colors pop more vividly against it.
Don’t overmix. One or two gentle swirls is enough. More destroys the layer structure. Stop before you think you need to.
Use fine glitter, and use it generously. Ultra-fine iridescent or holographic glitter creates a light, suspended starfield effect that looks genuinely astronomical. Be generous — too little glitter always shows; too much is rarely a problem.
Make more than one. A single galaxy ornament is beautiful. Three or four in coordinating palettes, hung together on a tree or displayed together on a shelf, look extraordinary. The variety across multiple ornaments creates a collection effect that is significantly more impressive than any individual piece.
Creative Display and Gifting Ideas
Glowing galaxy bowl: Place three or four completed ornaments in a glass bowl over a string of warm fairy lights. The ornaments glow from within and cast colored light across the surrounding surface — a stunning table centerpiece.
Galaxy mobile: Hang multiple ornaments at different lengths from a wooden dowel or driftwood branch for a hanging mobile that catches light beautifully in a child’s bedroom window.
Miniature planets: Use single-color palettes with specific textures in smaller ornament balls to suggest different planets — swirls of orange and white for Jupiter, dusty red for Mars, pale blue and white for Earth seen from space.
Handmade gift sets: Three ornaments in coordinating galaxy palettes, nested in tissue paper inside a small kraft box, make a genuinely impressive handmade Christmas gift. Include a handwritten card listing the colors used.
Gift tag ornaments: Use tiny ornament balls, fill with two or three colors, and attach a luggage tag label. Beautiful enough to keep as a tree ornament after the gift is opened — a gift tag that becomes a decoration.
Why Galaxy Ornaments Make the Perfect Holiday Craft
Most homemade holiday ornaments are charming but can’t aesthetically compete with store-bought decorations. Galaxy ornaments are different. Done with thoughtful color choices and careful layering, they look genuinely stunning on a tree — and visitors consistently assume they were purchased rather than made.
They’re also a multi-sensory experience from start to finish: the mixing of colors, the texture of the glue-thickened baking soda, the sprinkle of glitter, the satisfying swirl, the brief exciting fizz of the vinegar, and finally the glowing reveal when the finished ornament is held up to light. Every stage delivers something — which is why children who make these stay absorbed and engaged from beginning to end.
And every ornament is unique. Unlike factory-made decorations, no two galaxy ornaments ever look exactly the same. That uniqueness makes each one feel genuinely precious — a small, irreplaceable piece of a universe someone made with their own hands.
Final Thoughts
Colorful Baking Soda Galaxy Ornaments are proof that the most spectacular things are often made from the simplest ingredients. Baking soda and food coloring and glitter — materials that cost almost nothing and live in most kitchen cupboards — combined with a clear plastic globe and a careful, patient hand, produce something that genuinely looks like a piece of the cosmos.
Make them for your tree. Make them as gifts. Make them with children who will spend the entire process leaning in close, completely absorbed, asking wonderful questions about stars and color and why the vinegar fizzes.
And when you hold the finished ornament up to the light for the first time — watching the colors glow from within and the glitter shift and sparkle like a frozen starfield — you’ll understand exactly why we look up at the night sky and feel something very close to wonder.