Beef Training Treats 🥩🐶🎾 (Easy, High-Value Homemade Dog Training Rewards)
Meta Description: These Beef Training Treats are a simple, high-value homemade reward made with lean ground beef, oats, and pumpkin. Perfect for training sessions, and easy to make in under 30 minutes!
Keywords: dog training treats, homemade dog training treats, beef dog treats, high-value dog treats, small training treats for dogs, healthy dog training treats, DIY dog treats, easy dog treat recipe
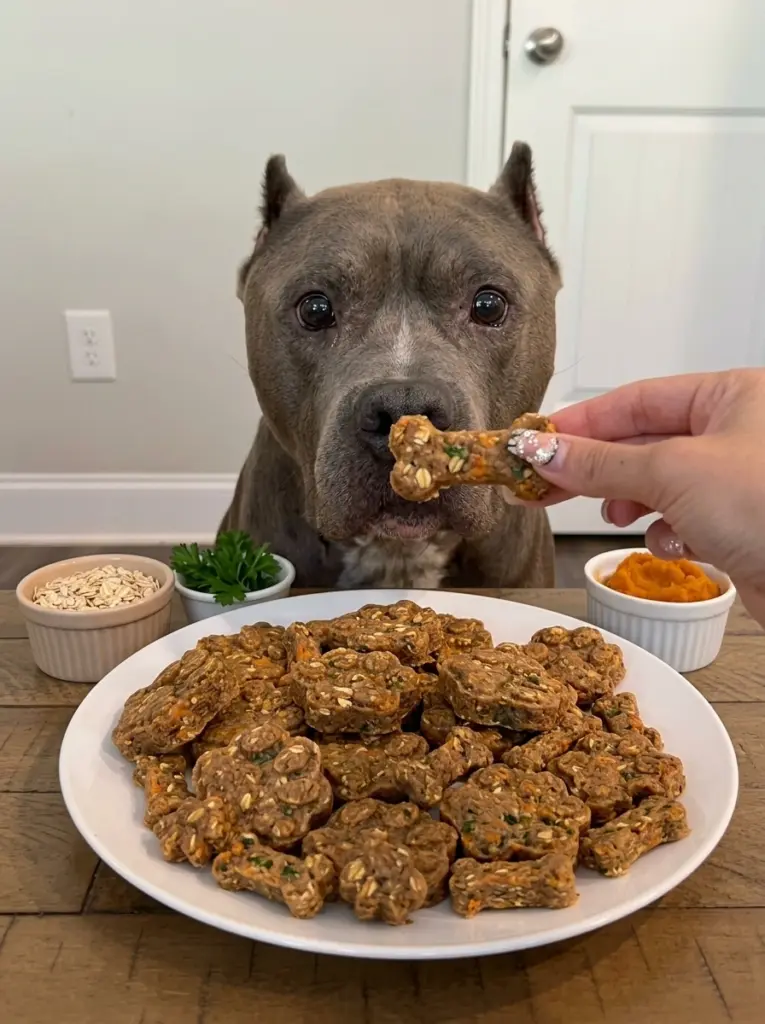
If you’ve ever struggled to keep your dog’s attention during a training session, the secret often comes down to one thing: the treat. High-value training treats need to be small, soft, easy to eat quickly, and irresistibly tasty — and these Beef Training Treats check every single box. Made with lean ground beef, rolled oats, egg, and pumpkin purée, these treats bake up into small, protein-packed rewards that are perfect for reinforcing good behavior, whether you’re working on basic obedience, tricks, or leash manners.
Unlike many commercial training treats, which can be full of fillers, artificial flavors, or excessive salt, this homemade recipe keeps things simple and clean. It’s made with real, whole ingredients your dog will love, and because the treats are small and bite-sized, they’re perfect for repeated rewards during a training session without overloading your dog with calories.
In this article, we’ll walk through the full recipe, explain the benefits of each ingredient, share step-by-step directions, offer helpful training treat tips, and answer common questions about making homemade training rewards for dogs.
Why Homemade Training Treats Are a Smart Choice
Training treats serve a very specific purpose, and homemade versions offer several advantages over many store-bought options.
- You control exactly what goes into them. No fillers, artificial flavors, preservatives, or excessive salt — just real, simple ingredients.
- They’re easy to make small and bite-sized. Pea-sized or marble-sized treats are ideal for training, since they allow for quick, repeated rewards without overfeeding.
- They’re cost-effective. Since training often requires a high volume of treats, making your own can save significant money compared to buying pre-packaged options.
- They’re highly motivating. The rich smell and flavor of real beef make these treats especially appealing, which can help keep your dog focused and engaged during training.
- They freeze well for convenience. You can make a big batch and freeze extras, so you always have training treats ready to go.
Why This Recipe Works So Well for Training
Every ingredient in this recipe plays a role in creating a treat that’s both nutritious and highly motivating for dogs. Here’s a closer look at what makes each one so effective.
Lean Ground Beef: A High-Value, Protein-Rich Base
Ground beef is a fantastic base for training treats because of its rich aroma and flavor, both of which help capture and hold your dog’s attention during training. Using lean ground beef helps keep the fat content more moderate, which is especially important since training sessions often involve giving many small treats in a row. Always choose plain ground beef with no added salt, seasonings, onion, or garlic, all of which can be harmful to dogs.
Egg: A Binding Agent and Protein Boost
A large egg helps bind the ingredients together while adding extra protein and nutrients to the mix. Eggs are a great source of amino acids and can contribute to a shiny, healthy coat.
Rolled Oats: Fiber and Texture
Old-fashioned rolled oats add fiber and help give the treats a firmer, more cohesive texture once baked. Oats are generally well tolerated by most dogs and are often used as a gentle grain option in homemade treat recipes.
Pumpkin Purée: Digestive Support
Plain, 100% pure pumpkin purée adds fiber and moisture to the mixture while supporting healthy digestion. Be sure to use pure pumpkin purée, not pumpkin pie filling, which contains added sugar and spices that aren’t appropriate for dogs.
Fresh Parsley: A Flavorful, Breath-Freshening Addition
Fresh parsley adds a subtle herbal flavor and is often included in dog treat recipes for its breath-freshening properties. Be sure to use plain, fresh parsley (not parsley combined with other seasonings).
Ingredients You’ll Need
Base Ingredients
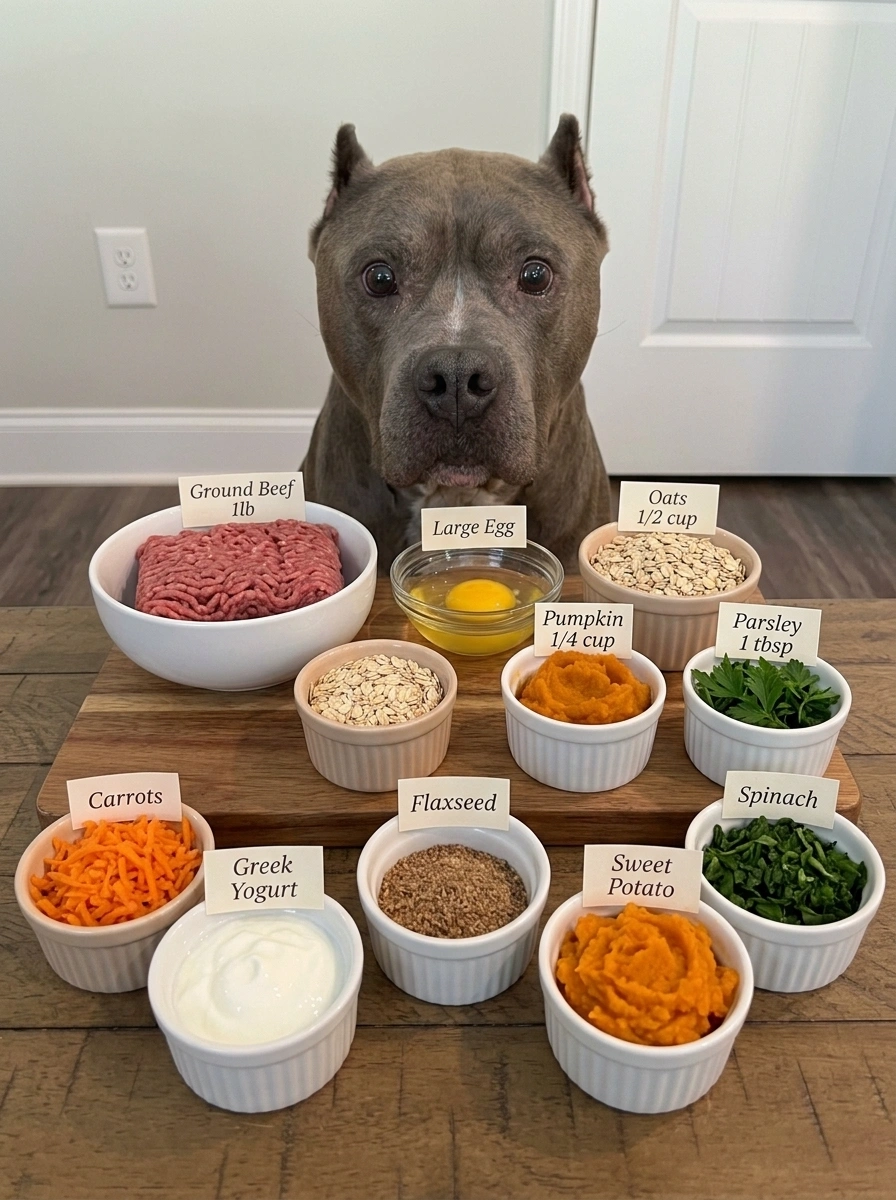
- 1 lb (450 g) lean ground beef – The high-value, protein-rich base of the treats. Choose plain beef with no added salt or seasonings.
- 1 large egg – Helps bind the mixture and adds extra protein.
- ½ cup old-fashioned rolled oats – Adds fiber and helps create a firmer texture.
- ¼ cup plain pumpkin purée (100% pure pumpkin) – Supports digestion and adds moisture.
- 1 tbsp chopped fresh parsley – Adds flavor and breath-freshening benefits.
Optional Add-Ins
Customize your training treats with any of these dog-safe extras:
- ¼ cup finely grated carrots – Adds crunch, fiber, and beta-carotene.
- 2 tbsp plain unsweetened Greek yogurt – Adds extra protein, calcium, and probiotics.
- 1 tbsp ground flaxseed – A source of omega-3 fatty acids that may support skin and coat health.
- 2 tbsp mashed sweet potato – Adds natural sweetness and additional fiber.
- 1 tbsp finely chopped spinach – Adds extra vitamins and a boost of color.
Step-by-Step Directions
This recipe is simple to prepare and bakes up in well under an hour.
Step 1: Preheat the Oven
Preheat your oven to 350°F (175°C) and line a baking sheet with parchment paper.
Step 2: Combine the Base Ingredients
Add the ground beef, egg, rolled oats, pumpkin purée, and parsley to a large mixing bowl.
Step 3: Mix Thoroughly
Mix until all the ingredients are evenly combined into a cohesive mixture.
Step 4: Fold in Optional Add-Ins
If you’re using any optional add-ins, such as grated carrots, Greek yogurt, flaxseed, mashed sweet potato, or chopped spinach, fold them into the mixture until well distributed.
Step 5: Shape the Treats
Roll the mixture into small, pea-sized or marble-sized balls for easy training use, or press it into silicone bone-shaped molds for more uniform, decorative treats.
Step 6: Arrange on the Baking Sheet
Arrange the shaped treats on the prepared baking sheet, leaving a little space between each one so they bake evenly.
Step 7: Bake Until Fully Cooked
Bake for 18–22 minutes, or until the treats are fully cooked through and lightly browned. Since these treats contain raw ground beef and egg before baking, it’s important to make sure they’re cooked all the way through for food safety.
Step 8: Cool Completely
Allow the treats to cool completely on the baking sheet or a wire rack before serving or storing them.
Step 9: Store and Serve
Store the cooled treats in an airtight container in the refrigerator for up to 5 days, or freeze them for up to 3 months. Serve as a high-value reward during training sessions.
Tips for Using Training Treats Effectively
Beyond the recipe itself, how you use these treats during training can make a big difference. Here are some helpful tips:
- Keep treats small. Pea-sized or marble-sized pieces allow for quick, repeated rewards without your dog filling up too quickly or gaining excess weight from frequent training sessions.
- Use high-value treats strategically. Save particularly exciting treats, like these beef training treats, for more challenging training tasks or distracting environments, and use lower-value treats for easier, more familiar behaviors.
- Factor treats into your dog’s daily calorie intake. Since training often involves a higher volume of treats, consider reducing your dog’s regular meal portions slightly on heavy training days, or ask your veterinarian for guidance.
- Keep a treat pouch handy. Having treats easily accessible during a walk or training session helps you reward good behavior immediately, which is key for effective training.
- Break larger treats into smaller pieces if needed. This is an easy way to stretch a batch of treats further during a long training session.
Safety Tips for Homemade Training Treats
Because this recipe includes raw ground beef and egg before baking, a few important safety guidelines should be kept in mind.
- Use plain lean ground beef with no added salt, onion, garlic, or seasonings. Onion and garlic, in particular, are toxic to dogs and should never be included in any homemade treat.
- Make sure the treats are fully cooked before serving. This is important both for food safety and for creating the right texture for a training treat.
- Use 100% pure pumpkin purée, not pumpkin pie filling. Pie filling contains added sugar and spices that aren’t appropriate for dogs.
- Wash your hands and surfaces thoroughly after handling raw beef and egg, just as you would when cooking for yourself.
- Always supervise your dog while eating, especially with any new treat.
- Adjust serving sizes based on your dog’s size, age, and activity level. Smaller dogs and less active dogs may need smaller portions or fewer treats per session. When in doubt, consult your veterinarian.
Tips for the Best Results
- Use lean ground beef. This helps keep the fat content more moderate, which is especially important given how many treats can be used in a single training session.
- Keep the shapes small and uniform. Consistent, bite-sized pieces make training smoother and help with portion control.
- Use a cookie scoop for consistency. A small cookie scoop or melon baller can help you form evenly sized treats quickly.
- Don’t skip the cooling step. Letting the treats cool completely helps them firm up to the right texture for handling and storage.
- Make a big batch. Since these treats freeze well for up to 3 months, it’s worth doubling the recipe so you always have training rewards on hand.
- Portion and freeze in small bags. Freezing treats in smaller, single-session portions makes it easy to grab exactly what you need before a training session.
Fun Variations to Try
Once you’ve mastered the base recipe, try these tasty twists:
- Veggie-Boosted Training Treats – Add grated carrots and chopped spinach for extra vitamins and a colorful mixture.
- Sweet Potato Beef Treats – Mix in mashed sweet potato for natural sweetness and additional fiber.
- Extra Protein Training Treats – Stir in a spoonful of plain Greek yogurt for an added protein and probiotic boost.
- Omega Boost Training Treats – Add ground flaxseed for a coat-supporting dose of omega-3 fatty acids.
- Turkey Training Treats – Substitute lean ground turkey for the ground beef for a leaner alternative with a different flavor profile.
Storage Instructions
Refrigerator Storage
Store the cooled treats in an airtight container in the refrigerator for up to 5 days. This is a great option if you plan to use them within the week for regular training sessions.
Freezer Storage
For longer storage, freeze the treats in an airtight, freezer-safe container or resealable bag for up to 3 months. Consider portioning them into smaller bags based on how many you typically use per training session for added convenience.
Thawing and Serving
If frozen, allow the treats to thaw in the refrigerator before serving, or let them sit at room temperature for a short time before your training session.
Recipe Facts
- Prep Time: 10 minutes
- Cook Time: 18–22 minutes
- Total Time: Approximately 30 minutes
- Yield: Varies based on treat size (typically 60–80 pea-sized treats or 30–40 marble-sized treats)
Frequently Asked Questions
Can I use a different type of meat for training treats? Yes, lean ground turkey or lean ground chicken can be substituted for the ground beef in this recipe. Just be sure to use plain meat with no added seasonings.
Why are small treats better for training? Small, pea-sized or marble-sized treats allow for quick, repeated rewards during a training session without your dog filling up too fast or consuming excessive calories, which is especially important during longer sessions.
Can I skip the egg in this recipe? The egg helps bind the mixture together, but if your dog has an egg allergy, you can try substituting a small amount of plain pumpkin purée or unsweetened applesauce as a binder, though the texture may vary slightly.
Is pumpkin necessary for this recipe? Pumpkin purée adds moisture and fiber, but if you don’t have it on hand, mashed sweet potato can serve as a similar substitute.
How many treats should I give my dog during a training session? This depends on your dog’s size, activity level, and the length of the session. Since these are calorie-dense, high-value treats, it’s a good idea to use small pieces and factor them into your dog’s overall daily calorie intake. When in doubt, consult your veterinarian.
Can I make these treats without an oven? Baking is recommended to ensure the treats are fully cooked and food-safe, given that the recipe includes raw ground beef and egg before cooking.
Are these treats suitable for puppies in training? The ingredients in this recipe are generally gentle and dog-friendly, but it’s always best to check with your veterinarian before introducing new treats to a puppy’s diet, especially during a critical growth stage.
How do I know the treats are fully cooked? The treats should be lightly browned on the outside and cooked through with no pink remaining in the center. If you’re unsure, you can check with a food thermometer to ensure the internal temperature reaches a safe level for ground beef.
Final Thoughts
These Beef Training Treats are a simple, effective way to keep your dog motivated and engaged during training sessions, all while avoiding the fillers, excessive salt, and artificial ingredients found in many commercial options. With a base of lean ground beef, oats, egg, and pumpkin, plus a variety of optional add-ins to make the recipe your own, these treats bake up quickly and freeze well for up to three months, so you’ll always have high-value rewards ready for your next training session. Whether you’re working on basic obedience, new tricks, or leash manners, these homemade treats are sure to keep your dog focused and eager to learn.
As always, check with your veterinarian if your dog has any specific dietary needs or health conditions before introducing new treats, and be sure to supervise your dog while they enjoy their reward. Here’s to successful training sessions and happy, well-fed pups!
Print
Beef Training Treats
Ingredients
Base Ingredients
- 1 lb (450 g) lean ground beef – The high-value, protein-rich base of the treats. Choose plain beef with no added salt or seasonings.
- 1 large egg – Helps bind the mixture and adds extra protein.
- ½ cup old-fashioned rolled oats – Adds fiber and helps create a firmer texture.
- ¼ cup plain pumpkin purée (100% pure pumpkin) – Supports digestion and adds moisture.
- 1 tbsp chopped fresh parsley – Adds flavor and breath-freshening benefits.
Optional Add-Ins
Customize your training treats with any of these dog-safe extras:
- ¼ cup finely grated carrots – Adds crunch, fiber, and beta-carotene.
- 2 tbsp plain unsweetened Greek yogurt – Adds extra protein, calcium, and probiotics.
- 1 tbsp ground flaxseed – A source of omega-3 fatty acids that may support skin and coat health.
- 2 tbsp mashed sweet potato – Adds natural sweetness and additional fiber.
- 1 tbsp finely chopped spinach – Adds extra vitamins and a boost of color.
Instructions
This recipe is simple to prepare and bakes up in well under an hour.
Preheat your oven to 350°F (175°C) and line a baking sheet with parchment paper.
Add the ground beef, egg, rolled oats, pumpkin purée, and parsley to a large mixing bowl.
Mix until all the ingredients are evenly combined into a cohesive mixture.
If you’re using any optional add-ins, such as grated carrots, Greek yogurt, flaxseed, mashed sweet potato, or chopped spinach, fold them into the mixture until well distributed.
Roll the mixture into small, pea-sized or marble-sized balls for easy training use, or press it into silicone bone-shaped molds for more uniform, decorative treats.
Arrange the shaped treats on the prepared baking sheet, leaving a little space between each one so they bake evenly.
Bake for 18–22 minutes, or until the treats are fully cooked through and lightly browned. Since these treats contain raw ground beef and egg before baking, it’s important to make sure they’re cooked all the way through for food safety.
Allow the treats to cool completely on the baking sheet or a wire rack before serving or storing them.
Store the cooled treats in an airtight container in the refrigerator for up to 5 days, or freeze them for up to 3 months. Serve as a high-value reward during training sessions.