Introduction to Mini Banana Pudding Cheesecakes
As a busy mom, I know how precious time can be, especially when it comes to whipping up something sweet. That’s why I adore these Mini Banana Pudding Cheesecakes! They’re the perfect blend of creamy cheesecake and nostalgic banana pudding, all in adorable little cups. Whether you’re hosting a gathering or just want to treat your family, these mini delights are sure to impress. Plus, they’re quick to make, allowing you to savor the joy of baking without the stress. Trust me, every bite is a delightful escape into dessert heaven!
Why You’ll Love This Mini Banana Pudding Cheesecakes
These Mini Banana Pudding Cheesecakes are a dream come true for busy lives. They come together in just 20 minutes, making them a quick solution for unexpected guests or a sweet family treat. The combination of creamy cheesecake and the classic taste of banana pudding is simply irresistible. Plus, they’re served in individual portions, so everyone gets their own little slice of happiness without the fuss!
Ingredients for Mini Banana Pudding Cheesecakes
Gathering the right ingredients is the first step to creating these delightful Mini Banana Pudding Cheesecakes. Here’s what you’ll need:
- Crushed vanilla wafers: These provide a sweet and crunchy base. You can also use graham crackers if you prefer a different flavor.
- Unsalted butter: This helps bind the crust together. Make sure it’s melted for easy mixing.
- Cream cheese: The star of the show! It gives the cheesecake its rich and creamy texture. Use full-fat for the best flavor.
- Powdered sugar: This sweetens the cheesecake filling without the graininess of granulated sugar.
- Vanilla extract: A splash of this adds depth and enhances the overall flavor of the cheesecakes.
- Whipped topping: This lightens the filling and gives it a fluffy texture. You can use homemade whipped cream if you’re feeling adventurous!
- Ripe bananas: Fresh bananas add natural sweetness and a lovely banana flavor. The riper, the better!
- Banana pudding mix: This is the secret ingredient that brings the classic banana pudding flavor to life.
- Milk: Used to prepare the pudding mix, it helps achieve the perfect consistency.
For exact measurements, check the bottom of the article where you can find everything listed for easy printing. Happy baking!
How to Make Mini Banana Pudding Cheesecakes
Now that you have your ingredients ready, let’s dive into the fun part—making these Mini Banana Pudding Cheesecakes! Follow these simple steps, and you’ll have a delightful dessert that’s sure to impress.
Step 1: Preheat the Oven
First things first, preheat your oven to 350°F (175°C). Preheating is crucial because it ensures that your cheesecakes bake evenly. If you skip this step, you might end up with a soggy crust or unevenly cooked filling. Trust me, a little patience goes a long way!
Step 2: Prepare the Crust
In a mixing bowl, combine the crushed vanilla wafers with the melted butter. Stir until the crumbs are well coated. This mixture should resemble wet sand. Now, press it firmly into the bottom of your mini cheesecake cups. Pressing it down well is key; it creates a sturdy base that holds everything together. No one wants a crumbly crust when they take a bite!
Step 3: Make the Cheesecake Filling
In another bowl, beat the softened cream cheese until it’s smooth and creamy. This is where the magic begins! Add in the powdered sugar and vanilla extract, mixing until everything is well combined. Now, gently fold in the whipped topping. Folding is important here; it keeps the mixture light and airy, giving your cheesecakes that dreamy texture we all love.
Step 4: Prepare the Banana Pudding Layer
In a separate bowl, whisk together the banana pudding mix and milk. Keep whisking until the mixture thickens up nicely. This step is where the classic banana pudding flavor comes to life! Make sure there are no lumps; a smooth pudding layer is essential for that perfect bite.
Step 5: Assemble the Mini Cheesecakes
Now it’s time to layer! Start by spooning the cheesecake filling over the crust in each cup. Then, add a generous layer of the banana pudding on top. Finally, place a few slices of ripe banana on top of the pudding. This not only adds flavor but also makes your mini cheesecakes look extra inviting!
Step 6: Chill and Serve
Once assembled, pop your mini cheesecakes in the refrigerator for at least 2 hours. Chilling is crucial; it allows the flavors to meld and the texture to set. When you’re ready to serve, you can garnish with a dollop of whipped topping and a slice of banana for that extra touch. Enjoy every delightful bite!
Tips for Success
- Use room temperature cream cheese for a smoother filling.
- Don’t skip the chilling time; it enhances flavor and texture.
- For a fun twist, add a sprinkle of crushed vanilla wafers on top before serving.
- Make these mini cheesecakes a day ahead for even better flavor.
- Experiment with different toppings like chocolate shavings or caramel drizzle!
Equipment Needed
- Mini cheesecake cups: Use silicone molds or muffin tins as alternatives.
- Mixing bowls: Any size will do, but a large bowl is best for mixing.
- Whisk: A hand whisk works, but an electric mixer speeds things up.
- Measuring cups and spoons: Essential for accurate ingredient amounts.
- Spatula: Great for folding and scraping down the sides of bowls.
Variations
- Chocolate Banana Pudding Cheesecakes: Add cocoa powder to the cheesecake filling for a chocolate twist.
- Nutty Delight: Mix in crushed nuts like pecans or walnuts into the crust for added crunch.
- Gluten-Free Option: Substitute crushed gluten-free cookies for the crust to make it suitable for gluten-sensitive friends.
- Vegan Version: Use vegan cream cheese and coconut whipped cream for a plant-based treat.
- Caramel Drizzle: Drizzle caramel sauce over the top before serving for an extra layer of sweetness.
Serving Suggestions
- Pair with a hot cup of coffee or a chilled glass of milk for a delightful contrast.
- Serve alongside fresh fruit like strawberries or blueberries for a pop of color.
- For a festive touch, garnish with mint leaves or edible flowers.
- Present on a decorative platter for an eye-catching display at gatherings.
FAQs about Mini Banana Pudding Cheesecakes
Can I make Mini Banana Pudding Cheesecakes ahead of time?
Absolutely! These mini cheesecakes can be made a day in advance. Just keep them covered in the refrigerator. The flavors will meld beautifully, making them even more delicious!
What can I use instead of vanilla wafers for the crust?
If you’re not a fan of vanilla wafers, graham crackers work wonderfully too. You can even try crushed Oreos for a chocolatey twist!
How do I store leftover Mini Banana Pudding Cheesecakes?
Store any leftovers in an airtight container in the refrigerator. They should stay fresh for up to three days. Just be sure to enjoy them before they disappear!
Can I freeze these Mini Banana Pudding Cheesecakes?
While you can freeze them, the texture may change once thawed. If you do freeze them, wrap each cheesecake tightly in plastic wrap and place them in a freezer-safe container. Thaw in the refrigerator before serving.
What can I substitute for whipped topping?
If you prefer a homemade touch, you can use freshly whipped cream instead of whipped topping. Just whip heavy cream with a bit of sugar until soft peaks form for a delightful, fluffy alternative!
Final Thoughts
Creating these Mini Banana Pudding Cheesecakes is more than just baking; it’s about crafting sweet memories. Each bite transports you back to simpler times, filled with laughter and love. The joy of sharing these delightful treats with family and friends is truly priceless. Plus, the ease of preparation means you can whip them up even on the busiest days. So, whether it’s a special occasion or just a Tuesday, these mini cheesecakes are sure to bring smiles all around. Trust me, once you make them, they’ll become a cherished favorite in your home!
Print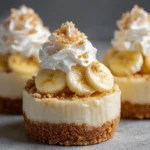
Mini Banana Pudding Cheesecakes: Delight in Every Bite!
- Total Time: 2 hours 30 minutes
- Yield: 12 mini cheesecakes 1x
- Diet: Vegetarian
Description
Mini Banana Pudding Cheesecakes are a delightful dessert that combines the creamy texture of cheesecake with the classic flavors of banana pudding, all served in individual portions.
Ingredients
- 1 cup crushed vanilla wafers
- 2 tablespoons unsalted butter, melted
- 8 oz cream cheese, softened
- 1/2 cup powdered sugar
- 1 teaspoon vanilla extract
- 1 cup whipped topping
- 2 ripe bananas, sliced
- 1/2 cup banana pudding mix
- 1 1/2 cups milk
Instructions
- Preheat the oven to 350°F (175°C).
- In a bowl, mix crushed vanilla wafers with melted butter until combined.
- Press the mixture into the bottom of mini cheesecake cups.
- In another bowl, beat cream cheese, powdered sugar, and vanilla extract until smooth.
- Fold in whipped topping until well combined.
- In a separate bowl, whisk together banana pudding mix and milk until thickened.
- Layer the banana pudding over the cream cheese mixture in the cups.
- Add sliced bananas on top of the pudding layer.
- Chill in the refrigerator for at least 2 hours before serving.
Notes
- For a richer flavor, use ripe bananas.
- These can be made a day in advance for convenience.
- Garnish with additional whipped topping and banana slices before serving.
- Prep Time: 20 minutes
- Cook Time: 10 minutes
- Category: Dessert
- Method: Baking and Chilling
- Cuisine: American
Nutrition
- Serving Size: 1 mini cheesecake
- Calories: 180
- Sugar: 12g
- Sodium: 150mg
- Fat: 8g
- Saturated Fat: 4g
- Unsaturated Fat: 2g
- Trans Fat: 0g
- Carbohydrates: 24g
- Fiber: 1g
- Protein: 2g
- Cholesterol: 30mg
Keywords: Mini Banana Pudding Cheesecakes, Banana Dessert, Cheesecake Recipe