As the tantalizing aroma of freshly baked treats wafts through your kitchen, the anticipation in the air grows thicker, almost palpable. Your pup, tail wagging furiously and eyes gleaming with excitement, dances around your feet, urging you onward. This is the magic of homemade treats, where every ingredient comes together not just to delight but to nourish, showing your furry friend just how much you care. With a few simple, wholesome ingredients, you can create irresistible greenies that are not only a health-boosting snack but also a bonding experience that turns an ordinary day into a celebration filled with joy.
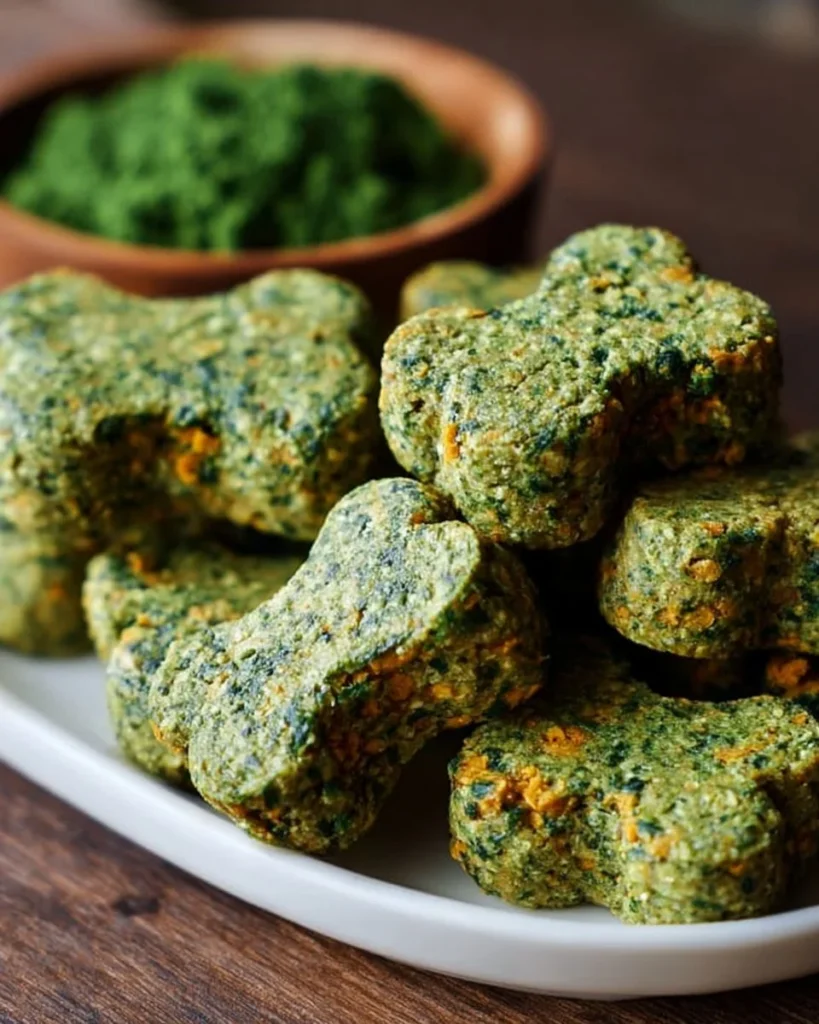
Picture tiny morsels—each with a gentle crunch that gives way to a tender, flavorful interior. The vibrant green of the spinach intertwines with the rich, earthy notes of pumpkin, while the refreshing bite of parsley dances alongside the subtle sweetness of coconut oil. These treats do more than please the palate; they support your dog’s overall health, keeping their coat shiny and their breath fresh. They embody love, health, and happiness, transforming every nibble into an expression of your affection.
Why You’ll Love This Homemade Greenies Recipe for Dogs
Why settle for store-bought treas? This homemade greenies recipe elevates treat time to an art form. You’ll love how you effortlessly combine nourishment with taste—each bite bursting with a medley of fresh ingredients. They serve as the perfect snack for any occasion, from rewarding good behavior during training sessions to simply sharing a special moment during your evening cuddle after a long day. Your dog deserves the best, and nothing says love quite like a homemade treat crafted from your own hands. Each greenie promotes dental health while offering an explosion of flavor that will have your pup sitting pretty for more!
Preparation Phase & Tools to Use
Before you dive into the delightful world of DIY dog treats, gather a few essential tools that make the preparation seamless and enjoyable. Here’s what you need:
- Food Processor: This powerful tool makes quick work of blending greens and creating the smooth dough you crave without any strenuous effort.
- Baking Sheet: A rimmed baking sheet helps catch any drips while allowing your treats to bake evenly and thoroughly.
- Parchment Paper: Lining your baking sheet ensures your treats won’t stick and makes cleanup a breeze—no one wants to scrape off burnt bits after a culinary adventure.
- Silicone Molds: Optional, but they lend a fun shape to your treats, perfect for customized servings—your pup will adore unique shapes!
Make sure to use fresh, quality ingredients, as each component plays a vital role. When you embrace freshness, not only do you boost flavor, but you also enhance nutritional value. Ready to create?
Ingredients for Homemade Greenies
Gathering the right ingredients sets the stage for a delicious final treat. Here’s what you need:
- 1 cup fresh spinach: Packed with vitamins, spinach offers a vibrant color and nutritional boost. Feel free to substitute with kale or Swiss chard if desired.
- 1/4 cup fresh parsley: This aromatic herb aids in digestion and freshens breath. You can use cilantro for a twist in flavor.
- 1/2 cup rolled oats: These bring texture and heartiness to the mix. Use gluten-free oats for a different variation.
- 1/2 cup pumpkin purée: Bright and flavorful, this superfood is rich in fiber and vitamins. Ensure it’s pure pumpkin purée rather than pie filling.
- 2 tbsp coconut oil: This creamy oil lends a beautiful texture and offers health benefits. You can switch this out with olive oil if needed.
- 1 tbsp ground flaxseed: Full of omega-3 fatty acids, this ingredient enhances benefits for skin and coat.
- 1 egg: Acts as a binder, ensuring your dough holds together nicely. For a vegan alternative, try a flax egg.
- Optional: 1 tsp spirulina: This nutrient-dense blue-green algae adds color and boosts nutrition.
How to Make Homemade Greenies
Creating these delightful little greenies is an enjoyable process. Follow these steps to bring your pup’s new favorite treat to life:
-
Wash and Chop: Begin by washing the spinach and parsley thoroughly, removing any dirt. Roughly chop them to help them blend smoothly.
-
Blend Greens: In a food processor, combine the chopped spinach, parsley, coconut oil, and pumpkin purée. Blend until you achieve a smooth paste.
-
Add Oats and Flaxseed: Next, add the rolled oats and ground flaxseed into the mixture. If you choose to use spirulina, add it now as well. Pulse the processor to combine everything evenly.
-
Incorporate Egg: Crack the egg into the mixture and blend until a thick, cohesive dough forms—this should be a sticky consistency that holds together well.
-
Chill the Dough: Chill the dough in the refrigerator for about 15–20 minutes. This makes it easier to shape and gives your greenies a firmer texture when cooked.
-
Shape the Dough: Roll the dough into small rectangles or, if you want to add flair, press it into silicone molds. Your creativity can truly shine here!
-
Prepare for Baking: Place your treats on a parchment-lined baking sheet, giving them some space to expand as they bake.
-
Bake: Preheat your oven to 325°F (163°C) and bake for 25–30 minutes, or until they feel firm to the touch.
-
Extra Crunchy: For an added crunch, leave the greenies in the oven with the door cracked open for an additional 20 minutes.
-
Cool and Store: Allow them to cool completely on a wire rack before serving or storing. Keep them in the fridge for up to a week or freeze them for longer-lasting treats!
Chef’s Notes & Helpful Tips
- Make-ahead Tips: You can prepare the dough in advance and store it in the fridge for up to three days before shaping and baking. This is especially useful for busy days!
- Cooking Alternatives: For those who prefer quicker methods, consider using an air fryer. Just adjust the cooking time, as air fryers often cook faster.
- Customization Ideas: Experiment with adding peanut butter or even sweet potato for a different flavor! Just ensure any additional ingredient is dog-friendly.
Common Mistakes to Avoid
Creating the perfect greenies has its pitfalls. Here’s what to watch out for:
- Overmixing the Dough: Blend just enough to combine ingredients. Over-processing can lead to a tough consistency.
- Skipping the Chill Time: Don’t rush this step! Chilling helps the dough firm up, making it easier to shape and preventing misshaping in the oven.
- Not Monitoring Baking Time: Ovens vary, keep an eye on your treats to prevent burning! Remove them as soon as they look firm to the touch.
What to Serve With Homemade Greenies
These delightful little treats pair beautifully with a wide variety of mealtimes and snacks. Consider these serving suggestions:
- As a Training Reward: Use them during obedience training sessions to reinforce good behavior.
- Snack Time: Give your dog a mid-afternoon pick-me-up to keep their spirits high!
- Birthday Treat: Celebrate your pup’s special day with a larger batch. You can even decorate them with dog-friendly frosting.
- During Playtime: Treat your dog to a greenie when they’ve had a particularly active play session.
- With Meals: Crumble them over their usual kibble as an enticing topper.
- Sharing with Friends: Encourage socialization by offering them to visiting canines!
Storage & Reheating Instructions
Keep your homemade greenies in optimal condition by following these tips:
- Fridge: Store in an airtight container for up to a week.
- Freezer: For longer storage, place them in a freezer-safe bag to keep them fresh for up to three months. Just thaw before serving.
- Reheating: To refresh a treat, pop it in the microwave for a few seconds, or let it sit at room temperature for softer goodness.
Estimated Nutrition Information
These homemade greenies offer a healthy treat option for your pup, but here’s a general breakdown per treat (approximate values):
- Calories: 40
- Fat: 2g
- Protein: 1.5g
- Carbohydrates: 5g
- Fiber: 1g
Note: Nutritional values may vary based on specific ingredient brands and proportions used.
FAQs
1. Can I give these treats to puppies?
Absolutely! These treats are made from natural ingredients. Just ensure they’re appropriately sized for their smaller mouths.
2. Can I add flavors my dog enjoys?
Certainly! Just make sure any flavor additions are safe for dogs. Peanut butter, sweet potato, or even banana can be great choices!
3. How can I tell when they’re done baking?
Your treats should feel firm to the touch. A golden-brown color at the edges is also an excellent indicator of doneness.
4. Can I use frozen spinach or parsley?
Yes, though fresh ingredients yield better flavor and texture, thawed frozen spinach can work if drastically squeezed of moisture.
5. My dough was too sticky, what should I do?
If your dough sticks too much, add a little extra oat flour until you reach a workable consistency.
Conclusion
Making homemade greenies for your furry companion not only fills their belly but also warms the heart. Each step of the process embodies the thoughtfulness and love that you pour into their happiness. With flavors that burst with freshness and the joy of creating something special, these treats transform any day into an occasion worth celebrating. So why not roll up your sleeves and get started on this delightful adventure? Your furry friend is waiting, and their tail is wagging in eager anticipation!
Print
Homemade Greenies for Dogs
- Total Time: 45 minutes
- Yield: 20 servings 1x
- Diet: Homemade, Healthy
Description
Delight your furry friend with these nutritious homemade greenies, packed with wholesome ingredients that support health and happiness.
Ingredients
- 1 cup fresh spinach
- 1/4 cup fresh parsley
- 1/2 cup rolled oats
- 1/2 cup pumpkin purée
- 2 tbsp coconut oil
- 1 tbsp ground flaxseed
- 1 egg
- Optional: 1 tsp spirulina
Instructions
- Wash and chop the spinach and parsley thoroughly, then chop it roughly.
- In a food processor, combine the chopped spinach, parsley, coconut oil, and pumpkin purée and blend until smooth.
- Add the rolled oats and ground flaxseed into the mixture, pulse to combine.
- Incorporate the egg and blend until a thick dough forms.
- Chill the dough in the refrigerator for 15-20 minutes.
- Roll the dough into small rectangles or press it into silicone molds.
- Place the treats on a parchment-lined baking sheet.
- Preheat the oven to 325°F (163°C) and bake for 25-30 minutes.
- For extra crunch, leave the oven door cracked open for an additional 20 minutes.
- Cool completely before serving or storing.
Notes
Store treats in an airtight container for up to a week or freeze for longer storage.
- Prep Time: 15 minutes
- Cook Time: 30 minutes
- Category: Dog Treats
- Method: Baking
- Cuisine: Pet Food
Nutrition
- Serving Size: 1 treat
- Calories: 40
- Sugar: 0g
- Sodium: 5mg
- Fat: 2g
- Saturated Fat: 1g
- Unsaturated Fat: 1g
- Trans Fat: 0g
- Carbohydrates: 5g
- Fiber: 1g
- Protein: 1.5g
- Cholesterol: 30mg
Keywords: dog treats, homemade dog snacks, healthy dog food