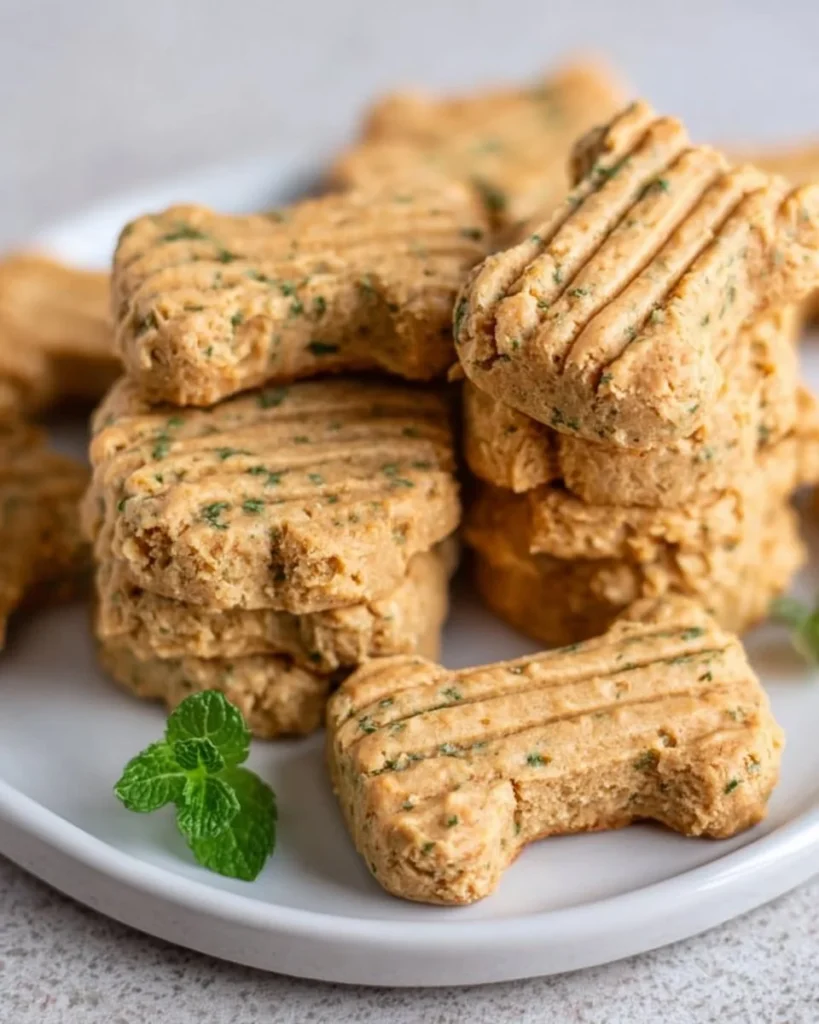
Nothing brings a wagging tail quite like the promise of a delicious homemade treat! Imagine the joy on your pup’s face as they crunch into a fresh, golden dog biscuit, the aroma of wholesome ingredients filling the air. The delightful snap and the rich, peanut buttery goodness create an irresistible moment that you both cherish. Each tasty bite delivers not just flavor but a warm fuzzy feeling, knowing that you’ve crafted something special just for them. With every crunch, you embrace the simple pleasure of providing your canine companion with a healthy, loving snack, designed to nourish both body and soul.
The kitchen becomes a joyful workshop as you blend love with whole ingredients. The earthy tones of whole wheat flour and the hearty texture of rolled oats come together effortlessly. The nutty aroma of unsweetened peanut butter wafts through the air, awakening not only your dog’s senses but also your own. You can almost envision those happy puppy eyes lighting up at the sight of their favorite treats. These crunchy dental delights don’t just taste good—they help maintain your dog’s oral health, making every bite a little gift of wellness.
Why You’ll Love This Homemade Crunchy Dental Treats for Dogs
Creating your own dog treats at home opens a delightful world of possibilities! Not only do you ensure that your furry friend enjoys the highest quality ingredients, but you also cater to their specific tastes and dietary needs. The wholesome combination of whole wheat flour, rolled oats, and nutrient-rich broth creates a treat that is both nutritious and flavorful. Imagine your dog excitedly anticipating treat time, their tail wagging wildly as they nibble away at these scrumptious biscuits!
These crunchy delights stand apart from store-bought options, boasting no artificial flavors or preservatives; they celebrate the natural goodness of real food. When you serve your dog these homemade snacks, you invite shared moments of joy—a special occasion daily that builds your bond. Plus, the added benefit of the parsley improves fresh breath, making nose-to-nose time even more enjoyable for both of you!
Preparation Phase & Tools to Use
Before you dive into this delightful culinary adventure, gather a few essential tools to streamline your experience.
-
Mixing Bowl: Choose a sturdy, large bowl to comfortably fit all your ingredients while allowing plenty of space for mixing. This will keep your workspace tidy.
-
Rolling Pin: A good rolling pin will also help you achieve that perfect thickness for your dough, ensuring every treat bakes evenly.
-
Cookie Cutters: Get creative! Use bone-shaped cutters for a classic appeal or explore fun, seasonal shapes to make your treats even more special.
-
Baking Sheet and Parchment Paper: The baking sheet provides a dedicated surface for treats to crisp beautifully, while parchment paper prevents sticking and makes for easy cleanup.
Before you begin, remember to create a calm baking environment. Gather your ingredients and tools beforehand to keep the process enjoyable and stress-free.
Ingredients for Homemade Crunchy Dental Treats for Dogs
Let’s talk about what makes these treats outstanding and why each ingredient plays an essential role in crafting these crunchy delights:
-
2 ½ cups whole wheat flour: This forms the base and provides a rich texture. If your pup is gluten-sensitive, choose oat or chickpea flour instead.
-
½ cup rolled oats: Adding heartiness and a lovely chewiness, oats also contribute fiber, aiding your dog’s digestion.
-
½ cup unsweetened peanut butter: Dogs adore this creamy treat, and it adds flavor and protein. If your pup has allergies, opt for unsweetened pumpkin puree or apple sauce instead.
-
1 cup low-sodium chicken or beef broth: A flavorful addition that helps bind the dough, the broth infuses every treat with savory goodness. Vegetable broth is a great plant-based alternative.
-
1 egg: This acts as a binding agent while introducing essential proteins to the mix.
-
¼ cup parsley (optional): A pinch of parsley not only freshens breath but also brings vibrant green flecks to your treats.
How to Make Homemade Crunchy Dental Treats for Dogs
-
Preheat your oven to 350°F (175°C) to create the perfect climate for baking.
-
In a large bowl, mix together the whole wheat flour, rolled oats, and peanut butter. A wooden spoon or spatula works beautifully here!
-
Add the chicken or beef broth and the egg, stirring until all ingredients meld into a smooth, firm dough.
-
If you opt for it, stir in the parsley, ensuring it’s evenly distributed among the mixture.
-
Roll the dough out on a lightly floured surface to about ½ inch thick, creating uniform treats.
-
Use cookie cutters to cut into fun shapes, ensuring to combine scraps and reroll as needed.
-
Place the treats on a baking sheet lined with parchment paper, giving them a little space—these babies will expand slightly!
-
Bake for 20-25 minutes, watching closely for that delightful golden brown color, ensuring that they become perfectly crunchy.
-
Let cool completely before serving! It’s the hardest part, but your dog’s anticipation will be worth it.
Chef’s Notes & Helpful Tips
-
Make-ahead tips: Prepare a large batch and store them in an airtight container. These treats can last up to two weeks in the pantry or longer in the fridge!
-
Cooking alternatives: Feel free to explore air frying these treats at 325°F (160°C) for around 10-15 minutes—just keep an eye on them, as air fryers can cook quickly.
-
Customization ideas: Add pumpkin puree for autumn flavors, or mix in shredded carrots for added texture and sweetness.
Common Mistakes to Avoid
Many novice bakers worry about their experience, but a few common mistakes can be easily avoided:
-
Too Much Flour: Adding excess flour can lead to dry, hard treats. Measure carefully and remember that the dough should be firm but not crumbly.
-
Not Baking Long Enough: Undercooked treats may become chewy instead of crunchy. Trust your instincts and bake until they are a shade darker than the dough you started with.
-
Skipping Cooling Time: Allowing treats to cool ensures their crispiness. If you serve them too soon, you risk a soggy biscuit!
What to Serve With Homemade Crunchy Dental Treats for Dogs
Pair these delicious biscuits with your dog’s favorite activities or serve them during special moments:
-
Training Reward: Use these crunchy delights as a motivating treat during training sessions.
-
Adding a Fun Surprise: Stuff a few treats in a puzzle toy to entertain your dog while they work for their reward.
-
Celebratory Snack: Perfect for birthdays or "just because" moments, they bring an extra sparkle to everyday life.
-
With a Puppuccino: Pair these treats with a dog-friendly whipped cream or simply enjoy some outside on a warm day with a cold drink in hand.
-
Snack Time at the Park: Share these with friends while on a dog park outing; your pooch will be the star of the day!
-
Post-Exercise Reward: After a joyful romp, these treats provide a satisfying end to an active day.
Storage & Reheating Instructions
Store your homemade treats in an airtight container at room temperature for up to two weeks. For longer storage, consider freezing them for up to three months. When you’re ready to treat your pup, simply let frozen biscuits thaw at room temperature or pop them in the microwave for a few seconds to warm them up. Your dog will be in for a delightful surprise!
Estimated Nutrition Information
Approximate values per treat (based on this recipe yielding 30 cookies) may include:
- Calories: 60
- Protein: 2.5g
- Fat: 2.2g
- Carbohydrates: 8g
These values can vary based on ingredient brands used. Always consult with your veterinarian regarding your dog’s specific dietary needs.
FAQs
Can I use other types of flour?
Absolutely! While whole wheat flour offers nutritional benefits, feel free to substitute it with oat flour, brown rice flour, or chickpea flour for a gluten-free option.
How do I know if my dog is allergic to any ingredients?
Introduce new foods gradually. Monitor your pup for any allergies (indicated by itching, stomach upset, or unusual behavior) when trying out these treats for the first time.
Can these treats be made without peanut butter?
Certainly! Many dogs enjoy pumpkin or sweet potato puree instead of peanut butter, adding a delicious sweetness that they will love.
What if my dog doesn’t like crunchy textures?
If your dog prefers softer treats, you can reduce baking time and create a chewier snack. Always monitor their preferences to find what they enjoy most.
How can I make these treats visually appealing?
Get creative with the shapes! Use colorful icing (safe for dogs) or sprinkle sesame seeds on top before baking. Your pup won’t be able to resist a beautifully crafted treat!
Conclusion
Making homemade crunchy dental treats for dogs not only provides wholesome nutrition but also sparks moments of joy and bonding with your furry friend. The experience of baking in your own kitchen transforms simple ingredients into something magical. As you watch your pup eagerly crunch away, you’ll feel the warmth of love and care that goes into every bite. So why not whisk up a batch and treat your dog to something homemade today? They will surely love every crunchy moment!
Print
Homemade Crunchy Dental Treats for Dogs
- Total Time: 40 minutes
- Yield: 30 cookies 1x
- Diet: Dog Food
Description
Delight your furry friend with these homemade crunchy dental treats, packed with wholesome ingredients and perfect for maintaining oral health.
Ingredients
- 2 ½ cups whole wheat flour (or oat/chickpea flour for gluten sensitivity)
- ½ cup rolled oats
- ½ cup unsweetened peanut butter (or pumpkin puree for allergies)
- 1 cup low-sodium chicken or beef broth (or vegetable broth for a plant-based option)
- 1 egg
- ¼ cup parsley (optional)
Instructions
- Preheat your oven to 350°F (175°C).
- In a large bowl, mix together the whole wheat flour, rolled oats, and peanut butter using a wooden spoon or spatula.
- Add the chicken or beef broth and the egg, stirring until a smooth, firm dough forms.
- If using, stir in the parsley until evenly distributed.
- Roll the dough out on a lightly floured surface to about ½ inch thick.
- Use cookie cutters to cut into fun shapes, combining scraps and rerolling as needed.
- Place the treats on a baking sheet lined with parchment paper.
- Bake for 20-25 minutes until golden brown and crunchy.
- Let cool completely before serving.
Notes
Store in an airtight container for up to two weeks or freeze for up to three months. Warm them in the microwave for a few seconds before serving.
- Prep Time: 15 minutes
- Cook Time: 25 minutes
- Category: Dog Treats
- Method: Baking
- Cuisine: Pet Food
Nutrition
- Serving Size: 1 treat
- Calories: 60
- Sugar: 0g
- Sodium: 20mg
- Fat: 2.2g
- Saturated Fat: 0.5g
- Unsaturated Fat: 1.7g
- Trans Fat: 0g
- Carbohydrates: 8g
- Fiber: 0.5g
- Protein: 2.5g
- Cholesterol: 30mg
Keywords: dog treats, homemade dog biscuits, crunchy dog snacks, pet dental health