Introduction to Easter Bunny Cake
As the vibrant colors of spring bloom around us, it’s time to celebrate Easter with a delightful treat that brings joy to both young and old. The Easter Bunny Cake is not just a dessert; it’s a centerpiece that sparks smiles and laughter at any gathering. I know how busy life can get, especially during the holidays, so this cake is a quick solution for those hectic days. With its charming bunny shape and delicious flavor, it’s sure to impress your loved ones and create sweet memories that last long after the last slice is gone.
Why You’ll Love This Easter Bunny Cake
This Easter Bunny Cake is a delightful blend of simplicity and flavor. It’s easy to whip up, making it perfect for busy moms like me who juggle multiple tasks. The moist, fluffy cake paired with sweet frosting creates a taste that will have everyone asking for seconds. Plus, its adorable bunny shape adds a festive touch to your holiday table, making it a showstopper without the stress!
Ingredients for Easter Bunny Cake
Gathering the right ingredients is the first step to creating your Easter Bunny Cake masterpiece. Here’s what you’ll need:
- All-purpose flour: This is the backbone of your cake, providing structure and texture.
- Granulated sugar: Sweetness is key! It helps create that delightful fluffy texture.
- Unsalted butter: Softened butter adds richness and moisture, making your cake tender.
- Milk: This ingredient brings moisture and helps to create a soft crumb.
- Baking powder: A leavening agent that helps the cake rise, giving it that light and airy feel.
- Vanilla extract: A splash of vanilla enhances the flavor, making every bite more delicious.
- Salt: Just a pinch balances the sweetness and enhances the overall flavor.
- Eggs: They bind the ingredients together and add moisture, contributing to the cake’s structure.
- Powdered sugar: Essential for the frosting, it creates a smooth and sweet topping.
- Food coloring: Pink and black for decorating your bunny, adding a fun and festive touch.
- Shredded coconut: This is optional but adds a lovely texture and a touch of whimsy to your cake.
- Chocolate chips: Perfect for the bunny’s eyes, adding a sweet surprise!
For exact measurements, check the bottom of the article where you can find everything listed for easy printing. Feel free to get creative with your ingredients! You can substitute almond extract for vanilla or use coconut milk for a dairy-free version. The possibilities are endless!
How to Make Easter Bunny Cake
Now that you have your ingredients ready, let’s dive into the fun part—making the Easter Bunny Cake! Follow these simple steps, and you’ll have a delightful dessert that will wow your guests.
Step 1: Preheat the Oven
First things first, preheat your oven to 350°F (175°C). Preheating is crucial because it ensures your cake bakes evenly. A hot oven helps the batter rise properly, giving you that fluffy texture we all love.
Step 2: Cream Butter and Sugar
In a large bowl, cream together the softened butter and granulated sugar until it’s light and fluffy. This process is essential for creating air pockets in the batter, which leads to a tender cake. It’s like giving your cake a little hug before it goes into the oven!
Step 3: Add Eggs and Mix
Next, add the eggs one at a time, mixing well after each addition. This step is important because it allows each egg to fully incorporate into the batter, ensuring a smooth and consistent mixture. Think of it as building a strong foundation for your cake!
Step 4: Incorporate Milk and Vanilla
Now, stir in the milk and vanilla extract. These ingredients not only enhance the flavor but also add moisture to the cake. The vanilla brings a warm, inviting aroma that will make your kitchen smell heavenly!
Step 5: Combine Dry Ingredients
In another bowl, whisk together the all-purpose flour, baking powder, and salt. The flour provides structure, while the baking powder acts as a leavening agent, helping your cake rise. The salt balances the sweetness, making every bite delicious.
Step 6: Mix Wet and Dry Ingredients
Gradually add the dry ingredients to the wet mixture, mixing until just combined. Be careful not to overwork the batter; otherwise, your cake might turn out dense. It’s like a gentle dance—mix just enough to bring everything together!
Step 7: Pour Batter into Cake Pan
Pour the batter into a greased bunny-shaped cake pan. Make sure to spread it evenly to ensure uniform baking. If you don’t have a bunny pan, you can use a regular round cake pan and shape it later. Just remember to grease it well!
Step 8: Bake the Cake
Place the cake in the preheated oven and bake for 30-35 minutes. To check for doneness, insert a toothpick into the center. If it comes out clean, your cake is ready! The aroma wafting through your home will be irresistible.
Step 9: Cool the Cake
Once baked, let the cake cool completely before frosting. This step is crucial; if you frost a warm cake, the frosting will melt away. Patience is key here, but trust me, it’s worth the wait!
Step 10: Prepare the Frosting
In a bowl, mix the powdered sugar with 4 tablespoons of milk to create a smooth frosting. You want it to be spreadable but not too runny. If it’s too thick, add a splash more milk. This frosting is the sweet crown for your bunny cake!
Step 11: Frost and Decorate
Finally, frost the cooled cake and get creative with your decorations! Use shredded coconut for a fluffy bunny fur effect, chocolate chips for the eyes, and food coloring for those adorable details. Let your imagination run wild—this is where the fun really begins!
Tips for Success
- Always measure your ingredients accurately for the best results.
- Use room temperature eggs and butter for easier mixing.
- Don’t skip the cooling step; it prevents melting frosting.
- Experiment with different decorations to make your cake unique.
- Keep an eye on the baking time; ovens can vary.
Equipment Needed
- Bunny-shaped cake pan: If you don’t have one, a regular round cake pan works too.
- Mixing bowls: A large bowl for wet ingredients and a medium bowl for dry.
- Electric mixer: A hand mixer or whisk can also do the job.
- Spatula: For spreading frosting smoothly.
- Toothpick: Essential for checking cake doneness.
Variations of Easter Bunny Cake
- Carrot Cake Version: Substitute half of the all-purpose flour with finely grated carrots for a moist, flavorful twist.
- Chocolate Bunny Cake: Replace some of the flour with cocoa powder for a rich chocolate flavor that kids will love.
- Gluten-Free Option: Use a gluten-free all-purpose flour blend to make this cake suitable for those with gluten sensitivities.
- Dairy-Free Version: Swap out the butter for coconut oil and use almond or oat milk instead of regular milk.
- Vegan Bunny Cake: Replace eggs with flaxseed meal mixed with water and use plant-based milk and butter alternatives.
Serving Suggestions for Easter Bunny Cake
- Pair the cake with fresh fruit, like strawberries or raspberries, for a refreshing contrast.
- Serve with a scoop of vanilla ice cream for an indulgent treat.
- Complement with a light, fruity punch or lemonade for a festive drink.
- Present the cake on a colorful platter, garnished with edible flowers for a springtime touch.
FAQs about Easter Bunny Cake
Can I make the Easter Bunny Cake ahead of time?
Absolutely! You can bake the cake a day in advance. Just make sure to store it in an airtight container to keep it fresh. Frost it on the day you plan to serve it for the best results.
What can I use if I don’t have a bunny-shaped cake pan?
No worries! You can use a regular round cake pan. Once baked, simply shape the cake into a bunny using a knife. It’s a fun way to get creative!
How do I store leftover Easter Bunny Cake?
Store any leftovers in an airtight container at room temperature for up to three days. If you want to keep it longer, refrigerate it, but let it come to room temperature before serving for the best taste.
Can I customize the decorations on the cake?
Definitely! Feel free to get creative with your decorations. You can use different colored frosting, candies, or even fresh fruit to make your Easter Bunny Cake uniquely yours!
Is this cake suitable for kids with allergies?
It depends on the specific allergies. You can easily adapt the recipe to be gluten-free or dairy-free. Just be sure to check all ingredient labels for potential allergens!
Final Thoughts
Creating the Easter Bunny Cake is more than just baking; it’s about bringing joy and laughter to your holiday celebrations. As you gather around the table, sharing slices of this delightful cake, you’ll create cherished memories with family and friends. The smiles on their faces as they dig into this whimsical dessert are priceless. Plus, the ease of making this cake means you can focus on what truly matters—spending quality time with your loved ones. So, roll up your sleeves, embrace the fun, and let this Easter Bunny Cake be the star of your festive gathering!
Print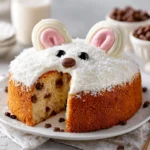
Easter Bunny Cake: Delight Your Guests This Holiday!
- Total Time: 1 hour 5 minutes
- Yield: 12 servings 1x
- Diet: Vegetarian
Description
A delightful and festive cake shaped like a bunny, perfect for Easter celebrations.
Ingredients
- 2 cups all-purpose flour
- 1 ½ cups granulated sugar
- ½ cup unsalted butter, softened
- 1 cup milk
- 3 ½ teaspoons baking powder
- 1 teaspoon vanilla extract
- ½ teaspoon salt
- 3 large eggs
- 2 cups powdered sugar
- 4 tablespoons milk (for frosting)
- Food coloring (pink and black)
- Shredded coconut (for decoration)
- Chocolate chips (for eyes)
Instructions
- Preheat the oven to 350°F (175°C).
- In a large bowl, cream together the butter and sugar until light and fluffy.
- Add the eggs one at a time, mixing well after each addition.
- Stir in the milk and vanilla extract.
- In another bowl, combine the flour, baking powder, and salt.
- Gradually add the dry ingredients to the wet mixture, mixing until just combined.
- Pour the batter into a greased bunny-shaped cake pan.
- Bake for 30-35 minutes or until a toothpick inserted in the center comes out clean.
- Let the cake cool completely before frosting.
- In a bowl, mix powdered sugar with 4 tablespoons of milk to create the frosting.
- Frost the cooled cake and decorate with shredded coconut, chocolate chips, and food coloring for details.
Notes
- Ensure the cake is completely cooled before frosting to prevent melting.
- You can use a regular round cake pan and shape the cake into a bunny if you don’t have a bunny-shaped pan.
- Feel free to customize the decorations to suit your taste.
- Prep Time: 30 minutes
- Cook Time: 35 minutes
- Category: Dessert
- Method: Baking
- Cuisine: American
Nutrition
- Serving Size: 1 slice
- Calories: 350
- Sugar: 30g
- Sodium: 200mg
- Fat: 15g
- Saturated Fat: 8g
- Unsaturated Fat: 5g
- Trans Fat: 0g
- Carbohydrates: 50g
- Fiber: 1g
- Protein: 4g
- Cholesterol: 50mg
Keywords: Easter Bunny Cake, Easter dessert, festive cake, holiday cake