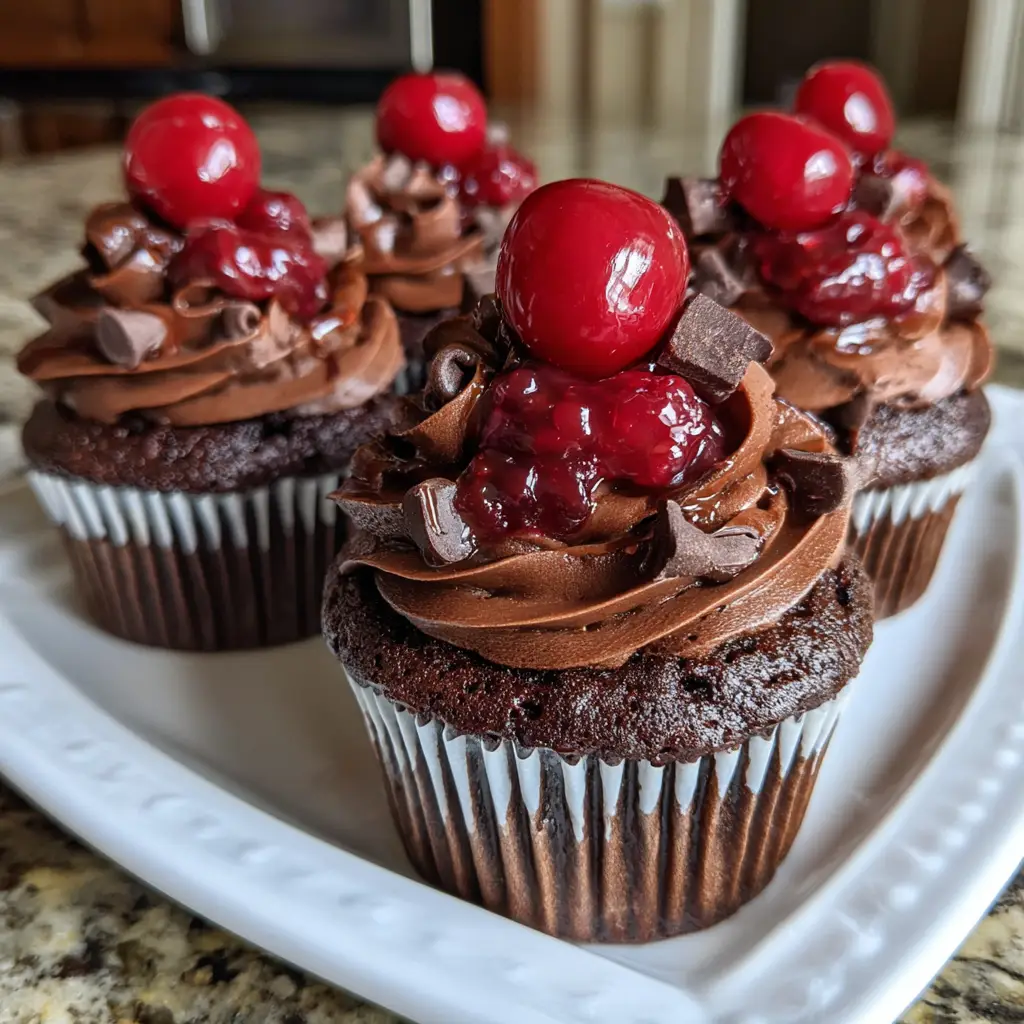
Introduction to Chocolate Covered Cherry Cupcakes
As a busy mom, I know how precious time can be, especially when it comes to whipping up something sweet. That’s why I adore these Chocolate Covered Cherry Cupcakes! They’re not just a treat; they’re a delightful escape from the daily grind. Imagine biting into a moist chocolate cupcake, only to discover a luscious cherry filling waiting inside. It’s like a little surprise party for your taste buds! Perfect for a quick dessert or to impress your loved ones, these cupcakes are sure to bring smiles all around. Let’s dive into this delicious adventure together!
Why You’ll Love This Chocolate Covered Cherry Cupcakes
These Chocolate Covered Cherry Cupcakes are a dream come true for busy lives! They’re quick to make, taking just 40 minutes from start to finish. The rich chocolate flavor combined with the sweet cherry filling creates a taste sensation that’s hard to resist. Plus, they’re perfect for any occasion, whether it’s a family gathering or a cozy night in. Trust me, these cupcakes will become a favorite in your home!
Ingredients for Chocolate Covered Cherry Cupcakes
Gathering the right ingredients is the first step to creating these delightful Chocolate Covered Cherry Cupcakes. Here’s what you’ll need:
- All-purpose flour: The backbone of any cupcake, providing structure and texture.
- Granulated sugar: Sweetens the batter and helps create that lovely moist crumb.
- Unsweetened cocoa powder: Adds rich chocolate flavor; opt for dark cocoa for an even deeper taste.
- Butter: Softened butter gives the cupcakes a tender, rich quality.
- Eggs: They bind the ingredients together and add moisture.
- Milk: Enhances the cupcake’s moisture and helps create a soft texture.
- Vanilla extract: A splash of vanilla elevates the flavor profile beautifully.
- Baking powder and baking soda: These leavening agents help the cupcakes rise and become fluffy.
- Salt: Just a pinch enhances all the flavors, balancing the sweetness.
- Cherry pie filling: The star of the show! This adds a burst of fruity goodness right in the center.
- Chocolate chips: For that extra chocolatey goodness, fold these in for delightful pockets of melted chocolate.
For those looking to customize, consider using gluten-free flour or a dairy-free butter substitute. You can find the exact measurements for each ingredient at the bottom of the article, ready for printing!
How to Make Chocolate Covered Cherry Cupcakes
Step 1: Preheat and Prepare
First things first, preheat your oven to 350°F (175°C). While it warms up, line a cupcake pan with your favorite cupcake liners. This simple step ensures your cupcakes come out easily and look adorable. Trust me, presentation matters, especially when you’re serving these delightful treats!
Step 2: Cream Butter and Sugar
In a large mixing bowl, cream together the softened butter and granulated sugar. Use an electric mixer for about 2-3 minutes until the mixture is light and fluffy. This step is crucial as it incorporates air, giving your Chocolate Covered Cherry Cupcakes that perfect rise and texture. It’s like magic!
Step 3: Add Eggs and Mix
Next, add the eggs one at a time, mixing well after each addition. This helps to ensure that each egg is fully incorporated before adding the next. The eggs will add moisture and richness, making your cupcakes even more delicious. Don’t rush this step; it’s worth it!
Step 4: Incorporate Milk and Vanilla
Now, stir in the milk and vanilla extract until well combined. The milk adds moisture, while the vanilla brings a warm, inviting aroma to your batter. It’s like a hug for your taste buds! Make sure everything is mixed smoothly for the best results.
Step 5: Combine Dry Ingredients
In a separate bowl, whisk together the all-purpose flour, cocoa powder, baking powder, baking soda, and salt. This step ensures that the leavening agents are evenly distributed throughout the flour. It’s a small but important detail that helps your cupcakes rise beautifully!
Step 6: Mix Wet and Dry Ingredients
Gradually add the dry ingredients to the wet mixture, mixing until just combined. Be careful not to overmix; a few lumps are perfectly fine. This gentle approach keeps your cupcakes tender and fluffy. Remember, we want them to be light, not dense!
Step 7: Fold in Chocolate Chips
Now it’s time for the fun part! Gently fold in the chocolate chips using a spatula. This ensures that the chips are evenly distributed without breaking them apart. Each bite will be a delightful surprise of melted chocolate goodness. Yum!
Step 8: Fill Cupcake Liners
Using a spoon or an ice cream scoop, fill each cupcake liner about two-thirds full with batter. This allows room for the cupcakes to rise without overflowing. It’s like filling little cups of joy, ready to be baked into perfection!
Step 9: Add Cherry Filling
Now, take a spoonful of cherry pie filling and place it right on top of each cupcake batter. This is where the magic happens! The cherry filling will create a delicious surprise in the center of each cupcake, making them even more irresistible.
Step 10: Bake and Cool
Pop the cupcake pan into the preheated oven and bake for 18-20 minutes. Keep an eye on them! You’ll know they’re done when a toothpick inserted into the center comes out clean. Once baked, let them cool completely before serving. Patience is key here!
Tips for Success
- Always use room temperature ingredients for better mixing.
- Don’t overmix the batter; it can lead to dense cupcakes.
- For a fun twist, try adding a splash of almond extract.
- Check your oven temperature with an oven thermometer for accuracy.
- Let the cupcakes cool completely before frosting or serving.
Equipment Needed
- Cupcake pan: Essential for baking; a muffin tin works too!
- Mixing bowls: Use any size; a large bowl is best for batter.
- Electric mixer: A hand mixer is perfect; whisking by hand works in a pinch.
- Measuring cups and spoons: Accurate measurements are key; a kitchen scale is a great alternative.
- Spatula: For folding in ingredients; a wooden spoon can do the trick!
Variations
- Gluten-Free: Substitute all-purpose flour with a gluten-free blend for a delicious gluten-free option.
- Dairy-Free: Use coconut oil or dairy-free butter and almond milk to make these cupcakes dairy-free.
- Cherry Almond: Add a splash of almond extract to the batter for a delightful cherry-almond flavor combination.
- Chocolate Ganache Topping: Drizzle warm chocolate ganache over the cooled cupcakes for an extra indulgent treat.
- Mini Cupcakes: Bake in a mini cupcake pan for bite-sized delights, perfect for parties or gatherings.
Serving Suggestions
- Pair these Chocolate Covered Cherry Cupcakes with a scoop of vanilla ice cream for a delightful dessert duo.
- Serve with a hot cup of coffee or tea to balance the sweetness.
- For a festive touch, garnish with fresh cherries or a sprinkle of powdered sugar.
- Display on a beautiful cake stand for an eye-catching presentation at gatherings.
FAQs about Chocolate Covered Cherry Cupcakes
Can I make these Chocolate Covered Cherry Cupcakes ahead of time?
Absolutely! You can bake the cupcakes a day in advance. Just store them in an airtight container at room temperature. When you’re ready to serve, add the cherry filling and any toppings for a fresh taste!
What can I use instead of cherry pie filling?
If cherry pie filling isn’t your thing, feel free to swap it out for other fruit fillings like raspberry or blueberry. You could even use homemade fruit compote for a personal touch!
How do I store leftover cupcakes?
Store any leftover Chocolate Covered Cherry Cupcakes in an airtight container. They’ll stay fresh for up to three days. If you want to keep them longer, consider freezing them!
Can I freeze these cupcakes?
Yes, you can freeze the cupcakes! Just make sure they are completely cooled. Wrap them tightly in plastic wrap and place them in a freezer-safe container. They can last up to three months in the freezer.
What’s the best way to frost these cupcakes?
For a delightful finish, top your cupcakes with whipped cream or a simple chocolate frosting. You can also drizzle some melted chocolate on top for that extra chocolatey goodness!
Final Thoughts
Creating these Chocolate Covered Cherry Cupcakes is more than just baking; it’s about sharing joy and deliciousness with those you love. Each bite is a delightful blend of rich chocolate and sweet cherry, making them perfect for any occasion. Whether it’s a family gathering or a cozy night in, these cupcakes are sure to bring smiles and warm hearts. Plus, they’re simple enough to whip up even on the busiest days! So, roll up your sleeves, gather your ingredients, and let the magic of baking fill your kitchen with love and laughter. Enjoy every scrumptious bite!
Print
Chocolate Covered Cherry Cupcakes that Delight Every Bite!
- Total Time: 40 minutes
- Yield: 12 cupcakes 1x
- Diet: Vegetarian
Description
Delicious chocolate cupcakes topped with a cherry filling and covered in rich chocolate.
Ingredients
- 1 cup all-purpose flour
- 1 cup granulated sugar
- 1/2 cup unsweetened cocoa powder
- 1/2 cup butter, softened
- 2 large eggs
- 1/2 cup milk
- 1 teaspoon vanilla extract
- 1/2 teaspoon baking powder
- 1/2 teaspoon baking soda
- 1/4 teaspoon salt
- 1 cup cherry pie filling
- 1 cup chocolate chips
Instructions
- Preheat the oven to 350°F (175°C) and line a cupcake pan with liners.
- In a large bowl, cream together the butter and sugar until light and fluffy.
- Add the eggs one at a time, mixing well after each addition.
- Stir in the milk and vanilla extract.
- In another bowl, combine the flour, cocoa powder, baking powder, baking soda, and salt.
- Gradually add the dry ingredients to the wet ingredients, mixing until just combined.
- Fold in the chocolate chips.
- Fill each cupcake liner about 2/3 full with batter.
- Place a spoonful of cherry pie filling on top of each cupcake.
- Bake for 18-20 minutes or until a toothpick inserted comes out clean.
- Let cool completely before serving.
Notes
- For a richer flavor, use dark chocolate cocoa powder.
- These cupcakes can be stored in an airtight container for up to 3 days.
- Top with whipped cream for an extra treat!
- Prep Time: 20 minutes
- Cook Time: 20 minutes
- Category: Dessert
- Method: Baking
- Cuisine: American
Nutrition
- Serving Size: 1 cupcake
- Calories: 250
- Sugar: 20g
- Sodium: 150mg
- Fat: 12g
- Saturated Fat: 7g
- Unsaturated Fat: 3g
- Trans Fat: 0g
- Carbohydrates: 35g
- Fiber: 2g
- Protein: 3g
- Cholesterol: 40mg
Keywords: Chocolate Covered Cherry Cupcakes, cupcakes, chocolate dessert, cherry dessert