Ingredients
Here’s everything required to make this simple, four-ingredient base recipe.
Base Ingredients
- 1 cup plain unsweetened Greek yogurt – Provides a creamy, protein-rich base with probiotic benefits.
- ½ cup fresh or frozen blueberries – Adds natural sweetness and a boost of antioxidants.
- 1 ripe banana – Contributes natural sweetness, potassium, and a smooth texture.
- 1 tbsp natural peanut butter (xylitol-free) – Adds irresistible flavor dogs love. Always verify the label is free of xylitol.
Optional Add-Ins
Want to boost the nutrition or mix things up? Try adding one or more of these dog-safe ingredients:
- 2 tbsp pumpkin purée – Great for digestive health and adds extra fiber. Be sure to use plain canned pumpkin, not pumpkin pie filling.
- 1 tbsp ground flaxseed – A source of omega-3 fatty acids that can support skin and coat health.
- 2 tbsp unsweetened applesauce – Adds natural sweetness and moisture without added sugar.
- 2 tbsp unsweetened coconut water – Helps thin the mixture slightly while adding hydration and electrolytes, great for hot days.
- 1 tbsp finely shredded carrots – Adds crunch, fiber, and beta-carotene.
Instructions
Making these pup cups couldn’t be easier. Here’s how to do it from start to finish.
Add the Greek yogurt, blueberries, banana, and peanut butter to a blender or food processor.
Blend the mixture until it’s completely smooth and creamy, with no chunks of banana or blueberry remaining. This ensures an even texture throughout the frozen treat.
If you’re using any of the optional add-ins, like pumpkin purée, flaxseed, applesauce, coconut water, or shredded carrots, gently stir them into the blended mixture now. Stirring them in by hand (rather than blending) helps preserve a little texture if you’re using ingredients like shredded carrots.
Spoon the mixture into small paper cups, silicone molds, or reusable dog-safe treat cups. Silicone molds are especially handy since they make it easy to pop the frozen treats out cleanly.
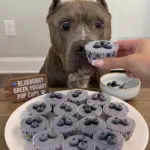
For an extra special touch, place a few whole blueberries on top of each pup cup before freezing. This adds visual appeal and a little burst of flavor in every bite.
Place the filled cups in the freezer and freeze for 4–6 hours, or until they are completely firm all the way through.
Once frozen, you can either pop the treats out of their cups or serve them directly in the cup, just like a classic drive-thru pup cup. Either way, your dog is in for a treat.
Cover and store any remaining pup cups in the freezer for up to 2 months, so you’ll always have a refreshing treat ready to go.