Introduction to Loaded Brownie Cheesecake Cups
Hey there, fellow dessert lovers! If you’re anything like me, you know that life can get pretty hectic. Between juggling work, family, and everything in between, finding time to whip up a delightful treat can feel impossible. That’s where these Loaded Brownie Cheesecake Cups come in! They’re the perfect solution for a busy day or a sweet surprise for your loved ones. Imagine rich, fudgy brownie cups topped with creamy cheesecake goodness. Trust me, these little delights will make your heart sing and your taste buds dance!
Why You’ll Love This Loaded Brownie Cheesecake Cups
These Loaded Brownie Cheesecake Cups are a dream come true for busy moms and professionals alike. They’re quick to prepare, taking just 15 minutes of your time, and they bake in under half an hour. Plus, the combination of rich brownie and creamy cheesecake is simply irresistible! Whether you’re treating yourself or impressing guests, these cups are sure to bring smiles and satisfaction to everyone at the table.
Ingredients for Loaded Brownie Cheesecake Cups
Let’s gather our ingredients for these delightful Loaded Brownie Cheesecake Cups. Each component plays a vital role in creating that perfect balance of flavors and textures. Here’s what you’ll need:
- Brownie mix: This is the foundation of our cups. Choose your favorite brand, or go for a dark chocolate mix for an extra rich flavor.
- Cream cheese: The star of the cheesecake layer! It adds that creamy, tangy goodness that pairs beautifully with the brownie.
- Sugar: A little sweetness to balance the cream cheese. You can use granulated sugar or even a sugar substitute if you prefer.
- Egg: This helps bind the cream cheese mixture together, giving it a smooth texture.
- Vanilla extract: A splash of vanilla enhances the overall flavor, making everything taste even more delicious.
- Chocolate chips: These little gems add bursts of chocolatey goodness throughout the cups. Feel free to use semi-sweet or dark chocolate chips.
- Whipped cream: The perfect finishing touch! It adds a light, airy texture on top of your brownie cheesecake cups.
For those who like to get creative, consider adding nuts or your favorite toppings for an extra crunch. You can find the exact measurements for each ingredient at the bottom of the article, ready for printing. Let’s get cooking!
How to Make Loaded Brownie Cheesecake Cups
Now that we have our ingredients ready, let’s dive into the fun part—making these Loaded Brownie Cheesecake Cups! Follow these simple steps, and you’ll have a delicious dessert in no time.
Step 1: Preheat the Oven
First things first, preheat your oven to 350°F (175°C). Preheating is crucial because it ensures even baking. If you skip this step, your brownie cups might end up unevenly cooked. Trust me, no one wants a gooey center when they’re expecting a fudgy treat!
Step 2: Prepare the Brownie Mix
Next, grab your brownie mix and prepare it according to the package instructions. This usually involves mixing the brownie mix with water, oil, and eggs. For an extra flavor boost, consider adding a splash of vanilla extract or a pinch of espresso powder. It enhances the chocolate flavor beautifully!
Step 3: Make the Cream Cheese Mixture
In a separate bowl, it’s time to whip up the cream cheese mixture. Beat the cream cheese until it’s smooth and creamy. Then, add in the sugar, egg, and vanilla extract. Mix until everything is well combined. You want a silky texture that will sit perfectly atop your brownie base.
Step 4: Assemble the Cups
Now comes the fun part—assembling your cups! Line a muffin tin with cupcake liners. Fill each liner halfway with the brownie batter. Then, spoon a generous dollop of the cream cheese mixture on top. Don’t be shy; this is where the magic happens! Finally, sprinkle a few chocolate chips on top for that extra chocolatey goodness.
Step 5: Bake to Perfection
Pop your muffin tin into the preheated oven and bake for 20-25 minutes. To check for doneness, insert a toothpick into the center. If it comes out with a few moist crumbs, you’re good to go! Once baked, let them cool in the tin for a few minutes before transferring them to a wire rack. Cooling is essential; it helps the flavors meld together beautifully.
Step 6: Add the Finishing Touches
Finally, it’s time to add the finishing touches! Once your Loaded Brownie Cheesecake Cups have cooled completely, top each one with a dollop of whipped cream. You can also add a sprinkle of chocolate shavings or a drizzle of chocolate sauce for an extra touch of elegance. Serve them up, and watch everyone’s eyes light up!
Tips for Success
- Use room temperature cream cheese for a smoother mixture.
- Don’t overmix the brownie batter; a few lumps are okay!
- Check your oven temperature with an oven thermometer for accuracy.
- Let the cups cool completely before adding whipped cream to prevent melting.
- Experiment with different toppings like nuts or caramel for variety.
Equipment Needed
- Muffin tin: A standard muffin tin works perfectly, but you can use silicone molds for easy removal.
- Mixing bowls: A couple of medium-sized bowls will do the trick for mixing your brownie and cream cheese layers.
- Electric mixer: While a whisk can work, an electric mixer saves time and effort for that creamy texture.
- Measuring cups and spoons: Essential for accurate ingredient measurements.
Variations
- Gluten-Free: Use a gluten-free brownie mix to make these Loaded Brownie Cheesecake Cups suitable for those with gluten sensitivities.
- Nutty Delight: Add chopped walnuts or pecans to the brownie batter for a delightful crunch and extra flavor.
- Fruit Infusion: Incorporate fresh raspberries or strawberries into the cream cheese mixture for a fruity twist.
- Vegan Option: Substitute the cream cheese with a vegan cream cheese alternative and use a plant-based egg replacer.
- Mint Chocolate: Add a few drops of peppermint extract to the cream cheese mixture for a refreshing minty flavor.
Serving Suggestions
- Pair your Loaded Brownie Cheesecake Cups with a scoop of vanilla ice cream for a delightful contrast.
- Serve with fresh berries on the side for a pop of color and freshness.
- Drizzle with chocolate or caramel sauce for an elegant presentation.
- Enjoy with a cup of coffee or a glass of milk to balance the sweetness.
FAQs about Loaded Brownie Cheesecake Cups
As a passionate home cook, I often get questions about my favorite recipes. Here are some common queries about these Loaded Brownie Cheesecake Cups that might help you out!
Can I make these Loaded Brownie Cheesecake Cups ahead of time?
Absolutely! You can prepare the brownie cups a day in advance. Just store them in the refrigerator after they cool completely. Add the whipped cream just before serving for the best texture.
What can I substitute for cream cheese?
If you’re looking for a dairy-free option, try using a vegan cream cheese alternative. It works beautifully in this recipe and keeps the creamy texture intact.
How do I know when the brownie cups are done baking?
To check for doneness, insert a toothpick into the center of a cup. If it comes out with a few moist crumbs, they’re ready! Remember, they will continue to set as they cool.
Can I freeze Loaded Brownie Cheesecake Cups?
Yes, you can freeze them! Just make sure they are completely cooled and wrapped tightly. They can be stored in the freezer for up to a month. Thaw in the refrigerator before serving.
What toppings can I add to these brownie cups?
The sky’s the limit! You can add fresh fruit, chocolate shavings, or even a drizzle of caramel sauce. Get creative and make them your own!
Final Thoughts
Creating these Loaded Brownie Cheesecake Cups is more than just baking; it’s about sharing joy and deliciousness with those you love. Each bite is a delightful blend of rich brownie and creamy cheesecake that brings smiles to faces, young and old alike. Whether it’s a special occasion or a simple weeknight treat, these cups are sure to impress. Plus, they’re easy enough to whip up even on the busiest days! So, roll up your sleeves, gather your loved ones, and enjoy the sweet moments that come with every delicious bite!
Print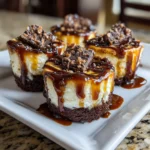
Loaded Brownie Cheesecake Cups That Will Delight You!
- Total Time: 40 minutes
- Yield: 12 cups 1x
- Diet: Vegetarian
Description
Delicious brownie cheesecake cups loaded with chocolate and cream cheese, perfect for dessert lovers.
Ingredients
- 1 box brownie mix
- 1 package cream cheese (8 oz)
- 1/2 cup sugar
- 1 egg
- 1 teaspoon vanilla extract
- 1/2 cup chocolate chips
- 1/4 cup whipped cream
Instructions
- Preheat the oven to 350°F (175°C).
- Prepare the brownie mix according to package instructions.
- In a separate bowl, beat the cream cheese, sugar, egg, and vanilla extract until smooth.
- Line a muffin tin with cupcake liners and fill each liner halfway with brownie batter.
- Top the brownie batter with a spoonful of the cream cheese mixture.
- Add a few chocolate chips on top of the cream cheese layer.
- Bake for 20-25 minutes or until set.
- Let cool and top with whipped cream before serving.
Notes
- For a richer flavor, use dark chocolate brownie mix.
- These can be stored in the refrigerator for up to 3 days.
- Feel free to add nuts or other toppings as desired.
- Prep Time: 15 minutes
- Cook Time: 25 minutes
- Category: Dessert
- Method: Baking
- Cuisine: American
Nutrition
- Serving Size: 1 cup
- Calories: 250
- Sugar: 18g
- Sodium: 150mg
- Fat: 12g
- Saturated Fat: 7g
- Unsaturated Fat: 3g
- Trans Fat: 0g
- Carbohydrates: 30g
- Fiber: 2g
- Protein: 3g
- Cholesterol: 40mg
Keywords: Loaded Brownie Cheesecake Cups, Brownie Cups, Cheesecake Dessert